2002 LINCOLN TOWN CAR steering
[x] Cancel search: steeringPage 165 of 248

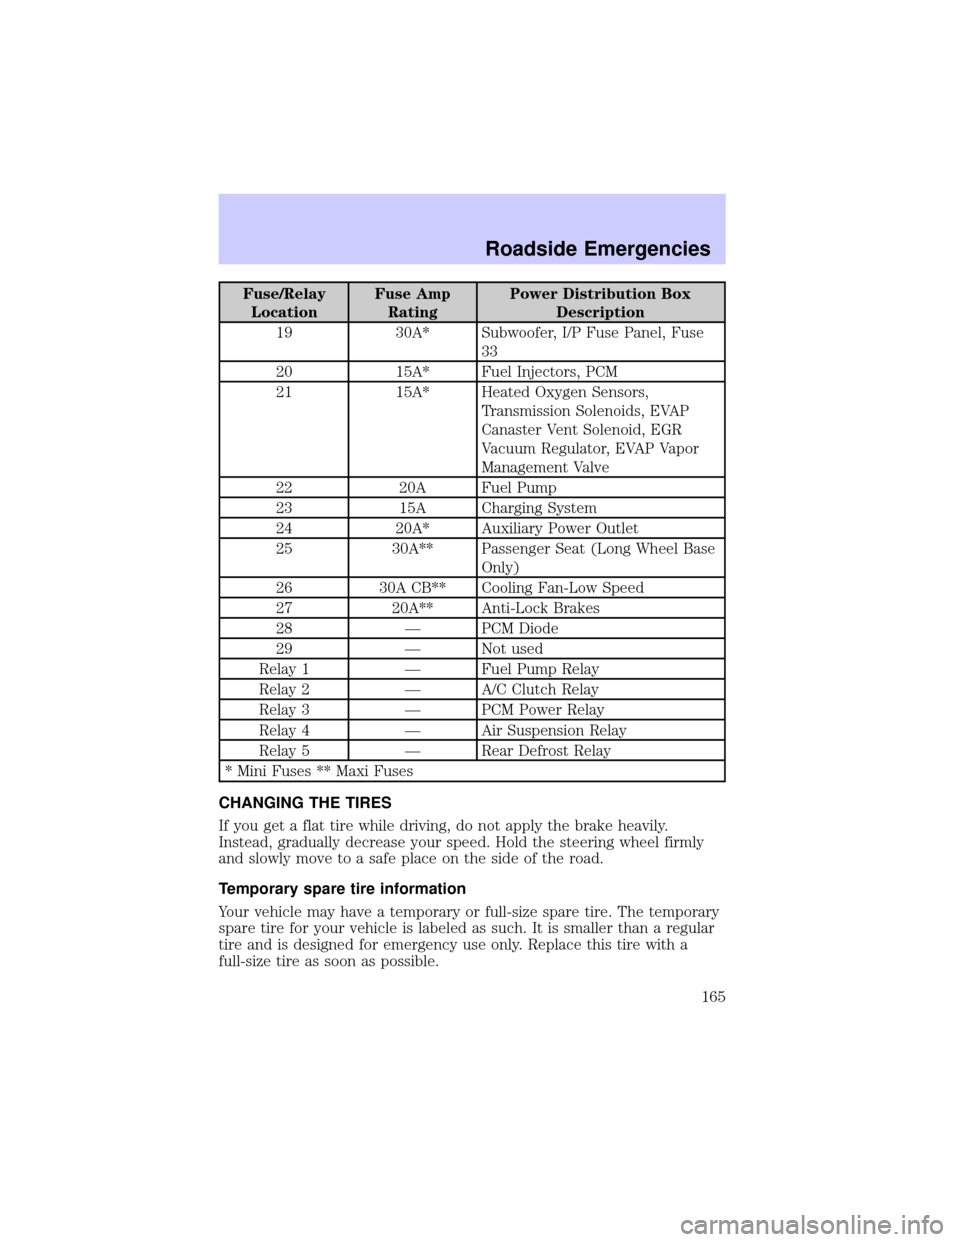
Fuse/Relay
LocationFuse Amp
RatingPower Distribution Box
Description
19 30A* Subwoofer, I/P Fuse Panel, Fuse
33
20 15A* Fuel Injectors, PCM
21 15A* Heated Oxygen Sensors,
Transmission Solenoids, EVAP
Canaster Vent Solenoid, EGR
Vacuum Regulator, EVAP Vapor
Management Valve
22 20A Fuel Pump
23 15A Charging System
24 20A* Auxiliary Power Outlet
25 30A** Passenger Seat (Long Wheel Base
Only)
26 30A CB** Cooling Fan-Low Speed
27 20A** Anti-Lock Brakes
28 Ð PCM Diode
29 Ð Not used
Relay 1 Ð Fuel Pump Relay
Relay 2 Ð A/C Clutch Relay
Relay 3 Ð PCM Power Relay
Relay 4 Ð Air Suspension Relay
Relay 5 Ð Rear Defrost Relay
* Mini Fuses ** Maxi Fuses
CHANGING THE TIRES
If you get a flat tire while driving, do not apply the brake heavily.
Instead, gradually decrease your speed. Hold the steering wheel firmly
and slowly move to a safe place on the side of the road.
Temporary spare tire information
Your vehicle may have a temporary or full-size spare tire. The temporary
spare tire for your vehicle is labeled as such. It is smaller than a regular
tire and is designed for emergency use only. Replace this tire with a
full-size tire as soon as possible.
Roadside Emergencies
165
Page 190 of 248

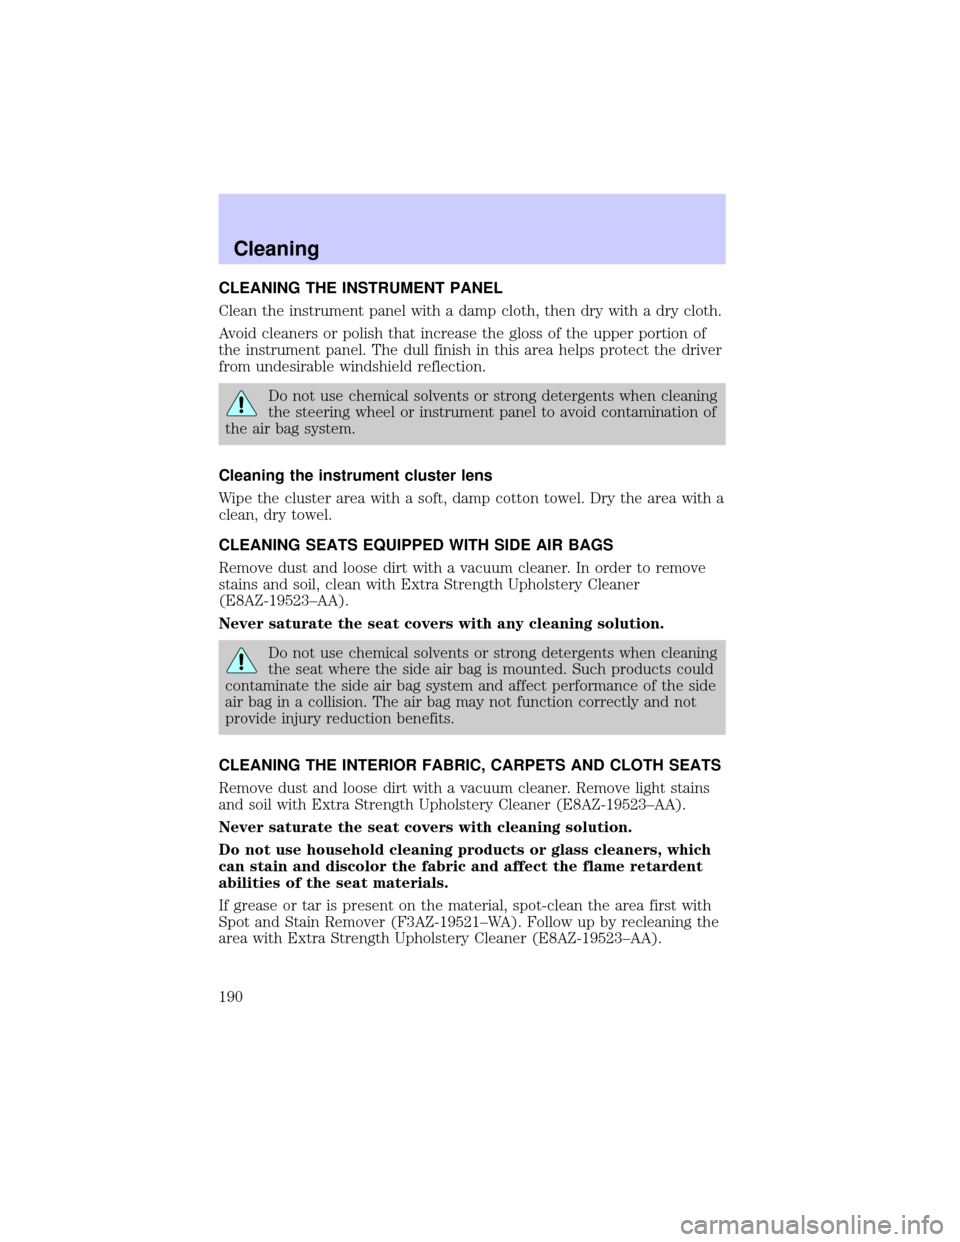
CLEANING THE INSTRUMENT PANEL
Clean the instrument panel with a damp cloth, then dry with a dry cloth.
Avoid cleaners or polish that increase the gloss of the upper portion of
the instrument panel. The dull finish in this area helps protect the driver
from undesirable windshield reflection.
Do not use chemical solvents or strong detergents when cleaning
the steering wheel or instrument panel to avoid contamination of
the air bag system.
Cleaning the instrument cluster lens
Wipe the cluster area with a soft, damp cotton towel. Dry the area with a
clean, dry towel.
CLEANING SEATS EQUIPPED WITH SIDE AIR BAGS
Remove dust and loose dirt with a vacuum cleaner. In order to remove
stains and soil, clean with Extra Strength Upholstery Cleaner
(E8AZ-19523±AA).
Never saturate the seat covers with any cleaning solution.
Do not use chemical solvents or strong detergents when cleaning
the seat where the side air bag is mounted. Such products could
contaminate the side air bag system and affect performance of the side
air bag in a collision. The air bag may not function correctly and not
provide injury reduction benefits.
CLEANING THE INTERIOR FABRIC, CARPETS AND CLOTH SEATS
Remove dust and loose dirt with a vacuum cleaner. Remove light stains
and soil with Extra Strength Upholstery Cleaner (E8AZ-19523±AA).
Never saturate the seat covers with cleaning solution.
Do not use household cleaning products or glass cleaners, which
can stain and discolor the fabric and affect the flame retardent
abilities of the seat materials.
If grease or tar is present on the material, spot-clean the area first with
Spot and Stain Remover (F3AZ-19521±WA). Follow up by recleaning the
area with Extra Strength Upholstery Cleaner (E8AZ-19523±AA).
Cleaning
190
Page 195 of 248

2. Engine oil dipstick
3. Engine oil filler cap
4. Air filter assembly
5. Power steering fluid reservoir
6. Engine coolant reservoir
7. Battery
8. Windshield washer fluid reservoir
9. Automatic transmission fluid dipstick
WINDSHIELD WASHER FLUID
Checking and adding washer fluid
Check the washer fluid whenever
you stop for fuel.
If the level is low, add enough fluid
to fill the reservoir. In very cold
weather, do not fill the reservoir all
the way.
Only use a washer fluid that meets
Ford specifications. Refer toRefill
capacitiesin this chapter.
State or local regulations on volatile
organic compounds may restrict the use of methanol, a common
windshield washer antifreeze additive. Washer fluids containing
non-methanol antifreeze agents should be used only if they provide cold
weather protection without damaging the vehicle's paint finish, wiper
blades or washer system.
Note:Do not put washer fluid in the engine coolant reservoir. Washer
fluid placed in the cooling system may harm engine and cooling system
components.
ENGINE OIL
Checking the engine oil
Refer to the scheduled maintenance guide for the appropriate intervals
for checking the engine oil.
1. Make sure the vehicle is on level ground.
Maintenance and Specifications
195
Page 207 of 248

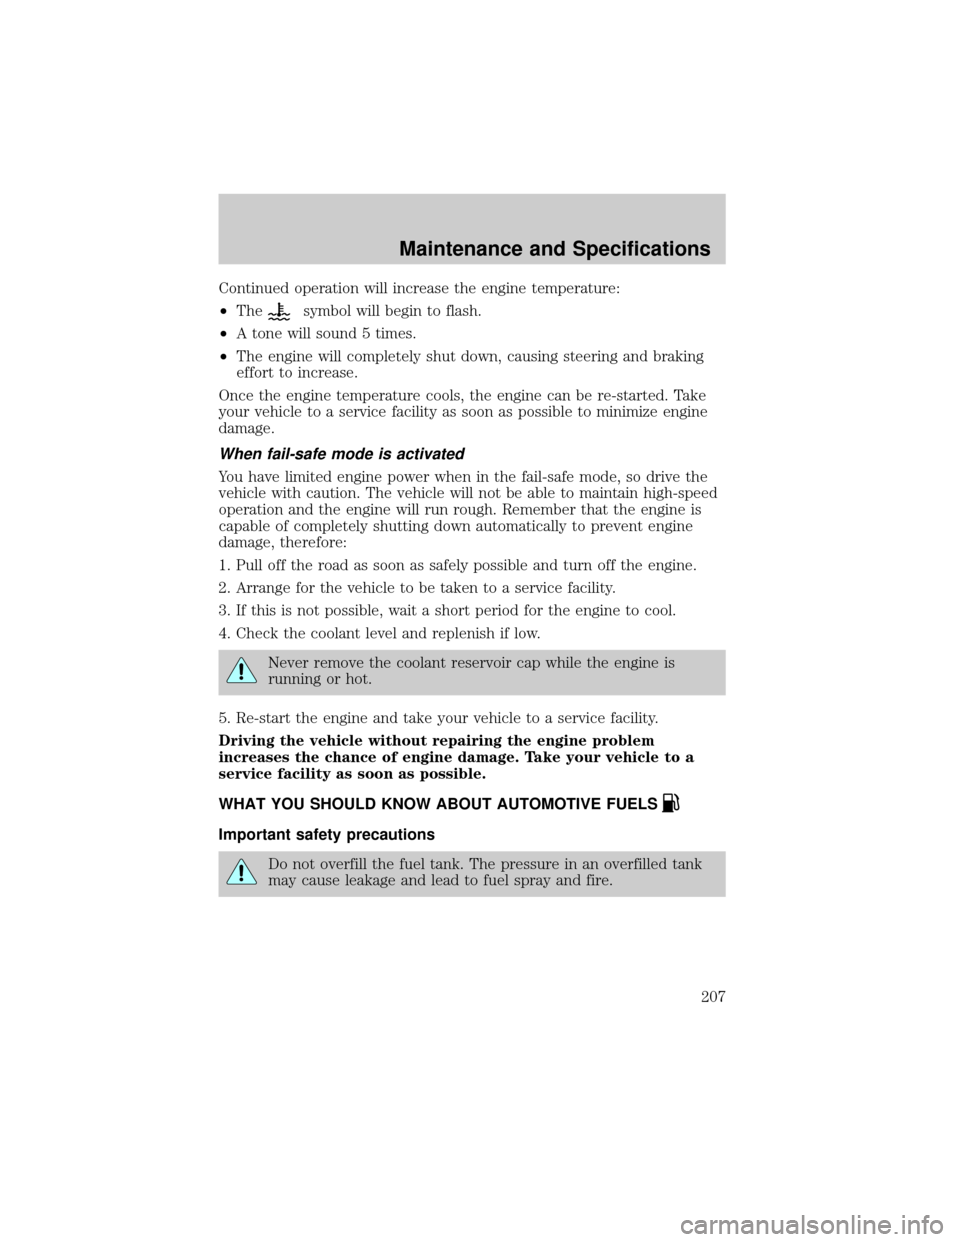
Continued operation will increase the engine temperature:
²The
symbol will begin to flash.
²A tone will sound 5 times.
²The engine will completely shut down, causing steering and braking
effort to increase.
Once the engine temperature cools, the engine can be re-started. Take
your vehicle to a service facility as soon as possible to minimize engine
damage.
When fail-safe mode is activated
You have limited engine power when in the fail-safe mode, so drive the
vehicle with caution. The vehicle will not be able to maintain high-speed
operation and the engine will run rough. Remember that the engine is
capable of completely shutting down automatically to prevent engine
damage, therefore:
1. Pull off the road as soon as safely possible and turn off the engine.
2. Arrange for the vehicle to be taken to a service facility.
3. If this is not possible, wait a short period for the engine to cool.
4. Check the coolant level and replenish if low.
Never remove the coolant reservoir cap while the engine is
running or hot.
5. Re-start the engine and take your vehicle to a service facility.
Driving the vehicle without repairing the engine problem
increases the chance of engine damage. Take your vehicle to a
service facility as soon as possible.
WHAT YOU SHOULD KNOW ABOUT AUTOMOTIVE FUELS
Important safety precautions
Do not overfill the fuel tank. The pressure in an overfilled tank
may cause leakage and lead to fuel spray and fire.
Maintenance and Specifications
207
Page 217 of 248

Please consult yourWarranty Guidefor complete emission warranty
information.
Readiness for Inspection/Maintenance (I/M) testing
In some localities, it may be a legal requirement to pass an I/M test of
the on-board diagnostics system. If your ªCheck Engine/Service Engine
Soonº light is on, refer to the description in theWarning lights and
chimessection of theInstrument Clusterchapter. Your vehicle may not
pass the I/M test with the ªCheck Engine/Service Engine Soonº light on.
If the vehicle's powertrain system or its battery has just been serviced,
the on-board diagnostics system is reset to a ªnot ready for I/M testº
condition. To ready the on-board diagnostics system for I/M testing, a
minimum of 30 minutes of city and highway driving is necessary as
described below:
²First, at least 10 minutes of driving on an expressway or highway.
²Next, at least 20 minutes driving in stop-and-go, city-type traffic with
at least four idle periods.
Allow the vehicle to sit for at least eight hours without starting the
engine. Then, start the engine and complete the above driving cycle. The
engine must warm up to its normal operating temperature. Once started,
do not turn off the engine until the above driving cycle is complete.
CHECKING AND ADDING POWER STEERING FLUID
Check the power steering fluid.
Refer to the scheduled maintenance
guide for the service interval
schedules. If adding fluid is
necessary, use only MERCONtAT F.
1. Start the engine and let it run until it reaches normal operating
temperature (the engine coolant temperature gauge indicator will be
near the center of the normal area between H and C).
2. While the engine idles, turn the steering wheel left and right several
times.
Maintenance and Specifications
217
Page 218 of 248

3. Turn the engine off.
4. Check the fluid level in the
reservoir. It should be between the
MIN and MAX lines. Do not add
fluid if the level is in this range.
5. If the fluid is low, add fluid in small amounts, continuously checking
the level until it reaches the range between the MIN and MAX lines. Be
sure to put the cap back on the reservoir.
BRAKE FLUID
Checking and adding brake fluid
Brake fluid should be checked and
refilled as needed. Refer to the
scheduled maintenance guide for
the service interval schedules.
1. Clean the reservoir cap before
removal to prevent dirt or water
from entering the reservoir.
2. Visually inspect the fluid level.
3. If necessary, add brake fluid from
a clean un-opened container until
the level reaches MAX. Do not fill
above this line.
4. Use only brake fluids certified to
meet Ford specification ESA-M6C25±A. Refer toLubricant
specificationsin this chapter. DOT 3 fluid is recommended. However, if
DOT 3 is not available, DOT 4 fluid can be used.
DONOTOVERFILLPOWERSTEERINGFLUID
MAX
MIN
MAX
Maintenance and Specifications
218
Page 227 of 248

REFILL CAPACITIES
Fluid Ford Part Name Capacity
Engine oil (includes
filter change)Motorcraft SAE 5W-20
Super Premium Motor
Oil4.7L (5.0 quarts)
Brake fluid Motorcraft High
Performance DOT 3
Motor Vehicle Brake
Fluid
1
Fill to line on reservoir
Power steering fluid Motorcraft MERCONt
AT FFill to line on reservoir
Transmission fluid
2Motorcraft
MERCONtVATF13.2L (13.9 quarts)3
Engine coolant4Motorcraft Premium
Engine Coolant
(green-colored)or
Motorcraft Premium
Gold Engine Coolant
(yellow-colored)15.0L (15.8 quarts)
Fuel tank N/A 71.9L (19.0 gallons)
Rear axle lubricant
5Motorcraft SAE
80W-90 Premium Rear
Axle Lubricant1.8L (3.75 pints)6
Windshield washer
fluidUltra-Clear Windshield
Washer ConcentrateFill to line on reservoir
1Use only brake fluids certified to meet Ford specifications. Refer to
Lubricant Specificationsin this chapter. DOT 3 fluid is recommended.
However, if DOT 3 is not available, DOT 4 fluid can be used.
2Ensure the correct automatic transmission fluid is used. MERCONtand
MERCONtV are not interchangeable. DO NOT MIX MERCONtand
MERCONtV. Refer to the scheduled maintenance guide to determine
the correct service interval.
3Indicates only approximate dry-fill capacity. Some applications may vary
based on cooler size and if equipped with an in-tank cooler. The amount
of transmission fluid and fluid level should be set by the indication on
the dipstick's normal operating range.
Maintenance and Specifications
227
Page 229 of 248

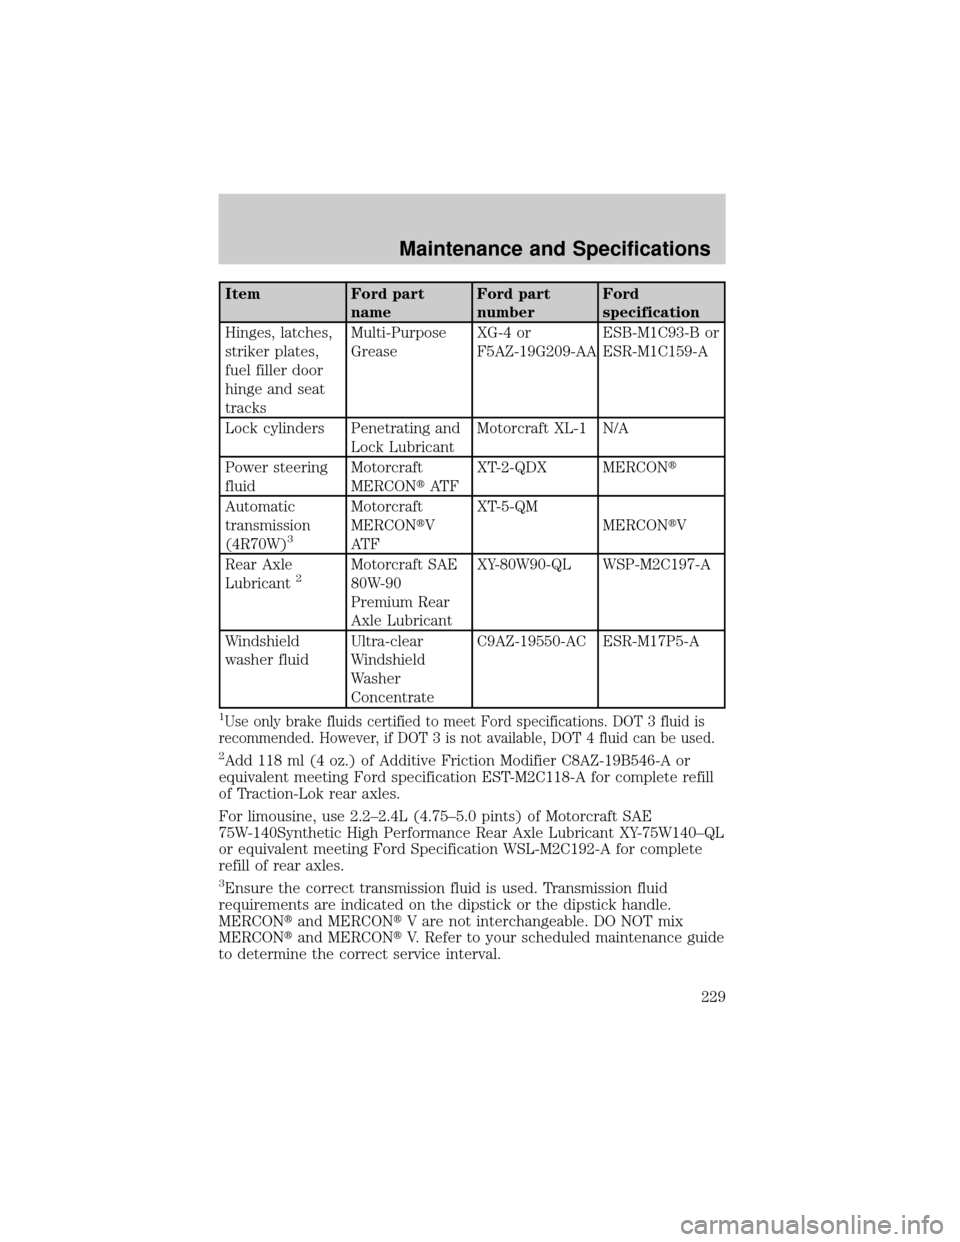
Item Ford part
nameFord part
numberFord
specification
Hinges, latches,
striker plates,
fuel filler door
hinge and seat
tracksMulti-Purpose
GreaseXG-4 or
F5AZ-19G209-AAESB-M1C93-B or
ESR-M1C159-A
Lock cylinders Penetrating and
Lock LubricantMotorcraft XL-1 N/A
Power steering
fluidMotorcraft
MERCONtAT FXT-2-QDX MERCONt
Automatic
transmission
(4R70W)
3
Motorcraft
MERCONtV
AT FXT-5-QM
MERCONtV
Rear Axle
Lubricant
2Motorcraft SAE
80W-90
Premium Rear
Axle LubricantXY-80W90-QL WSP-M2C197-A
Windshield
washer fluidUltra-clear
Windshield
Washer
ConcentrateC9AZ-19550-AC ESR-M17P5-A
1Use only brake fluids certified to meet Ford specifications. DOT 3 fluid is
recommended. However, if DOT 3 is not available, DOT 4 fluid can be used.
2Add 118 ml (4 oz.) of Additive Friction Modifier C8AZ-19B546-A or
equivalent meeting Ford specification EST-M2C118-A for complete refill
of Traction-Lok rear axles.
For limousine, use 2.2±2.4L (4.75±5.0 pints) of Motorcraft SAE
75W-140Synthetic High Performance Rear Axle Lubricant XY-75W140±QL
or equivalent meeting Ford Specification WSL-M2C192-A for complete
refill of rear axles.
3Ensure the correct transmission fluid is used. Transmission fluid
requirements are indicated on the dipstick or the dipstick handle.
MERCONtand MERCONtV are not interchangeable. DO NOT mix
MERCONtand MERCONtV. Refer to your scheduled maintenance guide
to determine the correct service interval.
Maintenance and Specifications
229