2002 LINCOLN LS roof
[x] Cancel search: roofPage 66 of 288

Do not remove lamp bulbs unless they will be replaced immediately. If a
bulb is removed for an extended period of time, contaminants may enter
the lamp housings and affect performance.
Using the right bulbs
Replacement bulbs are specified in the chart below. Headlamp bulbs
must be marked with an authorized ªD.O.T.º for North America and an
ªEº for Europe to assure lamp performance, light brightness and pattern
and safe visibility. The correct bulbs will not damage the lamp assembly
or void the lamp assembly warranty and will provide quality bulb burn
time.
Function Trade Number
Headlamp low beam 9006
Headlamp high beam 9005
Park and turn lamp (front) 3157K
Side marker lamp (front) 168
Foglamp 9145
Tail lamp, brakelamp, side lamp 3157K
Rear turn lamp 3156K
Backup lamp 3157K
Tail/body side 161
Tail/deck (trunk) lid 161
License plate lamp W5WL
High-mount brakelamp 3156K
Front door courtesy lamp 192
Map lamp (with moon roof) 212-2
Dome lamp (rear) 212-2
Map lamp (front) 212-2
Sun visor lighted mirror lamp Part # E9SB-13465-BA
Glove compartment 194
Ashtray 194
Luggage compartment lamp 212-2
All replacement bulbs are clear in color except where noted.
To replace all instrument panel lights - see your dealer.
Lights
66
Page 86 of 288

MOON ROOF (IF EQUIPPED)
To open the moon roof:
²Push up on the control to raise
the moon roof to the vent
position (when the glass panel is
closed).
²Push the front portion of the
control rearward to open the
moon roof.
²Press the rear portion of the
control past the first detent to
activate theAuto Openfeature.
To close the moon roof:
²To close from the vent, intermediate and full open positions, push the
rear portion of the control forward.
HOMELINKTUNIVERSAL TRANSCEIVER (IF EQUIPPED)
The HomeLinktUniversal Transceiver, located on the driver's visor,
provides a convenient way to replace up to three hand-held transmitters
with a single built-in device. This feature will learn the radio frequency
codes of most current transmitters to operate garage doors, entry gates,
security systems, entry door locks, and home or office lighting.
When programming your HomeLinktUniversal Transceiver, to a
garage door or gate be sure that people and objects are out of
the way to prevent potential harm or damage.
Do not use the HomeLinktUniversal Transceiver with any garage door
opener that lacks safety stop and reverse features as required by U.S.
federal safety standards (this includes any garage door opener model
manufactured before April 1, 1982). A garage door which cannot detect
an object, signaling the door to stop and reverse, does not meet current
U.S. federal safety standards. For more information on this matter, call
toll-free: 1±800±355±3515 or on the Internet atHomeLink.jci.com.
Driver Controls
86
Page 107 of 288

POSITIVE RETENTION FLOOR MAT
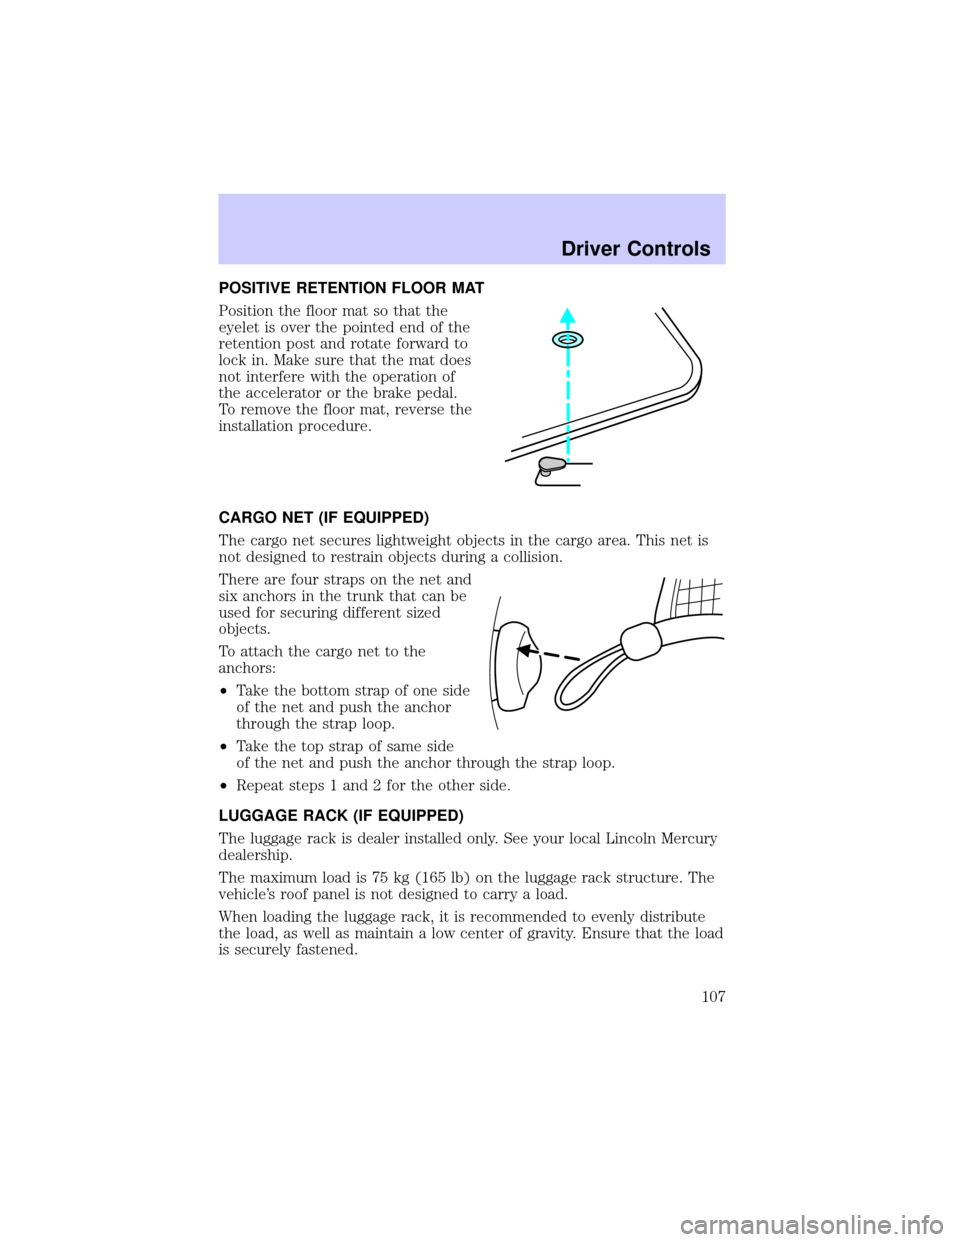
Position the floor mat so that the
eyelet is over the pointed end of the
retention post and rotate forward to
lock in. Make sure that the mat does
not interfere with the operation of
the accelerator or the brake pedal.
To remove the floor mat, reverse the
installation procedure.
CARGO NET (IF EQUIPPED)
The cargo net secures lightweight objects in the cargo area. This net is
not designed to restrain objects during a collision.
There are four straps on the net and
six anchors in the trunk that can be
used for securing different sized
objects.
To attach the cargo net to the
anchors:
²Take the bottom strap of one side
of the net and push the anchor
through the strap loop.
²Take the top strap of same side
of the net and push the anchor through the strap loop.
²Repeat steps 1 and 2 for the other side.
LUGGAGE RACK (IF EQUIPPED)
The luggage rack is dealer installed only. See your local Lincoln Mercury
dealership.
The maximum load is 75 kg (165 lb) on the luggage rack structure. The
vehicle's roof panel is not designed to carry a load.
When loading the luggage rack, it is recommended to evenly distribute
the load, as well as maintain a low center of gravity. Ensure that the load
is securely fastened.
Driver Controls
107
Page 109 of 288

Central locking/Two step unlocking
When unlocking the driver door with the key, turn it once toward the
front of the vehicle to unlock that door only. Turn the key a second time
to unlock all doors. When locking, turn the key toward the back of the
vehicle to lock all doors.
Childproof door locks
When these locks are set, the rear
doors cannot be opened from the
inside. The rear doors can be
opened from the outside when the
doors are unlocked.
The childproof locks are located on
rear edge of each rear door and
must be set separately for each
door. Setting the lock for one door
will not automatically set the lock
for both doors.
Rotate lock control in the direction of arrow to engage the lock. Rotate
control in the opposite direction to disengage childproof locks.
INTERIOR LUGGAGE COMPARTMENT RELEASE
Your vehicle is equipped with a mechanical interior luggage compartment
release handle that provides a means of escape for children and adults in
the event they become locked inside the luggage compartment.
Adults are advised to familiarize themselves with the operation and
location of the release handle.
Locks and Security
109
Page 111 of 288

REMOTE ENTRY SYSTEM
This device complies with part 15 of the FCC rules and with RS-210 of
Industry Canada. Operation is subject to the following two conditions:
(1) This device may not cause harmful interference, and (2) This device
must accept any interference received, including interference that may
cause undesired operation.
Changes or modifications not expressly approved by the party
responsible for compliance could void the user's authority to
operate the equipment.
Your remote entry system contains two remote transmitters which
provide remote control of several features. Each remote transmitter will
allow you to:
²unlock the vehicle doors without a key.
²lock all the vehicle doors without a key.
²open the trunk without a key.
²activate the personal alarm.
²open all windows and moonroof (if equipped).
²arm and disarm the perimeter anti-theft system.
²operate the illuminated entry feature.
²operate the memory seat/mirror/steering column feature (if equipped).
The remote transmitter features only operate with the ignition in the
OFF or ACC positions. For vehicles equipped with an automatic
transmission, the remote transmitter features also operate if the ignition
is in the RUN position and the gear shift is in P (Park). The personal
alarm feature, however, will not operate when the ignition is in the RUN
position.
When the vehicle is armed the power door locks and remote trunk
release control are disabled. These will not work until the vehicle is
disarmed.
If there is any potential remote keyless entry problem with your vehicle,
ensureALL key fobs(remote entry transmitters) are brought to the
dealership, to aid in troubleshooting.
Locks and Security
111
Page 112 of 288

Unlocking the doors
Press this control to unlock the
driver door and disarm the
perimeter alarm (if armed). The
interior lamps will illuminate and
the turn signal lamps will display
two short flashes (to indicate
disarming of the perimeter alarm).
If the memory seat/mirror/steering
column feature (if equipped) is
activated, the corresponding
seat/mirror/steering column
positions will be recalled.
Refer toMemory seat/mirror/steering column featurein this chapter
for more information.
Press the control a second time within three seconds to unlock all the
doors.
Opening all windows and moonroof (if equipped)
Press this control and hold down for
more than one second to begin to
open all the windows and moonroof.
Release the control to stop. If the
control is held down for more than
four seconds, the windows and
moonroof will open fully.
Locks and Security
112
Page 197 of 288

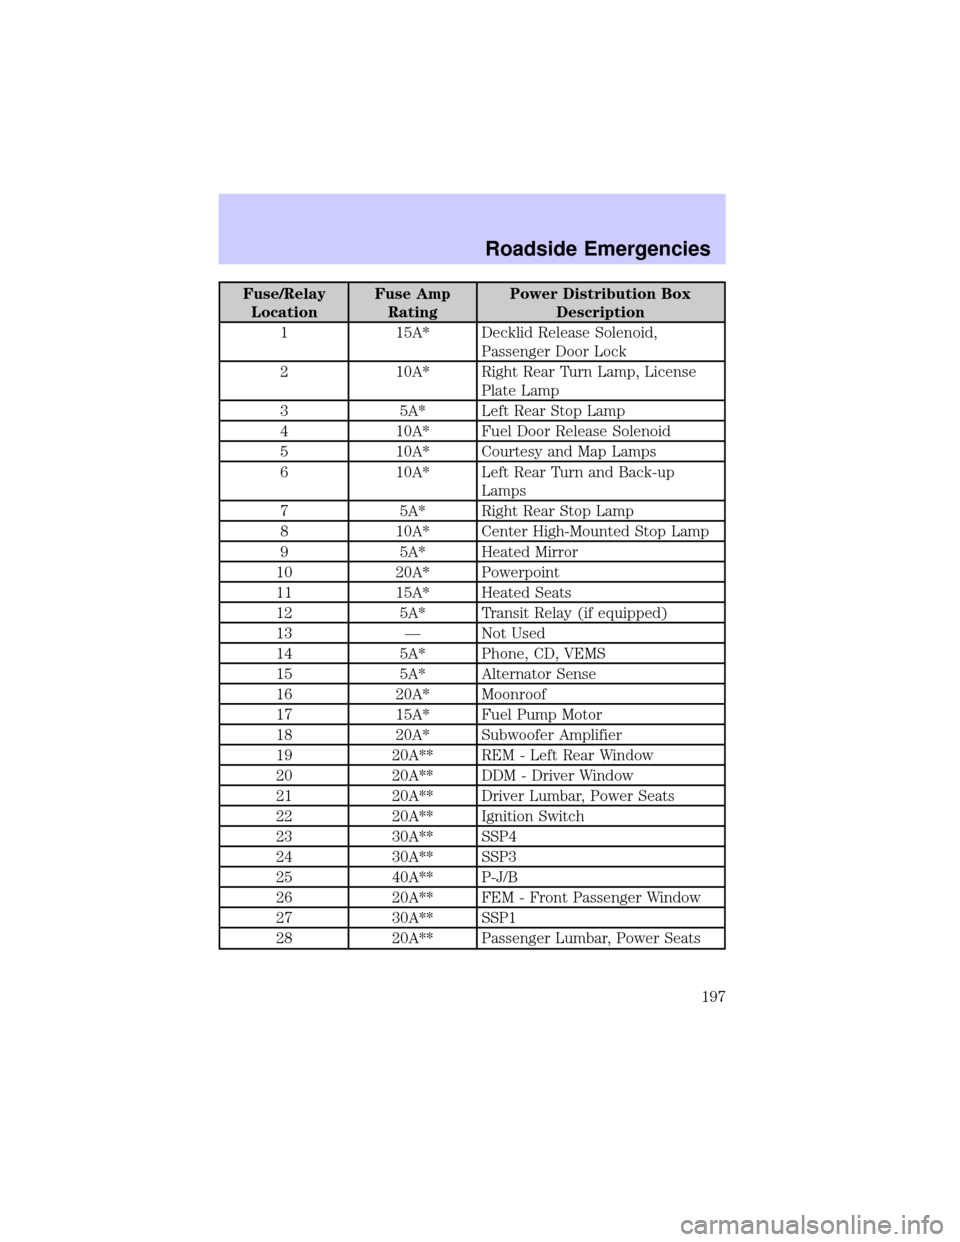
Fuse/Relay
LocationFuse Amp
RatingPower Distribution Box
Description
1 15A* Decklid Release Solenoid,
Passenger Door Lock
2 10A* Right Rear Turn Lamp, License
Plate Lamp
3 5A* Left Rear Stop Lamp
4 10A* Fuel Door Release Solenoid
5 10A* Courtesy and Map Lamps
6 10A* Left Rear Turn and Back-up
Lamps
7 5A* Right Rear Stop Lamp
8 10A* Center High-Mounted Stop Lamp
9 5A* Heated Mirror
10 20A* Powerpoint
11 15A* Heated Seats
12 5A* Transit Relay (if equipped)
13 Ð Not Used
14 5A* Phone, CD, VEMS
15 5A* Alternator Sense
16 20A* Moonroof
17 15A* Fuel Pump Motor
18 20A* Subwoofer Amplifier
19 20A** REM - Left Rear Window
20 20A** DDM - Driver Window
21 20A** Driver Lumbar, Power Seats
22 20A** Ignition Switch
23 30A** SSP4
24 30A** SSP3
25 40A** P-J/B
26 20A** FEM - Front Passenger Window
27 30A** SSP1
28 20A** Passenger Lumbar, Power Seats
Roadside Emergencies
197
Page 220 of 288

WASHING THE EXTERIOR OF YOUR VEHICLE
Never wash a vehicle that is ªhot to
the touchº or during exposure to
strong, direct sunlight. It is
recommended that you wash your
vehicle regularly with cool or
lukewarm water and a neutral Ph
shampoo, such as Detail Wash
(ZC-3±A), which is available from
your authorized Ford, Lincoln or
Mercury dealer. Always use a clean
sponge or carwash mitt with plenty
of water for best results. Dry the vehicle with a chamois or soft terry
cloth towel in order to eliminate water spotting.
Never use strong household detergents or soap, such as dish
washing or laundry liquid. These products can discolor and spot
painted surfaces.
It is especially important to wash the vehicle regularly during winter
months, as dirt and road salt are difficult to remove and do cause
damage to the vehicle.
Items such as gasoline, diesel fuel, bird droppings and insect deposits
should be washed and sponged off as soon as possible. Deposits not
removed promptly can cause damage to the vehicle's paintwork and trim
over time.
Remove any exterior accessories, such as antennas, before
entering a car wash.
PROTECTING THE PAINT FINISH OF YOUR VEHICLE
Applying a polymer paint sealant to your vehicle on a regular basis will
assist in reducing minor scratches and paint damage.
A typical paint sealant lasts approximately six months to a year,
depending on local weather conditions and the cleaning soap that is used
in washing the vehicle.
Do not use a wax that beads excessively.
Do not allow paint sealant to come in contact with any non-body
(low-gloss black) colored trim, such as grained door handles, roof
racks, bumpers, side moldings, mirror housings or the windshield
cowl area. The paint sealant will ªgrayº or stain the parts over time.
Cleaning
220