2002 LINCOLN LS seats
[x] Cancel search: seatsPage 152 of 288
Attaching child safety seats with tether straps
Most new forward-facing child safety seats include a tether strap which
goes over the back of the seat and hooks to an anchoring point. Tether
straps are available as an accessory for many older safety seats. Contact
the manufacturer of your child seat for information about ordering a
tether strap.
The rear seats of your vehicle are equipped with built-in tether strap
anchors located behind the seats as described below.
The tether anchors in your vehicle are located under a cover marked
with the tether anchor symbol (shown with title).
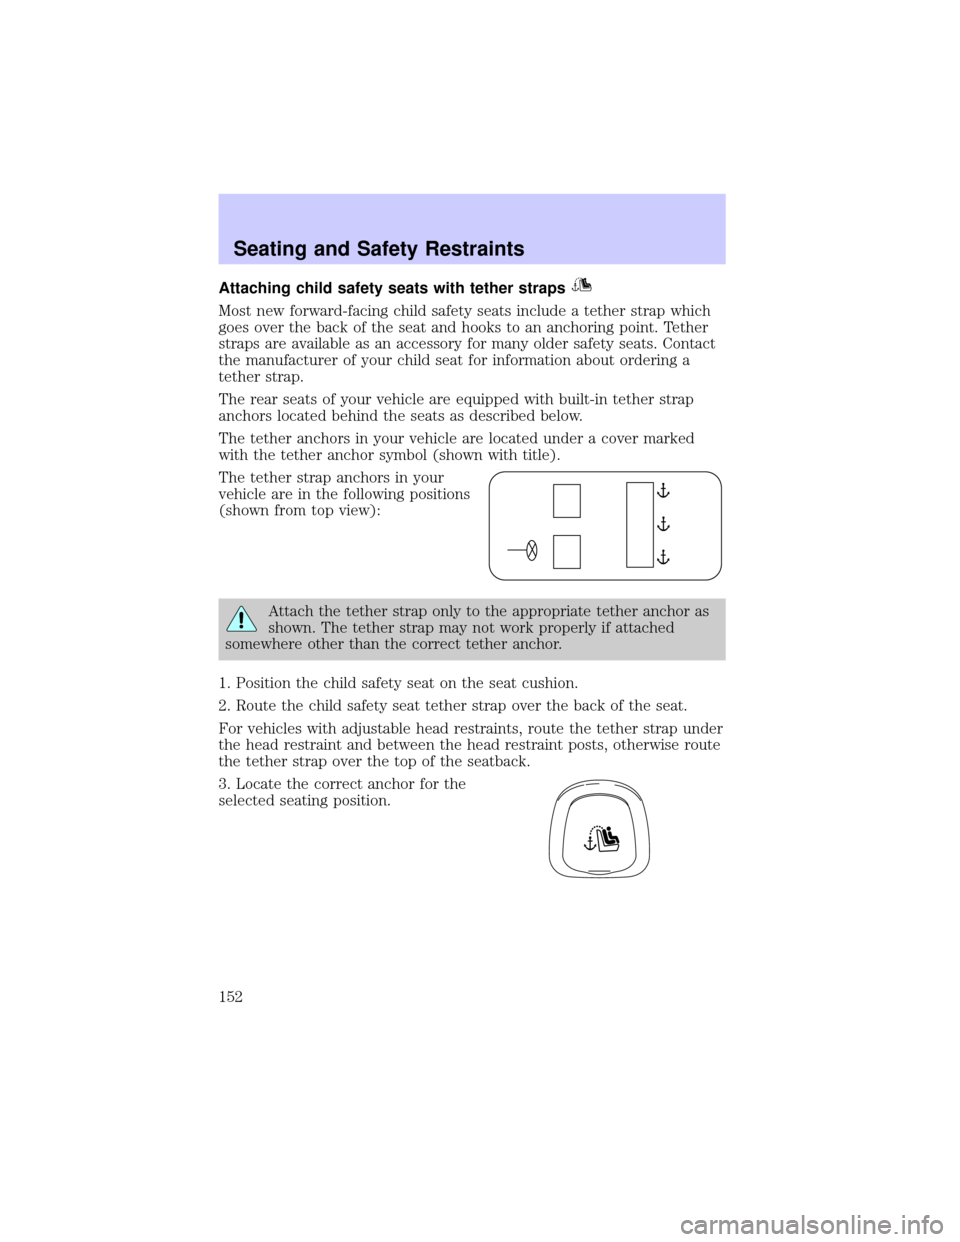
The tether strap anchors in your
vehicle are in the following positions
(shown from top view):
Attach the tether strap only to the appropriate tether anchor as
shown. The tether strap may not work properly if attached
somewhere other than the correct tether anchor.
1. Position the child safety seat on the seat cushion.
2. Route the child safety seat tether strap over the back of the seat.
For vehicles with adjustable head restraints, route the tether strap under
the head restraint and between the head restraint posts, otherwise route
the tether strap over the top of the seatback.
3. Locate the correct anchor for the
selected seating position.
Seating and Safety Restraints
152
Page 153 of 288
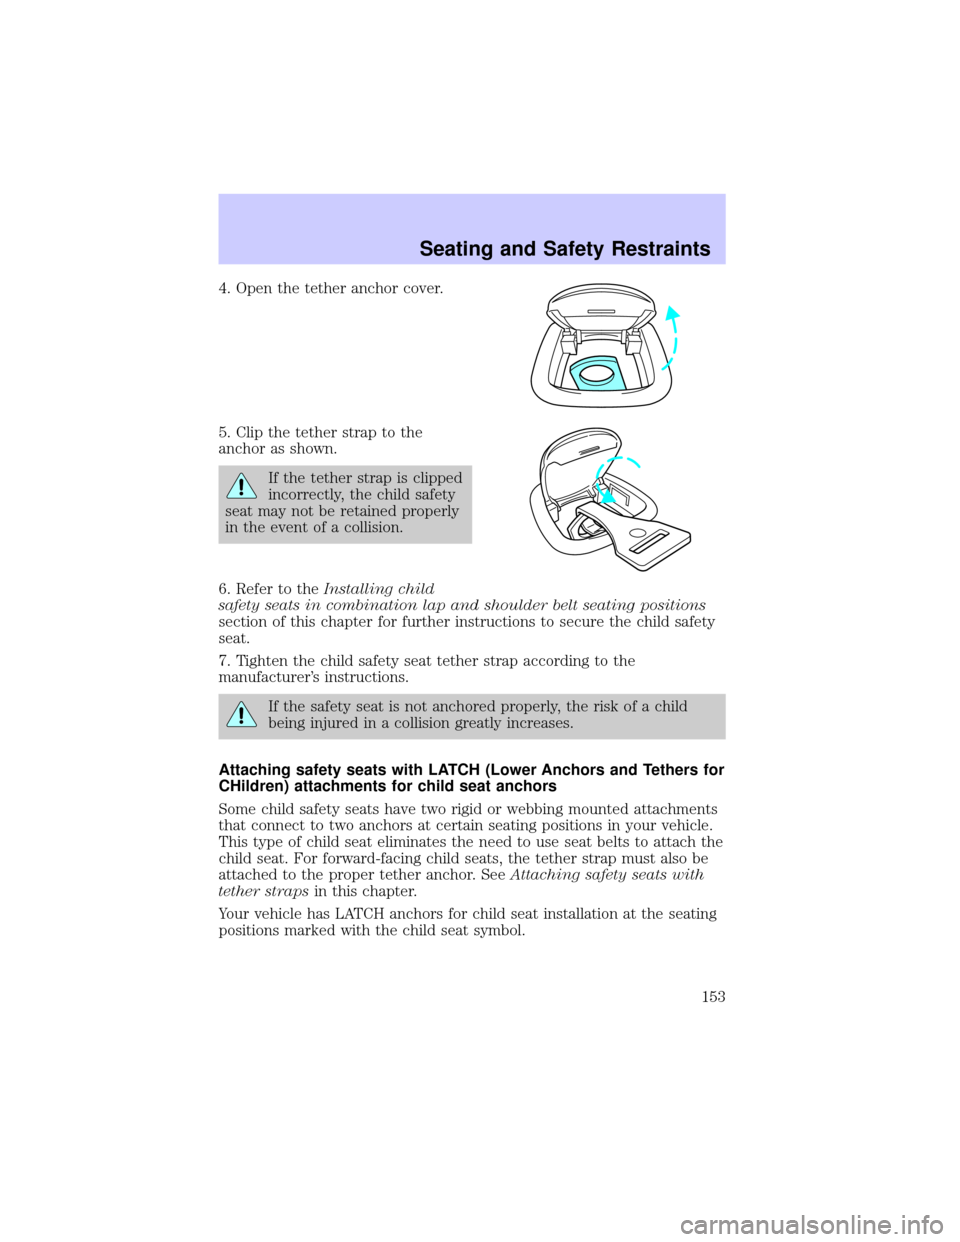
4. Open the tether anchor cover.
5. Clip the tether strap to the
anchor as shown.
If the tether strap is clipped
incorrectly, the child safety
seat may not be retained properly
in the event of a collision.
6. Refer to theInstalling child
safety seats in combination lap and shoulder belt seating positions
section of this chapter for further instructions to secure the child safety
seat.
7. Tighten the child safety seat tether strap according to the
manufacturer's instructions.
If the safety seat is not anchored properly, the risk of a child
being injured in a collision greatly increases.
Attaching safety seats with LATCH (Lower Anchors and Tethers for
CHildren) attachments for child seat anchors
Some child safety seats have two rigid or webbing mounted attachments
that connect to two anchors at certain seating positions in your vehicle.
This type of child seat eliminates the need to use seat belts to attach the
child seat. For forward-facing child seats, the tether strap must also be
attached to the proper tether anchor. SeeAttaching safety seats with
tether strapsin this chapter.
Your vehicle has LATCH anchors for child seat installation at the seating
positions marked with the child seat symbol.
Seating and Safety Restraints
153
Page 154 of 288
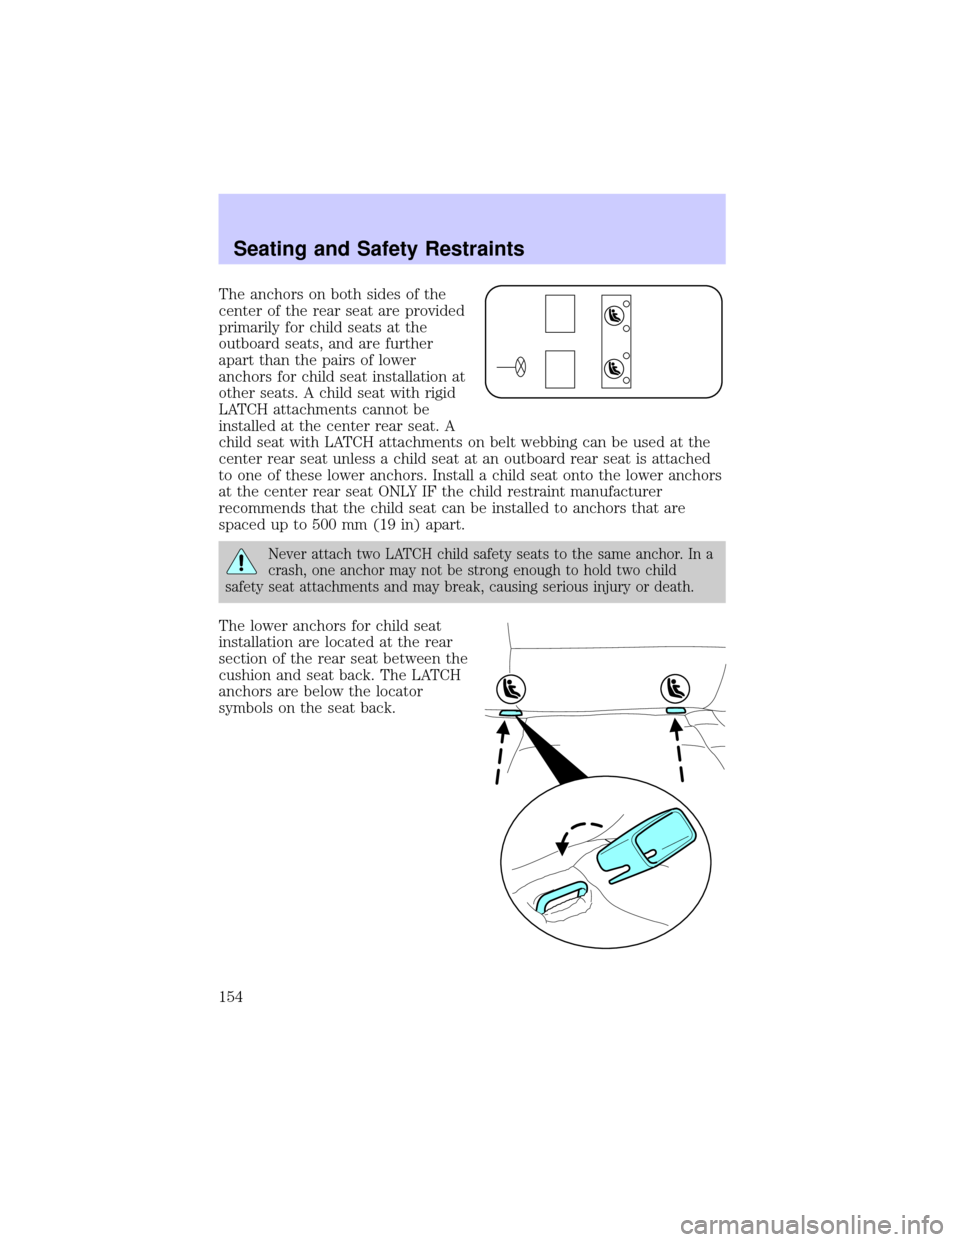
The anchors on both sides of the
center of the rear seat are provided
primarily for child seats at the
outboard seats, and are further
apart than the pairs of lower
anchors for child seat installation at
other seats. A child seat with rigid
LATCH attachments cannot be
installed at the center rear seat. A
child seat with LATCH attachments on belt webbing can be used at the
center rear seat unless a child seat at an outboard rear seat is attached
to one of these lower anchors. Install a child seat onto the lower anchors
at the center rear seat ONLY IF the child restraint manufacturer
recommends that the child seat can be installed to anchors that are
spaced up to 500 mm (19 in) apart.
Never attach two LATCH child safety seats to the same anchor. In a
crash, one anchor may not be strong enough to hold two child
safety seat attachments and may break, causing serious injury or death.
The lower anchors for child seat
installation are located at the rear
section of the rear seat between the
cushion and seat back. The LATCH
anchors are below the locator
symbols on the seat back.
Seating and Safety Restraints
154
Page 155 of 288
Follow the child seat manufacturer's instructions to properly install a
child seat with LATCH attachments. Two plastic LATCH guides can be
obtained at no charge from any Ford or Lincoln-Mercury dealer. They
snap onto the LATCH lower anchors in the seat to help attach a child
seat with rigid attachments. The guides hold the seat trim away to
expose the anchor and make it easier to attach some child seats.
Attach LATCH lower attachments of the child seat only to the
anchors shown.
If you install a child seat with rigid LATCH attachments, do not tighten
the tether strap enough to lift the child seat off the vehicle seat cushion
when the child is seated in it. Keep the tether strap just snug without
lifting the front of the child seat. Keeping the child seat just touching the
vehicle seat gives the best protection in a severe crash.
Each time you use the safety seat, check that the seat is properly
attached to the lower anchors and tether anchor. Try to tilt the child
seat from side to side. Also try to tug the seat forward. Check to see if
the anchors hold the seat in place.
If the safety seat is not anchored properly, the risk of a child
being injured in a crash greatly increases.
Seating and Safety Restraints
155
Page 197 of 288
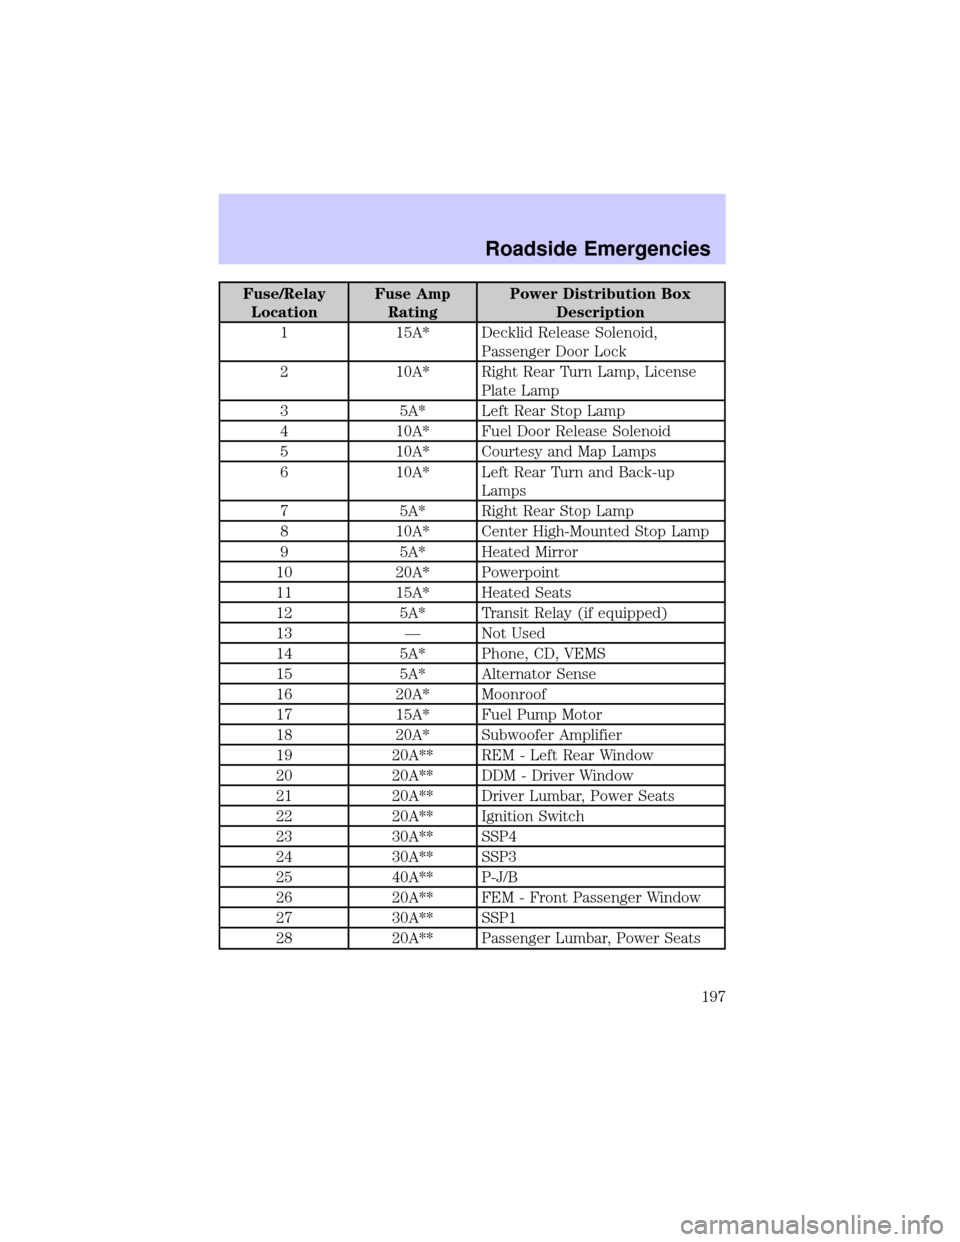
Fuse/Relay
LocationFuse Amp
RatingPower Distribution Box
Description
1 15A* Decklid Release Solenoid,
Passenger Door Lock
2 10A* Right Rear Turn Lamp, License
Plate Lamp
3 5A* Left Rear Stop Lamp
4 10A* Fuel Door Release Solenoid
5 10A* Courtesy and Map Lamps
6 10A* Left Rear Turn and Back-up
Lamps
7 5A* Right Rear Stop Lamp
8 10A* Center High-Mounted Stop Lamp
9 5A* Heated Mirror
10 20A* Powerpoint
11 15A* Heated Seats
12 5A* Transit Relay (if equipped)
13 Ð Not Used
14 5A* Phone, CD, VEMS
15 5A* Alternator Sense
16 20A* Moonroof
17 15A* Fuel Pump Motor
18 20A* Subwoofer Amplifier
19 20A** REM - Left Rear Window
20 20A** DDM - Driver Window
21 20A** Driver Lumbar, Power Seats
22 20A** Ignition Switch
23 30A** SSP4
24 30A** SSP3
25 40A** P-J/B
26 20A** FEM - Front Passenger Window
27 30A** SSP1
28 20A** Passenger Lumbar, Power Seats
Roadside Emergencies
197
Page 225 of 288

Do not use chemical solvents or strong detergents when cleaning
the steering wheel or instrument panel to avoid contamination of
the air bag system.
Cleaning the instrument cluster lens
Wipe the cluster area with a soft, damp cotton towel. Dry the area with a
clean, dry towel.
CLEANING SEATS EQUIPPED WITH SIDE AIR BAGS
Remove dust and loose dirt with a vacuum cleaner. In order to remove
stains and soil, clean with Extra Strength Upholstery Cleaner
(E8AZ-19523±AA).
Never saturate the seat covers with any cleaning solution.
Do not use chemical solvents or strong detergents when cleaning
the seat where the side air bag is mounted. Such products could
contaminate the side air bag system and affect performance of the side
air bag in a collision. The air bag may not function correctly and not
provide injury reduction benefits.
CLEANING THE INTERIOR FABRIC, CARPETS AND CLOTH SEATS
Remove dust and loose dirt with a vacuum cleaner. Remove light stains
and soil with Extra Strength Upholstery Cleaner (E8AZ-19523±AA).
Never saturate the seat covers with cleaning solution.
Do not use household cleaning products or glass cleaners, which
can stain and discolor the fabric and affect the flame retardent
abilities of the seat materials.
If grease or tar is present on the material, spot-clean the area first with
Spot and Stain Remover (F3AZ-19521±WA). Follow up by recleaning the
area with Extra Strength Upholstery Cleaner (E8AZ-19523±AA).
Cleaning
225
Page 226 of 288

CLEANING LEATHER SEATS (IF EQUIPPED)
All Ford, Lincoln and Mercury vehicles with leather seating surfaces have
a clear, protective coating over the leather.
To clean the leather seats, simply use a soft cloth with Deluxe Leather
and Vinyl Cleaner (F2AZ-19521±WA). Dry the area with a soft cloth.
It is recommended that you use the Deluxe Leather Care Kit
(F8AZ-19G253±AA), available from your authorized Ford, Lincoln or
Mercury dealer. The mild cleaner and special pad available in the kit
cleans the leather and maintains its natural beauty. For best results,
follow the instructions printed on the cleaner label. Regular cleaning of
your leather upholstery helps maintain its resiliency and color.
Do not use household cleaning products, alcohol solutions,
solvents or cleaners intended for rubber, vinyl and plastics, or
oil/petroleum-based leather conditioners. These products may
cause premature wearing of the clear, protective coating.
CLEANING THE INSIDE WINDOWS
Use Ultra Clear Spray Glass Cleaner (E4AZ-19C507±AA) for the inside
windows if they become fogged.
To clean, use two lint-free, soft towels, folded into a pad-shape. Mist the
glass completely with cleaner, and use one of the towels to evenly agitate
the surface. Use the other towel to remove the residue.
CLEANING AND MAINTAINING THE SAFETY BELTS
Clean the safety belts with Extra Strength Upholstery Cleaner
(E8AZ-19523±AA), available from your authorized Ford, Lincoln or
Mercury dealer.
Do not use bleach, dye or any other solvent to clean the belts, as
these actions may weaken the belt webbing.
UNDERBODY
Flush the complete underside of your vehicle frequently. Keep body and
door drain holes free from packed dirt.
Cleaning
226
Page 276 of 288

A
Accessory delay ..........................74
AdvanceTrac ..............................165
Air bag supplemental
restraint system ................139, 143
and child safety seats ............141
description ......................139, 143
disposal ....................................146
driver air bag ..................141, 144
indicator light ...........12, 143, 145
operation .........................141, 144
passenger air bag ...........141, 144
side air bag ..............................143
Air cleaner filter .......253±254, 261
Air conditioning ..........................48
Air filter, cabin ............................59
Antifreeze
(see Engine coolant) ................237
Anti-lock brake system
(see Brakes) ..............................161
Anti-theft system ......................120
arming the system ..................120
disarming a triggered
system .....................................120
Audio system (see Radio) .........31
Automatic transmission ............167
driving an automatic
overdrive .................................168
fluid, adding ............................252
fluid, checking ........................252
fluid, refill capacities ..............261
fluid, specification ..................264
Axle
lubricant specifications ..263±264
refill capacities ........................261B
Battery .......................................235
acid, treating
emergencies ............................235
charging system
warning light .............................12
jumping a disabled battery ....202
maintenance-free ....................235
replacement, specifications ...261
servicing ..................................235
Belt minder ...............................134
Brakes ........................................160
anti-lock ...................................161
anti-lock brake system
(ABS) warning light .........12, 162
brake warning light ..................11
fluid, checking and adding ....251
fluid, refill capacities ..............261
fluid, specifications .........263±264
lubricant
specifications ..................263±264
parking ....................................162
shift interlock ..........................167
Break-in period .............................6
C
Capacities for refilling fluids ....261
Cargo net ...................................107
Cassette tape player ...................31
CD changer .................................44
Certification Label ....................271
Child safety restraints ..............147
child safety belts ....................147
Child safety seats ......................148
attaching with tether
straps .......................................152
Index
276