Page 162 of 248

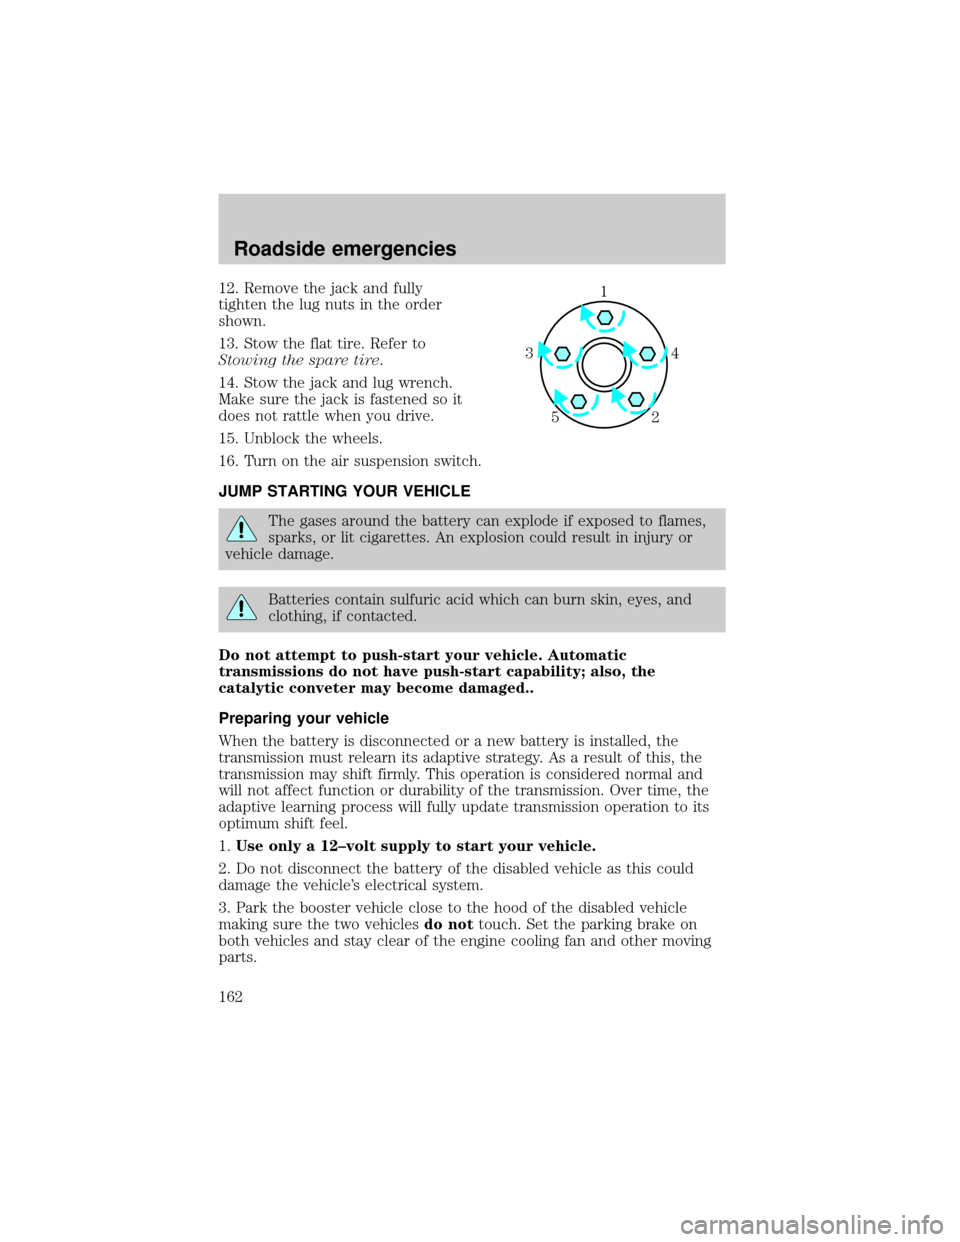
12. Remove the jack and fully
tighten the lug nuts in the order
shown.
13. Stow the flat tire. Refer to
Stowing the spare tire.
14. Stow the jack and lug wrench.
Make sure the jack is fastened so it
does not rattle when you drive.
15. Unblock the wheels.
16. Turn on the air suspension switch.
JUMP STARTING YOUR VEHICLE
The gases around the battery can explode if exposed to flames,
sparks, or lit cigarettes. An explosion could result in injury or
vehicle damage.
Batteries contain sulfuric acid which can burn skin, eyes, and
clothing, if contacted.
Do not attempt to push-start your vehicle. Automatic
transmissions do not have push-start capability; also, the
catalytic conveter may become damaged..
Preparing your vehicle
When the battery is disconnected or a new battery is installed, the
transmission must relearn its adaptive strategy. As a result of this, the
transmission may shift firmly. This operation is considered normal and
will not affect function or durability of the transmission. Over time, the
adaptive learning process will fully update transmission operation to its
optimum shift feel.
1.Use only a 12±volt supply to start your vehicle.
2. Do not disconnect the battery of the disabled vehicle as this could
damage the vehicle's electrical system.
3. Park the booster vehicle close to the hood of the disabled vehicle
making sure the two vehiclesdo nottouch. Set the parking brake on
both vehicles and stay clear of the engine cooling fan and other moving
parts.
1
4 3
2 5
Roadside emergencies
162
Page 163 of 248
4. Check all battery terminals and remove any excessive corrosion before
you attach the battery cables.
5. Turn the heater fan on in both vehicles to protect any electrical
surges. Turn all other accessories off.
Connecting the jumper cables
1. Connect the positive (+) booster cable to the positive (+) terminal of
the discharged battery.
Note:In the illustrations,lightning boltsare used to designate the
assisting (boosting) battery.
2. Connect the other end of the positive (+) cable to the positive (+)
terminal of the assisting battery.
+–+–
+–+–
Roadside emergencies
163
Page 164 of 248
3. Connect the negative (-) cable to the negative (-) terminal of the
assisting battery.
4. Make the final connection of the negative (-) cable to an exposed
metal part of the stalled vehicle's engine, away from the battery and the
carburetor/fuel injection system.Do notuse fuel lines, engine rocker
covers or the intake manifold asgroundingpoints.
Do not connect the end of the second cable to the negative (-)
terminal of the battery to be jumped. A spark may cause an
explosion of the gases that surround the battery.
5. Ensure that the cables are clear of fan blades, belts, moving parts of
both engines, or any fuel delivery system parts.
+–+–
+–+–
Roadside emergencies
164
Page 165 of 248
Jump starting
1. Start the engine of the booster vehicle and run the engine at
moderately increased speed.
2. Start the engine of the disabled vehicle.
3. Once the disabled vehicle has been started, run both engines for an
additional three minutes before disconnecting the jumper cables.
Removing the jumper cables
Remove the jumper cables in the reverse order that they were
connected.
1. Remove the jumper cable from thegroundmetal surface.
Note:In the illustrations,lightning boltsare used to designate the
assisting (boosting) battery.
2. Remove the jumper cable on the negative (-) connection of the
booster vehicle's battery.
+–+–
+–+–
Roadside emergencies
165
Page 166 of 248
3. Remove the jumper cable from the positive (+) terminal of the booster
vehicle's battery.
4. Remove the jumper cable from the positive (+) terminal of the
disabled vehicle's battery.
After the disabled vehicle has been started and the jumper cables
removed, allow it to idle for several minutes so the engine computer can
relearnits idle conditions.
When the battery is disconnected or a new battery is installed, the
transmission must relearn its adaptive strategy. As a result of this, the
transmission may shift firmly. This operation is considered normal and
will not effect function or durability of the transmission. Over time, the
adaptive learning process will fully update transmission operation to its
optimum shift feel.
+–+–
+–+–
Roadside emergencies
166
Page 238 of 248

A
Accessory delay ..........................70
Air bag supplemental restraint
system ................................111±112
and child safety seats ............114
description ..............................112
disposal ....................................116
driver air bag ..........................114
indicator light .....................9, 116
operation .................................114
passenger air bag ...................114
Air cleaner filter .......187±188, 218
Air conditioning ..........................41
rear seat controls .....................47
Air suspension ...........................132
description ..............................132
warning light .............................12
Ambulance packages ....................3
Antifreeze
(see Engine coolant) ................175
Anti-lock brake system
(see Brakes) ......................129±130
Anti-theft system
warning light .............................10
Audio system (see Radio) .........23
Automatic transmission
driving an automatic
overdrive .................................137
fluid, adding ............................183
fluid, checking ........................183
fluid, refill capacities ..............218
fluid, specification ..................222
Auxiliary power point .................19
Axle
lubricant
specifications ..................220, 222refill capacities ........................218
B
Battery .......................................185
acid, treating emergencies .....185
charging system
warning light .............................11
jumping a disabled battery ....162
maintenance-free ....................185
replacement, specifications ...218
servicing ..................................185
voltage gauge ............................15
Belt minder ...............................107
Brakes ........................................129
anti-lock ...........................129±130
anti-lock brake system
(ABS) warning light .........10, 129
brake warning light ..................10
fluid, checking and adding ....174
fluid, refill capacities ..............218
fluid, specifications .........220, 222
lubricant specifications ..220, 222
parking ....................................130
pedals (see Power adjustable
foot pedals) ...............................18
shift interlock ..........................135
Break-in period .............................3
C
Capacities for refilling fluids ....218
CD changer .................................37
Certification Label ....................224
Child safety restraints ..............117
child safety belts ....................117
Child safety seats ......................118
attaching with tether straps ..122
in front seat ............................119
Index
238