Page 145 of 248

²After you have traveled 80 km (50 miles), thoroughly check your
hitch, electrical connections and trailer wheel lug nuts.
²When stopped in traffic for long periods of time in hot weather, place
the gearshift in P (Park). This aids engine cooling and air conditioner
efficiency.
²Vehicles with trailers should not be parked on a grade. If you must
park on a grade, place wheel chocks under the trailer's wheels.
Launching or retrieving a boat
When backing down a ramp during boat launching or retrieval,
²Disengage the traction control system to eliminate excessive wheel
spin.
²Do not allow the static water level to rise above the bottom edge of
the rear bumper.
²Do not allow waves to break higher than 15 cm (6 inches) above the
bottom edge of the rear bumper.
Exceeding these limits may allow water to enter critical vehicle
components, adversely affecting driveability, emissions, reliability and
causing internal transmission damage.
Replace the rear axle lubricant anytime the axle has been submerged in
water. Rear axle lubricant quantities are not to be checked or changed
unless a leak is suspected or repair required.
Disconnect the wiring to the trailer before backing the trailer into the
water. Reconnect the wiring to the trailer after the trailer is removed
from the water.
Recreational towing (all wheels on the ground)
Follow these guidelines for your specific powertrain combination to tow
your vehicle with all four wheels on the ground (such as behind a
recreational vehicle).
These guidelines are designed to ensure that your transmission is not
damaged due to insufficient lubrication.
All Rear Wheel Drive (RWD) vehicles
This applies to all cars and 4x2 trucks/sport utilities with rear wheel
drive capability.
Driving
145
Page 146 of 248

An example of recreational towing is towing your vehicle behind a
motorhome. The following recreational towing guidelines are designed to
ensure that your transmission is not damaged.
²Place the transmission in N (Neutral).
²Maximum speed is 56 km/h (35 mph).
²Maximum distance is 80 km (50 miles).
If a distance of 80 km (50 miles) or a speed of 56 km/h (35 mph) must
be exceeded, you must disconnect the driveshaft. Ford recommends the
driveshaft be removed/installed only by a qualified technician. See your
local dealer for driveshaft removal/installation.
Improper removal/installation of the driveshaft can cause
transmission fluid loss, damage to the driveshaft and internal
transmission components.
DRIVING THROUGH WATER
Do not drive quickly through standing water, especially if the depth is
unknown. Traction or brake capability may be limited and if the ignition
system gets wet, your engine may stall. Water may also enter your
engine's air intake and severely damage your engine.
If driving through deep or standing water is unavoidable, proceed very
slowly. Never drive through water that is higher than the bottom of the
hubs (for trucks) or the bottom of the wheel rims (for cars).
Once through the water, always try the brakes. Wet brakes do not stop
the vehicle as effectively as dry brakes. Drying can be improved by
moving your vehicle slowly while applying light pressure on the brake
pedal.
Driving through deep water where the transmission vent tube is
submerged may allow water into the transmission and cause
internal transmission damage.
Driving through deep water where the axle vent tube is
submerged may allow water into the rear axle and cause internal
axle damage.
Driving
146
Page 148 of 248

If you need to arrange roadside assistance for yourself, Ford will
reimburse a reasonable amount. To obtain reimbursement information,
U.S. Ford or Mercury vehicles customers call 1-800-241-3673; Lincoln
vehicle customers call 1±800±521±4140.
Canadian customers who need to obtain reimbursement information, call
1±800±665±2006.
Roadside coverage beyond basic warranty
In the United States, you may purchase additional roadside assistance
coverage beyond this period through the Ford Auto Club by contacting
your Ford or Lincoln Mercury dealer.
Similarly in Canada, for uninterrupted Roadside Assistance coverage, you
may purchase extended coverage prior to your Basic Warranty's Roadside
Assistance expiring. For more information and enrollment, contact
1±877±294±2582 or visit our website at www.ford.ca.
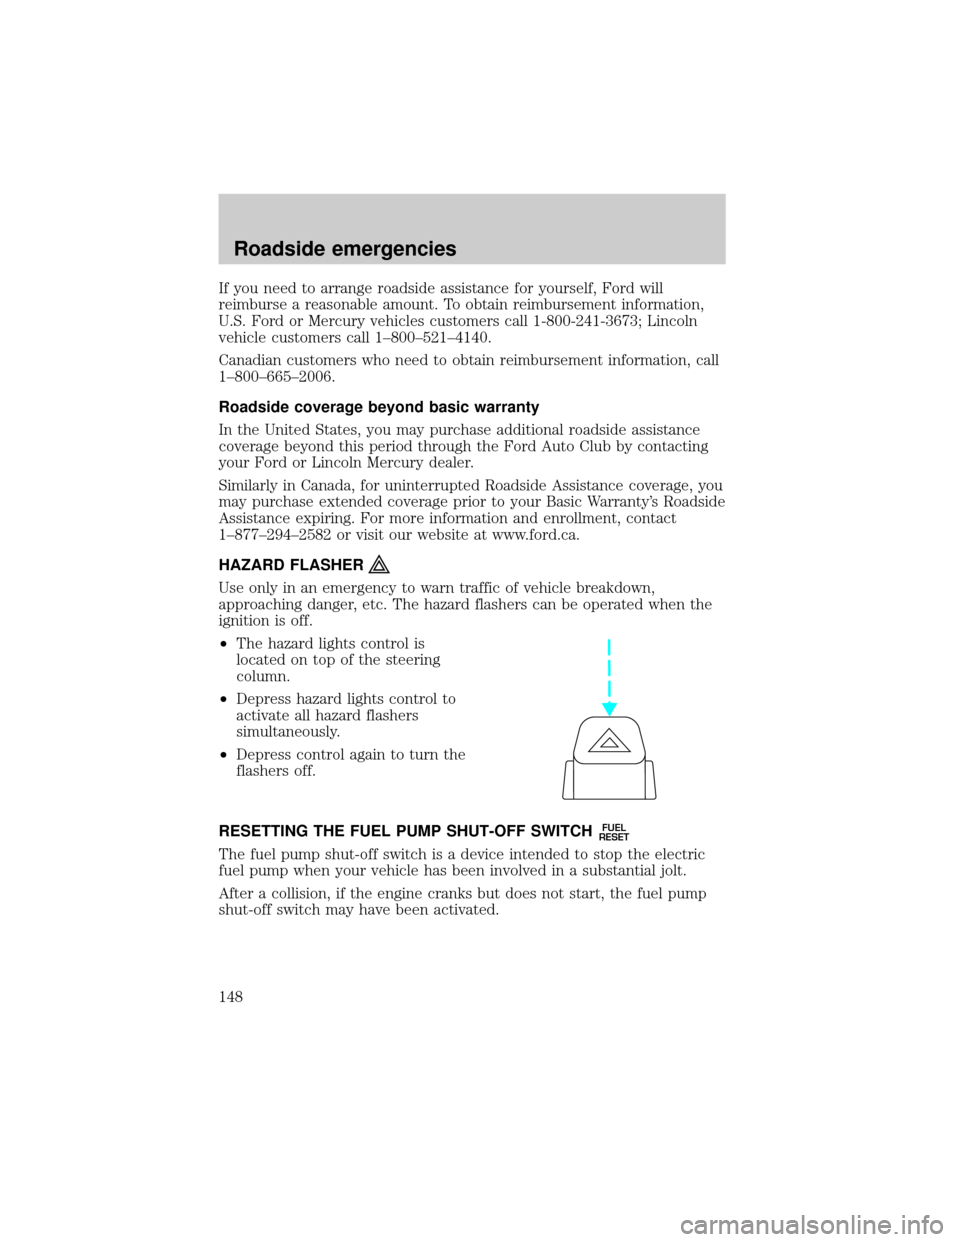
HAZARD FLASHER
Use only in an emergency to warn traffic of vehicle breakdown,
approaching danger, etc. The hazard flashers can be operated when the
ignition is off.
²The hazard lights control is
located on top of the steering
column.
²Depress hazard lights control to
activate all hazard flashers
simultaneously.
²Depress control again to turn the
flashers off.
RESETTING THE FUEL PUMP SHUT-OFF SWITCH
FUEL
RESET
The fuel pump shut-off switch is a device intended to stop the electric
fuel pump when your vehicle has been involved in a substantial jolt.
After a collision, if the engine cranks but does not start, the fuel pump
shut-off switch may have been activated.
Roadside emergencies
148
Page 153 of 248

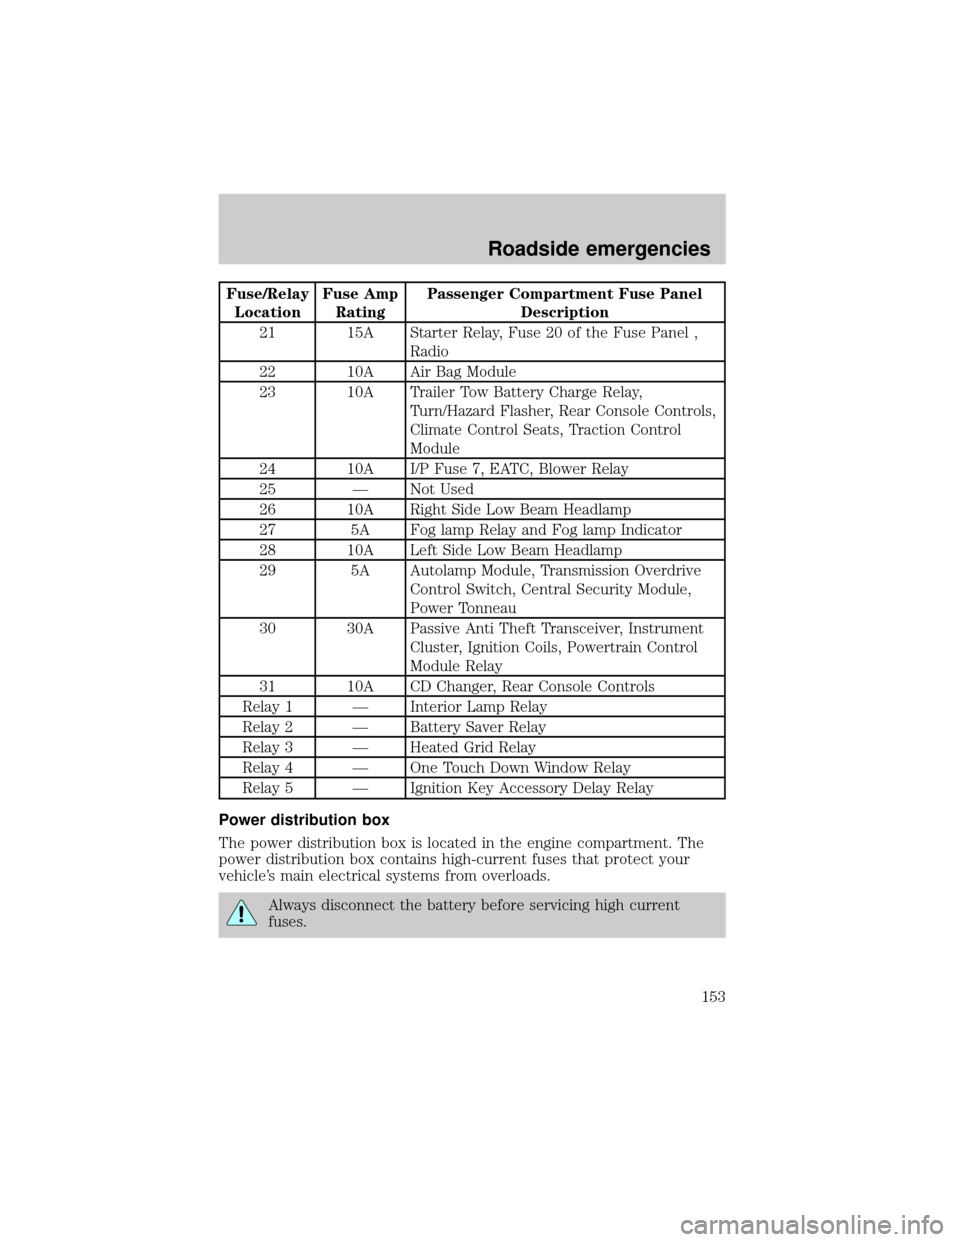
Fuse/Relay
LocationFuse Amp
RatingPassenger Compartment Fuse Panel
Description
21 15A Starter Relay, Fuse 20 of the Fuse Panel ,
Radio
22 10A Air Bag Module
23 10A Trailer Tow Battery Charge Relay,
Turn/Hazard Flasher, Rear Console Controls,
Climate Control Seats, Traction Control
Module
24 10A I/P Fuse 7, EATC, Blower Relay
25 Ð Not Used
26 10A Right Side Low Beam Headlamp
27 5A Fog lamp Relay and Fog lamp Indicator
28 10A Left Side Low Beam Headlamp
29 5A Autolamp Module, Transmission Overdrive
Control Switch, Central Security Module,
Power Tonneau
30 30A Passive Anti Theft Transceiver, Instrument
Cluster, Ignition Coils, Powertrain Control
Module Relay
31 10A CD Changer, Rear Console Controls
Relay 1 Ð Interior Lamp Relay
Relay 2 Ð Battery Saver Relay
Relay 3 Ð Heated Grid Relay
Relay 4 Ð One Touch Down Window Relay
Relay 5 Ð Ignition Key Accessory Delay Relay
Power distribution box
The power distribution box is located in the engine compartment. The
power distribution box contains high-current fuses that protect your
vehicle's main electrical systems from overloads.
Always disconnect the battery before servicing high current
fuses.
Roadside emergencies
153
Page 157 of 248

CHANGING THE TIRES
If you get a flat tire while driving, do not apply the brake heavily.
Instead, gradually decrease your speed. Hold the steering wheel firmly
and slowly move to a safe place on the side of the road.
Spare tire information
Your vehicle is equipped with a spare tire that may be used as a spare or
a regular tire. The spare is identical to the other tires on your vehicle.
Location of the spare tire and tools
The spare tire and tools for your vehicle are stowed in the following
locations:
Item Location
Spare tire Under the vehicle, just forward of
the rear bumper
Jack, wheel nut wrench,
instructionsBehind the access panel located
behind the rear seat
Jack handle On top of the radiator support at
the front of the engine
compartment
Lock In the glove compartment
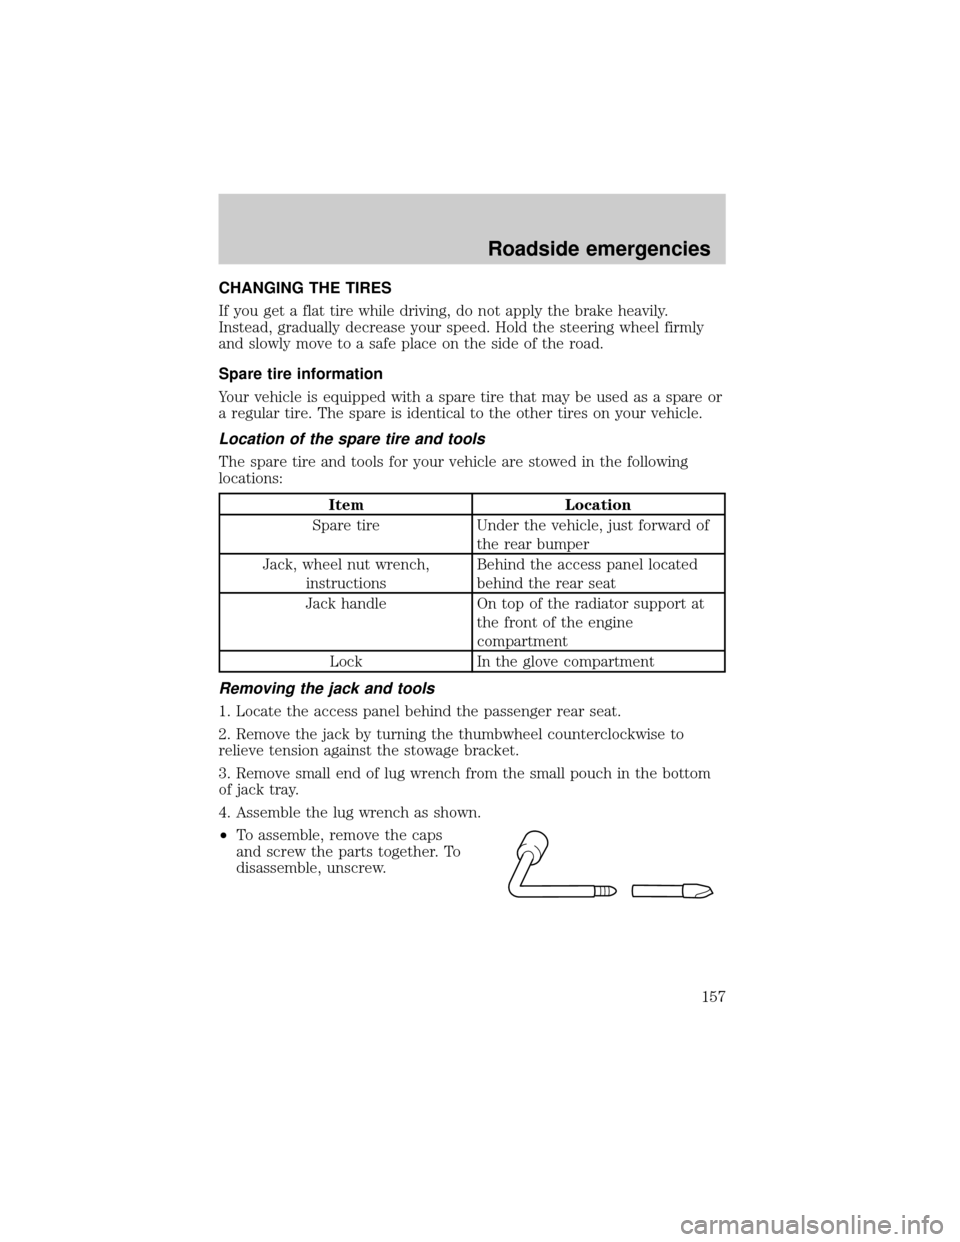
Removing the jack and tools
1. Locate the access panel behind the passenger rear seat.
2. Remove the jack by turning the thumbwheel counterclockwise to
relieve tension against the stowage bracket.
3. Remove small end of lug wrench from the small pouch in the bottom
of jack tray.
4. Assemble the lug wrench as shown.
²To assemble, remove the caps
and screw the parts together. To
disassemble, unscrew.
Roadside emergencies
157
Page 159 of 248
On vehicles equipped with Air Suspension, turn OFF the Air
Suspension switch prior to jacking, hoisting or towing your
vehicle.
Refer to the instruction sheet (located behind the interior trim access
panel with the jack) for detailed tire change instructions.
1. Park on a level surface, activate
hazard flashers and set the parking
brake.
2. Place gearshift lever in P (Park)
and turn engine OFF.
3. Turn OFF the air suspension
switch.
Refer toAir suspension systemin
theDrivingchapter for more
information.
AIR SUSPENSION
SWITCH
INTERRUPTEUR DE
LA SUSPENSION
PNEUMATIQUE
OFF
Roadside emergencies
159
Page 161 of 248
²Rear
To lessen the risk of
personal injury, do not put
any part of your body under the
vehicle while changing a tire. Do
not start the engine when your
vehicle is on the jack. The jack is
only meant for changing the tire.
²Never use the rear differential
as a jacking point.
9. Remove the lug nuts with the lug wrench.
10. Replace the flat tire with the spare tire, making sure the valve stem
is facing outward. Reinstall the lug nuts until the wheel is snug against
the hub. Do not fully tighten the lug nuts until the wheel has been
lowered.
11. Lower the wheel by turning the jack handle counterclockwise.
Roadside emergencies
161
Page 162 of 248

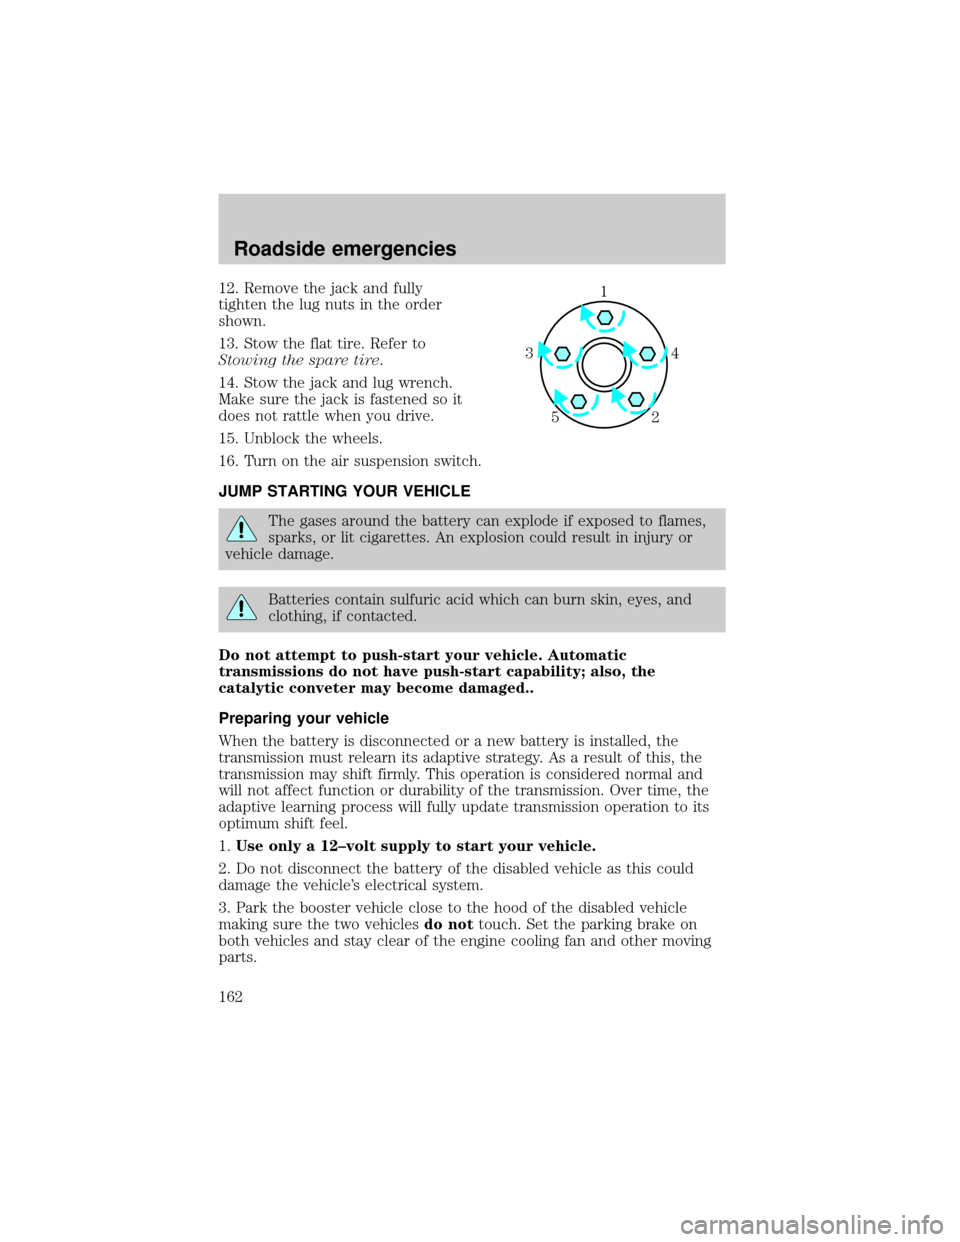
12. Remove the jack and fully
tighten the lug nuts in the order
shown.
13. Stow the flat tire. Refer to
Stowing the spare tire.
14. Stow the jack and lug wrench.
Make sure the jack is fastened so it
does not rattle when you drive.
15. Unblock the wheels.
16. Turn on the air suspension switch.
JUMP STARTING YOUR VEHICLE
The gases around the battery can explode if exposed to flames,
sparks, or lit cigarettes. An explosion could result in injury or
vehicle damage.
Batteries contain sulfuric acid which can burn skin, eyes, and
clothing, if contacted.
Do not attempt to push-start your vehicle. Automatic
transmissions do not have push-start capability; also, the
catalytic conveter may become damaged..
Preparing your vehicle
When the battery is disconnected or a new battery is installed, the
transmission must relearn its adaptive strategy. As a result of this, the
transmission may shift firmly. This operation is considered normal and
will not affect function or durability of the transmission. Over time, the
adaptive learning process will fully update transmission operation to its
optimum shift feel.
1.Use only a 12±volt supply to start your vehicle.
2. Do not disconnect the battery of the disabled vehicle as this could
damage the vehicle's electrical system.
3. Park the booster vehicle close to the hood of the disabled vehicle
making sure the two vehiclesdo nottouch. Set the parking brake on
both vehicles and stay clear of the engine cooling fan and other moving
parts.
1
4 3
2 5
Roadside emergencies
162