Page 152 of 248

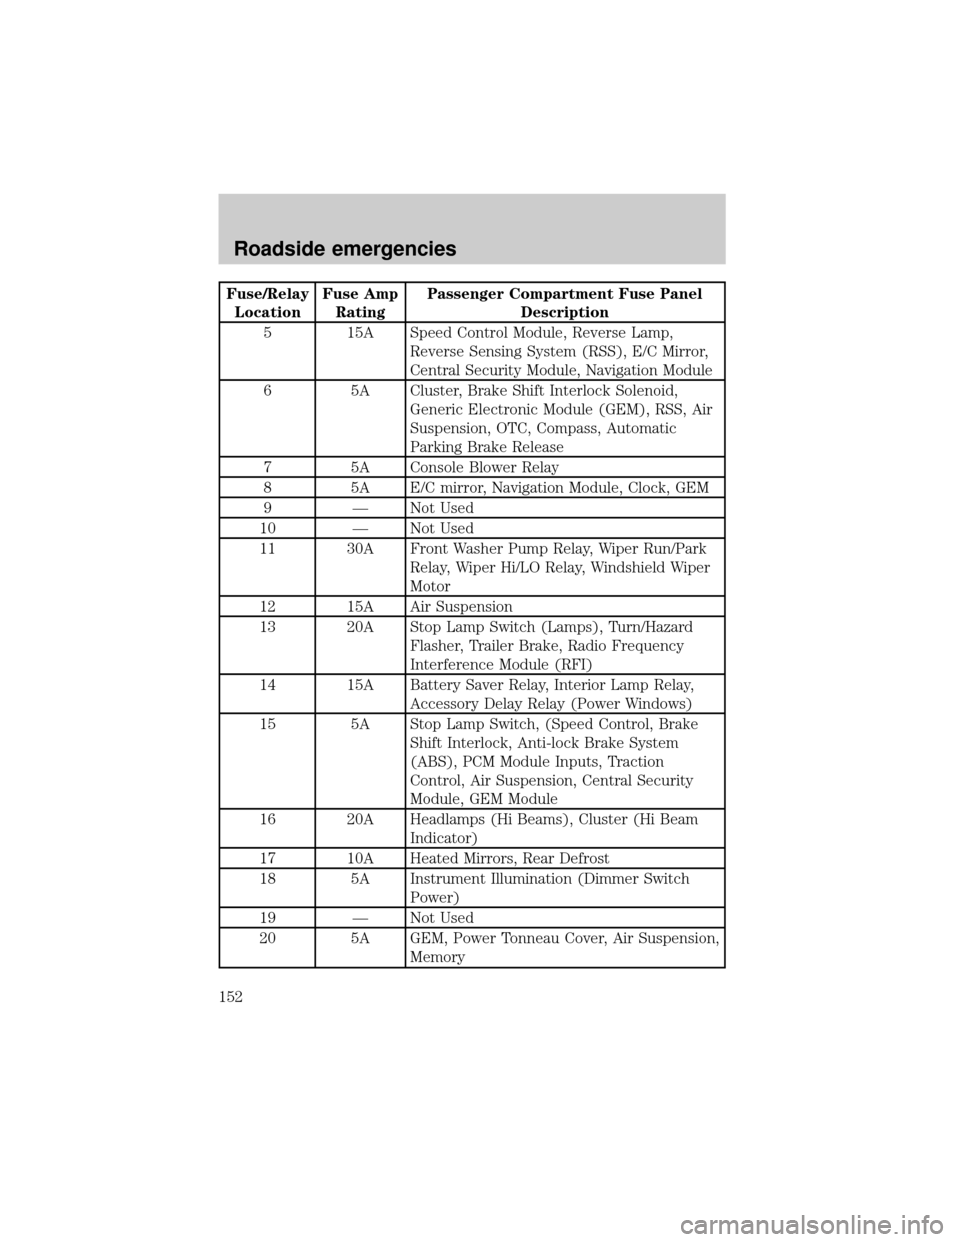
Fuse/Relay
LocationFuse Amp
RatingPassenger Compartment Fuse Panel
Description
5 15A Speed Control Module, Reverse Lamp,
Reverse Sensing System (RSS), E/C Mirror,
Central Security Module, Navigation Module
6 5A Cluster, Brake Shift Interlock Solenoid,
Generic Electronic Module (GEM), RSS, Air
Suspension, OTC, Compass, Automatic
Parking Brake Release
7 5A Console Blower Relay
8 5A E/C mirror, Navigation Module, Clock, GEM
9 Ð Not Used
10 Ð Not Used
11 30A Front Washer Pump Relay, Wiper Run/Park
Relay, Wiper Hi/LO Relay, Windshield Wiper
Motor
12 15A Air Suspension
13 20A Stop Lamp Switch (Lamps), Turn/Hazard
Flasher, Trailer Brake, Radio Frequency
Interference Module (RFI)
14 15A Battery Saver Relay, Interior Lamp Relay,
Accessory Delay Relay (Power Windows)
15 5A Stop Lamp Switch, (Speed Control, Brake
Shift Interlock, Anti-lock Brake System
(ABS), PCM Module Inputs, Traction
Control, Air Suspension, Central Security
Module, GEM Module
16 20A Headlamps (Hi Beams), Cluster (Hi Beam
Indicator)
17 10A Heated Mirrors, Rear Defrost
18 5A Instrument Illumination (Dimmer Switch
Power)
19 Ð Not Used
20 5A GEM, Power Tonneau Cover, Air Suspension,
Memory
Roadside emergencies
152
Page 153 of 248

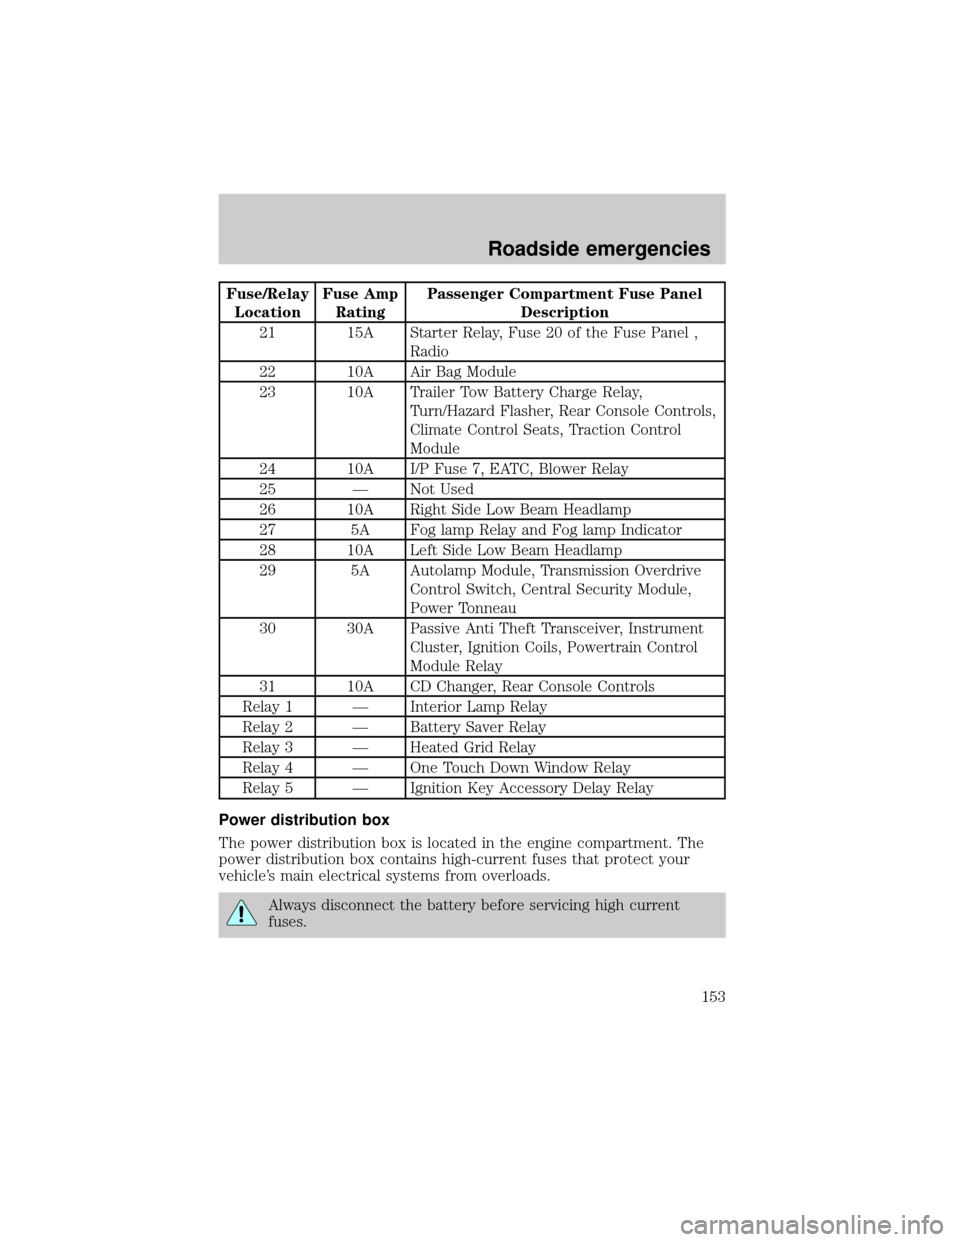
Fuse/Relay
LocationFuse Amp
RatingPassenger Compartment Fuse Panel
Description
21 15A Starter Relay, Fuse 20 of the Fuse Panel ,
Radio
22 10A Air Bag Module
23 10A Trailer Tow Battery Charge Relay,
Turn/Hazard Flasher, Rear Console Controls,
Climate Control Seats, Traction Control
Module
24 10A I/P Fuse 7, EATC, Blower Relay
25 Ð Not Used
26 10A Right Side Low Beam Headlamp
27 5A Fog lamp Relay and Fog lamp Indicator
28 10A Left Side Low Beam Headlamp
29 5A Autolamp Module, Transmission Overdrive
Control Switch, Central Security Module,
Power Tonneau
30 30A Passive Anti Theft Transceiver, Instrument
Cluster, Ignition Coils, Powertrain Control
Module Relay
31 10A CD Changer, Rear Console Controls
Relay 1 Ð Interior Lamp Relay
Relay 2 Ð Battery Saver Relay
Relay 3 Ð Heated Grid Relay
Relay 4 Ð One Touch Down Window Relay
Relay 5 Ð Ignition Key Accessory Delay Relay
Power distribution box
The power distribution box is located in the engine compartment. The
power distribution box contains high-current fuses that protect your
vehicle's main electrical systems from overloads.
Always disconnect the battery before servicing high current
fuses.
Roadside emergencies
153
Page 154 of 248
Always replace the cover to the Power Distribution Box before
reconnecting the battery or refilling fluid reservoirs.
If the battery has been disconnected and reconnected, refer to the
Batterysection of theMaintenance and specificationschapter.
The high-current fuses are coded as follows.
Fuse/Relay
LocationFuse Amp
RatingPower Distribution Box Description
1 20A * Power Point
2 30A* Powertrain Control Module
3 30A* Headlamps/Autolamps
4 20A* Console Power Point
5 20A* Trailer Tow Backup/Park Lamps
6
15A*Parklamps/Autolamps, Passenger Fuse Panel
Feed Fuse #18
7 20A* Horn
8 30A* Power Door Locks
9 15A* Fog Lamps, Power Tonneau
10 20A* Fuel Pump
11 20A* Alternator Field
Roadside emergencies
154
Page 169 of 248
Do not start your engine with the air cleaner removed and do
not remove it while the engine is running.
OPENING THE HOOD
1. Inside the vehicle, pull the hood
release handle located under the
bottom left corner of the instrument
panel.
2. Go to the front of the vehicle and
release the auxiliary latch located
under the front of the hood, just
above the passenger side headlamp.
Slide the yellow handle to release
the auxiliary latch.
3. Lift the hood until the lift
cylinders hold it open.
BRAKE
HOOD
Maintenance and care
169
Page 204 of 248

Allow the vehicle to sit for at least eight hours without starting the
engine. Then, start the engine and complete the above driving cycle. The
engine must warm up to its normal operating temperature. Once started,
do not turn off the engine until the above driving cycle is complete.
BULBS
Replacing exterior bulbs
Check the operation of the following lamps frequently:
²Headlamps
²Foglamps
²High-mount brakelamp
²Brakelamps
²Turn signals
²License plate lamp
²Tail lamps
²Back-up lamps
Do not remove lamp bulbs unless they can be replaced immediately with
new ones. If a bulb is removed for an extended period of time,
contaminants may enter the lamp housings and affect lamp performance.
Replacing headlamp bulbs
1. Make sure the headlamp control is in the OFF position.
2. Open the hood.
3. At the back of the headlamp,
remove the headlamp assembly
retainers by pushing rearward and
pulling up.
4. Pull the headlamp assembly
forward slightly to expose the
electrical connectors.
Maintenance and care
204
Page 205 of 248
5. Rotate the bulb cover
counterclockwise and remove.
6. Disconnect the electrical
connector from the bulb by pulling
rearward.
7. Remove the bulb retainer ring by
turning it counterclockwise, then
slide the ring off the plastic base.
8. Without turning, carefully pull the
bulb out of the headlamp assembly.
Handle a halogen headlamp bulb carefully and keep out of
children's reach. Grasp the bulb only by its plastic base and do
not touch the glass. The oil from your hand could cause the bulb to
break the next time the headlamps are operated.
Maintenance and care
205
Page 206 of 248
9. Insert the glass end of the new bulb into the headlamp assembly.
When the grooves in the plastic base are aligned, push the bulb into the
lamp assembly until the plastic base contacts the rear of the lamp
assembly.
10. To complete installation, follow the removal procedure in reverse
order.
Replacing front parking lamp/turn signal bulbs
1. Make sure the headlamp control is in the OFF position.
2. Open the hood.
3. At the back of the headlamp,
remove the headlamp assembly
retainers by pushing rearward and
pulling up.
4. Pull the headlamp assembly
forward slightly to expose the
electrical connectors.
5. Release clip and disconnect the
electrical connector from the bulb
socket.
6. Rotate the bulb socket
counterclockwise and remove.
7. Pull the bulb straight out of the
socket and push in the new bulb.
8. To complete installation of the
parking lamp/turn signal assembly,
follow the removal procedures in reverse order.
Maintenance and care
206
Page 209 of 248
USING THE RIGHT BULBS
Replacement bulbs are specified in the chart below. Headlamp bulbs
must be marked with an authorized ªD.O.T.º for North America and an
ªEº for Europe to assure lamp performance, light brightness and pattern
and safe visibility. The correct bulbs will not damage the lamp assembly
or void the lamp assembly warranty and will provide quality bulb burn
time.
Function Number of bulbs Trade number
Headlamps 2 9007
Front park/turn lamps 2 3157 AK (amber)
Front sidemarker 2 194 AK (amber)
Foglamps 2 880
Dome/map lamps 2 579
Turn/tail/brake lamps 2 3157K
Rear cornering lamp 2 921
Backup lamp 2 921
License lamp 2 168
High-mount brake
lamp3 906
All replacement bulbs are clear in color except where noted.
To replace all instrument panel lights - see your dealer
Maintenance and care
209