Page 95 of 378
EXTERIOR EQUIPMENT
82
CAUTION
�Keep the trunk lid closed while driving. This not only
keeps the luggage from being thrown out, but also
prevents exhaust gases from entering the vehicle.
� Always lock the trunk lid and all doors, and keep
away the vehicle keys out of children's reaches.
� Never leave children unattended in the vehicle.
Unsupervised children may lock themselves in the
vehicle or trunk and suffer serious injuries or death.
Lock release lever
SS15006
To open the trunk lid from the driver's seat, pull up on the
lock release lever.
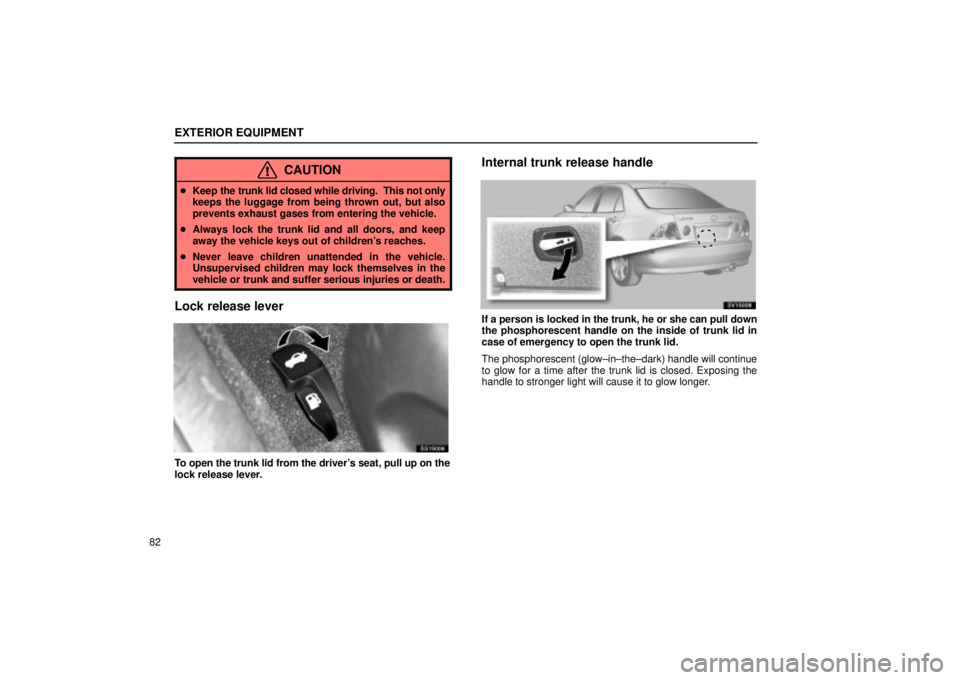
Internal trunk release handle
SV15008
If a person is locked in the trunk, he or she can pull down
the phosphorescent handle on the inside of trunk lid in
case of emergency to open the trunk lid.
The phosphorescent (glow±in±the±dark) handle will continue
to glow for a time after the trunk lid is closed. Exposing the
handle to stronger light will cause it to glow longer.
Page 97 of 378
 EXTERIOR EQUIPMENT
84
SV15009
2. To remove the fuel tank cap, turn the cap slowly
counterclockwise, then pause slightly before removing it.
After removing the cap, hang the tether as shown in the
illu")
EXTERIOR EQUIPMENT
84
SV15009
2. To remove the fuel tank cap, turn the cap slowly
counterclockwise, then pause slightly before removing it.
After removing the cap, hang the tether as shown in the
illustration.
It is not unusual to hear a slight swoosh when the cap is
opened. When installing the cap, turn the cap clockwise until
you hear a click.
If the cap is not tightened securely, the malfunction indicator
lamp comes on. Make sure the cap is tightened securely.
The indicator lamp goes off after driving several times. If the
indicator lamp does not go off, contact your Lexus dealer as
soon as possible.
CAUTION
� Make sure the cap is tightened securely to prevent
fuel spillage in case of an accident.
� Use only a genuine Lexus fuel tank cap for
replacement. It is designed to regulate fuel tank
pressure.
Refueling the vehicle
As soon as the correctly operated nozzle switches off
automatically for the first time, the tank is full. Do not try
to add more fuel, because fuel may spill out.
Page 106 of 378
COMFORT ADJUSTMENT
93
Adjusting front seats
SS16001
� 1Seat position lock release lever
2Seat cushion front edge angle adjusting knob
3Seat cushion height adjusting knob
4Seatback angle lock release lever
Adjusting seat position
SS16003
Hold the center of the lever and pull it up. Then slide the
seat to the desired position with slight body pressure and
release the lever.
Page 115 of 378
 COMFORT ADJUSTMENT
102
TILT STEERING WHEEL
SV16064
To change the steering wheel angle, hold the steering
wheel, pull the lock release lever toward you, tilt the
steering wheel to the desired angle and")
COMFORT ADJUSTMENT
102
TILT STEERING WHEEL
SV16064
To change the steering wheel angle, hold the steering
wheel, pull the lock release lever toward you, tilt the
steering wheel to the desired angle and release the lever.
When the steering wheel is in a low position, it will spring up as
you release the lock release lever.
CAUTION
� Do not adjust the steering wheel while the vehicle is
moving. It may cause the driver to mishandle the
vehicle and an accident may occur resulting in death
or injuries.
� After adjusting the steering wheel, try moving it up
and down to make sure it is locked in position.
OUTSIDE REAR VIEW MIRRORS
SV16010
Adjust the mirror so that you can just see the side of your
vehicle in the mirror.
Be careful when judging the size or distance of any object seen
in the outside rear view mirror on the passenger's side. It is a
convex mirror with a curved surface. Any object seen in a
convex mirror will look smaller and farther away than if seen in
a normal flat mirror.
When you push the rear window and outside rear view mirror
defogger switch or operate the wipers, the heater panels in the
outside rear view mirrors will quickly clear the mirror surface.
(See º Rear window and outside rear view mirror defogger, and
windshield wiper deicer switchº on page 32.)
Some models: When the inside rear view mirror darkens in
ºAUTOº mode, the outside rear view mirrors also darken to
reduce the reflection of the headlights of the following vehicle.
For details, see ºInside rear view mirrorº on page 104.
Page 117 of 378
 COMFORT ADJUSTMENT
104
INSIDE REAR VIEW MIRROR
SL16013
�Type A 1Day 2Night
When driving at night, pull the lever toward you to reduce
the glare from the headlights of vehicles behind you.
Before adj")
COMFORT ADJUSTMENT
104
INSIDE REAR VIEW MIRROR
SL16013
�Type A 1Day 2Night
When driving at night, pull the lever toward you to reduce
the glare from the headlights of vehicles behind you.
Before adjusting the mirror to the position with most clarity,
push the day±night change lever forward (daylight driving
position).
Remember that by reducing glare you also lose some rear view
clarity.
CAUTION
Do not adjust the mirror while the vehicle is moving.
Doing so may cause the driver to mishandle the vehicle
and an accident may occur resulting in personal death
or injuries.
SV16128
�Type B
Adjust the m irror so that you can just see the rear of your
vehicle in the mirror.
Pushing the switch changes the mode between ºAUTOº
and ºDAYº.
The indicator comes on when the ºAUTOº mode is selected.
ºDAYº mode: The mirror surface is normal.
ºAUTOº mode: If the mirror detects light from the
headlights of the vehicle behind you, the mirror surface
darkens slightly to reduce the reflected light.
When the inside rear view mirror surface changes, the outside
rear view mirror surfaces will also become darker.
When the ignition key is inserted and turned on, the inside rear
view mirror always turns on in the ºAUTOº mode.
When the outside air temperature is low, it may take a little
longer for the mirror to darken in response to the detection of
headlights.
Page 123 of 378
 COMFORT ADJUSTMENT
11 0
�Keep the belts clean and dry. If they need cleaning,
use a mild soap solution or lukewarm water. Never
use bleach, dye, or abrasive cleaners ± they may
severely weaken the")
COMFORT ADJUSTMENT
11 0
�Keep the belts clean and dry. If they need cleaning,
use a mild soap solution or lukewarm water. Never
use bleach, dye, or abrasive cleaners ± they may
severely weaken the belts. (See ºCleaning the
interiorº on page 357 for instructions.)
� Replace the belt assembly (including bolts) if it has
been used in a severe impact. The entire assembly
should be replaced even if damage is not obvious.
Fastening front and rear seat belts
SV16013
Adjust the seat as needed and sit up straight and well back
in the seat. To fasten your belt, pull it out of the retractor
and insert the tab into the buckle.
You will hear a click when the tab locks into the buckle.
The seat belt length automatically adjusts to your size and the
seat position. The retractor will lock the belt during a sudden stop or on
impact. It also may lock if you lean forward too quickly. A slow,
easy motion will allow the belt to extend, and you can move
around freely.
When a passenger's shoulder belt is completely extended and
is then retracted even slightly, the belt is locked in that position
and cannot be extended. This feature is used to hold the child
restraint system securely.
(For details, see ºChild restraintº on
page 135.) To free the belt again, fully retract the belt and then
pull the belt out once more.
If the seat belt cannot be pulled out of the retractor, firmly pull
the belt and release it. You will then be able to smoothly pull
the belt out of the retractor.
CAUTION
� After inserting the tab, make sure the tab and buckle
are locked and that the belt is not twisted.
� Do not insert coins, clips, etc. in the buckle as this
may prevent you from properly latching the tab and
buckle.
� If the seat belt does not function normally,
immediately contact your Lexus dealer. Do not use
the seat until the seat belt is fixed. It cannot protect
an adult occupant or your child from injury.
Page 125 of 378
COMFORT ADJUSTMENT
11 2
SV16016
To release the belt, press the buckle release button and
allow the belt to retract.
If the belt does not retract smoothly, pull it out and check for
kinks or twists. Then make sure it remains untwisted as it
retracts.
Rear center seat belt
SV16087
� 1Buckle with light gray buckle ±release button
2Buckle with red buckle ± release button
The rear center seat belt is a 3±point type restraint with 2
buckles. Both seat belt buckles must be correctly located and
securely latched for proper operation.
Make sure that buckle (with light gray buckle±release button)
is securely latched for ready use of the center seat belt.
Page 126 of 378
COMFORT ADJUSTMENT
11 3
SV16088
Two buckles and tabs for rear center seat belt.
The 2 buckles for the rear center seat belt are distinguished
with colors of the buckle release button. Also the 2 tabs have
different shape for its end so that the belt is not buckled in the
wrong place.
1Buckle with light gray buckle±release button ±
Properly matches with concave end tab
2Buckle with red buckle±release button ± Properly
matches with round end tab
CAUTION
Make sure the both buckles are correctly located and
securely latched. Failure to properly match the buckle
and tab may cause severe injury in case of an accident
or a collision.
SV16089
To release the concave end tab, insert the key into the hole on
buckle (with light gray buckle±release button ) and allow the
belt to retract.

 COMFORT ADJUSTMENT
11 2
SV16016
To release the belt, press the buckle release button and
allow the belt to retract.
If the belt does not retract smoothly, pull it out and check for
kinks or twists. T")
 COMFORT ADJUSTMENT
11 3
SV16088
Two buckles and tabs for rear center seat belt.
The 2 buckles for the rear center seat belt are distinguished
with colors of the buckle release button. Also the 2 tabs")