Page 282 of 378
 IN CASE OF AN EMERGENCY
269
Compact spare tire (Some models)
SV64025
The compact spare tire is designed for temporary
emergency use only.
The compact spare tire is identified by the distinctive wheel")
IN CASE OF AN EMERGENCY
269
Compact spare tire (Some models)
SV64025
The compact spare tire is designed for temporary
emergency use only.
The compact spare tire is identified by the distinctive wheel
design and color and special wording ºTEMPORARY USE
ONLYº molded into the side wall of the tire.
The standard tire should be repaired and replaced as soon as
possible.
To keep the compact spare tire noticeable, do not hide the
wheel by a wheel cover or such.
The compact spare tire saves space in your luggage
compartment, and its lighter weight helps to improve fuel
economy and permits easier installation in case of a flat tire.The compact spare tire can be used many times, if necessary.
It has tread life of up to 4800 km (3000 miles) depending on
road conditions and your driving habits. When tread wear
indicators appear on the tire, replace the tire. (See ºChecking
and replacing tiresº on page 326.)
CAUTION
�
The compact spare tire was designed especially for
your Lexus. Do not use it on any other vehicle.
� Do not exceed 80 km/h (50 mph) when driving with the
compact spare tire.
� Avoid sudden acceleration, sudden deceleration and
sharp turns with the compact spare tire.
NOTICE
Your ground clearance is reduced when the compact
spare tire is installed so avoid driving over obstaclesand drive slowly on rough, unpaved roads and speedbumps. Also, do not attempt to go through an automatic
car wash as the vehicle may get caught, resulting in damage.
Page 284 of 378
IN CASE OF AN EMERGENCY
271
SV41034
When closing the board, replace the hook also in its
original position as shown.
NOTICE
If you close the back door with the board hooked, thehook may be damaged.
Spare tire with turning direction indicators
(Some models)
SV41014
The spare tire with turning direction indicators is of a
uni±directional type and is intended for use on the
passenger side of the vehicle.
Installing the wheel on the driver side of the vehicle will not
affect tire performance. If the spare tire is used on the driver
side of the vehicle, it should be used only temporarily and then
replaced with the correct one.
Page 286 of 378
IN CASE OF AN EMERGENCY
273
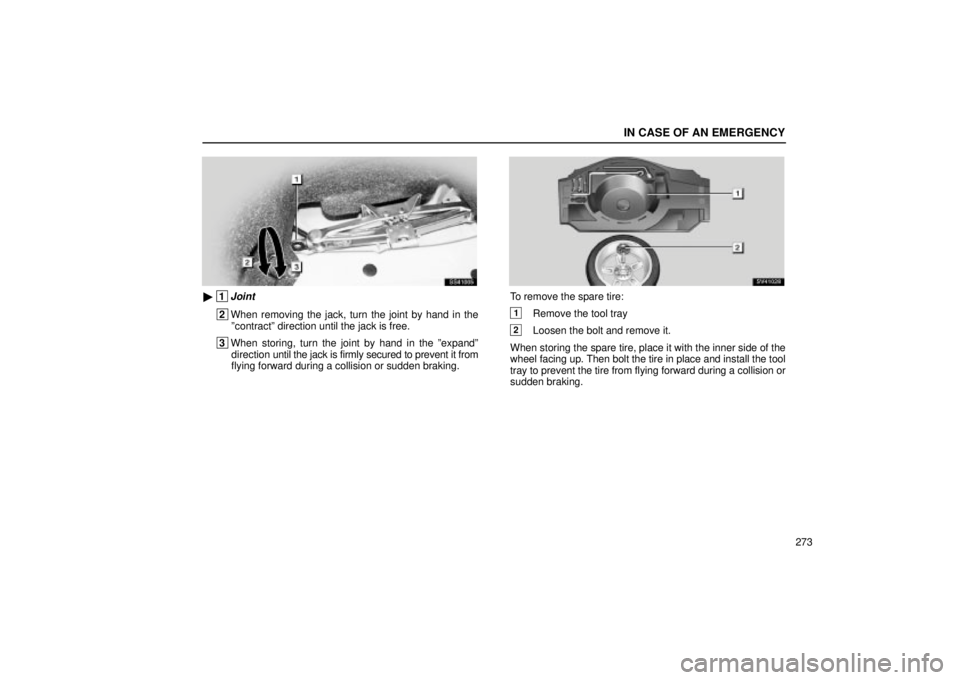
SS41005
� 1Joint
2When removing the jack, turn the joint by hand in the
ºcontractº direction until the jack is free.
3 When storing, turn the joint by hand in the ºexpandº
direction u ntil the jack is firmly secured to prevent it from
flying forward during a collision or sudden braking.
SV41028
To remove the spare tire:
1Remove the tool tray
2Loosen the bolt and remove it.
When storing the spare tire, place it with the inner side of the
wheel facing up. Then bolt the tire in place and install the tool
tray to prevent the tire from flying forward during a collision or
sudden braking.
Page 287 of 378
IN CASE OF AN EMERGENCY
274
SV41033
2. Block the wheel diagonally opposite the flat tire to keep
the vehicle from rolling when it is jacked up.
When blocking the wheel, place a wheel block in front of the
front wheels or behind the rear wheels.
SS41008
3. Loosen all the wheel nuts.
Always loosen the wheel nuts before raising the vehicle.
Turn the wheel nuts counterclockwise to loosen them. To get
maximum leverage, fit the wrench to the nut so that the handle
is on the right side, as shown above. Grab the wrench near the
end of the handle and pull up on the handle. Be careful that the
wrench does not slip off the nut.
Do not remove the nuts yet ± just unscrew them about one±half
turn.
Page 289 of 378
IN CASE OF AN EMERGENCY
276
SS41011
6. Remove the wheel nuts and remove the flat tire.
Lift the flat tire straight off and put it aside.
SL41003
7. Remove the wheel ornament.
When installing the alloy wheels, at this point, remove the
wheel ornament from the flat tire and replace it on the newly
installed tire.
SS41012
Before putting on the wheel, remove any corrosion on the
mounting surfaces with a wire brush or such. Installation of
wheels without good metal±to±metal contact at the mounting
surface can cause wheel nuts to loosen and eventually cause
a wheel to come off while driving.
Page 290 of 378
 IN CASE OF AN EMERGENCY
277
SS41013
8. Reinstall all the wheel nuts finger tight.
Align the holes in the wheel with the bolts. Then lift up the
wheel and get at least the top bolt started through its")
IN CASE OF AN EMERGENCY
277
SS41013
8. Reinstall all the wheel nuts finger tight.
Align the holes in the wheel with the bolts. Then lift up the
wheel and get at least the top bolt started through its hole.
Wiggle the tire and press it back over the other bolts.
Reinstall the wheel nuts and tighten them as much as you can
by hand. Press the tire back and see if you can tighten them
more.
SS41014
9. Lower the vehicle completely and tighten the wheel
nuts.
Turn the jack handle counterclockwise to lower the vehicle.
Use only the wheel nut wrench to tighten the nuts. Do not use
other tools or any additional leverage other than your hands,
such as a hammer, pipe or your foot. Make sure the wrench
is securely engaged over the nut.
Tighten each nut a little at a time in the order shown. Repeat
the process until all the nuts are tight.
CAUTION
� When lowering the vehicle, make sure all portions of
your body and all other persons around will not be
injured as the vehicle is lowered to the ground.
� As soon as possible after changing wheels, have the
wheel nuts tightened by torque wrench at 103 N´m
(10.5 kgf´m, 76 ft´lbf.).
Page 291 of 378
 IN CASE OF AN EMERGENCY
278
SL41002
10. Reinstall the wheel ornament.
Put the wheel ornament into position and then tap it firmly with
the side or heel of your hand to snap it into place.
CAUTION
Take")
IN CASE OF AN EMERGENCY
278
SL41002
10. Reinstall the wheel ornament.
Put the wheel ornament into position and then tap it firmly with
the side or heel of your hand to snap it into place.
CAUTION
Take due care in handling the ornament to avoid
unexpected personal injury.
11. After changing the wheel, check the air pressure of the
replaced tire. Stow all the tools, jack and flat tire securely.
If the pressure of the replaced tire is low, drive slowly to the
nearest service station and fill to the correct pressure.
Do not forget to reinstall the tire valve cap as dirt and moisture
could get into the valve core and possible cause air leakage.
If the cap is missing, put a new one on as soon as possible.
This is the same procedure for changing or rotating your tires.
CAUTION
� When reinstalling a standard tire, take due care in
handling the ornament to avoid unexpected personal
injury.
� Before driving, make sure all the tools, jack and flat
tire are securely in place in their storage location to
reduce the possibility of personal injury during a
collision or sudden braking.
Page 292 of 378
 IN CASE OF AN EMERGENCY
279
IF YOUR VEHICLE NEEDS TO BETOWED
If towing is necessary, we recommend you to have it done
by your Lexus dealer or a commercial tow truck service.
In consultation with them,")
IN CASE OF AN EMERGENCY
279
IF YOUR VEHICLE NEEDS TO BETOWED
If towing is necessary, we recommend you to have it done
by your Lexus dealer or a commercial tow truck service.
In consultation with them, have your vehicle towed using
either (a) or (b).
(a) Towing with a wheel lift type truck
(b) Using a flat bed truck
(c) Never tow with a sling type truck
Only when you cannot receive a towing service from a
Lexus dealer or commercial tow truck service, tow your
vehicle carefully in accordance with the instructions
given in º(d) Emergency towingº on page 283.
Proper equipment will help ensure that your vehicle is not
damaged while being towed. Commercial operators are
generally aware of the state/provincial and local laws
pertaining to towing.
Your vehicle can be damaged if it is towed incorrectly.
Although most operators know the correct procedure, it is
possible to make a mistake. To avoid damage to your vehicle,
make sure the following precautions are observed. If
necessary, show this page to the tow truck driver.
TOWING PRECAUTIONS:
Use a safety chain system for all towing, and abide by the
state/provincial and local laws. The wheels and axle on the
ground must be in good condition. If they are damaged, use
a towing dolly.
(a) Towing with a wheel lift type truck
�From front
SS41015
MANUAL TRANSMISSION:
We recommend using a towing dolly under the rear wheels. If
you do not use a towing dolly, release the parking brake and
put the transmission in neutral.
AUTOMATIC TRANSMISSION:
Use a towing dolly under the rear wheels.
NOTICE
Never tow a vehicle with an automatic transmission
from the front with rear wheels on the ground, as thismay cause serious damage to the transmission.
 IN CASE OF AN EMERGENCY
271
SV41034
When closing the board, replace the hook also in its
original position as shown.
NOTICE
If you close the back door with the board hooked, thehook may be damaged.
Sp")
 IN CASE OF AN EMERGENCY
274
SV41033
2. Block the wheel diagonally opposite the flat tire to keep
the vehicle from rolling when it is jacked up.
When blocking the wheel, place a wheel block in front of")
 IN CASE OF AN EMERGENCY
276
SS41011
6. Remove the wheel nuts and remove the flat tire.
Lift the flat tire straight off and put it aside.
SL41003
7. Remove the wheel ornament.
When installing the alloy")