Page 29 of 378
KEYS AND DOORS
16
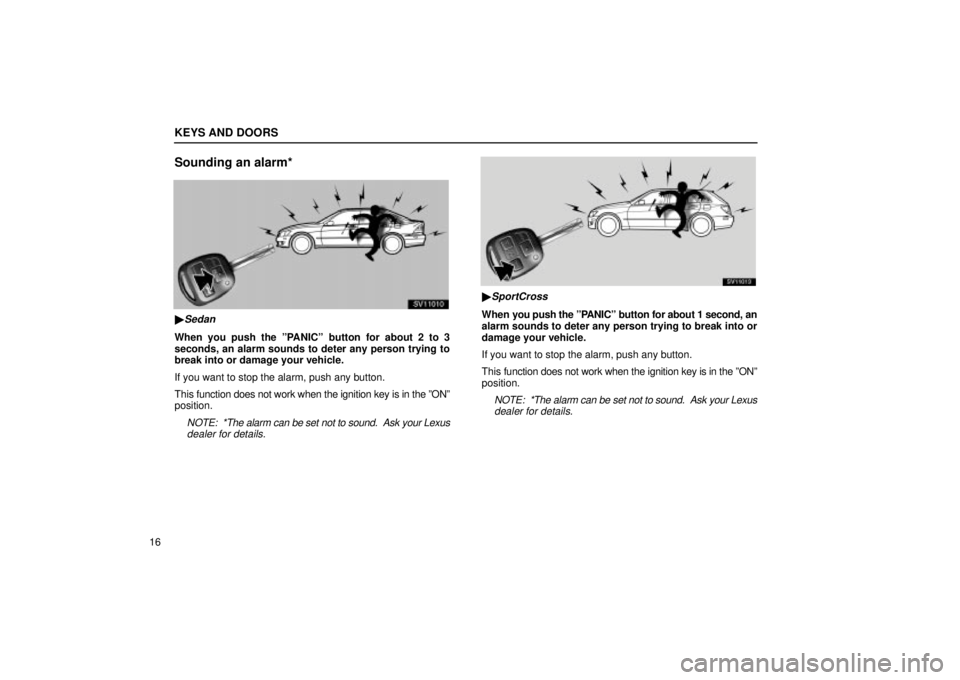
Sounding an alarm*
SV11010
�Sedan
When you push the ºPANICº button for about 2 to 3
seconds, an alarm sounds to deter any person trying to
break into or damage your vehicle.
If you want to stop the alarm, push any button.
This function does not work when the ignition key is in the ºONº
position.
NOTE: *The alarm can be set not to sound. Ask your Lexus
dealer for details.
SV11013
�SportCross
When you push the ºPANICº button for about 1 second, an
alarm sounds to deter any person trying to break into or
damage your vehicle.
If you want to stop the alarm, push any button.
This function does not work when the ignition key is in the ºONº
position.
NOTE: *The alarm can be set not to sound. Ask your Lexus dealer for details.
Page 32 of 378
 KEYS AND DOORS
19
NOTICE
�Make sure the positive side and negative side of thebattery should be faced correctly.
�Do not replace the battery with wet hands. Water may
cause unexpected rust.
�Do not")
KEYS AND DOORS
19
NOTICE
�Make sure the positive side and negative side of thebattery should be faced correctly.
�Do not replace the battery with wet hands. Water may
cause unexpected rust.
�Do not touch or move any components inside of the transmitter, or it may interfere with proper operation.
�Be careful not to bend the electrode of the batteryinsertion and that dust or oils do not adhere to theinside of the module.
�Take care not to lose the screws and O±ring.
5. Install the lid with the 2 screws.
NOTICE
Take care not to damage or bend the O±ring wheninstalling.
6. Install the module into the key frame and secure the cover
with the screw.
7. When pushing any switch on the wireless key, make sure
the indicator light comes on.
DOORS
Locking with key
SS11007a
� 1Lock 2Unlock
Turn the key towards the front of the vehicle to lock and
towards the back to unlock.
Locking (or unlocking) the driver's door will lock (or unlock) all
the other doors simultaneously. In the driver's door lock,
turning the key once will unlock the driver's door and twice in
succession will unlock all doors simultaneously.*
Together with the activation of unlocking, the interior light will
turn on for 15 seconds if the interior light switch is in the
ºDOORº position.** However, this function does not work
when the ignition key is in the ºONº position. For further
information, see ºInterior lightº on page 55.
Page 33 of 378
KEYS AND DOORS
20
NOTE: *The 2±step unlocking function can be changed.**The interior light can be set not to come on or the duration
of lighting can be changed. Ask your Lexus dealer for details.
Locking with inside lock button
SV11004
� 1Lock 2Unlock
Push in the lock button to lock and unlock the door.
When locked, the door cannot be opened with either the
outside or inside door handle.
Closing the door with the lock button pushed in will also lock
the door. Be careful not to lock your keys in the vehicle. The
door will not lock if the key is left in the ignition switch when
closing the front doors.
CAUTION
Before driving, make sure the doors are closed and
locked, especially when small children are in the
vehicle. Along with the proper use of seat belts, locking
the doors helps prevent the driver and passengers from
being thrown out from the vehicle during an accident.
It also helps prevent the doors from being opened
unintentionally.
Page 39 of 378
 SWITCHES
26
HEADLIGHT SWITCH
SS12002a
To turn the lights on, twist the knob on the end of the lever.
FIRST CLICKSTOP: Only the parking, tail, license plate, side
marker and instrument panel lights tu")
SWITCHES
26
HEADLIGHT SWITCH
SS12002a
To turn the lights on, twist the knob on the end of the lever.
FIRST CLICKSTOP: Only the parking, tail, license plate, side
marker and instrument panel lights turn on.
SECOND CLICKSTOP: Headlights also turn on.
THIRD CLICKSTOP (ºAUTOº): The headlights and all other
lights automatically turn on depending on the darkness of the
surroundings.*
Manually twist the knob to the second clickstop to turn on
the headlights if they are needed immediately when
entering a dark tunnel, parking structure, etc.
When the headlight switch is turned to the first or second
clickstop, the brightness of the instrument cluster will be
reduced slightly unless the instrument panel light control knob
is turned fully on.
NOTE: *The operating condition or sensitivity can be changed. Ask your Lexus dealer for details.
SV12024
The automatic light control sensor is on top of the driver's side
instrument panel.
Do not place anything on the instrument panel, and/or do not
affix anything on the windshield to block this sensor.
When the headlights come on, the lights automatically turn off
about 30 seconds after any of the doors is opened and closed
with the ignition key turned to the ºACCº or ºLOCKº position\
.*
When only the taillights come on: The lights automatically turn
off with the driver's door opened and the ignition key turned to
the ºACCº or ºLOCKº position.
To turn them on again, turn the ignition key to the ºONº position,
or turn the headlight switch off and then twist the knob until the
first or second clickstop. If you are going to park for over one
week, make sure the headlight switch is off.
NOTE: *The time before turning off the lights can be changed. Ask your Lexus dealer for details.
Page 40 of 378
 SWITCHES
27
Daytime Running Light System
The headlights turn on at reduced intensity when the parking
brake is released with the engine started, even with the light
switch in the ºOFFº position. Th")
SWITCHES
27
Daytime Running Light System
The headlights turn on at reduced intensity when the parking
brake is released with the engine started, even with the light
switch in the ºOFFº position. They will not go off until the
ignition switch is turned off.
To turn on the other exterior lights and instrument panel lights,
twist the knob to the first clickstop.
Twist
the knob to the second clickstop to turn on the headlights
to full intensity for driving at night.
When setting the knob to the third clickstop (ºAUTOº), the
headlights will automatically adjust to full intensity and/or turn
on the other lights depending on the darkness of the
surroundings. Likewise, as the surroundings become brighter,
the headlights will turn to reduced intensity, ultimately turning
off the other lights.
NOTICE
To prevent the battery from being discharged, do not leave the lights on longer than necessary when theengine is not running.
Automatic headlight leveling system
SV12022
As the headlight beam level is always maintained
automatically at the proper level in all loading conditions, your
headlights do not dazzle other road users.
If this system fails, the warning light in the instrument cluster
comes on. If this occurs, have your vehicle checked by Lexus
dealer.
Page 41 of 378
SWITCHES
28
HEADLIGHT DIMMER AND TURNSIGNAL SWITCH
SV12010
For high beam, push the lever forward. Pull it back for low
beam. For the headlight flasher, pull it further back.
A blue light in the instrument cluster indicates high beam or
headlight flasher is on.
The headlight flasher works even when the headlight switch is
off.
SV12011
For signaling turns, move the lever up or down in the
conventional manner.
The ignition key must be in the ºONº position.
The turn signal is self±cancelling after a turn, but after a lane
change, you may have to cancel it by hand. You can also signal
a lane change by moving the turn signal lever partway and
holding it there.
If the green light in the instrument cluster flashes faster than
normal, it indicates that the front or rear turn signal bulb has
burned out. If this indicator light does not come on, the fuse
or the indicator light itself has probably failed.
Page 43 of 378
 SWITCHES
30
WINDSHIELD WIPER AND WASHERSWITCH
SS12013b
� 1Interval adjuster 2Washer on
To turn the wipers on, move the lever down until you reach
the desired speed setting.
The ignition key must be")
SWITCHES
30
WINDSHIELD WIPER AND WASHERSWITCH
SS12013b
� 1Interval adjuster 2Washer on
To turn the wipers on, move the lever down until you reach
the desired speed setting.
The ignition key must be in the ºONº position.
There are 3 settings:
ºINTº position: Intermittent operation
ºLOº position: Low speed operation
ºHIº position: High speed operation
Twist the interval adjuster upward to increase the wiping
time interval between sweeps, and downward to decrease
it.
The wiper lever must be in the ºINTº position. For mist wiper operations (a single wipe), pull the lever
toward you and release it.
To make the washer squirt, push the button on the end of
the lever.
For information on adding washer fluid, see ºAdding washer
fluidº on page 344.
Some m
odels: If you push the windshield washer switch with
the headlights on, the headlight cleaner operates once
automatically.
In cold weather, warm the windshield with the defroster before
using the washer. This will help prevent icing, which could
block your vision.
The rear window and outside rear view mirror defogger
automatically turns on when you operate the wipers.
NOTICE
Do not operate the wipers if the windshield is dry. It may scratch the glass.
Page 44 of 378
SWITCHES
31
REAR WINDOW WIPER ANDWASHER SWITCH
SV12018
� 1Washer on during wiping 2Washer on
To turn the wipers on, twist the knob at the end of the lever.
The ignition key must be in the ºONº position.
There are 2 settings:
ºINTº position: Intermittent operation
ºONº position: Low speed operation
To make the washer squirt, twist the knob downward to
position 2.
To make the washer squirt while operating in ºONº
position, twist the knob upward to position 1.
The knob automatically returns from these positions after you
release it. For information on adding washer fluid, see ºAdding washer
fluidº on page 344.
NOTICE
Do not operate the rear window wiper if the rear window
is dry. It may scratch the glass.
 KEYS AND DOORS
20
NOTE: *The 2±step unlocking function can be changed.**The interior light can be set not to come on or the duration
of lighting can be changed. Ask your Lexus dealer for details.")
 SWITCHES
28
HEADLIGHT DIMMER AND TURNSIGNAL SWITCH
SV12010
For high beam, push the lever forward. Pull it back for low
beam. For the headlight flasher, pull it further back.
A blue light in the inst")
