Page 74 of 378
 INTERIOR EQUIPMENT
61
GARAGE DOOR OPENER
The garage door opener (HomeLink� Universal
Transceiver) is manufactured under license from
HomeLink
� and can be programmed to operate garage
doors, gates, en")
INTERIOR EQUIPMENT
61
GARAGE DOOR OPENER
The garage door opener (HomeLink� Universal
Transceiver) is manufactured under license from
HomeLink
� and can be programmed to operate garage
doors, gates, entry doors, door locks, home lighting
systems, and security systems, etc.
(a) Programming the HomeLink�
SV14007
� 1Buttons 2Indicator light
The HomeLink� in your vehicle has 3 buttons and you can
store one program for each button.
To ensure correct programming into the HomeLink
�, install a
new battery in the hand± held transmitter prior to
programming. The battery side of the hand± held transmitter must be pointed
away from the HomeLink
� during the programming process.
For Canadian users, follow the procedure in ªProgramming an
entrance gate/Programming all devices in the Canadian
marketº.
1. Decide which of 3 HomeLink
� buttons you want to
program.
2. Place your hand± held garage transmitter 25 to 75 mm (1
to 3 in.) away from the surface of the HomeLink
�.
Keep the indicator light on the HomeLink
� in view while
programming.
3. Simultaneously press and hold the hand± held garage
transmitter button along with the selected HomeLink
� button.
4. When the indicator light on the HomeLink
� changes from
a slow to a rapid flash after 20 seconds, you can release both
buttons.
5. Test the operation of the HomeLink
� by pressing the newly
programmed button. If programming a garage door opener,
check to see if the garage door opens and closes.
If the garage door does not operate, identify if your garage
transmitter is of the ªRolling Codeº type. Press and hold the
programmed HomeLink
� button. The garage door has the
rolling code feature if the indicator light (on the HomeLink�)
flashes rapidly and then remains lit after 2 seconds. If your
garage transmitter is the ªRolling Codeº type, proceed to the
heading ªProgramming a rolling code systemº.
6. Repeat steps 2 through 5 for each remaining HomeLink
�
button to program another device.
Page 75 of 378
 INTERIOR EQUIPMENT
62
Programming a rolling code system
If your device is ªRolling Codeº equipped, it is necessary
to follow steps 1 through 4 under the heading
ªProgramming the HomeLink
�º before")
INTERIOR EQUIPMENT
62
Programming a rolling code system
If your device is ªRolling Codeº equipped, it is necessary
to follow steps 1 through 4 under the heading
ªProgramming the HomeLink
�º before proceeding with
the steps listed below.
1. Locate the ªtrainingº button on the ceiling mounted garage
door opener motor. The exact location and color of the button
may vary by brand of garage door opener. Refer to the owner's
guide supplied by the garage door opener manufacturer for the
location of this ªtrainingº button.
2. Press the ªtrainingº button on the ceiling mounted garage
door opener motor.
Following this step, you have 30 seconds in which to initiate
step 3 below.
3. Press and release the vehicle's programmed HomeLink
�
button twice. The garage door may open. If the door does
open, the programming process in complete. If the door does
not open, press and release the button a third time. This third
press and release will complete the programming process by
opening the garage door.
The ceiling mounted garage door opener motor should now
recognize the HomeLink
� unit and be able to activate the
garage door up/down.
4. Repeat steps 1 through 3 for each remaining HomeLink
�
button to program another rolling code system.
Programming an entrance gate /
Programming all devices in the Canadian
market
1. Decide which of the 3 HomeLink� buttons you want to
program.
2. Place your hand± held gate/device transmitter 25 to 75 mm
(1 to 3 in.) away from the surface of the HomeLink
�.
Keep the indicator light on the HomeLink
� in view while
programming.
3. Press and hold the selected HomeLink
� button.
4. Continuously press and release (cycle) the hand± held
gate/device transmitter button every two seconds until step 5
is complete.
5. When the indicator light on the HomeLink
� changes from
a slow to a rapid flash after 20 seconds, you can release both
buttons.
6. Test the operation of the HomeLink
� by pressing the newly
programmed button. Check to see if the gate/device operates
correctly.
7. Repeat steps 1 through 6 for each remaining HomeLink
�
button to program another device.
Programming other devices
To program other devices such as home security systems,
home door locks or lighting, contact your authorized Lexus
dealer for assistance.
Page 78 of 378
INTERIOR EQUIPMENT
65
CAUTION
�Do not place anything else other than cups or
drink±cans in the cup holder, as such items may be
thrown about in the compartment and possibly injure
people in the vehicle during sudden braking or in an
accident.
� To reduce the chance of injury in case of an accident
or sudden stop while driving, keep the cup holder
closed when not in use.
SV14017
�Front (Type B)
SV14019
�Center (Type B)
The cup holder is designed for holding cups or drink±cans
securely.
Page 79 of 378
INTERIOR EQUIPMENT
66
CAUTION
Do not place anything else other than cups or
drink±cans in the cup holder, as such items may be
thrown about in the compartment and possibly injure
people in the vehicle during sudden braking or in an
accident.
SS14018
�Rear
To use the cup holder, push the cup holder portion of the
center console box.
The cup holder is designed for holding cups or drink±cans
securely in its holes.
CAUTION
�Do not place anything else other than cups or
drink±cans in the cup holder, as such items may be
thrown about in the compartment and possibly injure
people in the vehicle during sudden braking or in an
accident.
� To reduce the chance of injury in case of an accident
or sudden stop while driving, keep the cup holder
closed when not in use.
Page 81 of 378
INTERIOR EQUIPMENT
68
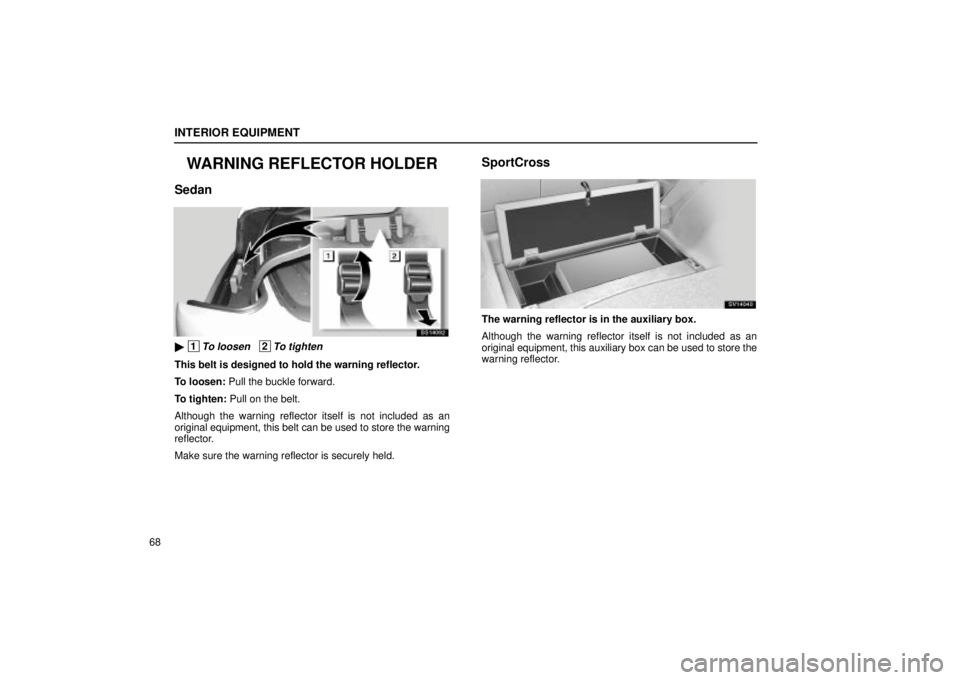
WARNING REFLECTOR HOLDER
Sedan
SS14092
� 1To loosen 2To tighten
This belt is designed to hold the warning reflector.
To loosen: Pull the buckle forward.
To tighten: Pull on the belt.
Although the warning reflector itself is not included as an
original equipment, this belt can be used to store the warning
reflector.
Make sure the warning reflector is securely held.
SportCross
SV14040
The warning reflector is in the auxiliary box.
Although the warning reflector itself is not included as an
original equipment, this auxiliary box can be used to store the
warning reflector.
Page 82 of 378
INTERIOR EQUIPMENT
69
TIE±DOWN HOOKS
SV14003
�Sedan
SV14024
�SportCross
To secure your luggage, use the tie±down hooks as
shown above.See ºLuggage stowage precautionsº on page 77 for
precautions to observe for loading luggage.
CAUTION
To avoid personal injury, keep the tie±down hooks
stored under the carpet when not in use.
Page 85 of 378
INTERIOR EQUIPMENT
72After
you remove the luggage cover, place it somewhere other
than the passenger compartment. This will prevent
passengers from injury in the event of a sudden stop or
accident.
CAUTION
When installing the luggage cover, while pushing the
button, slide the knob and securely lock the luggage
cover. Otherwise, breaking away and falling of the
cover may cause serious injury at a collision.
IN ORDER TO EXPAND THE LUGGAGE SPACE
If you want to have the wider luggage space, you are able to
widen the space by lowering the deck board.
SV41029
1. Pull up the deck board.
Page 86 of 378
INTERIOR EQUIPMENT
73
SV41030
2. Take off the hook at the rear of the deck board.
3. Lift up the back side of the board and secure the board
by hooking it at the top of the back door opening with the
hook at the edge of the strap.
Make sure the board is secured and does not fall down.
SV14036
4. Fold the legs of the center deck board

 INTERIOR EQUIPMENT
66
CAUTION
Do not place anything else other than cups or
drink±cans in the cup holder, as such items may be
thrown about in the compartment and possibly injure
people in the vehicl")

 INTERIOR EQUIPMENT
72After
you remove the luggage cover, place it somewhere other
than the passenger compartment. This will prevent
passengers from injury in the event of a sudden stop or
accident.
C")
 INTERIOR EQUIPMENT
73
SV41030
2. Take off the hook at the rear of the deck board.
3. Lift up the back side of the board and secure the board
by hooking it at the top of the back door opening with the")