Page 222 of 307
IN CASE OF AN EMERGENCY
209
SS41025
�Paper for protecting surface
3. Remove the wheel ornament.(Only for vehicles equipped with P205/55R16 tires.)
Pry off the wheel ornament, using the screwdriver as shown.
CAUTION
Do not try to pull off the ornament by hand. Take due
care in handling the ornament to avoid unexpected
personal injury.
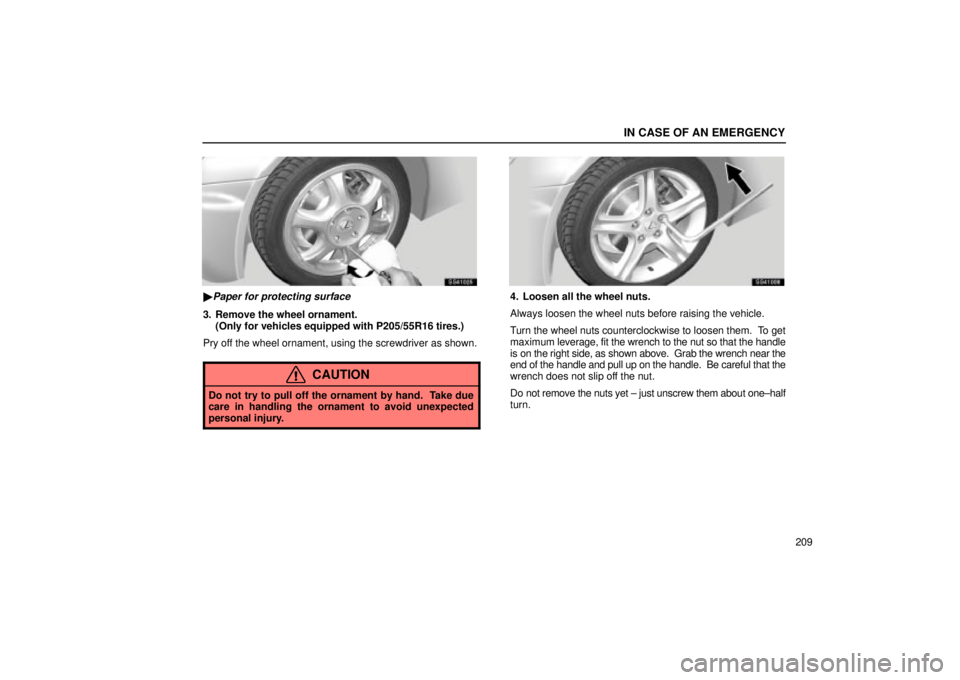
SS41008
4. Loosen all the wheel nuts.
Always loosen the wheel nuts before raising the vehicle.
Turn the wheel nuts counterclockwise to loosen them. To get
maximum leverage, fit the wrench to the nut so that the handle
is on the right side, as shown above. Grab the wrench near the
end of the handle and pull up on the handle. Be careful that the
wrench does not slip off the nut.
Do not remove the nuts yet ± just unscrew them about one±half
turn.
Page 224 of 307
IN CASE OF AN EMERGENCY
211
SS41011
7. Remove the wheel nuts and remove the flat tire.
Lift the flat tire straight off and put it aside.
SS41027
(Only for vehicles equipped with 215/45R17 tires)
When installing the alloy wheels, at this point, remove the
wheel ornament from the flat tire and replace it on the newly
installed tire.
SS41012
Before putting on the wheel, remove any corrosion on the
mounting surfaces with a wire brush or such. Installation of
wheels without good metal±to±metal contact at the mounting
surface can cause wheel nuts to loosen and eventually cause
a wheel to come off while driving.
Page 226 of 307
 IN CASE OF AN EMERGENCY
213
SS41026a
10. Reinstall the wheel ornament.(Only for vehicles equipped with P205/55R16 tires.)
Put the wheel ornament into position and then tap it firmly with
the side or h")
IN CASE OF AN EMERGENCY
213
SS41026a
10. Reinstall the wheel ornament.(Only for vehicles equipped with P205/55R16 tires.)
Put the wheel ornament into position and then tap it firmly with
the side or heel of your hand to snap it into place.
CAUTION
Take due care in handling the ornament to avoid
unexpected personal injury.
11. After changing the wheel, check the air pressure of the
replaced tire. Stow all the tools, jack and flat tire securely.
If the pressure of the replaced tire is low, drive slowly to the
nearest service station and fill to the correct pressure.
Do not forget to reinstall the tire valve cap as dirt and moisture
could get into the valve core and possible cause air leakage.
If the cap is missing, put a new one on as soon as possible.
This is the same procedure for changing or rotating your tires.
CAUTION
� When reinstalling a standard tire, take due care in
handling the ornament to avoid unexpected personal
injury.
� Before driving, make sure all the tools, jack and flat
tire are securely in place in their storage location to
reduce the possibility of personal injury during a
collision or sudden braking.
Page 236 of 307
 MAINTENANCE
223
Where to go for service?
Lexus technicians are well±trained specialists and are kept up
to date with the latest service information through technical
bulletins, service tips, and in±")
MAINTENANCE
223
Where to go for service?
Lexus technicians are well±trained specialists and are kept up
to date with the latest service information through technical
bulletins, service tips, and in±dealership training programs.
They are well informed about the operation of all the systems
on your vehicle.
You can be confident that your Lexus dealer's service
department performs the best job to meet the maintenance
requirements of your vehicle.
Your copy of the repair order is proof that all required
maintenance has been performed for warranty coverage. And
if any problems should arise with your vehicle while under
warranty, your Lexus dealer will promptly take care of it. Again,
be sure to keep a copy of the repair order for any service
performed on your Lexus.
What about do±it±yourself maintenance?
Many of the maintenance items are easy to do yourself, if you
have a little mechanical ability and a few basic automotive
tools. Simple instructions for how to perform them are
presented in Section 6.
If you are a skilled do±it±yourself mechanic, the Lexus service
manuals are recommended. Please be aware that
do±it±yourself maintenance can affect your warranty
coverage. See ºOwner's Guideº, ºOwner's Manual
Supplementº or ºWarranty Bookletº for the details.
GENERAL MAINTENANCE
Listed below are the general maintenance items that should be
performed at the intervals specified. It is recommended that
any problem you notice be brought to the attention of your
Lexus dealer or qualified service shop for their advice.
CAUTION
Make these checks only where adequate ventilation can
be obtained if you run the engine.
Vehicle exterior
Items listed below should be performed from time to time,
unless otherwise specified.
Tire pressure
Check the pressure with a gauge every two weeks, or at least
once a month and adjust as shown on the tire pressure label.
See page 254 for additional information.
Tire surface
Check the tires carefully for cuts, damage or excessive wear.
See page 256 for additional information.
Wheel nuts
When checking the tires, make sure to check the nuts for
looseness. Tighten them if necessary.
Page 237 of 307
 MAINTENANCE
224Tire rotation
Rotate the tires according to the maintenance schedule. (For
scheduled maintenance information, please refer to the
ªOwners Manual Supplementº or ªScheduled Maintenan")
MAINTENANCE
224Tire rotation
Rotate the tires according to the maintenance schedule. (For
scheduled maintenance information, please refer to the
ªOwner's Manual Supplementº or ªScheduled Maintenanceº.)
See page 255 for additional information.
Fluid leaks
Check under
neath for leaking fuel, oil, water or other fluid after
the vehicle has been parked for a while. If you smell fuel fumes
or notice any leak, have the cause found and corrected
immediately.
Doors and engine hood
Check that all doors, including trunk lid, operate smoothly and
all latches lock securely. Make sure the engine hood
secondary latch secures the hood when the primary latch is
released.
Vehicle interior
Items listed below should be checked regularly, e.g. while
performing periodic services, cleaning the vehicle, etc.
Lights
Make sure the headlight, stop lights, tail lights, turn signal
lights, and other lights are working. Check headlight aim.
Service reminder indicators and warning buzzers
Check that all service reminder indicators and warning
buzzers function properly. Steering wheel
Check that it has the specified free play. Be alert for changes
in steering condition, such as hard steering, excessive free
play or strange noise.
Seats
Check that all front seat controls such as seat adjusters,
seatback recliner, etc. operate smoothly. Ch
eck that the head
restraints move up and down smoothly and that the locks hold
securely in any latched position.
Seat belts
Check that the seat belt system such as buckles, retractors
and anchors operate properly and smoothly. Make sure the
belt webbing is not cut, frayed, worn or damaged.
Accelerator pedal
Check the pedal for smooth operation and uneven pedal ef fort
or catching.
Brake pedal
Check the pedal for smooth operation and the proper
clearance and free play. Check the brake booster function.
Brakes
At a safe place, check that the brakes do not pull to one side
when applied.
Parking brake
Check that the lever has the proper travel and that, on a safe
incline, your vehicle is held securely with only the parking
brake applied.
Page 239 of 307
 MAINTENANCE
226
DOES YOUR VEHICLE NEEDREPAIRING?
Be on the alert for changes in performance and sounds, and
visual tip±offs that indicate service is needed. Some important
clues are:
� Engine missin")
MAINTENANCE
226
DOES YOUR VEHICLE NEEDREPAIRING?
Be on the alert for changes in performance and sounds, and
visual tip±offs that indicate service is needed. Some important
clues are:
� Engine missing, stumbling, or pinging
� Appreciable loss of power
� Strange engine noises
� A fluid leak under the vehicle (however, water dripping from
the air conditioning after use is normal.)
� Change in exhaust sound (This may indicate a dangerous
carbon monoxide leak. Drive with the windows open and
have the exhaust system checked immediately.)
� Flat±looking tires, excessive tire squeal when cornering,
uneven tire wear
� Vehicle pulls to one side when driving straight on a level
road
� Strange noises related to suspension movement
� Loss of brake effectiveness, spongy feeling brake pedal,
pedal almost touches floors, vehicle pulls to one side when
braking
� Engine coolant temperature continually higher than normal
If you notice any of these clues, take your vehicle to your Lexus
dealer as soon as possible. It probably needs adjustment or
repair.
CAUTION
Do not continue driving with the vehicle unchecked. It
could result in serious vehicle damage and possibly
personal injury.
Page 260 of 307
 SECTION 6 ± 3
247
SERVICE PROCEDURES AND
SPECIFICATIONS
Chassis
Specifications248
. . . . . . . . . . . . . . . . . . . . . . . . . . . . . . . . . . . . .\
. . . . . .
Checking brake fluid 252
.")
SECTION 6 ± 3
247
SERVICE PROCEDURES AND
SPECIFICATIONS
Chassis
Specifications248
. . . . . . . . . . . . . . . . . . . . . . . . . . . . . . . . . . . . .\
. . . . . .
Checking brake fluid 252
. . . . . . . . . . . . . . . . . . . . . . . . . . . . . . . . . . . . .\
.
Checking power steering fluid 253
. . . . . . . . . . . . . . . . . . . . . . . . . . . . .
Checking tire pressure 254
. . . . . . . . . . . . . . . . . . . . . . . . . . . . . . . . . . . .
Rotating tires 255
. . . . . . . . . . . . . . . . . . . . . . . . . . . . . . . . . . . . .\
. . . . . . .
Checking and replacing tires 256
. . . . . . . . . . . . . . . . . . . . . . . . . . . . . .
Installing snow tires and chains 259
. . . . . . . . . . . . . . . . . . . . . . . . . . . .
Replacing wheels 260
. . . . . . . . . . . . . . . . . . . . . . . . . . . . . . . . . . . . .\
. . .
Aluminum wheel precautions 261
. . . . . . . . . . . . . . . . . . . . . . . . . . . . . .
Suspension and chassis 261
. . . . . . . . . . . . . . . . . . . . . . . . . . . . . . . . . .
Page 263 of 307
CHASSIS
250± TIRES AND WHEELS (Type A)
Tire size
Tire inflation pressure Recommended cold tire inflation pressure
Wheel size
Wheel nut torque
215/45ZR17
Front 230 kPa (2.3 kgf/cm
2 or bar, 33 psi)
Rear 230 kPa (2.3 kgf/cm2 or bar, 33 psi)
For sustained high speeds above 160 km/h (100 mph), in
countries where such speeds are permitted by law, add 70
kPa (0.8 kgf/cm
2, 0.7 bar, 10 psi) to the front tires and rear
tires, but never exceed the maximum cold tire pressure
molded on the tire sidewall.
17 x 7 JJ
103 N´m (10.5 kgf´m, 76 ft´lbf.)
NOTE: For complete information on tires (e.g. replacing tires or replacing wheels\
), see ºChecking tire pressureº through ºAluminum
wheel precautionsº on page 254 through 261.
 IN CASE OF AN EMERGENCY
211
SS41011
7. Remove the wheel nuts and remove the flat tire.
Lift the flat tire straight off and put it aside.
SS41027
(Only for vehicles equipped with 215/45R17 tires)
When")
 CHASSIS
250± TIRES AND WHEELS (Type A)
Tire size
Tire inflation pressure Recommended cold tire inflation pressure
Wheel size
Wheel nut torque
215/45ZR17
Front 230 kPa (2.3 kgf/cm
2 or bar, 33 psi)")