2002 JEEP GRAND CHEROKEE Air ah
[x] Cancel search: Air ahPage 1878 of 2199

DECKLID/HATCH/LIFTGATE/TAILGATE
TABLE OF CONTENTS
page page
EXTERIOR HANDLE
REMOVAL.............................5
INSTALLATION..........................5
FLIP-UP GLASS
REMOVAL.............................5
INSTALLATION..........................6
FLIP-UP GLASS LATCH
REMOVAL.............................6
INSTALLATION..........................6
FLIP-UP GLASS LATCH STRIKER
REMOVAL.............................7
INSTALLATION..........................7
FLIP-UP GLASS SWITCH
REMOVAL.............................7
INSTALLATION..........................7
HINGE
REMOVAL.............................7
INSTALLATION..........................7
LATCH
REMOVAL.............................8
INSTALLATION..........................8LATCH STRIKER
REMOVAL.............................8
INSTALLATION..........................8
LIFTGATE
REMOVAL.............................9
INSTALLATION..........................9
ADJUSTMENTS
LIFTGATE ADJUSTMENT................9
TRIM PANEL
REMOVAL
REMOVAL - LIFTGATE TRIM PANEL........9
REMOVAL - LOWER LIFTGATE OPENING
TRIM PANEL.........................10
INSTALLATION
INSTALLATION - LIFTGATE TRIM PANEL . . . 10
INSTALLATION - LOWER LIFTGATE
OPENING TRIM PANEL.................10
LIFTGATE INSULATOR
REMOVAL.............................10
INSTALLATION.........................10
EXTERIOR HANDLE
REMOVAL
(1) Remove the liftgate trim panel refer to (Refer
to 23 - BODY/DECKLID/HATCH/LIFTGATE/TAIL-
GATE/TRIM PANEL - REMOVAL).
(2) Remove the latch, outside handle linkage, and
power lock connector.
(3) Remove the fasteners attaching the outside
handle to the liftgate.
(4) Remove the outside handle from the liftgate.
INSTALLATION
(1) Position the outside handle on the liftgate.
(2) Install the fasteners attaching outside handle
to liftgate.
(3) Connect outside handle link and power lock
connector.
(4) Install liftgate trim panel, refer to (Refer to 23
- BODY/DECKLID/HATCH/LIFTGATE/TAILGATE/
TRIM PANEL - INSTALLATION).
FLIP-UP GLASS
REMOVAL
CAUTION: DO NOT DISCONNECT THE PROP ROD
CYLINDERS WITH THE LIFTGATE FLIP UP GLASS
CLOSED. THE PROP ROD PISTONS ARE OPER-
ATED BY HIGH PRESSURE GAS. THIS PRESSURE
COULD CAUSE DAMAGE AND/OR PERSONAL
INJURY IF THEY ARE REMOVED WHILE THE PIS-
TONS ARE COMPRESSED.
(1) Using a trim stick or other suitable device, sep-
arate the flip up glass hinge cover from the hinge on
the liftgate (Fig. 1).
(2) Open liftgate flip up glass. Support the glass
for ease of repair.
(3) Using a small flat blade or equivalent tool, gen-
tly pry open the locking caps on the end of the prop
rods.
(4) Remove prop rod cylinders from ball studs.
(5) Lower the flip up glass.
(6) Remove hinge fasteners from liftgate.
(7) Separate flip up glass from liftgate.
WJDECKLID/HATCH/LIFTGATE/TAILGATE 23 - 5
Page 1880 of 2199

(4) Close flip up glass panel and verify proper
operation.
(5)
Install liftgate trim panel, refer to (Refer to 23 -
BODY/DECKLID/HATCH/LIFTGATE/TAILGATE/TRIM
PANEL - INSTALLATION).
FLIP-UP GLASS LATCH
STRIKER
REMOVAL
(1) Raise flip up glass panel.
(2) Mark the position of the handle/striker on the
glass panel.
(3) Remove the screws attaching the handle/striker
to the glass.
INSTALLATION
(1) Position the handle/striker on the glass panel
and align the reference marks.
(2) Install the screws attaching the handle/striker
to the glass panel. Tighten the fasteners to 6 N´m (60
in. lbs.).
FLIP-UP GLASS SWITCH
REMOVAL
(1) Remove license plate lamp housing/trim panel
from liftgate, refer to (Refer to 8 - ELECTRICAL/
LAMPS/LIGHTING - EXTERIOR/LICENSE PLATE
LAMP UNIT - REMOVAL).
(2) Squeeze the locking tabs inward to release the
switch from the housing.
(3) Disconnect the switch harness connector,
remove the switch from the housing.
INSTALLATION
(1) Install switch harness connector.(2) Position switch in housing, snap switch into
place.
(3) Install license plate lamp housing/trim panel
onto liftgate, refer to (Refer to 8 - ELECTRICAL/
LAMPS/LIGHTING - EXTERIOR/LICENSE PLATE
LAMP UNIT - INSTALLATION).
HINGE
REMOVAL
NOTE: It is not necessary to remove the liftgate to
replace one or both hinges. The hinges can be
replaced one at a time.
(1) Open the liftgate. Support the liftgate for ease
of repair.
(2) Remove the liftgate header trim panel.
(3) Mark the hinge location with a grease pencil or
other suitable device.
(4) Remove the hinge screws (Fig. 5).
(5) Remove hinge.
INSTALLATION
NOTE: It is not necessary to remove the liftgate to
replace one or both hinges. The hinges can be
replaced one at a time.
(1) Position the hinge on the roof panel and on the
liftgate. (Use 3MŸ Fast and Firm or equivalent on
the hinge to body mating surfaces as a sealant.
(2) Install and tighten hinge screws at roof panel
to 28N´m (21 ft. lbs.).
(3) Install hinge screws at liftgate. Tighten screws
to 28N´m (21 ft. lbs.).
(4) Install liftgate header trim panel.
(5) Check the liftgate for proper alignment and
operation.
WJDECKLID/HATCH/LIFTGATE/TAILGATE 23 - 7
FLIP-UP GLASS LATCH (Continued)
Page 1882 of 2199

LIFTGATE
REMOVAL
CAUTION: DO NOT DISCONNECT THE SUPPORT ROD
CYLINDERS WITH THE LIFTGATE CLOSED. THE SUP-
PORT ROD PISTONS ARE OPERATED BY HIGH PRES-
SURE GAS. THIS PRESSURE COULD CAUSE DAMAGE
AND /OR PERSONAL INJURY IF THEY ARE REMOVED
WHILE THE PISTONS ARE COMPRESSED.
(1) Open the liftgate. Support the liftgate for ease
of repair.
(2) Remove the liftgate trim panel.
(3) Remove the prop rods from the liftgate.
(4) Unplug the wire harnesses and disconnect the
washer hose.
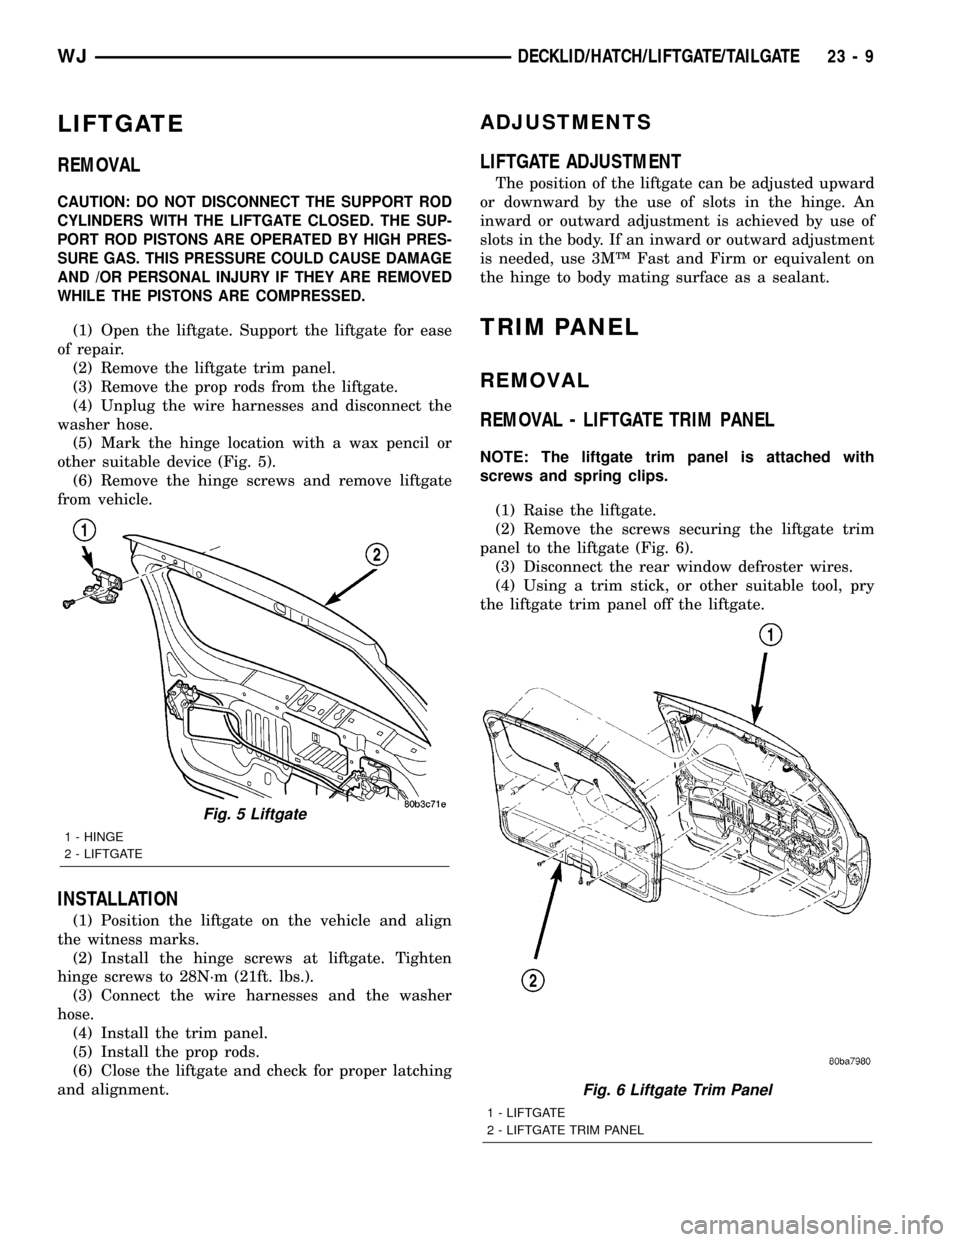
(5) Mark the hinge location with a wax pencil or
other suitable device (Fig. 5).
(6) Remove the hinge screws and remove liftgate
from vehicle.
INSTALLATION
(1) Position the liftgate on the vehicle and align
the witness marks.
(2) Install the hinge screws at liftgate. Tighten
hinge screws to 28N´m (21ft. lbs.).
(3) Connect the wire harnesses and the washer
hose.
(4) Install the trim panel.
(5) Install the prop rods.
(6) Close the liftgate and check for proper latching
and alignment.
ADJUSTMENTS
LIFTGATE ADJUSTMENT
The position of the liftgate can be adjusted upward
or downward by the use of slots in the hinge. An
inward or outward adjustment is achieved by use of
slots in the body. If an inward or outward adjustment
is needed, use 3MŸ Fast and Firm or equivalent on
the hinge to body mating surface as a sealant.
TRIM PANEL
REMOVAL
REMOVAL - LIFTGATE TRIM PANEL
NOTE: The liftgate trim panel is attached with
screws and spring clips.
(1) Raise the liftgate.
(2) Remove the screws securing the liftgate trim
panel to the liftgate (Fig. 6).
(3) Disconnect the rear window defroster wires.
(4) Using a trim stick, or other suitable tool, pry
the liftgate trim panel off the liftgate.
Fig. 5 Liftgate
1 - HINGE
2 - LIFTGATE
Fig. 6 Liftgate Trim Panel
1 - LIFTGATE
2 - LIFTGATE TRIM PANEL
WJDECKLID/HATCH/LIFTGATE/TAILGATE 23 - 9
Page 1898 of 2199

EXTERIOR
TABLE OF CONTENTS
page page
BODY SIDE MOLDINGS
REMOVAL
REMOVAL±FRONT DOOR...............25
REMOVAL±REAR DOOR................26
REMOVAL±FENDER/QUARTER PANEL.....26
INSTALLATION
INSTALLATION±FRONT DOOR...........26
INSTALLATION±REAR DOOR............26
INSTALLATION±FENDER/QUARTER PANEL . 26
COWL GRILLE
REMOVAL.............................27
INSTALLATION.........................27
D-PILLAR APPLIQUE
REMOVAL.............................27
INSTALLATION.........................27
D-PILLAR AIR EXHAUSTER
REMOVAL.............................27
INSTALLATION.........................27
AIR EXHAUSTER
REMOVAL.............................27
INSTALLATION.........................27
EXTERIOR NAME PLATES
REMOVAL.............................28
INSTALLATION.........................28FRONT FENDER
REMOVAL.............................28
INSTALLATION.........................29
FUEL FILL DOOR
REMOVAL.............................29
INSTALLATION.........................29
GRILLE
REMOVAL.............................29
INSTALLATION.........................29
HEADLAMP MOUNTING MODULE
REMOVAL.............................30
INSTALLATION.........................30
LUGGAGE RACK
REMOVAL.............................30
INSTALLATION.........................31
SIDE VIEW MIRROR GLASS
REMOVAL.............................31
INSTALLATION.........................31
SIDE VIEW MIRROR
REMOVAL.............................31
INSTALLATION.........................31
ROCK RAIL
REMOVAL.............................32
INSTALLATION.........................32
BODY SIDE MOLDINGS
REMOVAL
REMOVAL±FRONT DOOR
(1) Open the front door.
(2) Using a trim stick, pry the upper rear edge off
the door. Continue to the front edge of the front door
(Fig. 1).
(3) Using a heat gun, warm the adhesive tape on
the lower edge of the cladding and pull the cladding
from the door.
Fig. 1 Front Door Cladding
1 - CLADDING
WJEXTERIOR 23 - 25
Page 1900 of 2199

COWL GRILLE
REMOVAL
(1) Remove wiper arms, refer to (Refer to 8 -
ELECTRICAL/WIPERS/WASHERS/WIPER ARMS -
REMOVAL).
(2) Remove plenum seal.
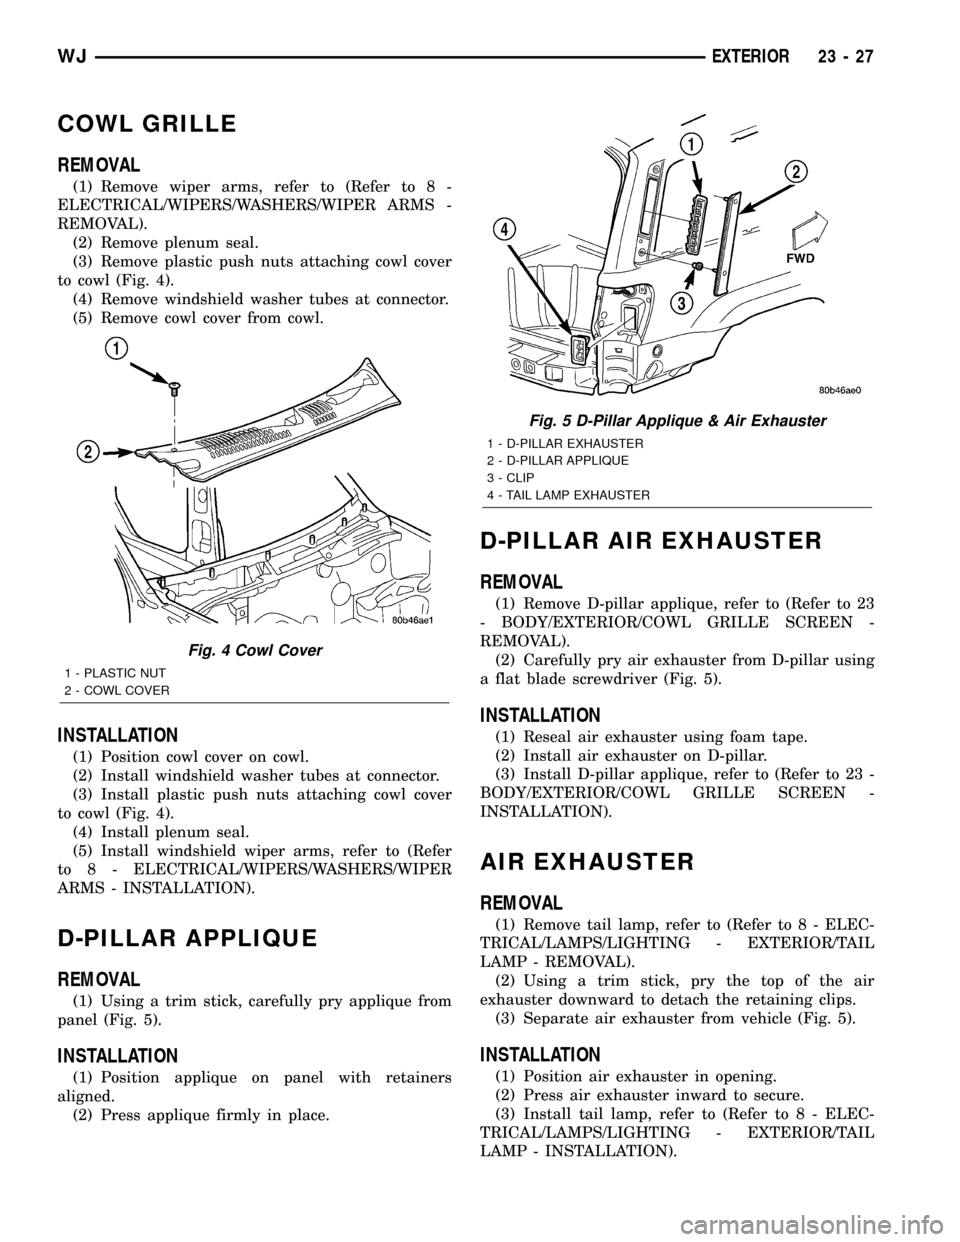
(3) Remove plastic push nuts attaching cowl cover
to cowl (Fig. 4).
(4) Remove windshield washer tubes at connector.
(5) Remove cowl cover from cowl.
INSTALLATION
(1) Position cowl cover on cowl.
(2) Install windshield washer tubes at connector.
(3) Install plastic push nuts attaching cowl cover
to cowl (Fig. 4).
(4) Install plenum seal.
(5) Install windshield wiper arms, refer to (Refer
to 8 - ELECTRICAL/WIPERS/WASHERS/WIPER
ARMS - INSTALLATION).
D-PILLAR APPLIQUE
REMOVAL
(1) Using a trim stick, carefully pry applique from
panel (Fig. 5).
INSTALLATION
(1) Position applique on panel with retainers
aligned.
(2) Press applique firmly in place.
D-PILLAR AIR EXHAUSTER
REMOVAL
(1) Remove D-pillar applique, refer to (Refer to 23
- BODY/EXTERIOR/COWL GRILLE SCREEN -
REMOVAL).
(2) Carefully pry air exhauster from D-pillar using
a flat blade screwdriver (Fig. 5).
INSTALLATION
(1) Reseal air exhauster using foam tape.
(2) Install air exhauster on D-pillar.
(3) Install D-pillar applique, refer to (Refer to 23 -
BODY/EXTERIOR/COWL GRILLE SCREEN -
INSTALLATION).
AIR EXHAUSTER
REMOVAL
(1) Remove tail lamp, refer to (Refer to 8 - ELEC-
TRICAL/LAMPS/LIGHTING - EXTERIOR/TAIL
LAMP - REMOVAL).
(2) Using a trim stick, pry the top of the air
exhauster downward to detach the retaining clips.
(3) Separate air exhauster from vehicle (Fig. 5).
INSTALLATION
(1) Position air exhauster in opening.
(2) Press air exhauster inward to secure.
(3) Install tail lamp, refer to (Refer to 8 - ELEC-
TRICAL/LAMPS/LIGHTING - EXTERIOR/TAIL
LAMP - INSTALLATION).
Fig. 4 Cowl Cover
1 - PLASTIC NUT
2 - COWL COVER
Fig. 5 D-Pillar Applique & Air Exhauster
1 - D-PILLAR EXHAUSTER
2 - D-PILLAR APPLIQUE
3 - CLIP
4 - TAIL LAMP EXHAUSTER
WJEXTERIOR 23 - 27
Page 1910 of 2199

INSTRUMENT PANEL SYSTEM
REMOVAL
WARNING: ON VEHICLES EQUIPPED WITH AIR-
BAGS, DISABLE THE AIRBAG SYSTEM BEFORE
ATTEMPTING ANY STEERING WHEEL, STEERING
COLUMN, OR INSTRUMENT PANEL COMPONENT
DIAGNOSIS OR SERVICE. DISCONNECT AND ISO-
LATE THE BATTERY NEGATIVE (GROUND) CABLE,
THEN WAIT TWO MINUTES FOR THE AIRBAG SYS-
TEM CAPACITOR TO DISCHARGE BEFORE PER-
FORMING FURTHER DIAGNOSIS OR SERVICE. THIS
IS THE ONLY SURE WAY TO DISABLE THE AIRBAG
SYSTEM. FAILURE TO TAKE THE PROPER PRE-
CAUTIONS COULD RESULT IN ACCIDENTAL AIR-
BAG DEPLOYMENT AND POSSIBLE PERSONAL
INJURY.
NOTE: Before starting this procedure, be certain to
turn the steering wheel until the front wheels are in
the straight-ahead position.
(1) Disconnect and isolate the battery negative
cable.
(2) Remove the trim from the right and left A-pil-
lars. (Refer to 23 - BODY/INTERIOR/A-PILLAR
TRIM - REMOVAL).(3) Remove the top cover from the instrument
panel. (Refer to 23 - BODY/INSTRUMENT PANEL/
INSTRUMENT PANEL TOP COVER - REMOVAL).
(4) Remove the four nuts that secure the instru-
ment panel to the studs on the dash panel near the
windshield fence line (Fig. 1).
(5) Remove the scuff plates from the right and left
front door sills. (Refer to 23 - BODY/INTERIOR/
DOOR SILL SCUFF PLATE - REMOVAL).
(6) Remove the trim panels from the right and left
inner cowl sides. (Refer to 23 - BODY/INTERIOR/
COWL TRIM - REMOVAL).
(7) Remove the console from the floor panel trans-
mission tunnel. (Refer to 23 - BODY/INTERIOR/
FLOOR CONSOLE - REMOVAL).
(8) Remove the fuse cover from the Junction Block
(JB). (Refer to 8 - ELECTRICAL/POWER DISTRIBU-
TION/FUSE COVER - REMOVAL).
(9) Remove the cluster bezel from the instrument
panel. (Refer to 23 - BODY/INSTRUMENT PANEL/
CLUSTER BEZEL - REMOVAL).
(10) Remove the steering column opening cover
from the instrument panel. (Refer to 23 - BODY/IN-
STRUMENT PANEL/STEERING COLUMN OPEN-
ING COVER - REMOVAL).
(11) Remove the steering column bracket from the
instrument panel steering column support bracket.
(Refer to 23 - BODY/INSTRUMENT PANEL/IP
STEERING COLUMN BRACKET - REMOVAL).
Fig. 1 Instrument Panel to Dash Panel Mounting
1 - STUD (4)
2 - NUT (4)3 - INSTRUMENT PANEL
4 - DASH PANEL
WJINSTRUMENT PANEL SYSTEM 23 - 37
Page 1912 of 2199

(18) Remove the four nuts that secure the steering
column to the studs on the instrument panel steering
column support bracket.
(19) Remove the steering column from the instru-
ment panel. Be certain that the steering wheel is
locked and secured from rotation to prevent the loss
of clockspring centering.
(20) Disconnect the left and right body wire har-
ness connectors, the Ignition Off Draw (IOD) wire
harness connector and the fused B(+) wire harness
connector from the connector receptacles of the JB
(Fig. 5).(21) Disconnect the instrument panel wire harness
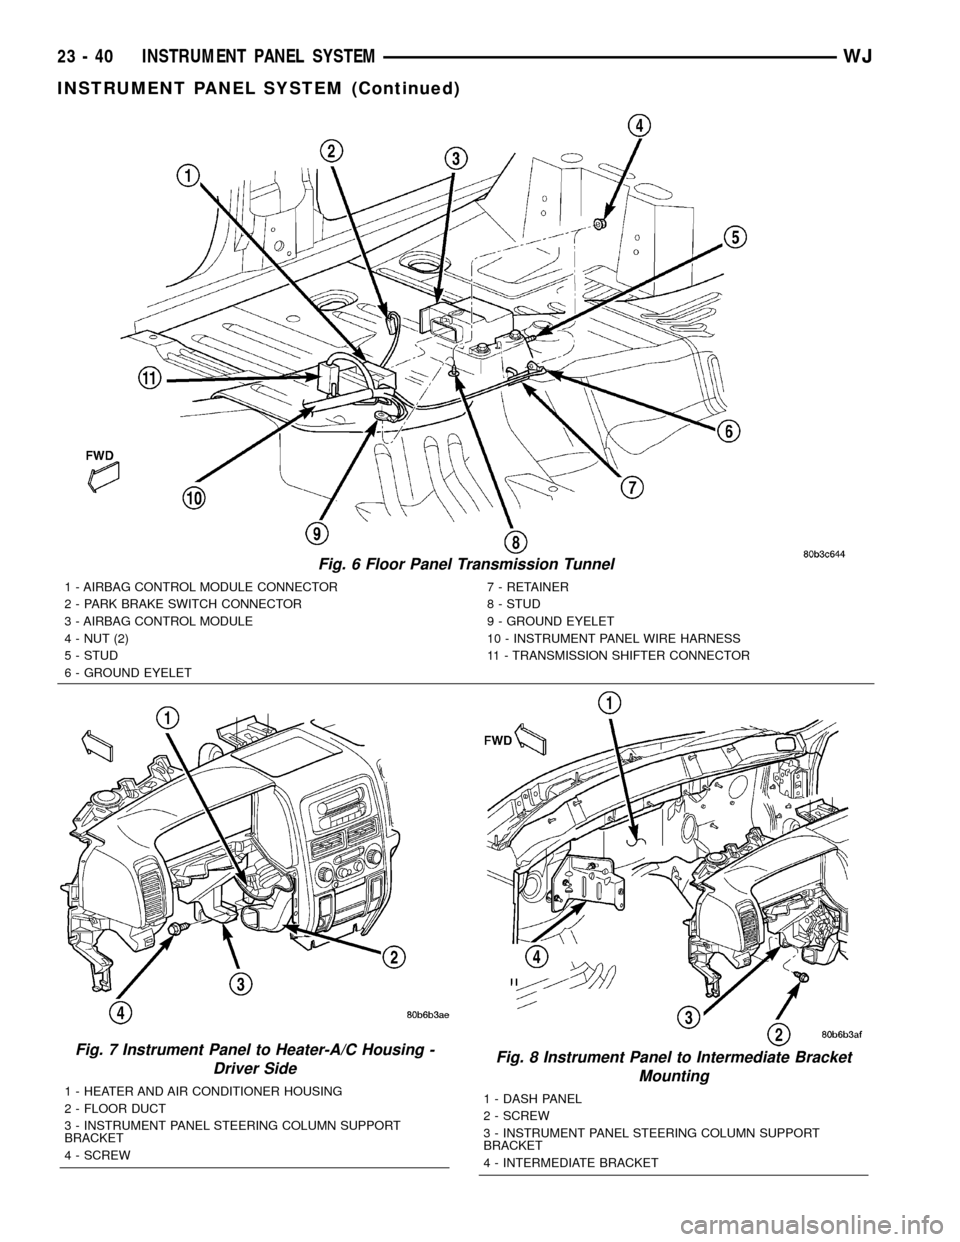
connectors from the following floor panel transmis-
sion tunnel components (Fig. 6):
²the Airbag Control Module (ACM) connector
receptacle
²the park brake switch terminal
²the transmission shifter connector receptacle.
(22) Remove the two nuts that secure the instru-
ment panel wire harness ground eyelets to the studs
on the floor panel transmission tunnel in front of and
behind the ACM.
(23) Disengage the retainers that secure the
instrument panel wire harness to the floor panel
transmission tunnel.
(24) Remove the instrument panel to center floor
tunnel bracket from the instrument panel and the
floor panel transmission tunnel. (Refer to 23 - BODY/
INSTRUMENT PANEL/IP CENTER FLOOR TUN-
NEL BRACKET - REMOVAL).
(25) Remove the one screw that secures the floor
duct to the heater and air conditioner housing near
the driver side of the floor panel transmission tunnel
and remove the duct from the housing.
(26) If the vehicle is equipped with the manual
heating and air conditioning system, disconnect the
vacuum harness connector located near the driver
side of the floor panel transmission tunnel behind
the driver side floor duct.
(27) Remove the one screw that secures the instru-
ment panel steering column support bracket to the
driver side end of the heater and air conditioner
housing (Fig. 7).
(28) Remove the one screw that secures the instru-
ment panel steering column support bracket to the
intermediate bracket on the driver side dash panel
(Fig. 8).
Fig. 5 Junction Block Connections
1 - SNAP CLIPS
2 - SCREW
3 - CONNECTOR
4 - LEFT BODY WIRE HARNESS
5 - IOD CONNECTOR
6 - FUSED B+ CONNECTOR
7 - RIGHT BODY WIRE HARNESS
8 - SCREW
9 - CONNECTOR
10 - JUNCTION BLOCK
WJINSTRUMENT PANEL SYSTEM 23 - 39
INSTRUMENT PANEL SYSTEM (Continued)
Page 1913 of 2199

Fig. 6 Floor Panel Transmission Tunnel
1 - AIRBAG CONTROL MODULE CONNECTOR
2 - PARK BRAKE SWITCH CONNECTOR
3 - AIRBAG CONTROL MODULE
4 - NUT (2)
5 - STUD
6 - GROUND EYELET7 - RETAINER
8 - STUD
9 - GROUND EYELET
10 - INSTRUMENT PANEL WIRE HARNESS
11 - TRANSMISSION SHIFTER CONNECTOR
Fig. 7 Instrument Panel to Heater-A/C Housing -
Driver Side
1 - HEATER AND AIR CONDITIONER HOUSING
2 - FLOOR DUCT
3 - INSTRUMENT PANEL STEERING COLUMN SUPPORT
BRACKET
4 - SCREW
Fig. 8 Instrument Panel to Intermediate Bracket
Mounting
1 - DASH PANEL
2 - SCREW
3 - INSTRUMENT PANEL STEERING COLUMN SUPPORT
BRACKET
4 - INTERMEDIATE BRACKET
23 - 40 INSTRUMENT PANEL SYSTEMWJ
INSTRUMENT PANEL SYSTEM (Continued)