2002 JEEP GRAND CHEROKEE 8W electric
[x] Cancel search: 8W electricPage 1794 of 2199
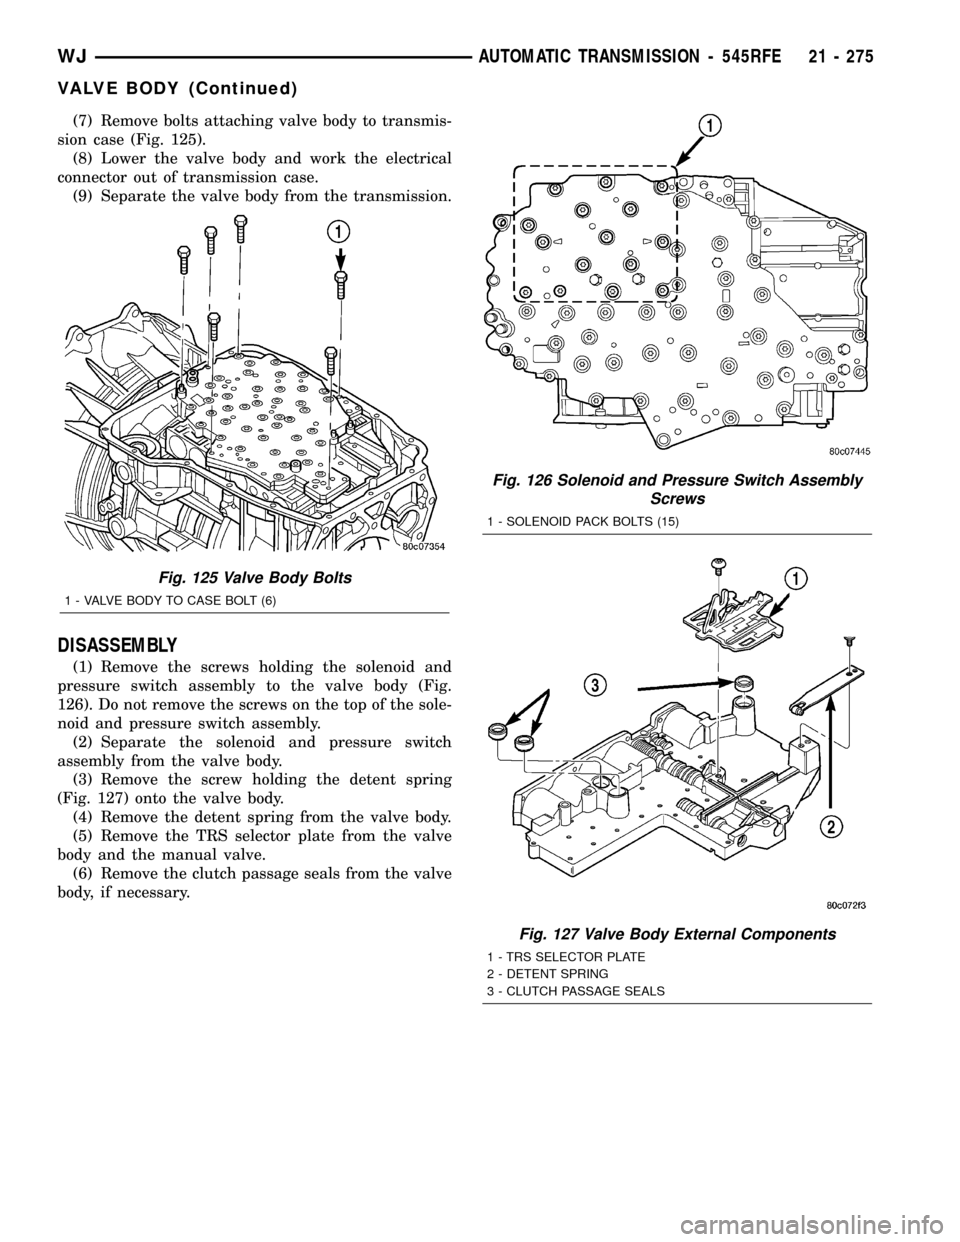
(7) Remove bolts attaching valve body to transmis-
sion case (Fig. 125).
(8) Lower the valve body and work the electrical
connector out of transmission case.
(9) Separate the valve body from the transmission.
DISASSEMBLY
(1) Remove the screws holding the solenoid and
pressure switch assembly to the valve body (Fig.
126). Do not remove the screws on the top of the sole-
noid and pressure switch assembly.
(2) Separate the solenoid and pressure switch
assembly from the valve body.
(3) Remove the screw holding the detent spring
(Fig. 127) onto the valve body.
(4) Remove the detent spring from the valve body.
(5) Remove the TRS selector plate from the valve
body and the manual valve.
(6) Remove the clutch passage seals from the valve
body, if necessary.
Fig. 125 Valve Body Bolts
1 - VALVE BODY TO CASE BOLT (6)
Fig. 126 Solenoid and Pressure Switch Assembly
Screws
1 - SOLENOID PACK BOLTS (15)
Fig. 127 Valve Body External Components
1 - TRS SELECTOR PLATE
2 - DETENT SPRING
3 - CLUTCH PASSAGE SEALS
WJAUTOMATIC TRANSMISSION - 545RFE 21 - 275
VALVE BODY (Continued)
Page 1796 of 2199

CLEANING
Clean the valve housings, valves, plugs, springs,
and separator plates with a standard parts cleaning
solution only. Do not use gasoline, kerosene, or any
type of caustic solution. (Fig. 131)
Do not immerse any of the electrical components in
cleaning solution. Clean the electrical components by
wiping them off with dry shop towels only.
Dry all except the electrical parts with compressed
air. Make sure all passages are clean and free from
obstructions.Do not use rags or shop towels to
dry or wipe off valve body components. Lint
from these materials can stick to valve body
parts, interfere with valve operation, and clog
filters and fluid passages.
INSPECTION
Inspect all of the valve body mating surfaces for
scratches, nicks, burrs, or distortion. Use a straight-edge to check surface flatness. Minor scratches may
be removed with crocus cloth using only very light
pressure.
Minor distortion of a valve body mating surface
may be corrected by smoothing the surface with a
sheet of crocus cloth. Position the crocus cloth on a
surface plate, sheet of plate glass or equally flat sur-
face. If distortion is severe or any surfaces are
heavily scored, the valve body will have to be
replaced.
Inspect the valves and plugs (Fig. 132) for
scratches, burrs, nicks, or scores. Minor surface
scratches on steel valves and plugs can be removed
with crocus cloth butdo not round off the edges
of the valve or plug lands.Maintaining sharpness
of these edges is vitally important. The edges prevent
foreign matter from lodging between the valves and
plugs and the bore.
Fig. 130 Valve Body Components
1 - SOLENOID SWITCH VALVE
2 - MANUAL VALVE
3 - LOW REVERSE SWITCH VALVE
4 - LOW REVERSE ACCUMULATOR
5 - 2ND CLUTCH ACCUMULATOR
6 - UNDERDRIVE ACCUMULATOR
7 - OVERDRIVE ACCUMULATOR
8 - 4TH CLUTCH ACCUMULATOR
9 - CHECK BALLS (7)
Fig. 131 Valve Body Components
1 - SOLENOID SWITCH VALVE
2 - MANUAL VALVE
3 - LOW REVERSE SWITCH VALVE
4 - LOW REVERSE ACCUMULATOR
5 - 2ND CLUTCH ACCUMULATOR
6 - UNDERDRIVE ACCUMULATOR
7 - OVERDRIVE ACCUMULATOR
8 - 4TH CLUTCH ACCUMULATOR
9 - CHECK BALLS (7)
WJAUTOMATIC TRANSMISSION - 545RFE 21 - 277
VALVE BODY (Continued)
Page 1873 of 2199
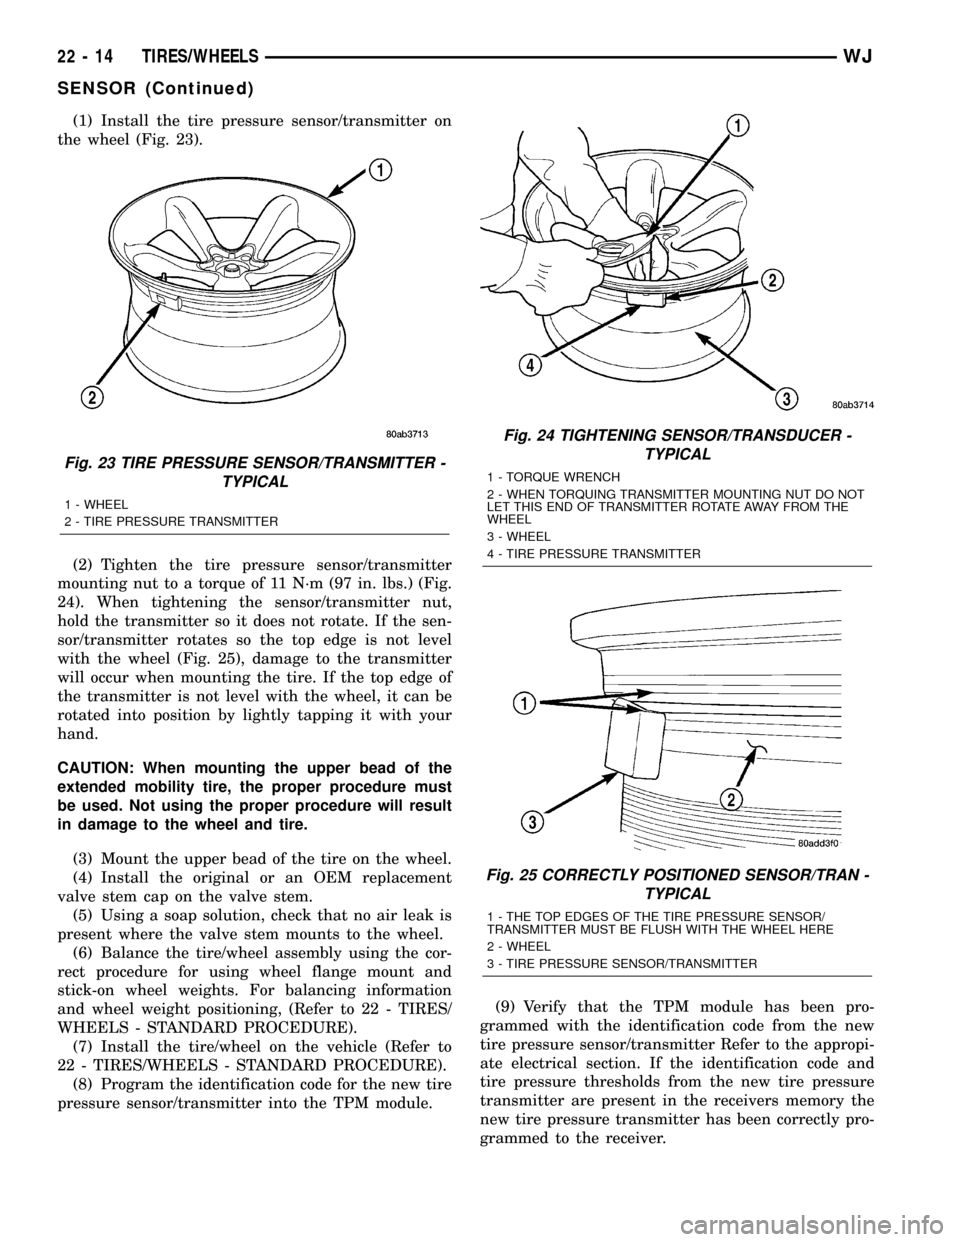
(1) Install the tire pressure sensor/transmitter on
the wheel (Fig. 23).
(2) Tighten the tire pressure sensor/transmitter
mounting nut to a torque of 11 N´m (97 in. lbs.) (Fig.
24). When tightening the sensor/transmitter nut,
hold the transmitter so it does not rotate. If the sen-
sor/transmitter rotates so the top edge is not level
with the wheel (Fig. 25), damage to the transmitter
will occur when mounting the tire. If the top edge of
the transmitter is not level with the wheel, it can be
rotated into position by lightly tapping it with your
hand.
CAUTION: When mounting the upper bead of the
extended mobility tire, the proper procedure must
be used. Not using the proper procedure will result
in damage to the wheel and tire.
(3) Mount the upper bead of the tire on the wheel.
(4) Install the original or an OEM replacement
valve stem cap on the valve stem.
(5) Using a soap solution, check that no air leak is
present where the valve stem mounts to the wheel.
(6) Balance the tire/wheel assembly using the cor-
rect procedure for using wheel flange mount and
stick-on wheel weights. For balancing information
and wheel weight positioning, (Refer to 22 - TIRES/
WHEELS - STANDARD PROCEDURE).
(7) Install the tire/wheel on the vehicle (Refer to
22 - TIRES/WHEELS - STANDARD PROCEDURE).
(8) Program the identification code for the new tire
pressure sensor/transmitter into the TPM module.(9) Verify that the TPM module has been pro-
grammed with the identification code from the new
tire pressure sensor/transmitter Refer to the appropi-
ate electrical section. If the identification code and
tire pressure thresholds from the new tire pressure
transmitter are present in the receivers memory the
new tire pressure transmitter has been correctly pro-
grammed to the receiver.
Fig. 23 TIRE PRESSURE SENSOR/TRANSMITTER -
TYPICAL
1 - WHEEL
2 - TIRE PRESSURE TRANSMITTER
Fig. 24 TIGHTENING SENSOR/TRANSDUCER -
TYPICAL
1 - TORQUE WRENCH
2 - WHEN TORQUING TRANSMITTER MOUNTING NUT DO NOT
LET THIS END OF TRANSMITTER ROTATE AWAY FROM THE
WHEEL
3 - WHEEL
4 - TIRE PRESSURE TRANSMITTER
Fig. 25 CORRECTLY POSITIONED SENSOR/TRAN -
TYPICAL
1 - THE TOP EDGES OF THE TIRE PRESSURE SENSOR/
TRANSMITTER MUST BE FLUSH WITH THE WHEEL HERE
2 - WHEEL
3 - TIRE PRESSURE SENSOR/TRANSMITTER
22 - 14 TIRES/WHEELSWJ
SENSOR (Continued)
Page 1874 of 2199

BODY
TABLE OF CONTENTS
page page
BODY
DIAGNOSIS AND TESTING
WATER LEAKS........................1
WIND NOISE..........................2
STANDARD PROCEDURE
STANDARD PROCEDURE - BODY
LUBRICATION.........................2
STANDARD PROCEDURE - DRILLING AND
WELDING............................3
SPECIFICATIONS
BODY LUBRICANTS....................3
SPECIFICATIONS - TORQUE.............4
SPECIAL TOOLS
BODY...............................4DECKLID/HATCH/LIFTGATE/TAILGATE........5
DOOR - FRONT.........................11
DOORS - REAR.........................19
EXTERIOR.............................25
HOOD.................................33
INSTRUMENT PANEL SYSTEM.............36
INTERIOR..............................69
PAINT.................................81
SEATS................................83
STATIONARY GLASS.....................93
SUNROOF.............................96
WEATHERSTRIP/SEALS..................105
BODY STRUCTURE.....................112
BODY
DIAGNOSIS AND TESTING
WATER LEAKS
Water leaks can be caused by poor sealing,
improper body component alignment, body seam
porosity, missing plugs, or blocked drain holes. Cen-
trifugal and gravitational force can cause water to
drip from a location away from the actual leak point,
making leak detection difficult. All body sealing
points should be water tight in normal wet-driving
conditions. Water flowing downward from the front of
the vehicle should not enter the passenger or luggage
compartment. Moving sealing surfaces will not
always seal water tight under all conditions. At
times, side glass or door seals will allow water to
enter the passenger compartment during high pres-
sure washing or hard driving rain (severe) condi-
tions. Overcompensating on door or glass
adjustments to stop a water leak that occurs under
severe conditions can cause premature seal wear and
excessive closing or latching effort. After completing
a repair, water test vehicle to verify leak has stopped
before returning vehicle to use.
VISUAL INSPECTION BEFORE WATER LEAK TESTS
Verify that floor and body plugs are in place, body
drains are clear, and body components are properly
aligned and sealed. If component alignment or seal-
ing is necessary, refer to the appropriate section of
this group for proper procedures.
WATER LEAK TESTS
WARNING: DO NOT USE ELECTRIC SHOP LIGHTS
OR TOOLS IN WATER TEST AREA. PERSONAL
INJURY CAN RESULT.
When the conditions causing a water leak have
been determined, simulate the conditions as closely
as possible.
²If a leak occurs with the vehicle parked in a
steady light rain, flood the leak area with an open-
ended garden hose.
²If a leak occurs while driving at highway speeds
in a steady rain, test the leak area with a reasonable
velocity stream or fan spray of water. Direct the
spray in a direction comparable to actual conditions.
²If a leak occurs when the vehicle is parked on an
incline, hoist the end or side of the vehicle to simu-
late this condition. This method can be used when
the leak occurs when the vehicle accelerates, stops or
turns. If the leak occurs on acceleration, hoist the
front of the vehicle. If the leak occurs when braking,
hoist the back of the vehicle. If the leak occurs on left
turns, hoist the left side of the vehicle. If the leak
occurs on right turns, hoist the right side of the vehi-
cle. For hoisting recommendations refer to Group 0,
Lubrication and Maintenance, General Information
section.
WATER LEAK DETECTION
To detect a water leak point-of-entry, do a water
test and watch for water tracks or droplets forming
on the inside of the vehicle. If necessary, remove inte-
rior trim covers or panels to gain visual access to the
WJBODY 23 - 1
Page 1876 of 2199
(2) Apply silicone lubricant to a cloth and wipe it
on door seals to avoid over-spray that can soil pas-
senger's clothing.
(3) Before applying lubricant, the component
should be wiped clean. After lubrication, any excess
lubricant should be removed.
(4) The hood latch, latch release mechanism, latch
striker, and safety latch should be lubricated period-
ically.
(5) The door lock cylinders should be lubricated
twice each year (preferably autumn and spring).
(a) Spray a small amount of lock cylinder lubri-
cant directly into the lock cylinder.
(b) Apply a small amount to the key and insert
it into the lock cylinder.
(c) Rotate it to the locked position and then back
to the unlocked position several times.(d) Remove the key. Wipe the lubricant from it
with a clean cloth to avoid soiling of clothing.
STANDARD PROCEDURE - DRILLING AND
WELDING
When holes must be drilled or punched in an inner
body panel, verify depth of space to the outer body
panel, electrical wiring, or other components. Dam-
age to vehicle can result.
Do not weld exterior panels unless combustible
material on the interior of vehicle is removed from
the repair area. Fire or hazardous conditions, can
result.
Always have a fire extinguisher ready for use when
welding.
SPECIFICATIONS
BODY LUBRICANTS
COMPONENT SERVICE INTERVAL LUBRICANT
Door Hinges As RequiredMulti-Purpose Grease NLGI GC-LB
(Water Resistant) (1)
Door Latches As RequiredMulti-Purpose Grease NLGI GC-LB
(Water Resistant) (1)
Hood Latch, Release Mechanism and
Safety LatchAs Required
(When Performing Other
Underhood Service)Multi-Purpose Grease NLGI GC-LB 2
EP (2)
Hood Hinges As Required Engine Oil
Seat Track and Release Mechanism As RequiredMulti-Purpose Grease NLGI GC-LB 2
EP (2)
Liftgate Hinge As RequiredMulti-Purpose Grease NLGI GC-LB 2
EP (2)
Liftgate Support Arms As Required Engine Oil
Liftgate Latches As Required White Spray Lubricant (3)
Liftgate Release Handle (Pivot and Slide
Contact Surfaces)As RequiredMulti-Purpose Grease NLGI GC-LB 2
EP (2)
Window System Components As Required White Spray Lubricant (3)
Lock Cylinders Twice a Year Lock-Cylinder Lubricant (4)
Parking Brake Mechanism As RequiredMulti-Purpose Grease NLGI GC-LB 2
EP (1)
1 = Mopar Wheel Bearing Grease (High
Temp)
2 = Mopar Multi-Mileage Lubricant
3 = Mopar Spray White Lube
4 = Mopar Lock Cylinder Lubricant
WJBODY 23 - 3
BODY (Continued)
Page 1880 of 2199

(4) Close flip up glass panel and verify proper
operation.
(5)
Install liftgate trim panel, refer to (Refer to 23 -
BODY/DECKLID/HATCH/LIFTGATE/TAILGATE/TRIM
PANEL - INSTALLATION).
FLIP-UP GLASS LATCH
STRIKER
REMOVAL
(1) Raise flip up glass panel.
(2) Mark the position of the handle/striker on the
glass panel.
(3) Remove the screws attaching the handle/striker
to the glass.
INSTALLATION
(1) Position the handle/striker on the glass panel
and align the reference marks.
(2) Install the screws attaching the handle/striker
to the glass panel. Tighten the fasteners to 6 N´m (60
in. lbs.).
FLIP-UP GLASS SWITCH
REMOVAL
(1) Remove license plate lamp housing/trim panel
from liftgate, refer to (Refer to 8 - ELECTRICAL/
LAMPS/LIGHTING - EXTERIOR/LICENSE PLATE
LAMP UNIT - REMOVAL).
(2) Squeeze the locking tabs inward to release the
switch from the housing.
(3) Disconnect the switch harness connector,
remove the switch from the housing.
INSTALLATION
(1) Install switch harness connector.(2) Position switch in housing, snap switch into
place.
(3) Install license plate lamp housing/trim panel
onto liftgate, refer to (Refer to 8 - ELECTRICAL/
LAMPS/LIGHTING - EXTERIOR/LICENSE PLATE
LAMP UNIT - INSTALLATION).
HINGE
REMOVAL
NOTE: It is not necessary to remove the liftgate to
replace one or both hinges. The hinges can be
replaced one at a time.
(1) Open the liftgate. Support the liftgate for ease
of repair.
(2) Remove the liftgate header trim panel.
(3) Mark the hinge location with a grease pencil or
other suitable device.
(4) Remove the hinge screws (Fig. 5).
(5) Remove hinge.
INSTALLATION
NOTE: It is not necessary to remove the liftgate to
replace one or both hinges. The hinges can be
replaced one at a time.
(1) Position the hinge on the roof panel and on the
liftgate. (Use 3MŸ Fast and Firm or equivalent on
the hinge to body mating surfaces as a sealant.
(2) Install and tighten hinge screws at roof panel
to 28N´m (21 ft. lbs.).
(3) Install hinge screws at liftgate. Tighten screws
to 28N´m (21 ft. lbs.).
(4) Install liftgate header trim panel.
(5) Check the liftgate for proper alignment and
operation.
WJDECKLID/HATCH/LIFTGATE/TAILGATE 23 - 7
FLIP-UP GLASS LATCH (Continued)
Page 1881 of 2199
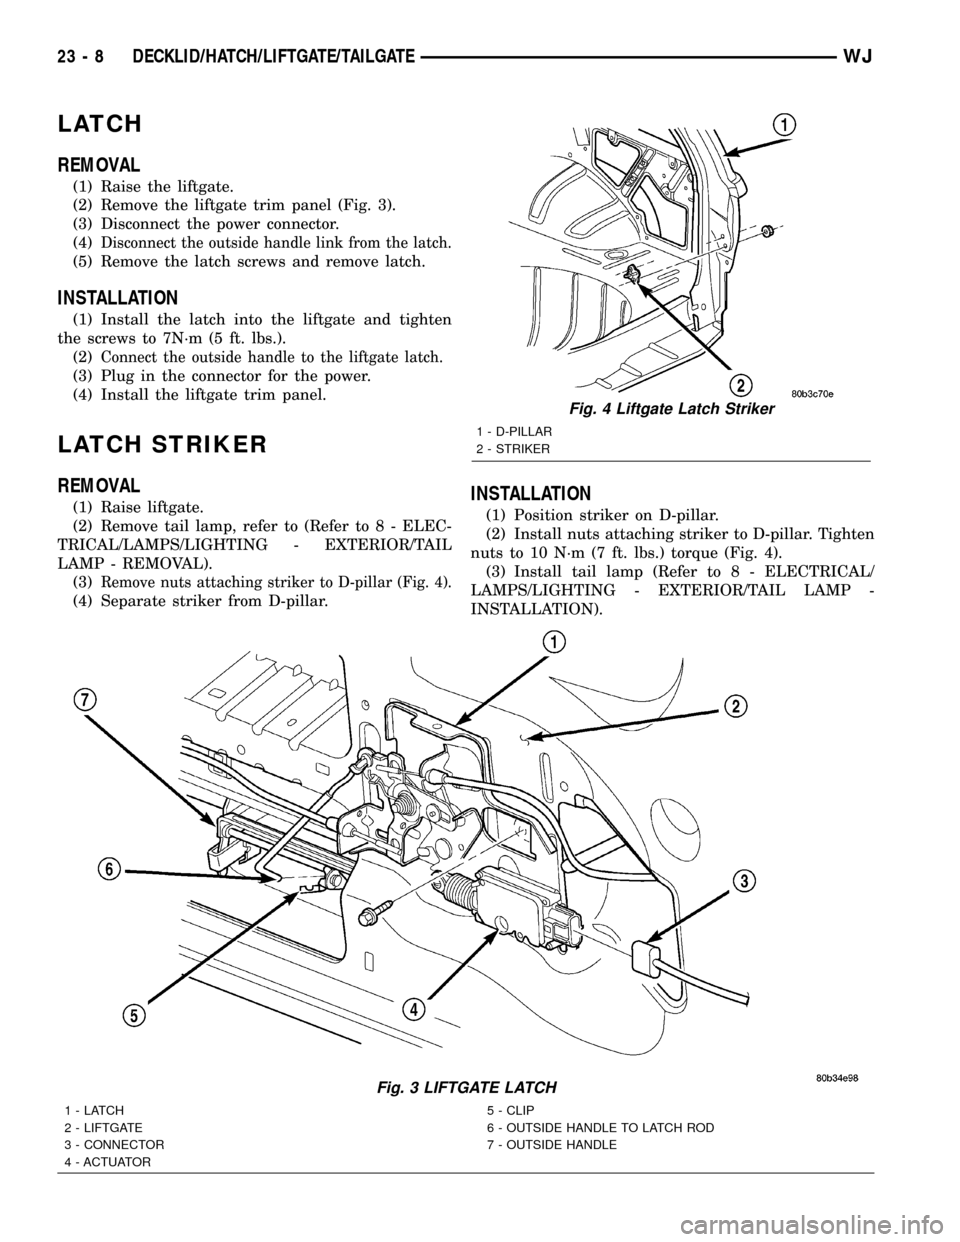
LATCH
REMOVAL
(1) Raise the liftgate.
(2) Remove the liftgate trim panel (Fig. 3).
(3) Disconnect the power connector.
(4)
Disconnect the outside handle link from the latch.
(5) Remove the latch screws and remove latch.
INSTALLATION
(1) Install the latch into the liftgate and tighten
the screws to 7N´m (5 ft. lbs.).
(2)
Connect the outside handle to the liftgate latch.
(3) Plug in the connector for the power.
(4) Install the liftgate trim panel.
LATCH STRIKER
REMOVAL
(1) Raise liftgate.
(2) Remove tail lamp, refer to (Refer to 8 - ELEC-
TRICAL/LAMPS/LIGHTING - EXTERIOR/TAIL
LAMP - REMOVAL).
(3)
Remove nuts attaching striker to D-pillar (Fig. 4).
(4) Separate striker from D-pillar.
INSTALLATION
(1) Position striker on D-pillar.
(2) Install nuts attaching striker to D-pillar. Tighten
nuts to 10 N´m (7 ft. lbs.) torque (Fig. 4).
(3) Install tail lamp (Refer to 8 - ELECTRICAL/
LAMPS/LIGHTING - EXTERIOR/TAIL LAMP -
INSTALLATION).
Fig. 3 LIFTGATE LATCH
1-LATCH
2 - LIFTGATE
3 - CONNECTOR
4 - ACTUATOR5 - CLIP
6 - OUTSIDE HANDLE TO LATCH ROD
7 - OUTSIDE HANDLE
Fig. 4 Liftgate Latch Striker
1 - D-PILLAR
2 - STRIKER
23 - 8 DECKLID/HATCH/LIFTGATE/TAILGATEWJ
Page 1900 of 2199
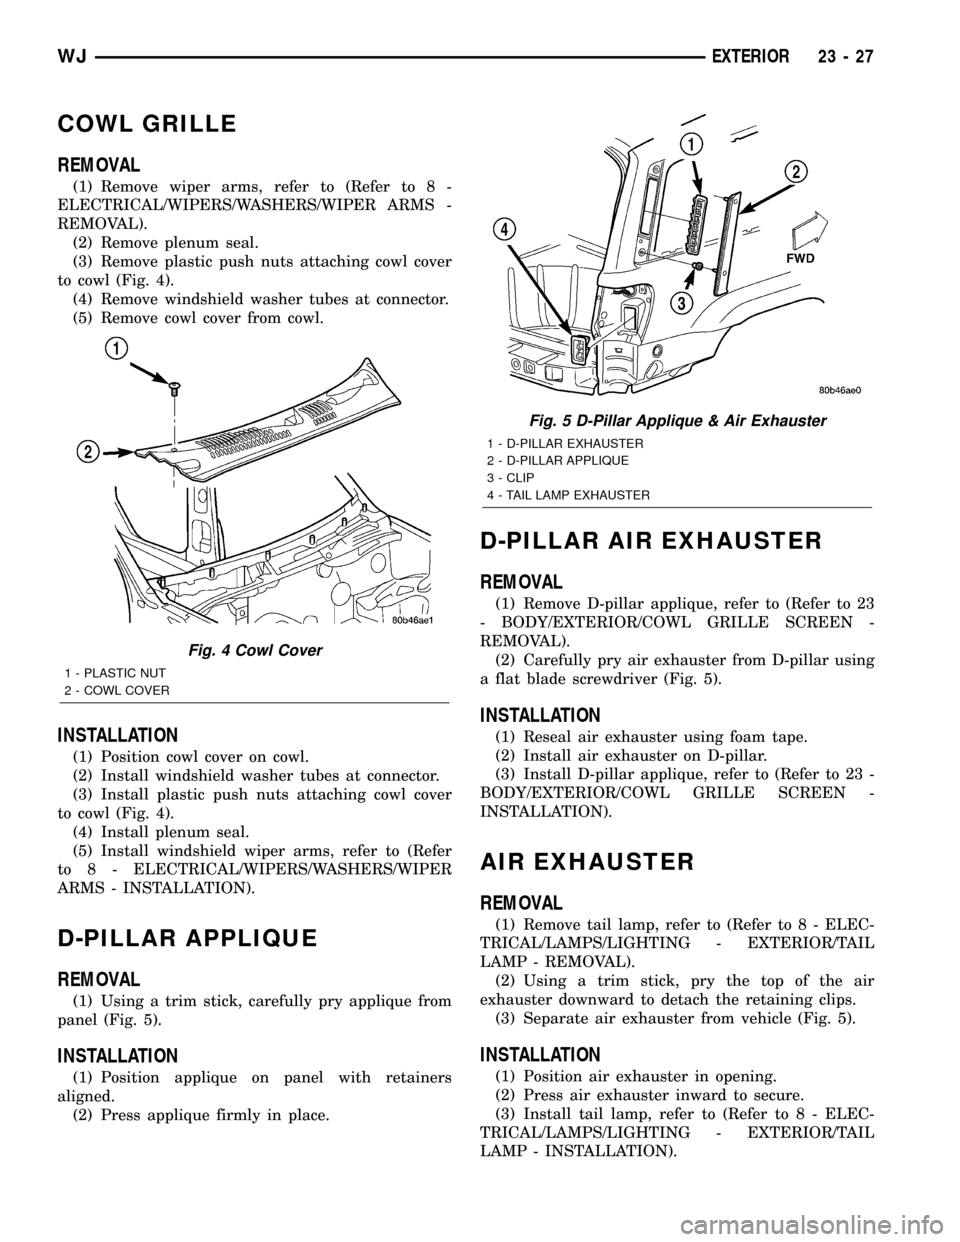
COWL GRILLE
REMOVAL
(1) Remove wiper arms, refer to (Refer to 8 -
ELECTRICAL/WIPERS/WASHERS/WIPER ARMS -
REMOVAL).
(2) Remove plenum seal.
(3) Remove plastic push nuts attaching cowl cover
to cowl (Fig. 4).
(4) Remove windshield washer tubes at connector.
(5) Remove cowl cover from cowl.
INSTALLATION
(1) Position cowl cover on cowl.
(2) Install windshield washer tubes at connector.
(3) Install plastic push nuts attaching cowl cover
to cowl (Fig. 4).
(4) Install plenum seal.
(5) Install windshield wiper arms, refer to (Refer
to 8 - ELECTRICAL/WIPERS/WASHERS/WIPER
ARMS - INSTALLATION).
D-PILLAR APPLIQUE
REMOVAL
(1) Using a trim stick, carefully pry applique from
panel (Fig. 5).
INSTALLATION
(1) Position applique on panel with retainers
aligned.
(2) Press applique firmly in place.
D-PILLAR AIR EXHAUSTER
REMOVAL
(1) Remove D-pillar applique, refer to (Refer to 23
- BODY/EXTERIOR/COWL GRILLE SCREEN -
REMOVAL).
(2) Carefully pry air exhauster from D-pillar using
a flat blade screwdriver (Fig. 5).
INSTALLATION
(1) Reseal air exhauster using foam tape.
(2) Install air exhauster on D-pillar.
(3) Install D-pillar applique, refer to (Refer to 23 -
BODY/EXTERIOR/COWL GRILLE SCREEN -
INSTALLATION).
AIR EXHAUSTER
REMOVAL
(1) Remove tail lamp, refer to (Refer to 8 - ELEC-
TRICAL/LAMPS/LIGHTING - EXTERIOR/TAIL
LAMP - REMOVAL).
(2) Using a trim stick, pry the top of the air
exhauster downward to detach the retaining clips.
(3) Separate air exhauster from vehicle (Fig. 5).
INSTALLATION
(1) Position air exhauster in opening.
(2) Press air exhauster inward to secure.
(3) Install tail lamp, refer to (Refer to 8 - ELEC-
TRICAL/LAMPS/LIGHTING - EXTERIOR/TAIL
LAMP - INSTALLATION).
Fig. 4 Cowl Cover
1 - PLASTIC NUT
2 - COWL COVER
Fig. 5 D-Pillar Applique & Air Exhauster
1 - D-PILLAR EXHAUSTER
2 - D-PILLAR APPLIQUE
3 - CLIP
4 - TAIL LAMP EXHAUSTER
WJEXTERIOR 23 - 27