2002 JEEP GRAND CHEROKEE rear diff fluid
[x] Cancel search: rear diff fluidPage 1584 of 2199
(8) Engine starts must be possible with shifter
lever in PARK or NEUTRAL gate positions only.
Engine starts must not be possible in any other gate
positions other than PARK or NEUTRAL.
(9) With shifter lever handle push-button not
depressed and lever detent in:
²PARK position- apply forward force on center of
handle and remove pressure. Engine start must be
possible.
²PARK position- apply rearward force on center
of handle and remove pressure. Engine start must be
possible.
²NEUTRAL position- engine start must be possi-
ble.
²NEUTRAL position, engine running and brakes
applied- Apply forward force on center of shift han-
dle. Transmission should not be able to shift into
REVERSE detent.
ELECTRONIC GOVERNOR
DESCRIPTION
Governor pressure is controlled electronically. Com-
ponents used for governor pressure control include:
²Governor body
²Valve body transfer plate
²Governor pressure solenoid valve
²Governor pressure sensor
²Fluid temperature thermistor
²Throttle position sensor (TPS)
²Transmission speed sensor
²Powertrain control module (PCM)
GOVERNOR PRESSURE SOLENOID VALVE
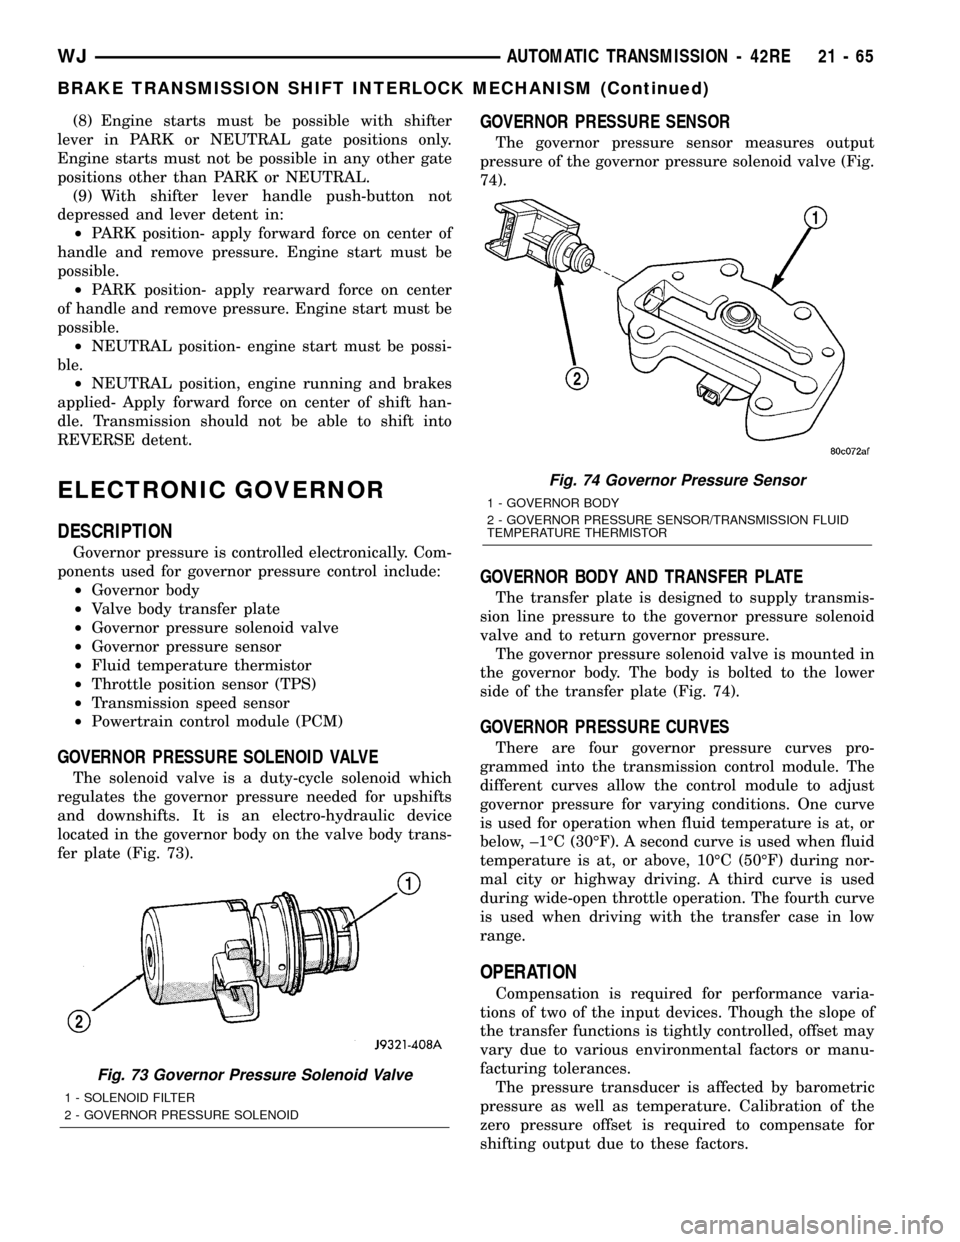
The solenoid valve is a duty-cycle solenoid which
regulates the governor pressure needed for upshifts
and downshifts. It is an electro-hydraulic device
located in the governor body on the valve body trans-
fer plate (Fig. 73).
GOVERNOR PRESSURE SENSOR
The governor pressure sensor measures output
pressure of the governor pressure solenoid valve (Fig.
74).
GOVERNOR BODY AND TRANSFER PLATE
The transfer plate is designed to supply transmis-
sion line pressure to the governor pressure solenoid
valve and to return governor pressure.
The governor pressure solenoid valve is mounted in
the governor body. The body is bolted to the lower
side of the transfer plate (Fig. 74).
GOVERNOR PRESSURE CURVES
There are four governor pressure curves pro-
grammed into the transmission control module. The
different curves allow the control module to adjust
governor pressure for varying conditions. One curve
is used for operation when fluid temperature is at, or
below, ±1ÉC (30ÉF). A second curve is used when fluid
temperature is at, or above, 10ÉC (50ÉF) during nor-
mal city or highway driving. A third curve is used
during wide-open throttle operation. The fourth curve
is used when driving with the transfer case in low
range.
OPERATION
Compensation is required for performance varia-
tions of two of the input devices. Though the slope of
the transfer functions is tightly controlled, offset may
vary due to various environmental factors or manu-
facturing tolerances.
The pressure transducer is affected by barometric
pressure as well as temperature. Calibration of the
zero pressure offset is required to compensate for
shifting output due to these factors.
Fig. 73 Governor Pressure Solenoid Valve
1 - SOLENOID FILTER
2 - GOVERNOR PRESSURE SOLENOID
Fig. 74 Governor Pressure Sensor
1 - GOVERNOR BODY
2 - GOVERNOR PRESSURE SENSOR/TRANSMISSION FLUID
TEMPERATURE THERMISTOR
WJAUTOMATIC TRANSMISSION - 42RE 21 - 65
BRAKE TRANSMISSION SHIFT INTERLOCK MECHANISM (Continued)
Page 1606 of 2199
DIAGNOSIS AND TESTING - OVERDRIVE
ELECTRICAL CONTROLS
The overdrive off switch, valve body solenoid, case
connectors and related wiring can all be tested with
a 12 volt test lamp or a volt/ohmmeter. Check conti-
nuity of each component when diagnosis indicates
this is necessary.
Switch and solenoid continuity should be checked
whenever the transmission fails to shift into fourth
gear range.
OVERDRIVE UNIT
REMOVAL
(1) Shift transmission into PARK.
(2) Raise vehicle.
(3) Remove transfer case, if equipped.
(4) Mark propeller shaft universal joint(s) and axle
pinion yoke, or the companion flange and flange
yoke, for alignment reference at installation, if necc-
esary.
(5) Disconnect and remove the rear propeller shaft,
if necessary. (Refer to 3 - DIFFERENTIAL & DRIV-
ELINE/PROPELLER SHAFT/PROPELLER SHAFT -
REMOVAL)
(6) Remove transmission oil pan, remove gasket,
drain oil and reinstall pan.
(7) If overdrive unit had malfunctioned, or if fluid
is contaminated, remove entire transmission. If diag-
nosis indicated overdrive problems only, remove just
the overdrive unit.
(8) Support transmission with transmission jack.
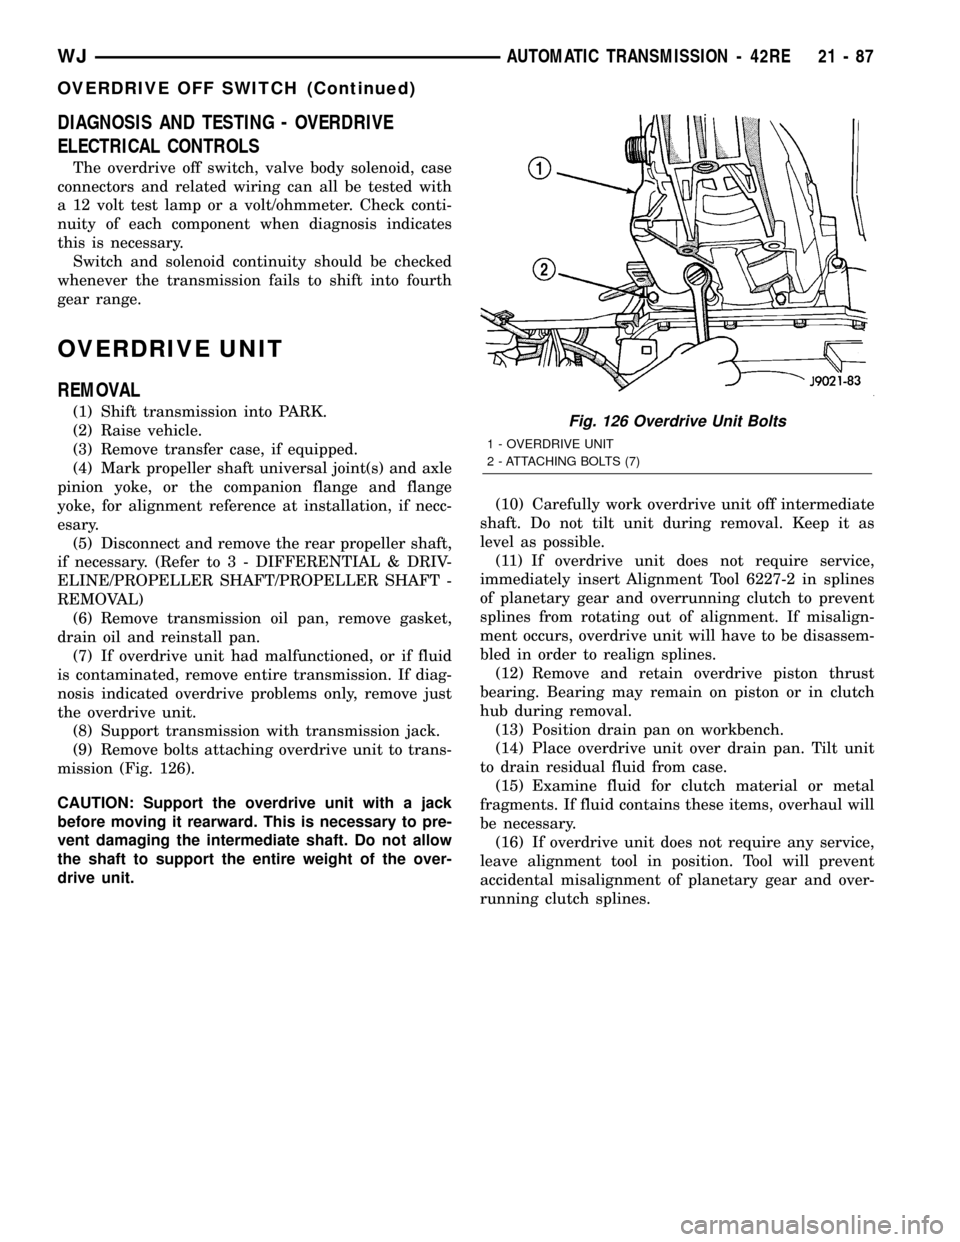
(9) Remove bolts attaching overdrive unit to trans-
mission (Fig. 126).
CAUTION: Support the overdrive unit with a jack
before moving it rearward. This is necessary to pre-
vent damaging the intermediate shaft. Do not allow
the shaft to support the entire weight of the over-
drive unit.(10) Carefully work overdrive unit off intermediate
shaft. Do not tilt unit during removal. Keep it as
level as possible.
(11) If overdrive unit does not require service,
immediately insert Alignment Tool 6227-2 in splines
of planetary gear and overrunning clutch to prevent
splines from rotating out of alignment. If misalign-
ment occurs, overdrive unit will have to be disassem-
bled in order to realign splines.
(12) Remove and retain overdrive piston thrust
bearing. Bearing may remain on piston or in clutch
hub during removal.
(13) Position drain pan on workbench.
(14) Place overdrive unit over drain pan. Tilt unit
to drain residual fluid from case.
(15) Examine fluid for clutch material or metal
fragments. If fluid contains these items, overhaul will
be necessary.
(16) If overdrive unit does not require any service,
leave alignment tool in position. Tool will prevent
accidental misalignment of planetary gear and over-
running clutch splines.Fig. 126 Overdrive Unit Bolts
1 - OVERDRIVE UNIT
2 - ATTACHING BOLTS (7)
WJAUTOMATIC TRANSMISSION - 42RE 21 - 87
OVERDRIVE OFF SWITCH (Continued)
Page 1632 of 2199
INSPECTION
Check sun gear and driving shell condition.
Replace the gear if damaged or if the bushings are
scored or worn. The bushings are not serviceable.
Replace the driving shell if worn, cracked or dam-
aged.Replace planetary gear sets if gears, pinion pins, or
carrier are damaged in any way. Replace the annulus
gears and supports if either component is worn or
damaged.
Inspect the geartrain spacers, thrust plates, snap-
rings, and thrust washers. Replace any of these parts
that are worn, distorted or damaged. Do not attempt
to reuse these parts.
The planetary gear thrust washers are different
sizes. The large diameter washers go on the front
planetary and the smaller washers go on the rear
planetary. All the washers have four locating tabs on
them. These tabs fit in the holes or slots provided in
each planetary gear.
Inspect the output shaft carefully. Pay particular
attention to the machined bushing/bearing surfaces
on the shaft and the governor valve shaft bore at the
shaft rear.
Replace the output shaft if the machined surfaces
are scored, pitted, or damaged in any way. Also
replace the shaft if the splines are damaged, or
exhibits cracks at any location (especially at the gov-
ernor valve shaft bore).
The annulus gears can be removed from their sup-
ports if necessary. Just remove the snap-rings and
separate the two parts when replacement is neces-
sary. In addition, the annulus gear bushings can be
replaced if severely worn, or scored. However it is not
necessary to replace the bushings if they only exhibit
normal wear. Check bushing fit on the output shaft
to be sure.
ASSEMBLY
(1) Lubricate output shaft and planetary compo-
nents with transmission fluid. Use petroleum jelly to
lubricate and hold thrust washers and plates in posi-
tion.
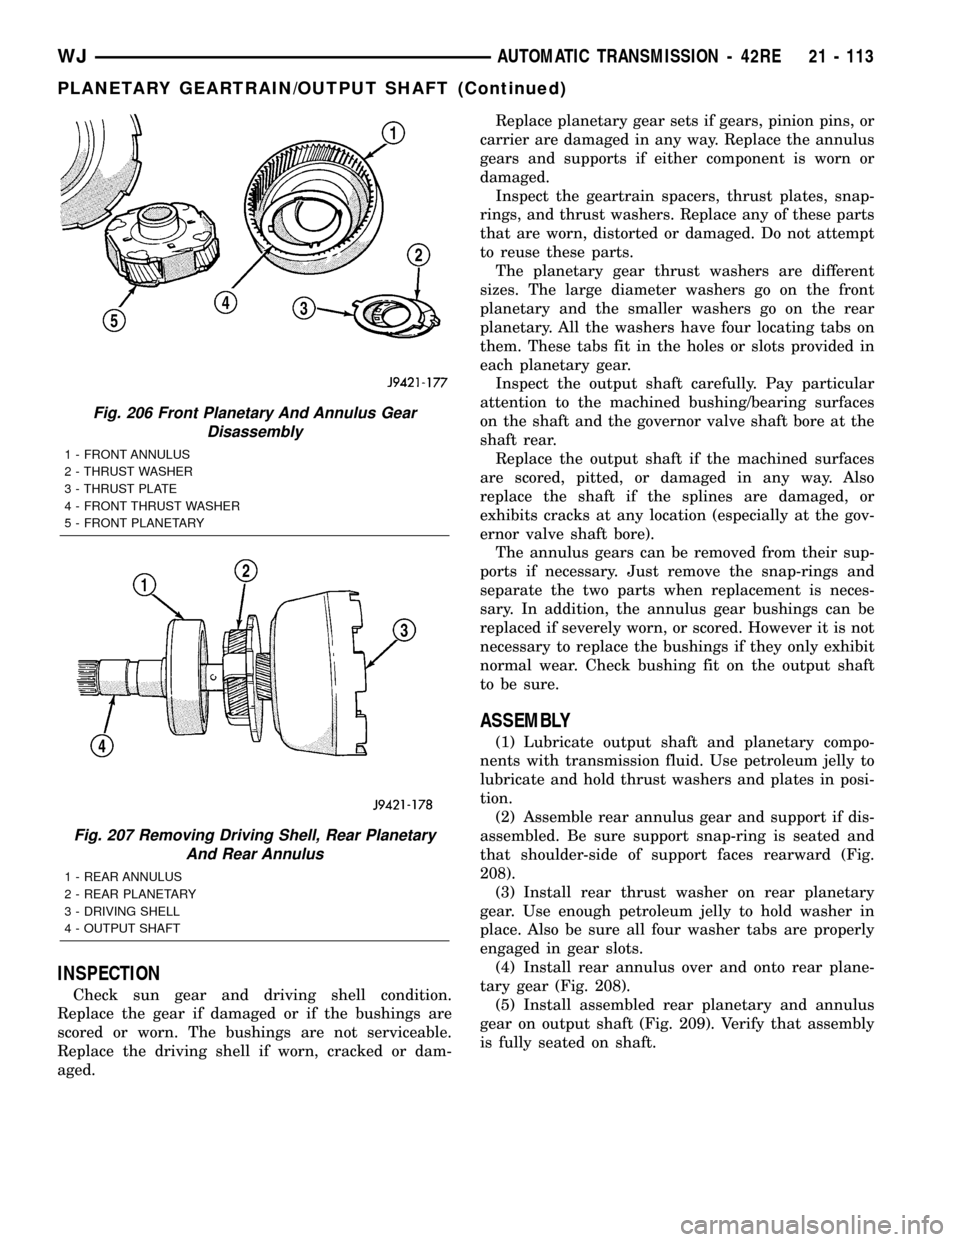
(2) Assemble rear annulus gear and support if dis-
assembled. Be sure support snap-ring is seated and
that shoulder-side of support faces rearward (Fig.
208).
(3) Install rear thrust washer on rear planetary
gear. Use enough petroleum jelly to hold washer in
place. Also be sure all four washer tabs are properly
engaged in gear slots.
(4) Install rear annulus over and onto rear plane-
tary gear (Fig. 208).
(5) Install assembled rear planetary and annulus
gear on output shaft (Fig. 209). Verify that assembly
is fully seated on shaft.
Fig. 206 Front Planetary And Annulus Gear
Disassembly
1 - FRONT ANNULUS
2 - THRUST WASHER
3 - THRUST PLATE
4 - FRONT THRUST WASHER
5 - FRONT PLANETARY
Fig. 207 Removing Driving Shell, Rear Planetary
And Rear Annulus
1 - REAR ANNULUS
2 - REAR PLANETARY
3 - DRIVING SHELL
4 - OUTPUT SHAFT
WJAUTOMATIC TRANSMISSION - 42RE 21 - 113
PLANETARY GEARTRAIN/OUTPUT SHAFT (Continued)
Page 1701 of 2199
NOTE: The 545RFE utilizes closed loop control of
pump line pressure. The pressure readings may
therefore vary greatly but should always follow line
pressure.
Some common pressures that can be measured to
evaluate pump and clutch performance are the
upshift/downshift pressures and the garage shift
pressures. The upshift/downshift pressure for all
shifts except the 4-5 shift is 120 psi. The upshift
pressure for the 4-5 shift is 130 psi. The garage shift
pressure when performing a N-R shift is 220 psi. The
garage shift pressure for the R-N and N-1 shifts is
120 psi.
DIAGNOSIS AND TESTING - AIR CHECKING
TRANSMISSION CLUTCH OPERATION
Air-pressure testing can be used to check transmis-
sion clutch operation. The test can be conducted with
the transmission either in the vehicle or on the work
bench, as a final check.
Air-pressure testing requires that the oil pan and
valve body be removed from the transmission. The
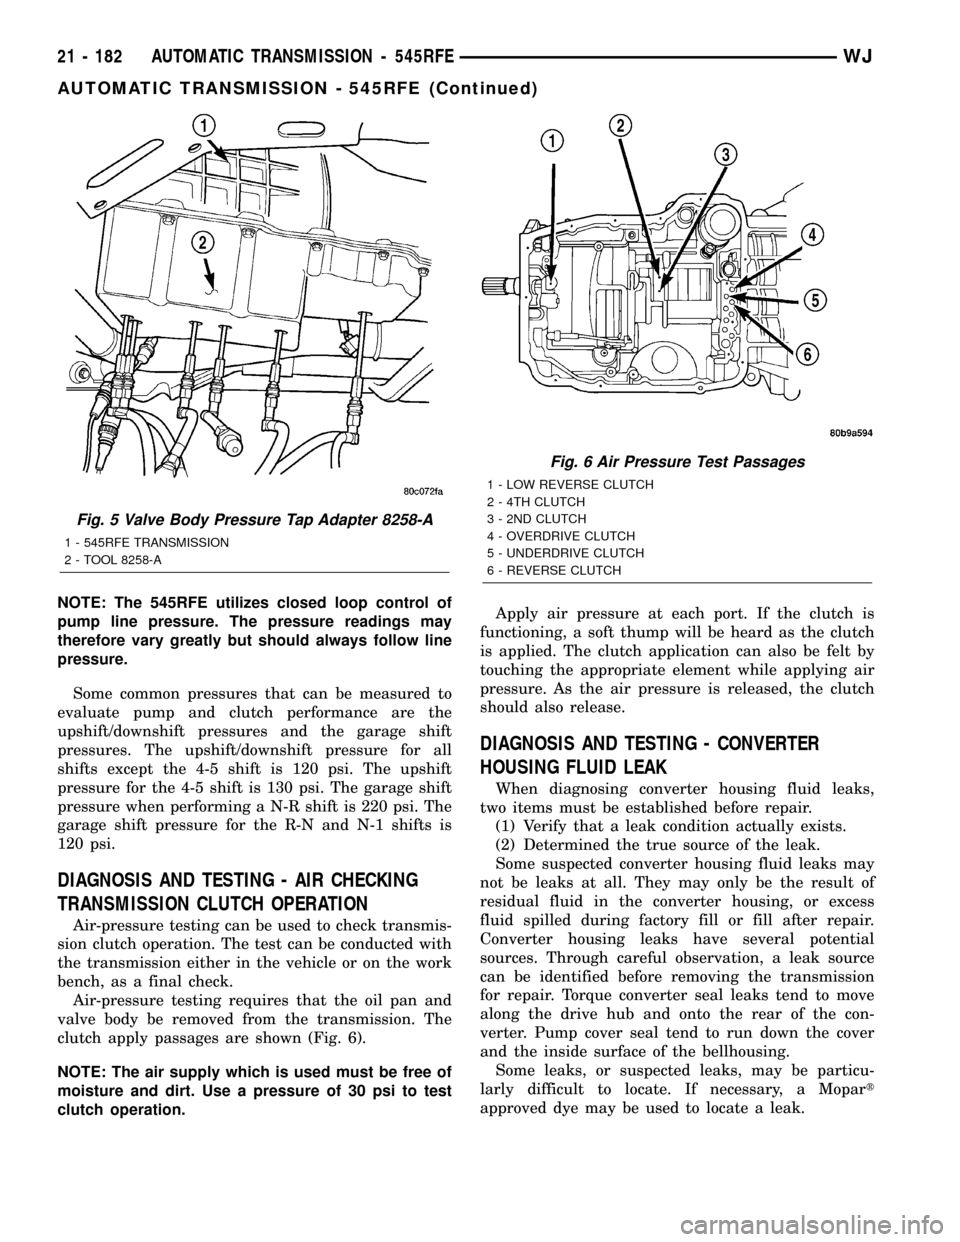
clutch apply passages are shown (Fig. 6).
NOTE: The air supply which is used must be free of
moisture and dirt. Use a pressure of 30 psi to test
clutch operation.Apply air pressure at each port. If the clutch is
functioning, a soft thump will be heard as the clutch
is applied. The clutch application can also be felt by
touching the appropriate element while applying air
pressure. As the air pressure is released, the clutch
should also release.
DIAGNOSIS AND TESTING - CONVERTER
HOUSING FLUID LEAK
When diagnosing converter housing fluid leaks,
two items must be established before repair.
(1) Verify that a leak condition actually exists.
(2) Determined the true source of the leak.
Some suspected converter housing fluid leaks may
not be leaks at all. They may only be the result of
residual fluid in the converter housing, or excess
fluid spilled during factory fill or fill after repair.
Converter housing leaks have several potential
sources. Through careful observation, a leak source
can be identified before removing the transmission
for repair. Torque converter seal leaks tend to move
along the drive hub and onto the rear of the con-
verter. Pump cover seal tend to run down the cover
and the inside surface of the bellhousing.
Some leaks, or suspected leaks, may be particu-
larly difficult to locate. If necessary, a Mopart
approved dye may be used to locate a leak.
Fig. 5 Valve Body Pressure Tap Adapter 8258-A
1 - 545RFE TRANSMISSION
2 - TOOL 8258-A
Fig. 6 Air Pressure Test Passages
1 - LOW REVERSE CLUTCH
2 - 4TH CLUTCH
3 - 2ND CLUTCH
4 - OVERDRIVE CLUTCH
5 - UNDERDRIVE CLUTCH
6 - REVERSE CLUTCH
21 - 182 AUTOMATIC TRANSMISSION - 545RFEWJ
AUTOMATIC TRANSMISSION - 545RFE (Continued)
Page 1799 of 2199
TRANSFER CASE - NV242
TABLE OF CONTENTS
page page
TRANSFER CASE - NV242
DESCRIPTION........................280
OPERATION..........................281
DIAGNOSIS AND TESTING - TRANSFER
CASE - NV242.......................281
REMOVAL............................282
DISASSEMBLY........................282
CLEANING...........................292
INSPECTION.........................293
ASSEMBLY...........................295
INSTALLATION........................307
SPECIFICATIONS
TRANSFER CASE - NV242.............308
SPECIAL TOOLS
TRANSFER CASE - NV242.............308
FLUID
STANDARD PROCEDURE - FLUID DRAIN/
REFILL............................310FRONT OUTPUT SHAFT SEAL
REMOVAL............................310
INSTALLATION........................310
POSITION SENSOR
DESCRIPTION........................311
OPERATION..........................311
REMOVAL............................312
INSTALLATION........................312
REAR RETAINER BUSHING AND SEAL -
NV242HD
REMOVAL............................312
INSTALLATION........................312
SHIFT CABLE
REMOVAL............................313
INSTALLATION........................313
TRANSFER CASE - NV242
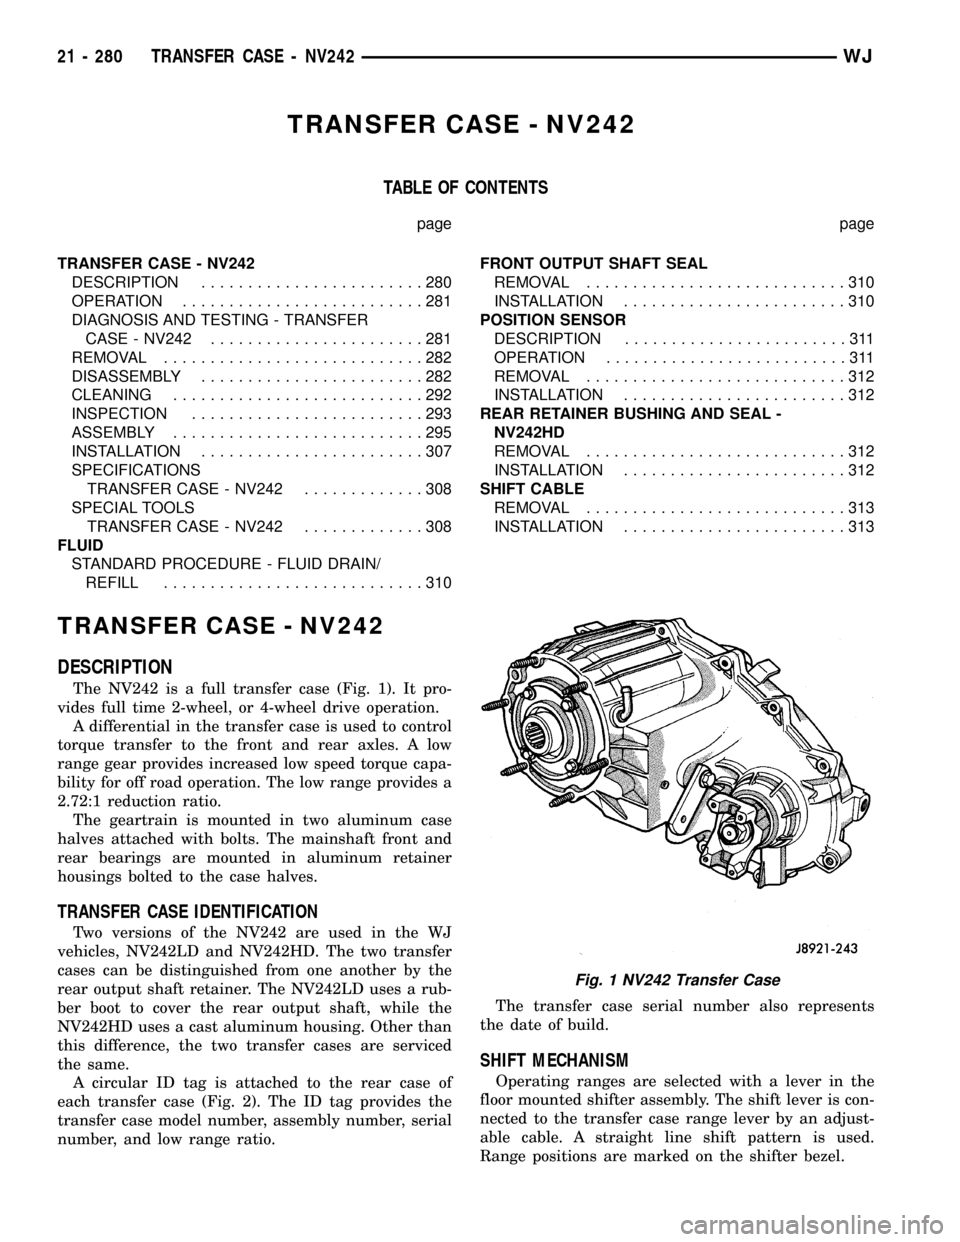
DESCRIPTION
The NV242 is a full transfer case (Fig. 1). It pro-
vides full time 2-wheel, or 4-wheel drive operation.
A differential in the transfer case is used to control
torque transfer to the front and rear axles. A low
range gear provides increased low speed torque capa-
bility for off road operation. The low range provides a
2.72:1 reduction ratio.
The geartrain is mounted in two aluminum case
halves attached with bolts. The mainshaft front and
rear bearings are mounted in aluminum retainer
housings bolted to the case halves.
TRANSFER CASE IDENTIFICATION
Two versions of the NV242 are used in the WJ
vehicles, NV242LD and NV242HD. The two transfer
cases can be distinguished from one another by the
rear output shaft retainer. The NV242LD uses a rub-
ber boot to cover the rear output shaft, while the
NV242HD uses a cast aluminum housing. Other than
this difference, the two transfer cases are serviced
the same.
A circular ID tag is attached to the rear case of
each transfer case (Fig. 2). The ID tag provides the
transfer case model number, assembly number, serial
number, and low range ratio.The transfer case serial number also represents
the date of build.
SHIFT MECHANISM
Operating ranges are selected with a lever in the
floor mounted shifter assembly. The shift lever is con-
nected to the transfer case range lever by an adjust-
able cable. A straight line shift pattern is used.
Range positions are marked on the shifter bezel.
Fig. 1 NV242 Transfer Case
21 - 280 TRANSFER CASE - NV242WJ
Page 1818 of 2199
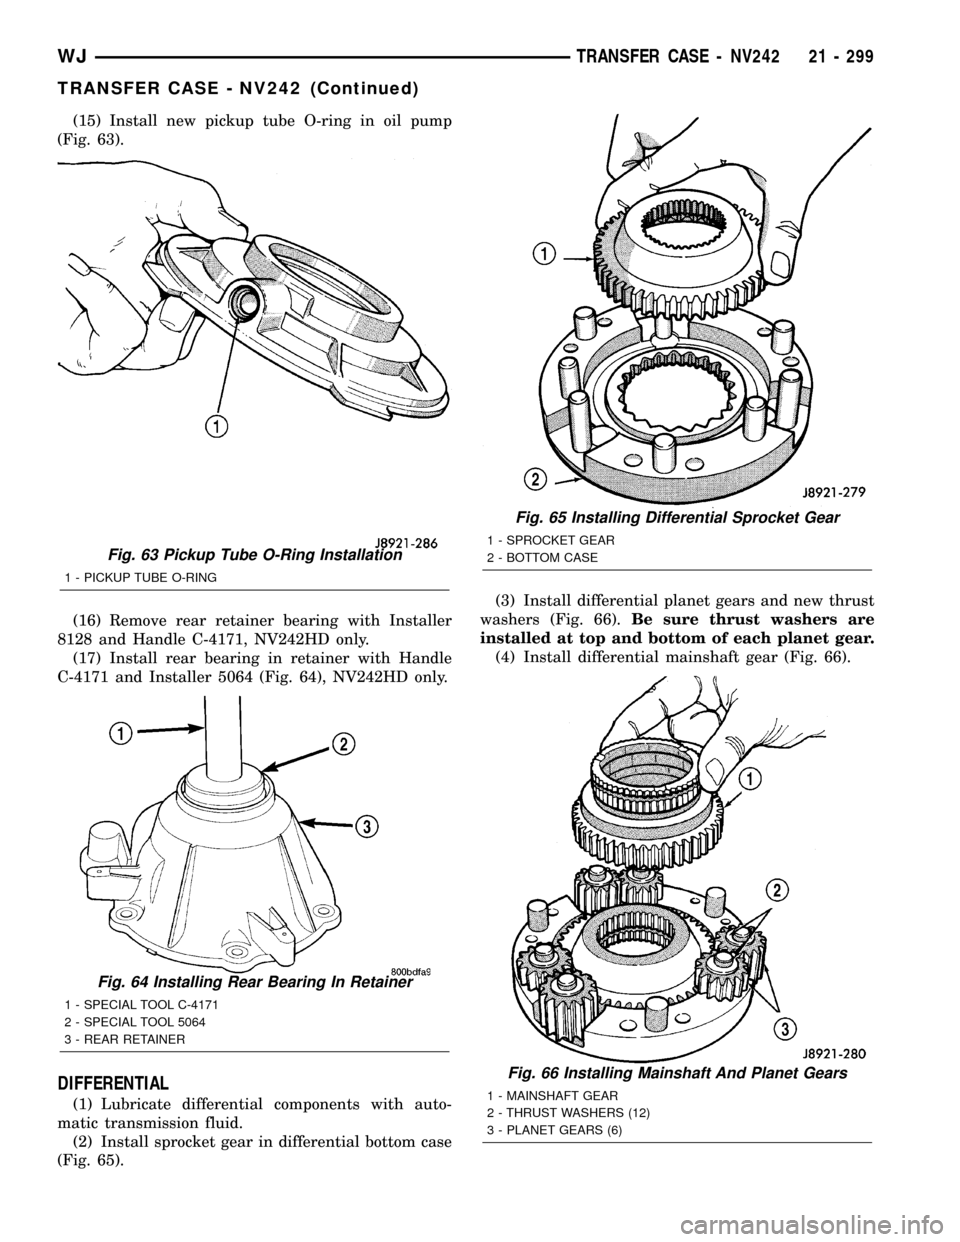
(15) Install new pickup tube O-ring in oil pump
(Fig. 63).
(16) Remove rear retainer bearing with Installer
8128 and Handle C-4171, NV242HD only.
(17) Install rear bearing in retainer with Handle
C-4171 and Installer 5064 (Fig. 64), NV242HD only.
DIFFERENTIAL
(1) Lubricate differential components with auto-
matic transmission fluid.
(2) Install sprocket gear in differential bottom case
(Fig. 65).(3) Install differential planet gears and new thrust
washers (Fig. 66).Be sure thrust washers are
installed at top and bottom of each planet gear.
(4) Install differential mainshaft gear (Fig. 66).
Fig. 63 Pickup Tube O-Ring Installation
1 - PICKUP TUBE O-RING
Fig. 64 Installing Rear Bearing In Retainer
1 - SPECIAL TOOL C-4171
2 - SPECIAL TOOL 5064
3 - REAR RETAINER
Fig. 65 Installing Differential Sprocket Gear
1 - SPROCKET GEAR
2 - BOTTOM CASE
Fig. 66 Installing Mainshaft And Planet Gears
1 - MAINSHAFT GEAR
2 - THRUST WASHERS (12)
3 - PLANET GEARS (6)
WJTRANSFER CASE - NV242 21 - 299
TRANSFER CASE - NV242 (Continued)
Page 1826 of 2199
NV242HD REAR RETAINER
(1) Apply bead of MopartSealer, or LoctiteŸ
Ultra Gray, to mating surface of rear retainer. Sealer
bead should be a maximum of 3/16 in.
(2) Install rear retainer on rear case. Tighten
retainer bolts to 20-27 N´m (15-20 ft. lbs.) torque.
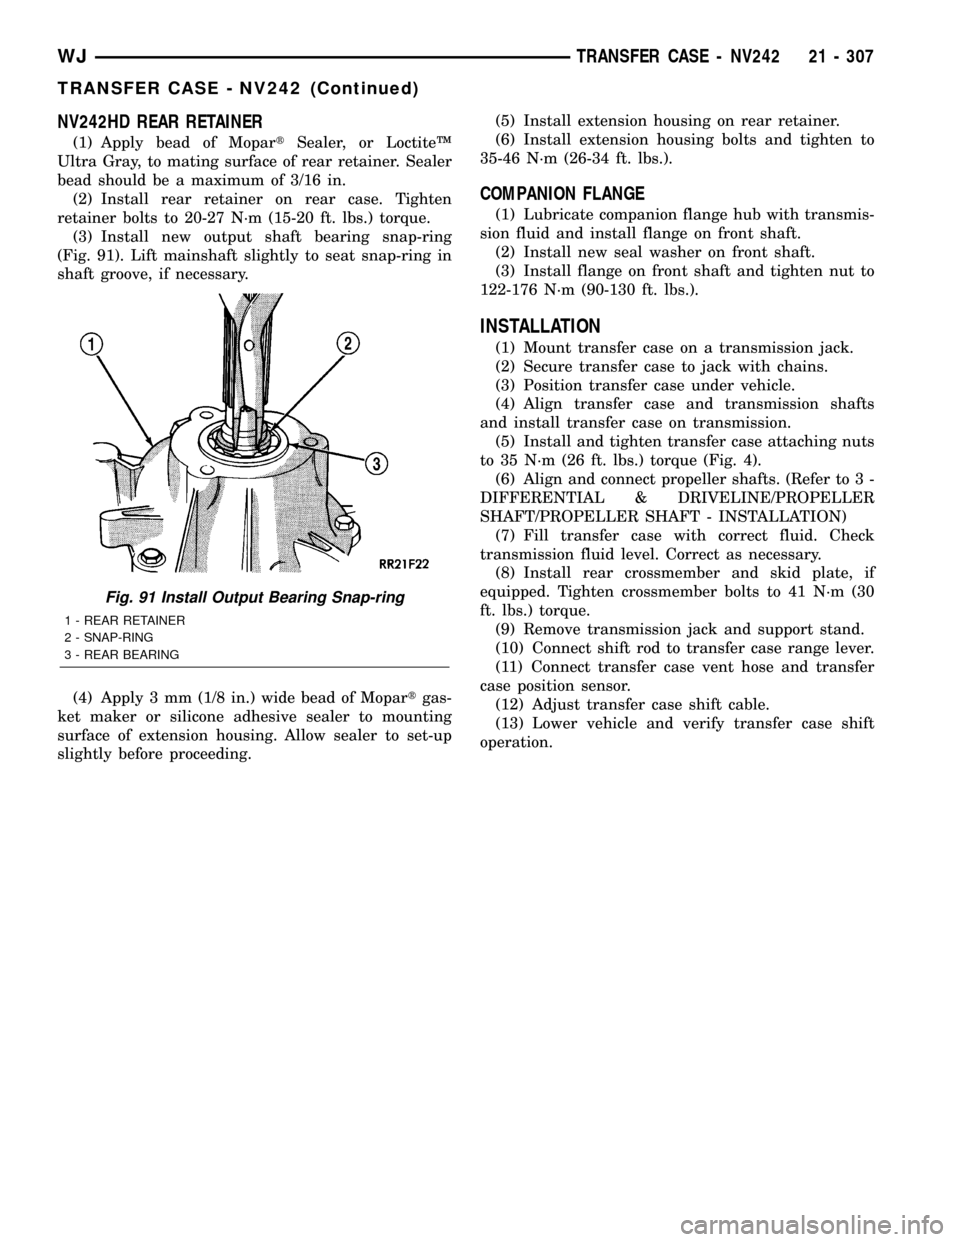
(3) Install new output shaft bearing snap-ring
(Fig. 91). Lift mainshaft slightly to seat snap-ring in
shaft groove, if necessary.
(4) Apply 3 mm (1/8 in.) wide bead of Mopartgas-
ket maker or silicone adhesive sealer to mounting
surface of extension housing. Allow sealer to set-up
slightly before proceeding.(5) Install extension housing on rear retainer.
(6) Install extension housing bolts and tighten to
35-46 N´m (26-34 ft. lbs.).
COMPANION FLANGE
(1) Lubricate companion flange hub with transmis-
sion fluid and install flange on front shaft.
(2) Install new seal washer on front shaft.
(3) Install flange on front shaft and tighten nut to
122-176 N´m (90-130 ft. lbs.).
INSTALLATION
(1) Mount transfer case on a transmission jack.
(2) Secure transfer case to jack with chains.
(3) Position transfer case under vehicle.
(4) Align transfer case and transmission shafts
and install transfer case on transmission.
(5) Install and tighten transfer case attaching nuts
to 35 N´m (26 ft. lbs.) torque (Fig. 4).
(6) Align and connect propeller shafts. (Refer to 3 -
DIFFERENTIAL & DRIVELINE/PROPELLER
SHAFT/PROPELLER SHAFT - INSTALLATION)
(7) Fill transfer case with correct fluid. Check
transmission fluid level. Correct as necessary.
(8) Install rear crossmember and skid plate, if
equipped. Tighten crossmember bolts to 41 N´m (30
ft. lbs.) torque.
(9) Remove transmission jack and support stand.
(10) Connect shift rod to transfer case range lever.
(11) Connect transfer case vent hose and transfer
case position sensor.
(12) Adjust transfer case shift cable.
(13) Lower vehicle and verify transfer case shift
operation.
Fig. 91 Install Output Bearing Snap-ring
1 - REAR RETAINER
2 - SNAP-RING
3 - REAR BEARING
WJTRANSFER CASE - NV242 21 - 307
TRANSFER CASE - NV242 (Continued)
Page 1832 of 2199
(5) Install the rear propeller shaft. (Refer to 3 -
DIFFERENTIAL & DRIVELINE/PROPELLER
SHAFT/PROPELLER SHAFT - INSTALLATION)
(6) Verify proper fluid level.
(7) Lower vehicle.
SHIFT CABLE
REMOVAL
(1) Shift transfer case into NEUTRAL.
(2) Raise vehicle.
(3) Disconnect the shift cable eyelet from the
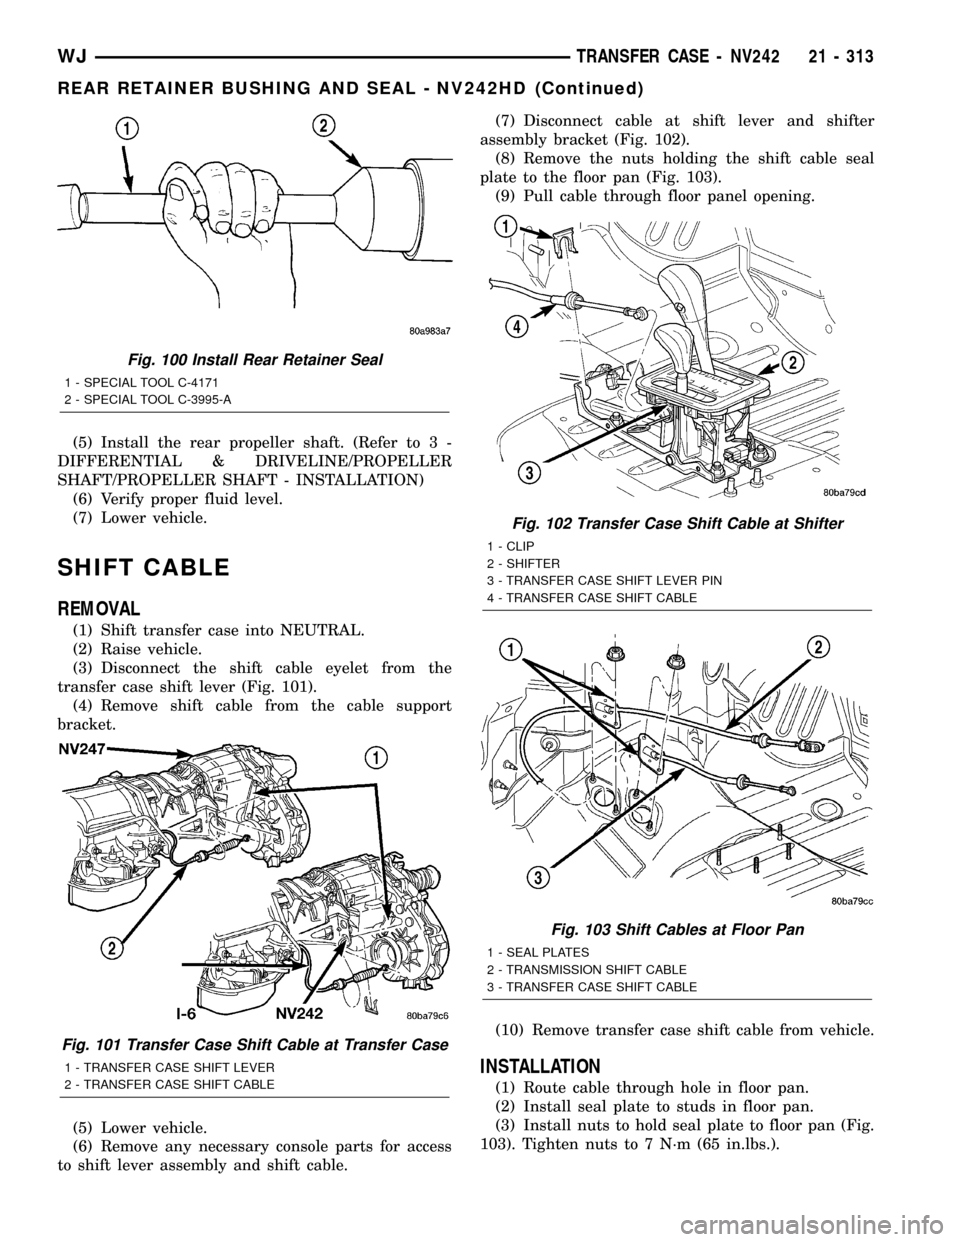
transfer case shift lever (Fig. 101).
(4) Remove shift cable from the cable support
bracket.
(5) Lower vehicle.
(6) Remove any necessary console parts for access
to shift lever assembly and shift cable.(7) Disconnect cable at shift lever and shifter
assembly bracket (Fig. 102).
(8) Remove the nuts holding the shift cable seal
plate to the floor pan (Fig. 103).
(9) Pull cable through floor panel opening.
(10) Remove transfer case shift cable from vehicle.
INSTALLATION
(1) Route cable through hole in floor pan.
(2) Install seal plate to studs in floor pan.
(3) Install nuts to hold seal plate to floor pan (Fig.
103). Tighten nuts to 7 N´m (65 in.lbs.).
Fig. 100 Install Rear Retainer Seal
1 - SPECIAL TOOL C-4171
2 - SPECIAL TOOL C-3995-A
Fig. 101 Transfer Case Shift Cable at Transfer Case
1 - TRANSFER CASE SHIFT LEVER
2 - TRANSFER CASE SHIFT CABLE
Fig. 102 Transfer Case Shift Cable at Shifter
1 - CLIP
2 - SHIFTER
3 - TRANSFER CASE SHIFT LEVER PIN
4 - TRANSFER CASE SHIFT CABLE
Fig. 103 Shift Cables at Floor Pan
1 - SEAL PLATES
2 - TRANSMISSION SHIFT CABLE
3 - TRANSFER CASE SHIFT CABLE
WJTRANSFER CASE - NV242 21 - 313
REAR RETAINER BUSHING AND SEAL - NV242HD (Continued)