2002 JEEP GRAND CHEROKEE Oil pan
[x] Cancel search: Oil panPage 2154 of 2199

(4) Unplug the clutch coil wire harness connector.
(5) Remove the bolts that secure the viscous
heater to the mounting bracket.
(6) Remove the viscous heater from the mounting
bracket. Support the viscous heater in the engine
compartment while servicing the clutch.
(7) Insert the two pins of the spanner wrench (spe-
cial Tool C-4489 or equivalent) into the holes of the
clutch plate. Hold the clutch plate stationary and
remove the hex nut (Fig. 18).
(8) Remove the clutch plate.
(9) Remove the clutch shims.
(10) Remove the external front housing snap ring
with snap ring pliers (Fig. 19).(11) Install the lip of the rotor puller (Special Tool
C-6141±1 or equivalent) into the snap ring groove
exposed in the previous step, and install the shaft
protector (Special Tool C-6141±2 or equivalent) (Fig.
20).
(12) Install the puller through bolts (Special Tool
C-6461 or equivalent) through the puller flange and
into the jaws of the rotor puller and tighten. Turn
the puller center bolt clockwise until the rotor is free
(Fig. 21).
(13) Remove the screw and retainer from the
clutch coil lead wire harness on the viscous heater
housing.
Fig. 18 CLUTCH NUT REMOVE-typical
1 - CLUTCH PLATE
2 - SPANNER
Fig. 19 EXTERNAL SNAP RING REMOVE- typical
1 - PULLEY
2 - SNAP RING PLIERS
Fig. 20 SHAFT PROTECTOR AND PULLER- typical
1 - PULLER JAW
2 - SHAFT PROTECTOR
Fig. 21 INSTALL PULLER PLATE- typical
1 - PULLER JAW
2 - PULLER
WJPLUMBING 24 - 77
VISCOUS HEATER (Continued)
Page 2162 of 2199

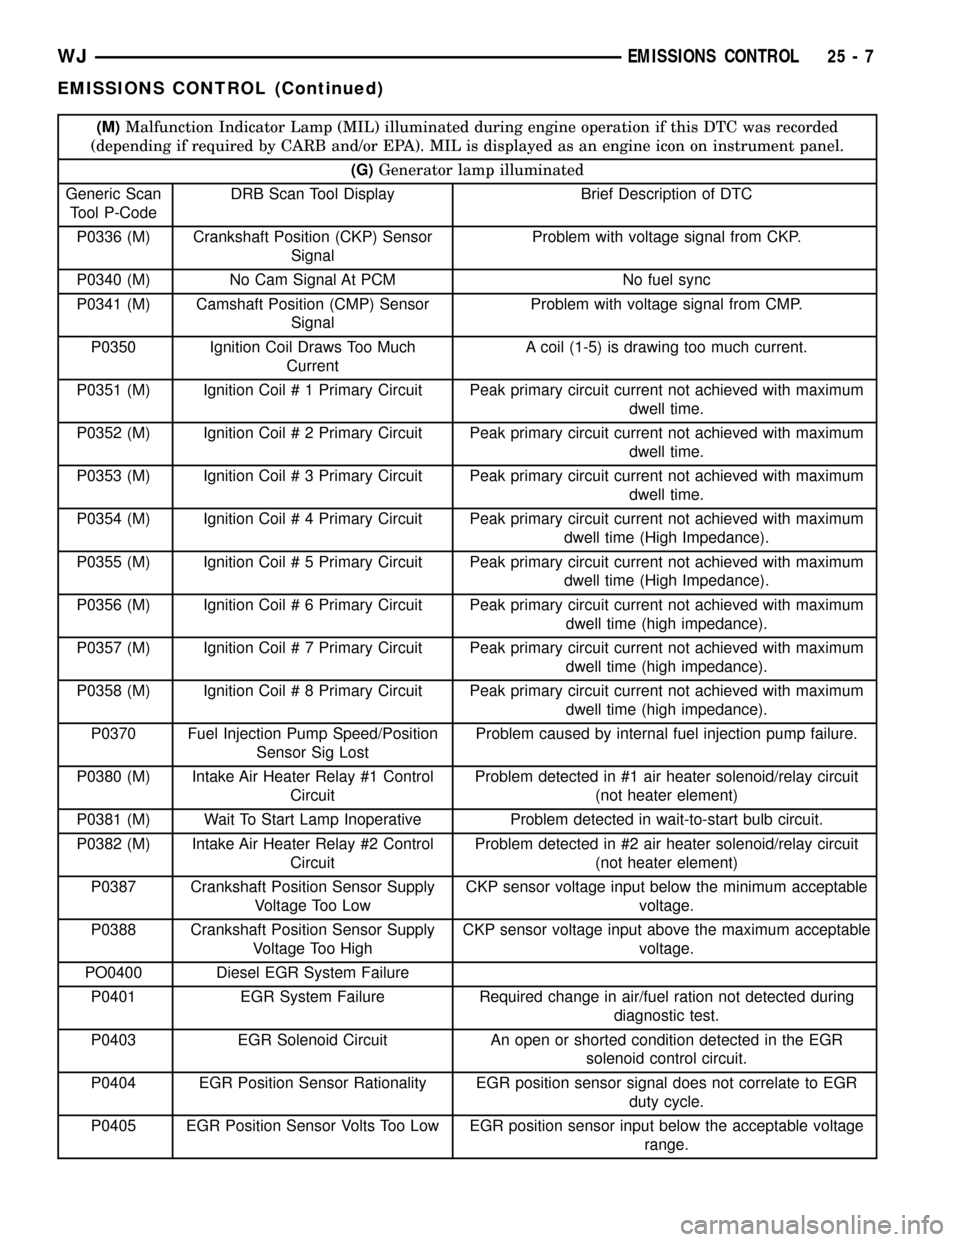
(M)Malfunction Indicator Lamp (MIL) illuminated during engine operation if this DTC was recorded
(depending if required by CARB and/or EPA). MIL is displayed as an engine icon on instrument panel.
(G)Generator lamp illuminated
Generic Scan
Tool P-CodeDRB Scan Tool Display Brief Description of DTC
P0336 (M) Crankshaft Position (CKP) Sensor
SignalProblem with voltage signal from CKP.
P0340 (M) No Cam Signal At PCM No fuel sync
P0341 (M) Camshaft Position (CMP) Sensor
SignalProblem with voltage signal from CMP.
P0350 Ignition Coil Draws Too Much
CurrentA coil (1-5) is drawing too much current.
P0351 (M) Ignition Coil # 1 Primary Circuit Peak primary circuit current not achieved with maximum
dwell time.
P0352 (M) Ignition Coil # 2 Primary Circuit Peak primary circuit current not achieved with maximum
dwell time.
P0353 (M) Ignition Coil # 3 Primary Circuit Peak primary circuit current not achieved with maximum
dwell time.
P0354 (M) Ignition Coil # 4 Primary Circuit Peak primary circuit current not achieved with maximum
dwell time (High Impedance).
P0355 (M) Ignition Coil # 5 Primary Circuit Peak primary circuit current not achieved with maximum
dwell time (High Impedance).
P0356 (M) Ignition Coil # 6 Primary Circuit Peak primary circuit current not achieved with maximum
dwell time (high impedance).
P0357 (M) Ignition Coil # 7 Primary Circuit Peak primary circuit current not achieved with maximum
dwell time (high impedance).
P0358 (M) Ignition Coil # 8 Primary Circuit Peak primary circuit current not achieved with maximum
dwell time (high impedance).
P0370 Fuel Injection Pump Speed/Position
Sensor Sig LostProblem caused by internal fuel injection pump failure.
P0380 (M) Intake Air Heater Relay #1 Control
CircuitProblem detected in #1 air heater solenoid/relay circuit
(not heater element)
P0381 (M) Wait To Start Lamp Inoperative Problem detected in wait-to-start bulb circuit.
P0382 (M) Intake Air Heater Relay #2 Control
CircuitProblem detected in #2 air heater solenoid/relay circuit
(not heater element)
P0387 Crankshaft Position Sensor Supply
Voltage Too LowCKP sensor voltage input below the minimum acceptable
voltage.
P0388 Crankshaft Position Sensor Supply
Voltage Too HighCKP sensor voltage input above the maximum acceptable
voltage.
PO0400 Diesel EGR System Failure
P0401 EGR System Failure Required change in air/fuel ration not detected during
diagnostic test.
P0403 EGR Solenoid Circuit An open or shorted condition detected in the EGR
solenoid control circuit.
P0404 EGR Position Sensor Rationality EGR position sensor signal does not correlate to EGR
duty cycle.
P0405 EGR Position Sensor Volts Too Low EGR position sensor input below the acceptable voltage
range.
WJEMISSIONS CONTROL 25 - 7
EMISSIONS CONTROL (Continued)
Page 2163 of 2199

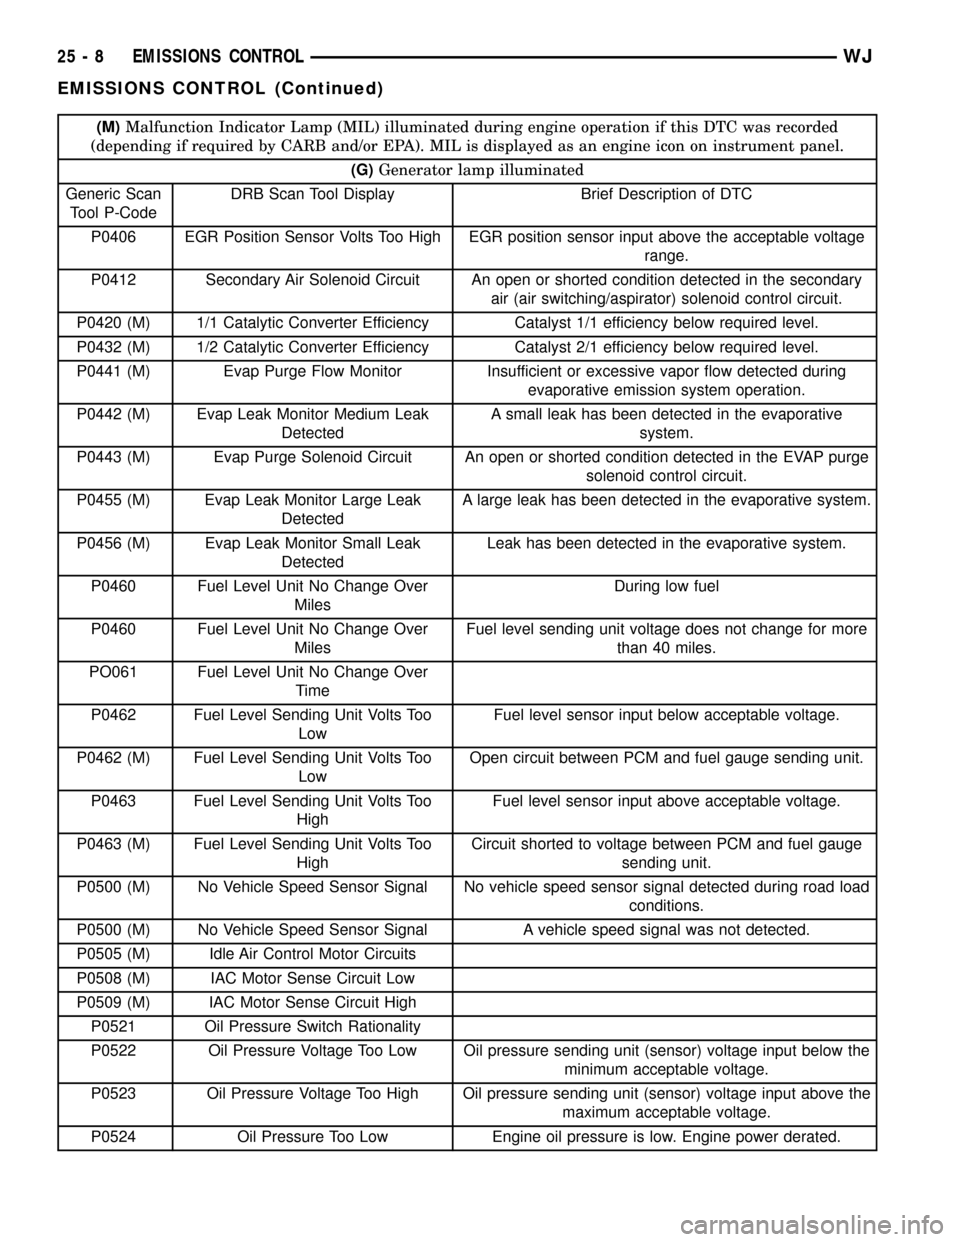
(M)Malfunction Indicator Lamp (MIL) illuminated during engine operation if this DTC was recorded
(depending if required by CARB and/or EPA). MIL is displayed as an engine icon on instrument panel.
(G)Generator lamp illuminated
Generic Scan
Tool P-CodeDRB Scan Tool Display Brief Description of DTC
P0406 EGR Position Sensor Volts Too High EGR position sensor input above the acceptable voltage
range.
P0412 Secondary Air Solenoid Circuit An open or shorted condition detected in the secondary
air (air switching/aspirator) solenoid control circuit.
P0420 (M) 1/1 Catalytic Converter Efficiency Catalyst 1/1 efficiency below required level.
P0432 (M) 1/2 Catalytic Converter Efficiency Catalyst 2/1 efficiency below required level.
P0441 (M) Evap Purge Flow Monitor Insufficient or excessive vapor flow detected during
evaporative emission system operation.
P0442 (M) Evap Leak Monitor Medium Leak
DetectedA small leak has been detected in the evaporative
system.
P0443 (M) Evap Purge Solenoid Circuit An open or shorted condition detected in the EVAP purge
solenoid control circuit.
P0455 (M) Evap Leak Monitor Large Leak
DetectedA large leak has been detected in the evaporative system.
P0456 (M) Evap Leak Monitor Small Leak
DetectedLeak has been detected in the evaporative system.
P0460 Fuel Level Unit No Change Over
MilesDuring low fuel
P0460 Fuel Level Unit No Change Over
MilesFuel level sending unit voltage does not change for more
than 40 miles.
PO061 Fuel Level Unit No Change Over
Time
P0462 Fuel Level Sending Unit Volts Too
LowFuel level sensor input below acceptable voltage.
P0462 (M) Fuel Level Sending Unit Volts Too
LowOpen circuit between PCM and fuel gauge sending unit.
P0463 Fuel Level Sending Unit Volts Too
HighFuel level sensor input above acceptable voltage.
P0463 (M) Fuel Level Sending Unit Volts Too
HighCircuit shorted to voltage between PCM and fuel gauge
sending unit.
P0500 (M) No Vehicle Speed Sensor Signal No vehicle speed sensor signal detected during road load
conditions.
P0500 (M) No Vehicle Speed Sensor Signal A vehicle speed signal was not detected.
P0505 (M) Idle Air Control Motor Circuits
P0508 (M) IAC Motor Sense Circuit Low
P0509 (M) IAC Motor Sense Circuit High
P0521 Oil Pressure Switch Rationality
P0522 Oil Pressure Voltage Too Low Oil pressure sending unit (sensor) voltage input below the
minimum acceptable voltage.
P0523 Oil Pressure Voltage Too High Oil pressure sending unit (sensor) voltage input above the
maximum acceptable voltage.
P0524 Oil Pressure Too Low Engine oil pressure is low. Engine power derated.
25 - 8 EMISSIONS CONTROLWJ
EMISSIONS CONTROL (Continued)
Page 2190 of 2199

set a temporary fault without turning on the MIL
and continue the leak portion of the test. However,
the PCM will assume that the system is already
pressurized and skip the rapid pump cycles.
Always diagnose leaks, if possible, before discon-
necting connections. Disconnecting connections may
mask a leak condition.
Keep in mind that if the purge solenoid seat is
leaking, it could go undetected since the leak would
end up in the intake manifold. Disconnect the purge
solenoid at the manifold when leak checking. In addi-
tion, a pinched hose fault (P1486) could set if the
purge solenoid does not purge the fuel system prop-
erly (blocked seat). The purge solenoid must vent the
fuel system prior to the LDP system test. If the
purge solenoid cannot properly vent the system the
LDP cannot properly complete the test for P1486 and
this fault can set due to pressure being in the EVAP
system during the test sequence.
Multiple actuation's of the DRB IIItLeak Detec-
tion Pump (LDP) Monitor Test can hide a 0.020 leak
because of excess vapor generation. Additionally, any
source for additional vapor generation can hide a
small leak in the EVAP system. Excess vapor gener-
ation can delay the fall of the LDP diaphragm thus
hiding the small leak. An example of this condition
could be bringing a cold vehicle into a warm shop for
testing or high ambient temperatures.
Fully plugged and partially plugged underhood
vacuum lines have been known to set MIL condi-
tions. P1494 and P0456 can be set for this reason.
Always, thoroughly, check plumbing for pinches or
blockage before condemning components.
TEST EQUIPMENT The Evaporative Emission
Leak Detector (EELD) Miller Special Tool 8404 is
capable of visually detecting leaks in the evaporative
system and will take the place of the ultrasonic leak
detector 6917A. The EELD utilizes shop air and a
smoke generator to visually detect leaks down to
0.020 or smaller. The food grade oil used to make the
smoke includes an UV trace dye that will leave tell-
tale signs of the leak under a black light. This is
helpful when components have to be removed to
determine the exact leak location. For detailed test
instructions, follow the operators manual packaged
with the EELD.
NOTE: Be sure that the PCM has the latest software
update. Reprogram as indicated by any applicable
Technical Service Bulletin. After LDP repairs are
completed, verify the repair by running the DRB IIIT
Leak Detection Pump (LDP) Monitor Test as
described in Technical Service Bulletin 18-12-99.REMOVAL
The Leak Detection Pump (LDP) is located under
the left quarter panel behind the left/rear wheel (Fig.
16). It is attached to a two-piece support bracket
(Fig. 17). The LDP and LDP filter are replaced (ser-
viced) as one unit.
(1) Remove stone shield behind left/rear wheel
(Fig. 18). Drill out plastic rivets for removal.
(2) Remove 3 LDP mounting bolts (Fig. 19).
(3) Remove support bracket brace bolt (Fig. 17).
(4) Loosen, but do not remove 2 support bracket
nuts at frame rail (Fig. 19).
(5) To separate and lower front section of two-piece
support bracket, remove 3 attaching bolts on bottom
of support bracket (Fig. 17). While lowering support
bracket, disconnect LDP wiring clip (Fig. 20).
(6) Disconnect electrical connector at LDP (Fig.
20).
(7) Carefully remove vapor/vacuum lines at LDP
(Fig. 20).
(8) Remove LDP.
INSTALLATION
The LDP is located in the left quarter panel behind
the left/rear wheel. It is attached to a two-piece sup-
port bracket (Fig. 17). The LDP and LDP filter are
replaced (serviced) as one unit.
(1) Position LDP and carefully install vapor/vac-
uum lines to LDP and LDP filter.The vapor/vac-
uum lines and hoses must be firmly connected.
Fig. 16 LOCATION, LDP / EVAP CANISTER
1 - LEAK DETECTION PUMP
2 - EVAP CANISTER
WJEVAPORATIVE EMISSIONS 25 - 35
LEAK DETECTION PUMP (Continued)