2002 Hyundai Grandeur light
[x] Cancel search: lightPage 159 of 230
WHAT TO DO IN AN EMERGENCY 3- 9
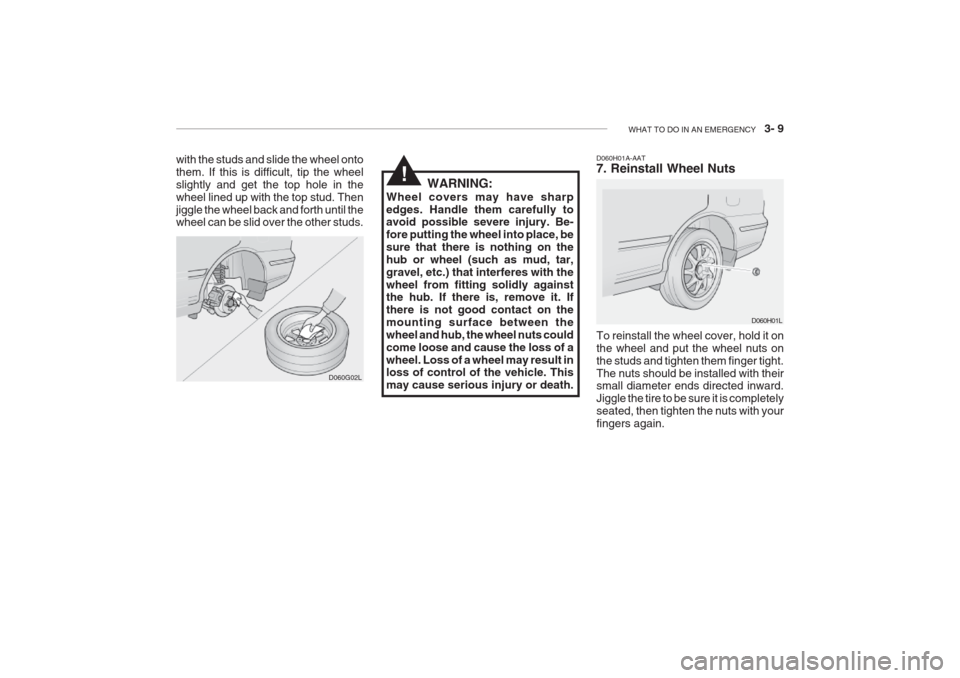
D060H01A-AAT 7. Reinstall Wheel Nuts To reinstall the wheel cover, hold it on the wheel and put the wheel nuts onthe studs and tighten them finger tight.The nuts should be installed with their small diameter ends directed inward. Jiggle the tire to be sure it is completelyseated, then tighten the nuts with yourfingers again. D060H01L
D060G02L
with the studs and slide the wheel ontothem. If this is difficult, tip the wheelslightly and get the top hole in thewheel lined up with the top stud. Thenjiggle the wheel back and forth until the wheel can be slid over the other studs.
WARNING:
Wheel covers may have sharp edges. Handle them carefully to avoid possible severe injury. Be- fore putting the wheel into place, besure that there is nothing on thehub or wheel (such as mud, tar,gravel, etc.) that interferes with thewheel from fitting solidly against the hub. If there is, remove it. If there is not good contact on themounting surface between thewheel and hub, the wheel nuts couldcome loose and cause the loss of awheel. Loss of a wheel may result in loss of control of the vehicle. This may cause serious injury or death.
!
Page 168 of 230
4- 6 CORROSION PREVENTION AND APPEARANCE CARE
E040E01A-AAT Cleaning the Windows You may use any household window cleaner on the windows. However,when cleaning the inside of the rearwindow be careful not to damage therear window defroster wiring. E050A01A-AAT Any Questions? If you have any questions about the care of your car, consult your Hyundaidealer.
E040D01A-AAT Cleaning the Seat Belts To clean the seat belts, use a cloth or sponge with mild soap or detergentand warm water. Do not use strongdetergents, dye, bleach or abrasivematerials on the seat belts as this may weaken the fabric. While cleaning the belts, inspect themfor excessive wear, cuts, fraying orother signs of damage and replacethem if necessary.
E040C01A-AAT Cleaning the Carpets Use a foam-type carpet cleaner. Clean- ers of this type are available in aerosolcans in liquid form or powder. Read theinstructions and follow them exactly.Using a vacuum cleaner with the ap- propriate attachment, remove as much dirt from the carpets as possible. Applythe foam following the manufacturer'sdirections, then rub in overlappingcircles. Do not add water. These clean-ers work best when the carpet is kept as dry as possible.
will keep your leather lustrous, beauti- ful and ensure you have many years ofwear.Take a piece of cheese cloth and usingany mild soap and lukewarm water, work up a good lather. Thoroughly wash the leather. Wipe clean with aslightly damp cloth and dry with softcloth. Do this as often as the leatherbecomes soiled. During tanning operations, sufficient oils are incorporated through process-ing that none need be applied duringthe life of the leather. Oil applied to thefinished surface will in no way help theleather and may do more harm than good. Varnishes and furniture polishes should never be used under any con-ditions.
Page 178 of 230

6. Do-It-Yourself Maintenance
Engine Compartment ..................................................................... 6-2
General Checks .............................................................................. 6-5
Checking the Engine Oil ................................................................ 6-6
Changing the Oil and Filter ........................................................... 6-7
Checking and Changing the Engine Coolant ............................... 6-8
Spark Plugs ..................................................................................6-10
Changing the Air Cleaner Filter ................................................... 6-11
Checking the Transaxle Oil (Manual) .......................................... 6-13
Checking the Transaxle Fluid (Automatic) .................................. 6-14
Checking the Brakes .................................................................... 6-15
Checking the Clutch Fluid ............................................................ 6-16
Air Conditioning Care ................................................................... 6-17
Changing the Air Filter (For Evaporator and Blower Unit) ......... 6-18
Checking Drive Belts .................................................................... 6-21
Checking and Replacing Fuses ................................................... 6-21
Power Steering Fluid Level .......................................................... 6-24
Headlight Aiming Adjustment ....................................................... 6-25
Replacement of Light Bulbs ......................................................... 6-26
Bulb Wattage ................................................................................ 6-33
Junction Box Description ............................................................. 6-34
6
Page 182 of 230

DO-IT-YOURSELF MAINTENANCE 6- 5
G020A02A-AAT
GENERAL CHECKS Engine Compartment
The following should be checked regu- larly:
o Engine oil level and condition
o Transaxle fluid level and condition
o Brake fluid level
o Clutch fluid level
o Coolant level
o Windshield washer fluid level
o Accessory drive belt condition
o Coolant hose condition
o Fluid leaks (on or below compo- nents)
o Power steering fluid level and con- dition
o Battery condition
o Air filter condition G020C01A-AAT Vehicle Interior The following should be checked each time when the vehicle is driven:
o Lights operation
o Windshield wiper operation
o Horn operation
o Defroster, heater system operation
(and air conditioning, if installed)
o Steering operation and condition
o Mirror condition and operation
o Turn signal operation
o Accelerator pedal operation
o Brake operation, including parking
brake
o Manual transaxle operation, includ- ing clutch operation
o Automatic transaxle operation, in- cluding "Park" mechanism opera-tion
o Seat control condition and opera- tion
o Seat belt condition and operation
o Sunvisor operation If you notice anything that does not operate correctly or appears to befunctioning incorrectly, inspect it care- fully and seek assistance from your Hyundai dealer if service is needed.
G020B01A-AAT
Vehicle Exterior
The following should be checked
monthly:
o Overall appearance and condition
o Wheel condition and wheel nut torgue
o Exhaust system condition
o Light condition and operation
o Windshield glass condition
o Wiper blade condition
o Paint condition and body corrosion
o Fluid leaks
o Door and hood lock condition
o Tire pressure and condition (including spare tire)
Page 196 of 230
DO-IT-YOURSELF MAINTENANCE 6- 19
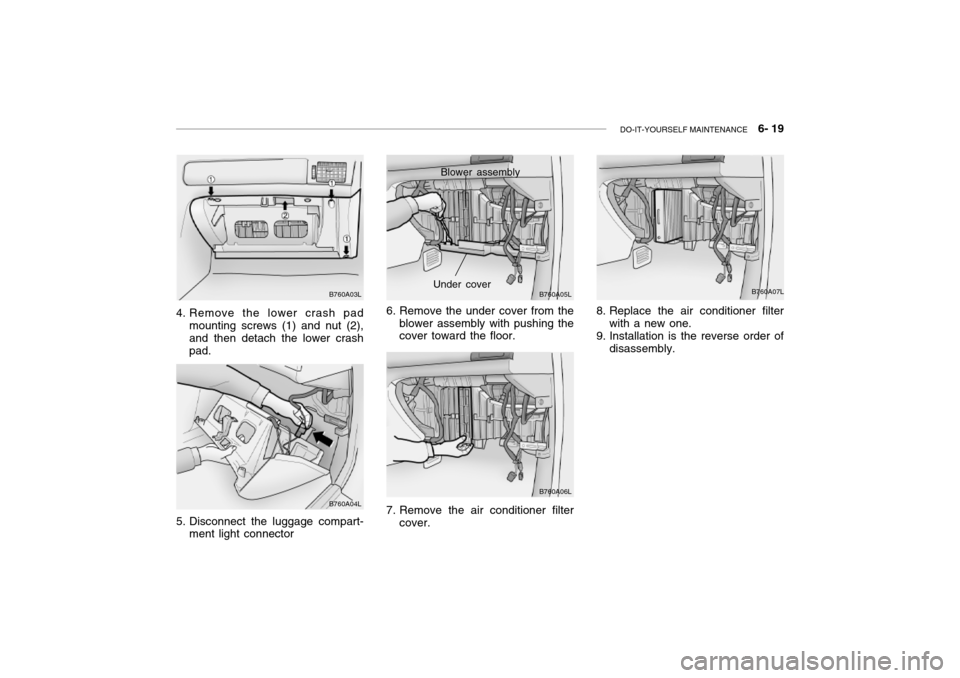
4. Remove the lower crash pad
mounting screws (1) and nut (2), and then detach the lower crashpad.6. Remove the under cover from the
blower assembly with pushing the cover toward the floor.
B760A05L
7. Remove the air conditioner filter cover. B760A06L
Blower assembly
B760A07L
Under coverB760A03L B760A04L
5. Disconnect the luggage compart- ment light connector 8. Replace the air conditioner filter
with a new one.
9. Installation is the reverse order of disassembly.
Page 197 of 230
6- 20 DO-IT-YOURSELF MAINTENANCE
G170A01A-GAT
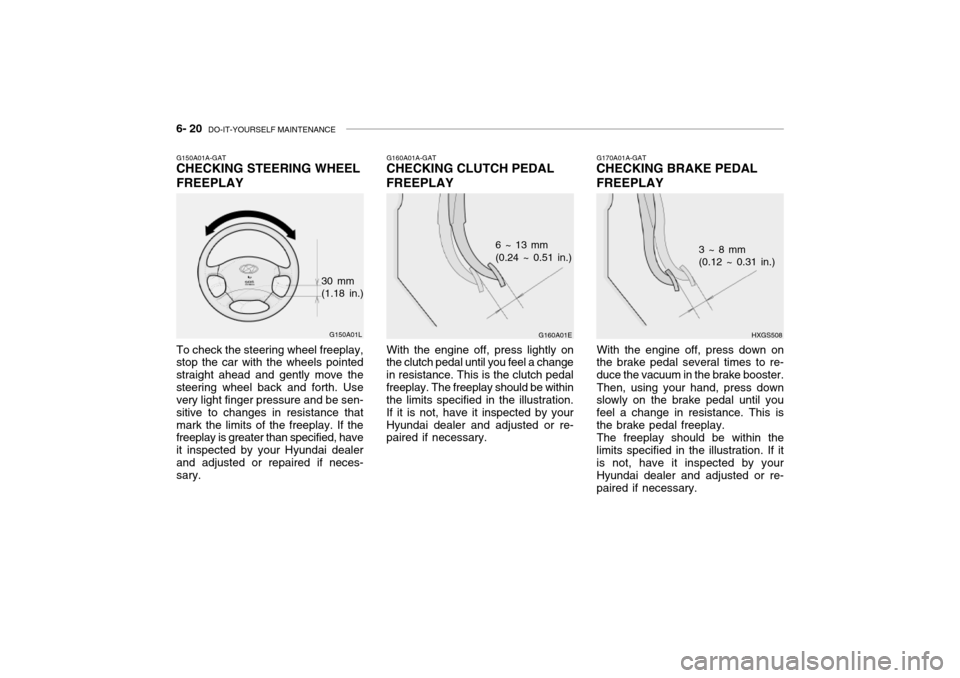
CHECKING BRAKE PEDAL FREEPLAY
HXGS508
3 ~ 8 mm (0.12 ~ 0.31 in.)
With the engine off, press down on
the brake pedal several times to re- duce the vacuum in the brake booster.
Then, using your hand, press down
slowly on the brake pedal until youfeel a change in resistance. This isthe brake pedal freeplay.
The freeplay should be within the
limits specified in the illustration. If it is not, have it inspected by your Hyundai dealer and adjusted or re-paired if necessary.G160A01A-GAT
CHECKING CLUTCH PEDAL FREEPLAY
G160A01E
6 ~ 13 mm (0.24 ~ 0.51 in.)
With the engine off, press lightly on
the clutch pedal until you feel a change in resistance. This is the clutch pedalfreeplay. The freeplay should be within the limits specified in the illustration. If it is not, have it inspected by yourHyundai dealer and adjusted or re- paired if necessary.G150A01A-GAT CHECKING STEERING WHEEL FREEPLAY
G150A01L
To check the steering wheel freeplay, stop the car with the wheels pointed straight ahead and gently move thesteering wheel back and forth. Use very light finger pressure and be sen- sitive to changes in resistance thatmark the limits of the freeplay. If the freeplay is greater than specified, have it inspected by your Hyundai dealerand adjusted or repaired if neces- sary. 30 mm(1.18 in.)
Page 199 of 230
6- 22 DO-IT-YOURSELF MAINTENANCE
strument panel junction box you will find a list showing the circuits pro- tected by each fuse.
If any of your car's lights or other
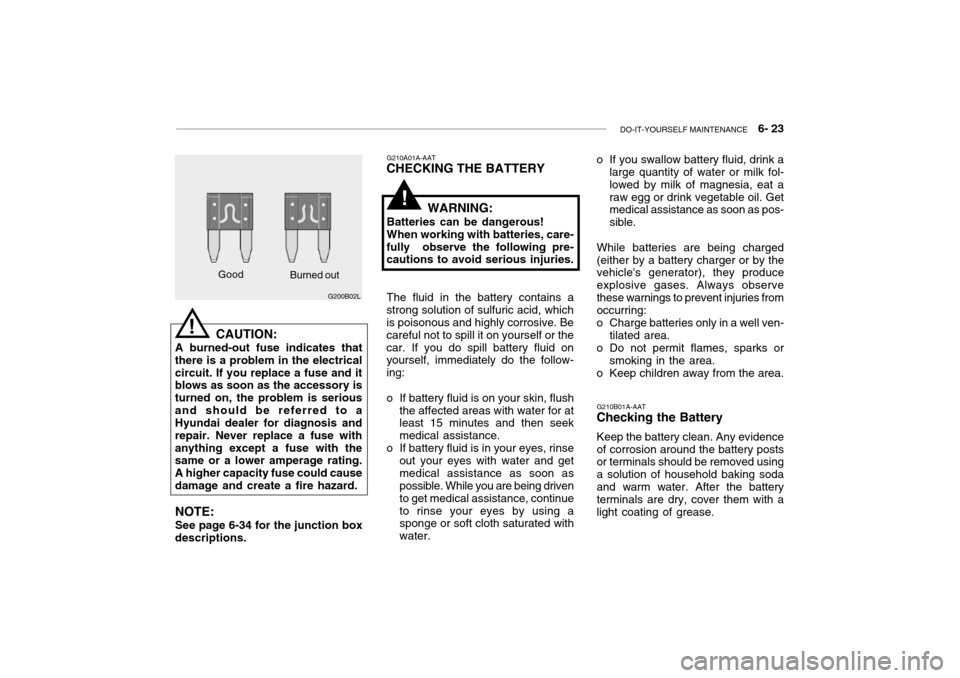
electrical accessories stop working, ablown fuse could be the reason. If the fuse has burned out, you will see that the metal strip inside the fuse hasburned through. If you suspect a blown fuse, follow this procedure:
1. Turn off the ignition and all other switches.
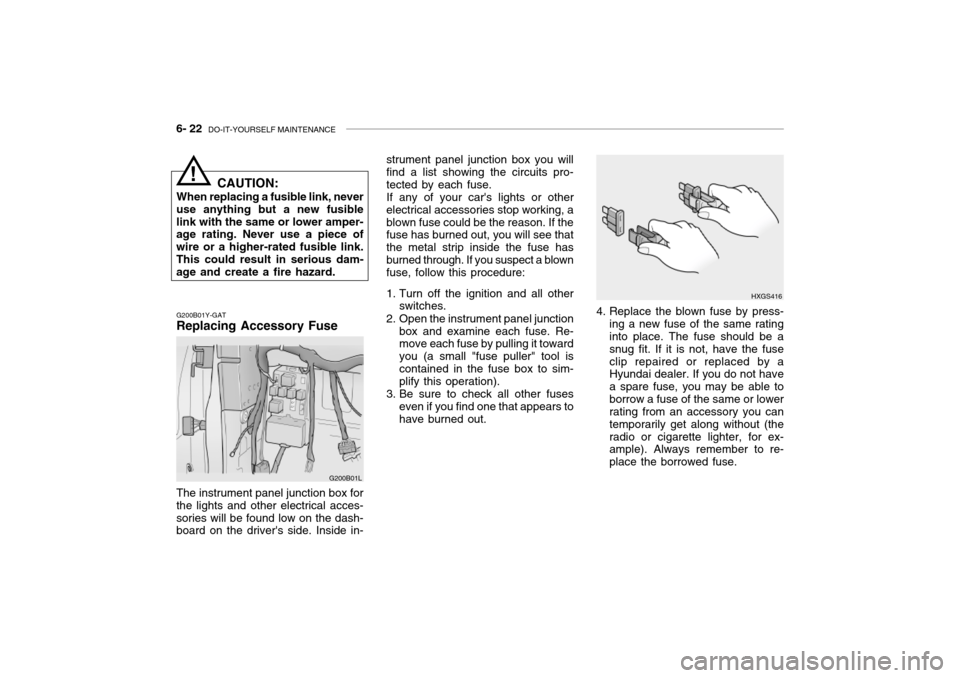
2. Open the instrument panel junction box and examine each fuse. Re- move each fuse by pulling it toward you (a small "fuse puller" tool iscontained in the fuse box to sim- plify this operation).
3. Be sure to check all other fuses even if you find one that appears to have burned out.
HXGS416
4. Replace the blown fuse by press- ing a new fuse of the same rating into place. The fuse should be a snug fit. If it is not, have the fuseclip repaired or replaced by a Hyundai dealer. If you do not have a spare fuse, you may be able toborrow a fuse of the same or lower rating from an accessory you can temporarily get along without (theradio or cigarette lighter, for ex- ample). Always remember to re- place the borrowed fuse.
G200B01Y-GAT Replacing Accessory Fuse
G200B01L
The instrument panel junction box for the lights and other electrical acces-sories will be found low on the dash- board on the driver's side. Inside in- CAUTION:
When replacing a fusible link, never
use anything but a new fusible link with the same or lower amper- age rating. Never use a piece of wire or a higher-rated fusible link.This could result in serious dam- age and create a fire hazard.
!
Page 200 of 230
DO-IT-YOURSELF MAINTENANCE 6- 23
Good
G200B02L
Burned out G210A01A-AAT
CHECKING THE BATTERY
WARNING:
Batteries can be dangerous! When working with batteries, care-
fully observe the following pre- cautions to avoid serious injuries.
The fluid in the battery contains a
strong solution of sulfuric acid, whichis poisonous and highly corrosive. Be careful not to spill it on yourself or thecar. If you do spill battery fluid on yourself, immediately do the follow- ing:
o If battery fluid is on your skin, flush the affected areas with water for at least 15 minutes and then seek medical assistance.
o If battery fluid is in your eyes, rinse
out your eyes with water and getmedical assistance as soon as possible. While you are being driven to get medical assistance, continueto rinse your eyes by using a sponge or soft cloth saturated with water.
CAUTION:
A burned-out fuse indicates that
there is a problem in the electricalcircuit. If you replace a fuse and it blows as soon as the accessory is turned on, the problem is seriousand should be referred to a Hyundai dealer for diagnosis and repair. Never replace a fuse withanything except a fuse with the same or a lower amperage rating. A higher capacity fuse could causedamage and create a fire hazard.
NOTE: See page 6-34 for the junction box
descriptions. o If you swallow battery fluid, drink a
large quantity of water or milk fol- lowed by milk of magnesia, eat araw egg or drink vegetable oil. Get medical assistance as soon as pos- sible.
While batteries are being charged(either by a battery charger or by the vehicle's generator), they produce explosive gases. Always observethese warnings to prevent injuries from occurring:
o Charge batteries only in a well ven- tilated area.
o Do not permit flames, sparks or smoking in the area.
o Keep children away from the area.
G210B01A-AAT
Checking the Battery
Keep the battery clean. Any evidence of corrosion around the battery posts or terminals should be removed using a solution of household baking sodaand warm water. After the battery terminals are dry, cover them with a light coating of grease.
!
!