2002 Hyundai Atos coolant capacity
[x] Cancel search: coolant capacityPage 31 of 249

FEATURES OF YOUR HYUNDAI
FEATURES OF YOUR HYUNDAI FEATURES OF YOUR HYUNDAI
FEATURES OF YOUR HYUNDAI
FEATURES OF YOUR HYUNDAI
1- 22 B300A01A-GAT SPEEDOMETER Your Hyundai's speedometer is calibrated in kilometers per hour or miles per hour.
B280A01A-AAT FUEL GAUGE The needle on the gauge indicates the approxi- mate fuel level in the fuel tank. The fuel capacityis given in Section 9.
B900A01A-GAT ACOUSTIC WARNING SOUND (If installed) The acoustic warning chime sounds when the tail lights are on and the door in driver side isopen. This prevents the battery from dischargingwhen the car is left with the tail lights on. Thechime sounds until the tail lights are turned off.
B260N02A-AAT
Malfunction Indicator Light (If installed)
This light illuminates when there is a malfunction of an exhaust gas related component, and thesystem is not functioning properly so that theexhaust gas regulation values are not satisfied.This light will also illuminate when the ignition keyis turned to the "ON" position, and will go out in afew seconds. If it illuminates while driving, ordoes not illuminate when the ignition key isturned to the "ON" position, take your car to yournearest authorized Hyundai dealer and have thesystem checked.
when the brake pedal is pushed down firmly. Excessive rotor damage will result if the wornpads are not replaced. See your Hyundai dealerimmediately.
B280A01X
B290A02A-AAT ENGINE COOLANT TEMPERATURE GAUGE WARNING: Never remove the radiator cap when the en-gine is hot. The engine coolant is under pres-sure and could erupt and cause severe burns.Wait until the engine is cool before removingthe radiator cap. The needle on the engine coolant temperature gauge should stay in the normal range. If itmoves across the dial to "H" (Hot), pull over andstop as soon as possible and turn off the engine.Then open the hood and check the coolant leveland the water pump drive belt. If you suspectcooling system trouble, have your cooling sys-tem checked by Hyundai dealer as soon aspossible.
B290A01X
B300A01X
Page 101 of 249
DO-IT-YOURSELF MAINTENANCE
DO-IT-YOURSELF MAINTENANCE DO-IT-YOURSELF MAINTENANCE
DO-IT-YOURSELF MAINTENANCE
DO-IT-YOURSELF MAINTENANCE
6-5
G050A01A-AAT
CHECKING AND CHANGING THE EN-
CHECKING AND CHANGING THE EN- CHECKING AND CHANGING THE EN-
CHECKING AND CHANGING THE EN-
CHECKING AND CHANGING THE EN-
GINE COOLANT
GINE COOLANT GINE COOLANT
GINE COOLANT
GINE COOLANT
WARNING:
WARNING: WARNING:
WARNING:
WARNING:
Do not remove the radiator cap when the
Do not remove the radiator cap when the Do not remove the radiator cap when the
Do not remove the radiator cap when the
Do not remove the radiator cap when the engine is hot. When the engine is hot, the
engine is hot. When the engine is hot, the engine is hot. When the engine is hot, the
engine is hot. When the engine is hot, the
engine is hot. When the engine is hot, the
engine coolant is under pressure and may
engine coolant is under pressure and may engine coolant is under pressure and may
engine coolant is under pressure and may
engine coolant is under pressure and may
erupt through the opening if the cap is
erupt through the opening if the cap is erupt through the opening if the cap is
erupt through the opening if the cap is
erupt through the opening if the cap is
removed. You could be seriously burned if
removed. You could be seriously burned if removed. You could be seriously burned if
removed. You could be seriously burned if
removed. You could be seriously burned if
you do not observe this precaution. Do not
you do not observe this precaution. Do not you do not observe this precaution. Do not
you do not observe this precaution. Do not
you do not observe this precaution. Do not
remove the radiator cap until the radiator is
remove the radiator cap until the radiator is remove the radiator cap until the radiator is
remove the radiator cap until the radiator is
remove the radiator cap until the radiator is
cool to the touch.
cool to the touch. cool to the touch.
cool to the touch.
cool to the touch.
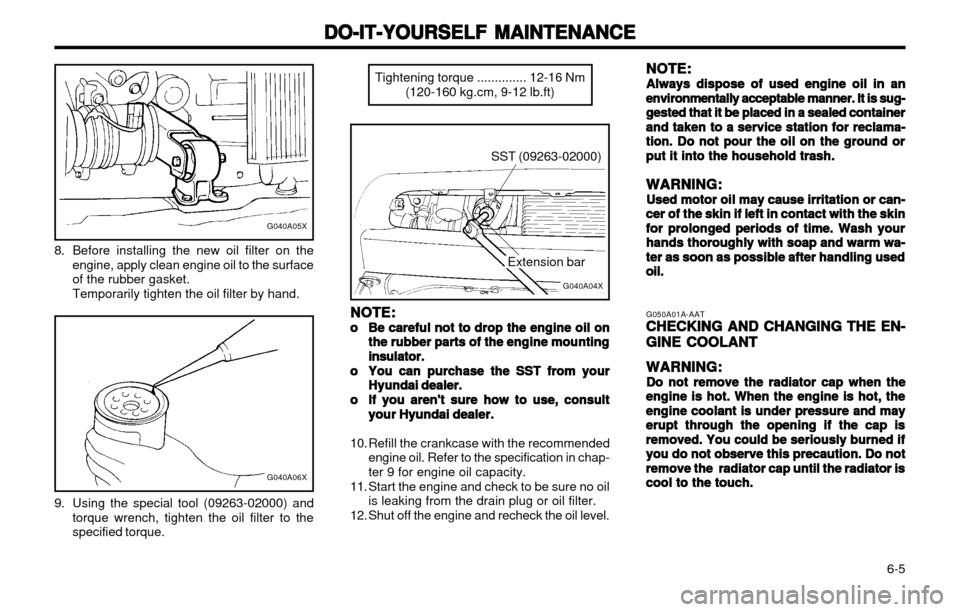
8. Before installing the new oil filter on the
engine, apply clean engine oil to the surface of the rubber gasket. Temporarily tighten the oil filter by hand.
G040A05X
G040A06X
9. Using the special tool (09263-02000) andtorque wrench, tighten the oil filter to the specified torque. Tightening torque .............. 12-16 Nm
(120-160 kg.cm, 9-12 lb.ft)
SST (09263-02000)
G040A04X
Extension bar
NOTE:
NOTE: NOTE:
NOTE:
NOTE:
oo
oo
o Be careful not to drop the engine oil on
Be careful not to drop the engine oil on Be careful not to drop the engine oil on
Be careful not to drop the engine oil on
Be careful not to drop the engine oil on
the rubber
the rubber the rubber
the rubber
the rubber
parts of the engine mounting
parts of the engine mounting parts of the engine mounting
parts of the engine mounting
parts of the engine mounting
insulator.
insulator. insulator.
insulator.
insulator.
oo
oo
o You can purchase the SST from your
You can purchase the SST from your You can purchase the SST from your
You can purchase the SST from your
You can purchase the SST from your
Hyundai dealer.
Hyundai dealer. Hyundai dealer.
Hyundai dealer.
Hyundai dealer.
oo
oo
o If you aren't sure how to use, consult
If you aren't sure how to use, consult If you aren't sure how to use, consult
If you aren't sure how to use, consult
If you aren't sure how to use, consult
your Hyundai dealer.
your Hyundai dealer. your Hyundai dealer.
your Hyundai dealer.
your Hyundai dealer.
10. Refill the crankcase with the recommended engine oil. Refer to the specification in chap- ter 9 for engine oil capacity.
11. Start the engine and check to be sure no oil is leaking from the drain plug or oil filter.
12. Shut off the engine and recheck the oil level. NOTE:
NOTE: NOTE:
NOTE:
NOTE:
Always dispose of used engine oil in an
Always dispose of used engine oil in an Always dispose of used engine oil in an
Always dispose of used engine oil in an
Always dispose of used engine oil in an environmentally acceptable
environmentally acceptable environmentally acceptable
environmentally acceptable
environmentally acceptable
manner. It is sug-
manner. It is sug- manner. It is sug-
manner. It is sug-
manner. It is sug-
gested that it be placed in a sealed container
gested that it be placed in a sealed container gested that it be placed in a sealed container
gested that it be placed in a sealed container
gested that it be placed in a sealed container
and taken
and taken and taken
and taken
and taken
to a service station for reclama-
to a service station for reclama- to a service station for reclama-
to a service station for reclama-
to a service station for reclama-
tion. Do not pour the oil on the ground or
tion. Do not pour the oil on the ground or tion. Do not pour the oil on the ground or
tion. Do not pour the oil on the ground or
tion. Do not pour the oil on the ground or
put it into the household trash.
put it into the household trash. put it into the household trash.
put it into the household trash.
put it into the household trash.
WARNING:
WARNING: WARNING:
WARNING:
WARNING:
Used motor oil may cause irritation or can-
Used motor oil may cause irritation or can- Used motor oil may cause irritation or can-
Used motor oil may cause irritation or can-
Used motor oil may cause irritation or can-cer of the skin if
cer of the skin if cer of the skin if
cer of the skin if
cer of the skin if left in contact with the skin
left in contact with the skin left in contact with the skin
left in contact with the skin
left in contact with the skin
for prolonged periods of time. Wash your
for prolonged periods of time. Wash your for prolonged periods of time. Wash your
for prolonged periods of time. Wash your
for prolonged periods of time. Wash your
hands
hands hands
hands
hands thoroughly with soap and warm wa-
thoroughly with soap and warm wa- thoroughly with soap and warm wa-
thoroughly with soap and warm wa-
thoroughly with soap and warm wa-
ter as soon as possible after handling used
ter as soon as possible after handling used ter as soon as possible after handling used
ter as soon as possible after handling used
ter as soon as possible after handling used
oil.oil.
oil.oil.
oil.
Page 102 of 249
DO-IT-YOURSELF MAINTENANCE
DO-IT-YOURSELF MAINTENANCE DO-IT-YOURSELF MAINTENANCE
DO-IT-YOURSELF MAINTENANCE
DO-IT-YOURSELF MAINTENANCE
6-6 -15 (5)
-25 (-13) -35 (-31)-45 (-49)
G050B01A-AAT
Recommended Engine Coolant
Recommended Engine Coolant Recommended Engine Coolant
Recommended Engine Coolant
Recommended Engine Coolant
Use a high quality ethylene-glycol coolant in a
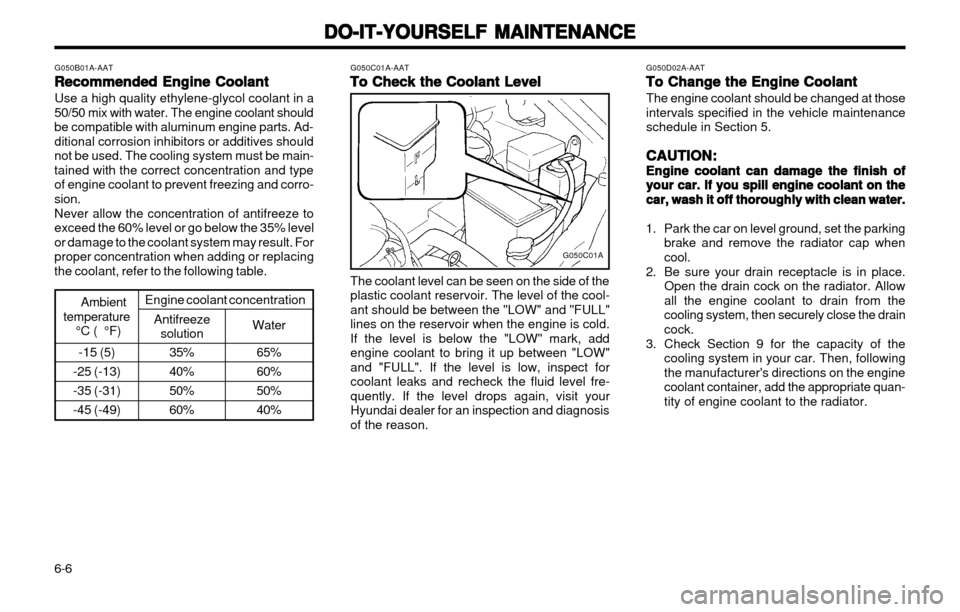
50/50 mix with water. The engine coolant should be compatible with aluminum engine parts. Ad-ditional corrosion inhibitors or additives shouldnot be used. The cooling system must be main-tained with the correct concentration and typeof engine coolant to prevent freezing and corro-sion. Never allow the concentration of antifreeze to exceed the 60% level or go below the 35% levelor damage to the coolant system may result. Forproper concentration when adding or replacingthe coolant, refer to the following table.
35% 40%50%60% G050C01A-AAT
To Check the Coolant Level
To Check the Coolant Level To Check the Coolant Level
To Check the Coolant Level
To Check the Coolant Level
The coolant level can be seen on the side of the plastic coolant reservoir. The level of the cool-ant should be between the "LOW" and "FULL"lines on the reservoir when the engine is cold.If the level is below the "LOW" mark, addengine coolant to bring it up between "LOW"and "FULL". If the level is low, inspect forcoolant leaks and recheck the fluid level fre-quently. If the level drops again, visit yourHyundai dealer for an inspection and diagnosisof the reason. G050D02A-AAT
To Change the Engine Coolant
To Change the Engine Coolant To Change the Engine Coolant
To Change the Engine Coolant
To Change the Engine Coolant
The engine coolant should be changed at thoseintervals specified in the vehicle maintenanceschedule in Section 5.
CAUTION:
CAUTION: CAUTION:
CAUTION:
CAUTION:
Engine coolant can damage the finish of
Engine coolant can damage the finish of Engine coolant can damage the finish of
Engine coolant can damage the finish of
Engine coolant can damage the finish of
your car. If you spill engine coolant on the
your car. If you spill engine coolant on the your car. If you spill engine coolant on the
your car. If you spill engine coolant on the
your car. If you spill engine coolant on the
car, wash it off thoroughly with clean water.
car, wash it off thoroughly with clean water. car, wash it off thoroughly with clean water.
car, wash it off thoroughly with clean water.
car, wash it off thoroughly with clean water.
1. Park the car on level ground, set the parking brake and remove the radiator cap whencool.
2. Be sure your drain receptacle is in place. Open the drain cock on the radiator. Allowall the engine coolant to drain from thecooling system, then securely close the draincock.
3. Check Section 9 for the capacity of the cooling system in your car. Then, followingthe manufacturer's directions on the enginecoolant container, add the appropriate quan-tity of engine coolant to the radiator.
G050C01A
65% 60%50%40%
Water
Antifreeze
solution
Ambient
temperature °C ( °F) Engine coolant concentration
Page 105 of 249
DO-IT-YOURSELF MAINTENANCE
DO-IT-YOURSELF MAINTENANCE DO-IT-YOURSELF MAINTENANCE
DO-IT-YOURSELF MAINTENANCE
DO-IT-YOURSELF MAINTENANCE
6-9
G090A01X-GAT
FILLING THE WASHER RESERVOIR
FILLING THE WASHER RESERVOIR FILLING THE WASHER RESERVOIR
FILLING THE WASHER RESERVOIR
FILLING THE WASHER RESERVOIR
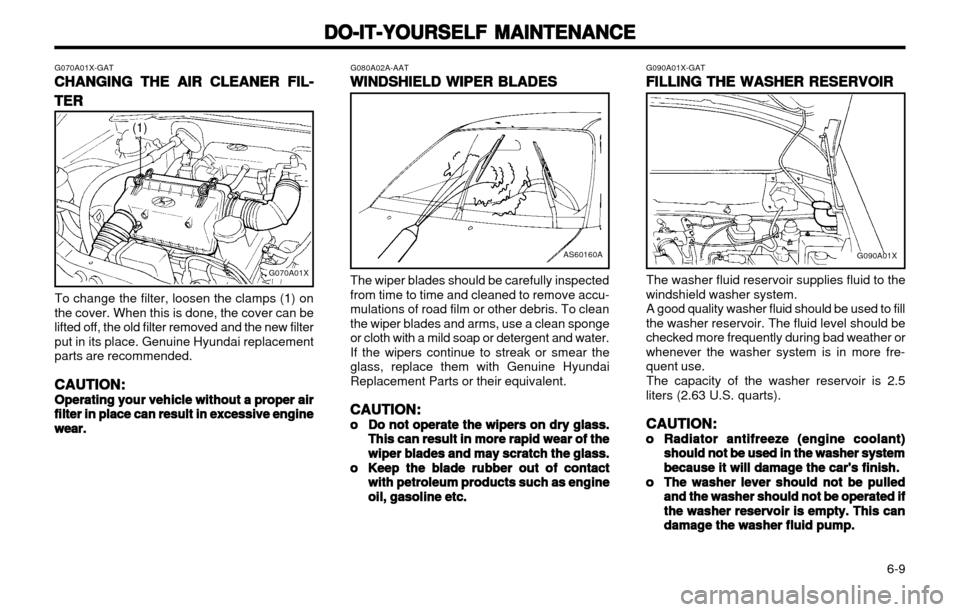
The washer fluid reservoir supplies fluid to the
windshield washer system. A good quality washer fluid should be used to fill
the washer reservoir. The fluid level should be checked more frequently during bad weather orwhenever the washer system is in more fre-quent use.
The capacity of the washer reservoir is 2.5
liters (2.63 U.S. quarts).
CAUTION:
CAUTION: CAUTION:
CAUTION:
CAUTION:
oo
oo
o Radiator antifreeze (engine coolant)
Radiator antifreeze (engine coolant) Radiator antifreeze (engine coolant)
Radiator antifreeze (engine coolant)
Radiator antifreeze (engine coolant)
should not be used in the washer system
should not be used in the washer system should not be used in the washer system
should not be used in the washer system
should not be used in the washer system
because it will damage the car's finish.
because it will damage the car's finish. because it will damage the car's finish.
because it will damage the car's finish.
because it will damage the car's finish.
oo
oo
o The washer lever should not be pulled
The washer lever should not be pulled The washer lever should not be pulled
The washer lever should not be pulled
The washer lever should not be pulled
and the washer should not be operated if
and the washer should not be operated if and the washer should not be operated if
and the washer should not be operated if
and the washer should not be operated if
the washer reservoir is empty. This can
the washer reservoir is empty. This can the washer reservoir is empty. This can
the washer reservoir is empty. This can
the washer reservoir is empty. This can
damage the washer fluid pump.
damage the washer fluid pump. damage the washer fluid pump.
damage the washer fluid pump.
damage the washer fluid pump.
G070A01X-GAT
CHANGING THE AIR CLEANER FIL-
CHANGING THE AIR CLEANER FIL- CHANGING THE AIR CLEANER FIL-
CHANGING THE AIR CLEANER FIL-
CHANGING THE AIR CLEANER FIL-
TER
TER TER
TER
TER G080A02A-AAT
WINDSHIELD WIPER BLADES
WINDSHIELD WIPER BLADES WINDSHIELD WIPER BLADES
WINDSHIELD WIPER BLADES
WINDSHIELD WIPER BLADES The wiper blades should be carefully inspected from time to time and cleaned to remove accu-mulations of road film or other debris. To cleanthe wiper blades and arms, use a clean spongeor cloth with a mild soap or detergent and water.If the wipers continue to streak or smear theglass, replace them with Genuine HyundaiReplacement Parts or their equivalent.
CAUTION:
CAUTION: CAUTION:
CAUTION:
CAUTION:
oo
oo
o Do not operate the wipers on dry glass.
Do not operate the wipers on dry glass. Do not operate the wipers on dry glass.
Do not operate the wipers on dry glass.
Do not operate the wipers on dry glass.
This can result in more rapid wear of the
This can result in more rapid wear of the This can result in more rapid wear of the
This can result in more rapid wear of the
This can result in more rapid wear of the
wiper blades and may scratch the glass.
wiper blades and may scratch the glass. wiper blades and may scratch the glass.
wiper blades and may scratch the glass.
wiper blades and may scratch the glass.
oo
oo
o Keep the blade rubber out of contact
Keep the blade rubber out of contact Keep the blade rubber out of contact
Keep the blade rubber out of contact
Keep the blade rubber out of contact
with petroleum products such as engine
with petroleum products such as engine with petroleum products such as engine
with petroleum products such as engine
with petroleum products such as engine
oil, gasoline etc.
oil, gasoline etc. oil, gasoline etc.
oil, gasoline etc.
oil, gasoline etc.
To change the filter, loosen the clamps (1) on
the cover. When this is done, the cover can be
lifted off, the old filter removed and the new filterput in its place. Genuine Hyundai replacement
parts are recommended.
CAUTION:
CAUTION: CAUTION:
CAUTION:
CAUTION:
Operating your vehicle without a proper air
Operating your vehicle without a proper air Operating your vehicle without a proper air
Operating your vehicle without a proper air
Operating your vehicle without a proper air filter in place
filter in place filter in place
filter in place
filter in place can result in excessive engine
can result in excessive engine can result in excessive engine
can result in excessive engine
can result in excessive engine
wear.
wear. wear.
wear.
wear.
G070A01X
(1)
AS60160AG090A01X
Page 126 of 249

INDEX
INDEX INDEX
INDEX
INDEX
10-2 EE
EE
E
Emission Control System ................................................................... 7-1Engine
Before starting the engine .............................................................. 2-2
Compartment (For MFI) ................................................................. 6-1 Coolant ........................................................................................... 6-5
Coolant temperature gauge ......................................................... 1-22
If the engine overheats .................................................................. 3-2 Number .......................................................................................... 8-1
Oil .................................................................................................. 6-2
Oil consumption ............................................................................. 6-3
Starting ........................................................................................... 2-3
Engine Exhaust Can Be Dangerous ................................................... 2-1
FF
FF
F
Fan Speed Control ............................................................................ 1-34
Fog Light
Front ............................................................................................. 1-31
Rear ............................................................................................. 1-31
Front Seats Adjustable front seats .................................................................... 1-5
Adjustable headrests ..................................................................... 1-6
Adjusting seat forward and rearward ............................................. 1-5
Adjusting seatback angle ............................................................... 1-6
Fuel Capacity ......................................................................................... 9-1Gauge .......................................................................................... 1-22
Recommendations ......................................................................... 1-1 Fuel Filler Lid
Remote release ............................................................................ 1-31
Fuses ................................................................................................ 6-15
GG
GG
G
General Everyday Checks .................................................................. 6-2
HH
HH
H
Hazard Warning System ................................................................... 1-27
Headlight ........................................................................................... 6-17
Headlight Bulb Replacement ............................................................. 6-17
Headlight Leveling Device System ................................................... 1-25
Heating and Ventilation
High-mounted Rear Stoplight ............................................................ 1-28
Hood Release ................................................................................... 1-32
Horn ................................................................................................ 1-33
II
II
I
Ignition Switch ..................................................................................... 2-2
Immobilizer System ............................................................................. 1-2
Instrument Cluster and Indicator ....................................................... 1-19
Instruments and Controls .................................................................. 1-18
Interior Light ...................................................................................... 1-27
JJ
JJ
J
Jump Starting ...................................................................................... 3-1
KK
KK
K
Keys .................................................................................................. 1-2
If you lose your keys ..................................................................... 3-8
Positions ........................................................................................ 2-2
Page 157 of 249
FEATURES OF YOUR HYUNDAI
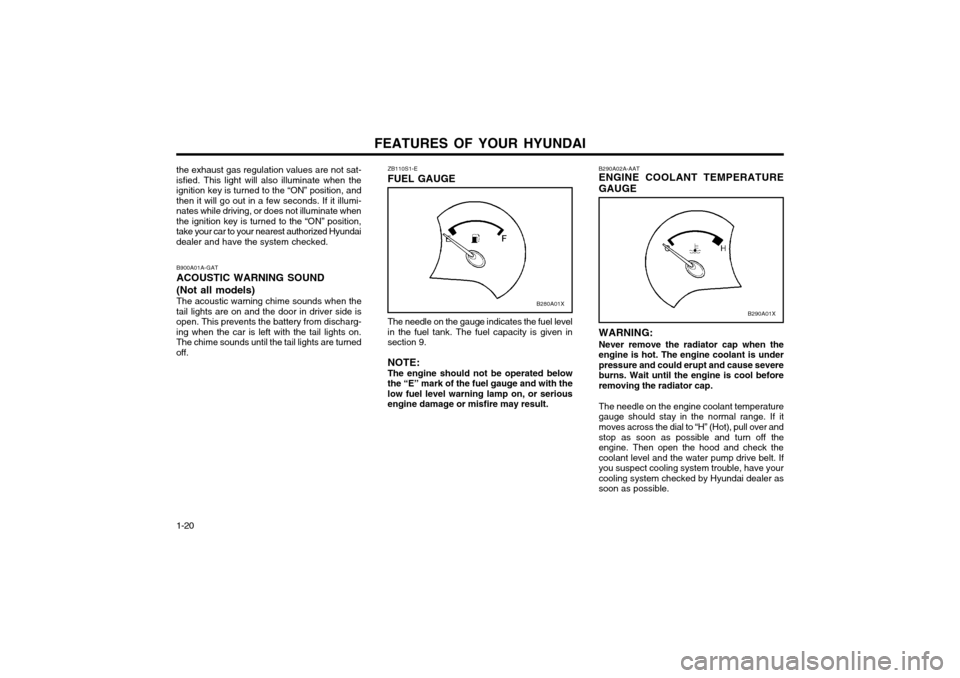
1-20 WARNING: Never remove the radiator cap when the engine is hot. The engine coolant is underpressure and could erupt and cause severeburns. Wait until the engine is cool beforeremoving the radiator cap. The needle on the engine coolant temperature
gauge should stay in the normal range. If itmoves across the dial to “H” (Hot), pull over and stop as soon as possible and turn off the engine. Then open the hood and check thecoolant level and the water pump drive belt. If
you suspect cooling system trouble, have yourcooling system checked by Hyundai dealer assoon as possible.
The needle on the gauge indicates the fuel levelin the fuel tank. The fuel capacity is given insection 9. NOTE: The engine should not be operated below the “E” mark of the fuel gauge and with thelow fuel level warning lamp on, or seriousengine damage or misfire may result. B290A02A-AAT ENGINE COOLANT TEMPERATURE GAUGE
ZB110S1-E FUEL GAUGE
B900A01A-GATACOUSTIC WARNING SOUND (Not all models) The acoustic warning chime sounds when the
tail lights are on and the door in driver side is open. This prevents the battery from discharg-ing when the car is left with the tail lights on.The chime sounds until the tail lights are turnedoff.
the exhaust gas regulation values are not sat-isfied. This light will also illuminate when theignition key is turned to the “ON” position, andthen it will go out in a few seconds. If it illumi-nates while driving, or does not illuminate whenthe ignition key is turned to the “ON” position,take your car to your nearest authorized Hyundaidealer and have the system checked.
B280A01XB290A01X
Page 223 of 249
DO-IT-YOURSELF MAINTENANCE 6-5
G040A05XNOTE: Always dispose of used engine oil in an
environmentally acceptable manner. It is suggested that it be placed in a sealed con-tainer and taken to a service station forreclamation. Do not pour the oil on theground or put it into the household trash.
WARNING: Used motor oil may cause irritation or can-
cer of the skin if left in contact with the skin for prolonged periods of time. Wash yourhands thoroughly with soap and warm wa-ter as soon as possible after handling usedoil.
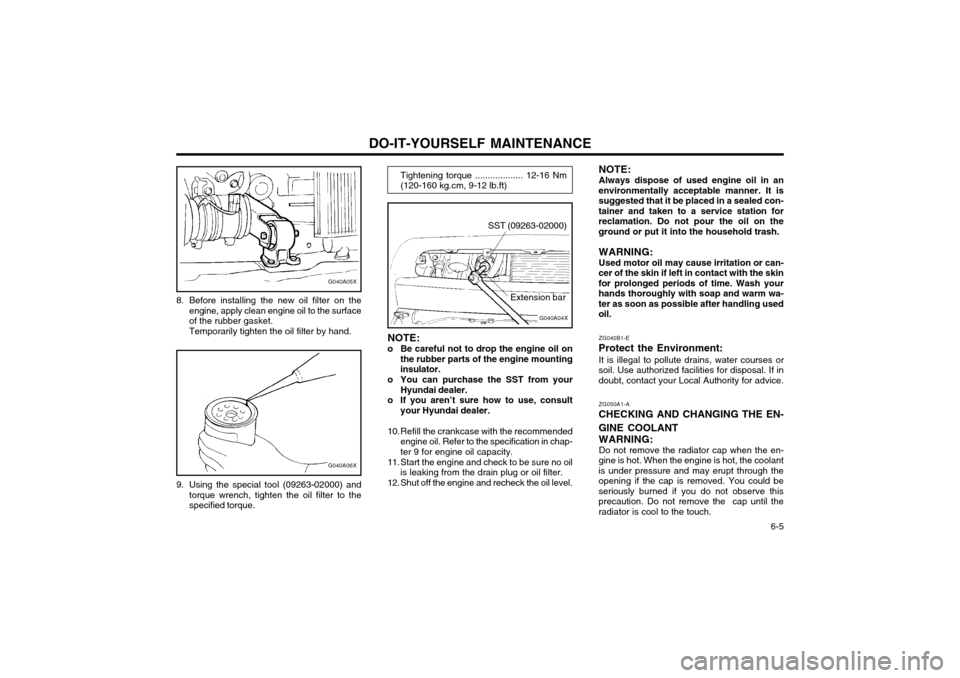
8. Before installing the new oil filter on the
engine, apply clean engine oil to the surfaceof the rubber gasket.Temporarily tighten the oil filter by hand.
G040A06X
9. Using the special tool (09263-02000) andtorque wrench, tighten the oil filter to the specified torque.
Tightening torque ................... 12-16 Nm (120-160 kg.cm, 9-12 lb.ft)
G040A04X
SST (09263-02000)
Extension bar
NOTE:
o Be careful not to drop the engine oil on the rubber parts of the engine mounting insulator.
o You can purchase the SST from your Hyundai dealer.
o If you aren’t sure how to use, consult your Hyundai dealer.
10. Refill the crankcase with the recommended engine oil. Refer to the specification in chap-ter 9 for engine oil capacity.
11. Start the engine and check to be sure no oil is leaking from the drain plug or oil filter.
12. Shut off the engine and recheck the oil level. ZG040B1-E
Protect the Environment: It is illegal to pollute drains, water courses or
soil. Use authorized facilities for disposal. If indoubt, contact your Local Authority for advice.
ZG050A1-A
CHECKING AND CHANGING THE EN- GINE COOLANT
WARNING: Do not remove the radiator cap when the en-
gine is hot. When the engine is hot, the coolant is under pressure and may erupt through theopening if the cap is removed. You could beseriously burned if you do not observe thisprecaution. Do not remove the cap until theradiator is cool to the touch.
Page 224 of 249
DO-IT-YOURSELF MAINTENANCE
6-6 ZG050B1-A
Recommended Coolant
G050B01A
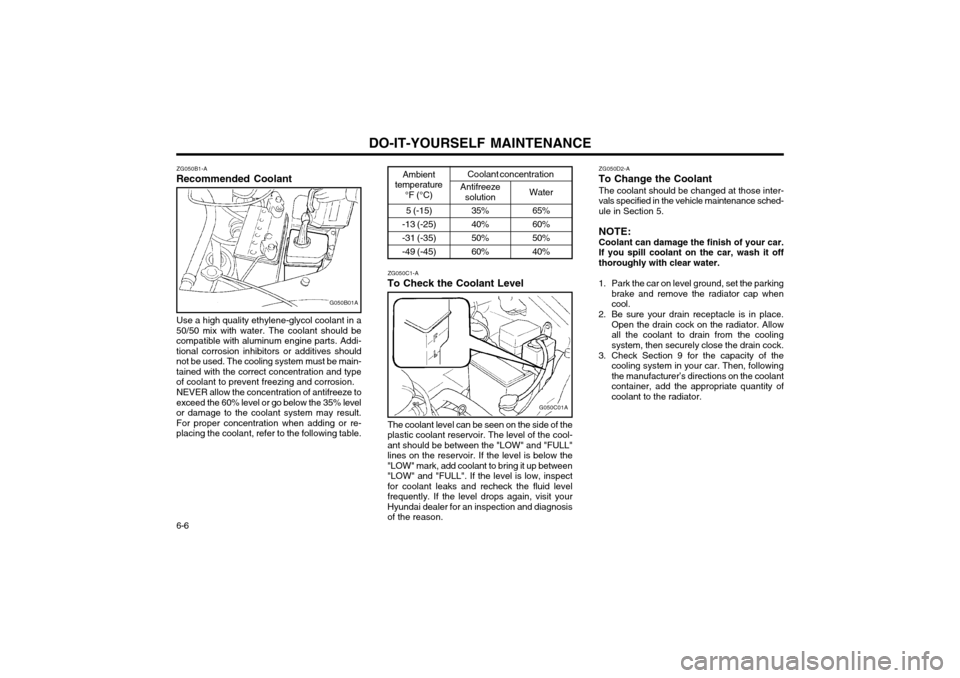
Use a high quality ethylene-glycol coolant in a
50/50 mix with water. The coolant should be compatible with aluminum engine parts. Addi-tional corrosion inhibitors or additives shouldnot be used. The cooling system must be main-tained with the correct concentration and typeof coolant to prevent freezing and corrosion.
NEVER allow the concentration of antifreeze to
exceed the 60% level or go below the 35% levelor damage to the coolant system may result.For proper concentration when adding or re-placing the coolant, refer to the following table.
Coolant concentration
ZG050C1-A
To Check the Coolant Level
G050C01A
The coolant level can be seen on the side of the
plastic coolant reservoir. The level of the cool- ant should be between the "LOW" and "FULL"lines on the reservoir. If the level is below the"LOW" mark, add coolant to bring it up between"LOW" and "FULL". If the level is low, inspectfor coolant leaks and recheck the fluid levelfrequently. If the level drops again, visit yourHyundai dealer for an inspection and diagnosisof the reason. ZG050D2-A
To Change the Coolant
The coolant should be changed at those inter-vals specified in the vehicle maintenance sched-ule in Section 5. NOTE: Coolant can damage the finish of your car. If you spill coolant on the car, wash it offthoroughly with clear water.
1. Park the car on level ground, set the parking brake and remove the radiator cap whencool.
2. Be sure your drain receptacle is in place. Open the drain cock on the radiator. Allowall the coolant to drain from the coolingsystem, then securely close the drain cock.
3. Check Section 9 for the capacity of the cooling system in your car. Then, followingthe manufacturer’s directions on the coolantcontainer, add the appropriate quantity ofcoolant to the radiator.
Water
Antifreeze
solution
35% 40%50%60%
Ambient
temperature °F (°C)
5 (-15)
-13 (-25)-31 (-35)-49 (-45) 65%60%50%40%