Page 288 of 399
To add oil, unscrew and remove the
engine oil f ill cap on top of the valve
cover. Pour in the oil, and install the
engine oil f ill cap. Tighten it securely.
Wait a f ew minutes and recheck the
oil level. Do not f ill above the upper
mark; you could damage the engine.Oil is a major contributor to your
engine’s perf ormance and longevity.
Always use a premium-grade 5W-20
detergent oil displaying the API
Certif ication Seal. This seal indicates
the oil is energy conserving, and that
it meets the American Petroleum
Institute’s latest requirements.
Genuine Honda Motor Oil is the
pref erred 5W-20 lubricant f or your
vehicle. It is highly recommended
that you use genuine Honda Motor
Oil in your vehicle f or optimum
engine protection.
Make sure the API Certif ication Seal
says ‘‘For Gasoline Engines.’’
CONT INUED
Recommended Oil
A dding Oil
Engine Oil
Maint enance285
E E N
NG GIINNE E O
OIILL F
FIILLL L C
CAA P
P
A
AP
PI
IC
CE ER
RT TI
IFFI ICCA A T
TI
IOON N S
SEEA
A L
L
Page 289 of 399
The oil’s viscosity or weight is
provided on the container’s label.
Select the oil f or your vehicle
according to this chart.5W-20 oil is f ormulated f or year-
round protection of your Honda, to
improve cold weather starting, and
to help your engine use less f uel.
If 5W-20 oil is not available, a 5W-30
oil may be used. However, it should
be replaced with 5W-20 at the next
oil change.You may use a synthetic motor oil if
it meets the same requirements
given f or a conventional motor oil: it
displays the API Certif ication Seal,
and it is the proper weight as shown
on the chart. When using synthetic
oil, you must f ollow the oil and f ilter
change intervals given in the
maintenance schedule. Synthetic Oil
Engine Oil
Maint enance286
A A
m
m b
bi
ieen n t
t T
Te
emm p
pe
erraat tuu r
ree
Page 290 of 399
 recommenda-
tions in the maintenance schedule.
The oil and f ilter collect contami-
nants that can damage your engine")
Always change the oil and f ilter
accordingtothetimeanddistance
(miles/kilometers) recommenda-
tions in the maintenance schedule.
The oil and f ilter collect contami-
nants that can damage your engine if
they are not removed regularly.
Changing the oil and f ilter requires
special tools and access f rom
underneath the vehicle. The vehicle
should be raised on a service station-
type hydraulic lif t f or this service.
Unless you have the knowledge and
proper equipment, you should have
this maintenance done by a skilled
mechanic.Run the engine until it reaches
normal operating temperature,
then shut it off. Open the hood and remove the
engine oil f ill cap. Remove the oil
drain bolt and washer f rom the
bottom of the engine. Drain the oil
into an appropriate container.
Your Honda does not require any oil
additives. Additives may adversely
af f ect your engine’s or transmission’s
perf ormance and durability.
1.2.
CONT INUED
Additives
Changing the Oil and Filter
Engine Oil
Maint enance287
D DR
RAA I
INN B
BOOL LTT
W
WA
AS
SHH E
ER
R
Page 291 of 399
 is required to
remove the f ilter.
Install a new oil f ilter according to
instructions that")
Remove the oil f ilter and let the
remaining oil drain. A special
wrench (available from your
Honda dealer) is required to
remove the f ilter.
Install a new oil f ilter according to
instructions that come with it.
Put a new washer on the drain bolt,
then reinstall the drain bolt.
Tighten it to:Refill the engine with the recom-
mended oil.
Engine oil change capacity
(including f ilter):
Replace the engine oil f ill cap.
Start the engine. The oil pressure
indicator light should go out within
f ive seconds. If it does not, turn of f
the engine and reinspect your
work.
Let the engine run f or several
minutes and check the drain bolt
and oil f ilter f or leaks.
Turn of f the engine, let it sit f or
several minutes, then check the oil
level. If necessary, add oil to bring
the level to the upper mark on the
dipstick.
9. 8. 7. 6.
4.
5. 3.
Engine Oil
Maint enance288
O OI ILL F
FIILLT T E
ER
R
29 lbf·ft (39 N·m , 4.0 kgf·m) 4.6 US qt (4.4
, 3.9 Imp qt)
Improper disposal of engine oil can be
harmf ul to the environment. If you
change your own oil, please dispose of
the used oil properly. Put it in a sealed
container and take it to a recycling
center. Do not discard it in a trash bin
or dump it on the ground.
Page 303 of 399
The spark plugs in your vehicle are a
special platinum-tipped design f or
longer lif e. The spark plugs should
be replaced according to the time
and distance recommendations in
the maintenance schedule.
Clean the hood latch assembly with a
mild cleaner, then lubricate it with a
multipurpose grease. Lubricate all
the moving parts (pointed by arrows),
including the pivot. Follow the time
and distance recommendations in
the Maintenance Schedule. If you
are not sure how to clean and grease
the latch, contact your Honda dealer. Loosen the two holding clips by
turning the heads one-quarter turn
counterclockwise with a f lat-tipped
screwdriver. Remove the cover on
the f ront cylinder bank by pulling
it straight up.
Clean up any dirt and oil that have
collected around the ignition coils.
1.
2.
Maint enance
Hood L atch
Spark PlugsReplacement
Hood L at ch, Spark Plugs
300
L LAA T
TC
CH H A
AS
SSSEEM
M B
BLLYY
H
HO
OL LDD I
INNG G C
CLLIIPP
Page 304 of 399
CONT INUED
Disconnect the wire connector
f rom the ignition coil by pushing
on the lock tab and pulling on the
connector. Pull on the plastic
connector, not the wires.Remove the spark plug with
a f ive-eighths inch (16 mm) spark
plug socket. Use a wrench to remove the
hexagonsocketheadcapbolt
holding the ignition coil. Remove
the ignition coil by pulling it
straight out.Put the new spark plug into the
socket; then screw it into the hole.
Screw it in by hand so you do not
crossthread it.
3.
4.
5.6.
Spark Plugs
Maint enance301
H H
E
EX
X A
AG
GO ONN S
SOOC CKKEET
T H
HE
EA
A D
D C
CAA P
P B
BOOL LTT
Page 305 of 399
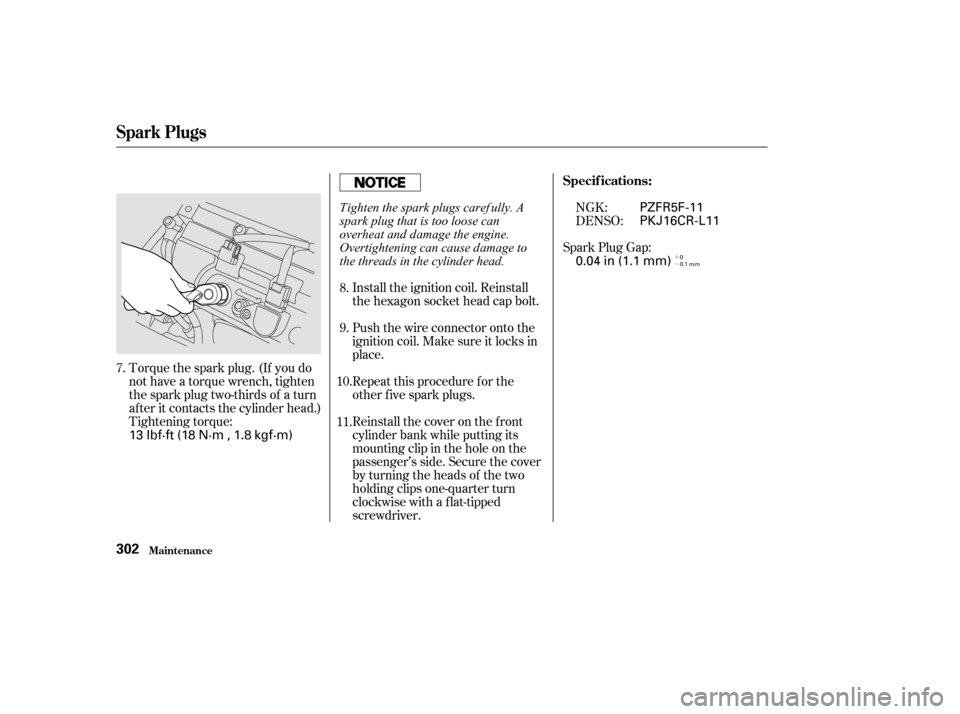
�´
�µ
Torque the spark plug. (If you do
not have a torque wrench, tighten
the spark plug two-thirds of a turn
af ter it contacts the cylinder head.)
Tightening torque:Spark Plug Gap:
Install the ignition coil. Reinstall
the hexagon socket head cap bolt.
Push the wire connector onto the
ignition coil. Make sure it locks in
place.
Repeat this procedure f or the
other f ive spark plugs.
Reinstall the cover on the front
cylinder bank while putting its
mounting clip in the hole on the
passenger’s side. Secure the cover
by turning the heads of the two
holding clips one-quarter turn
clockwise with a f lat-tipped
screwdriver. NGK:
DENSO:
7. 8.
9.
10.
11. Specif ications:
Spark Plugs
Maint enance302
13 lbf·ft (18 N·m , 1.8 kgf·m)
0.04 in (1.1 mm)
PKJ16CR-L11 PZFR5F-11
0
0.1 mm
Tighten the spark plugs caref ully. A
spark plug that is too loose can
overheat and damage the engine.
Overtightening can cause damage to
the threads in the cylinder head.
Page 310 of 399

Run the air conditioning at least once
a week during the cold weather
months. Run it f or at least ten
minutes while you are driving at a
steady speed with the engine at
normal operating temperature. This
circulates the lubricating oil con-
tained in the ref rigerant.If the air conditioning does not get as
cold as before, have your dealer
check the system. Recharge the
system with Ref rigerant HFC-134a
(R-134a). (See Specif ications on page
.)
Your vehicle’s air conditioning is a
sealed system. Any major mainte-
nance, such as recharging, should be
done by a qualif ied mechanic. You
can do a couple of things to make
sure the air conditioning works
ef f iciently.
Periodically check the engine’s
radiator and air conditioning
condenser f or leaves, insects, and
dirt stuck to the f ront surf ace. These
block the air f low and reduce cooling
ef f iciency. Use a light spray f rom a
hose or a sof t brush to remove them. 370
Maint enance
A ir Condit ioning Syst em
307
A A
I
IRR C
COON NDDI
ITT I
IOON NIINNG G
C
CO ON NDDE
EN
NS SEER
R
Whenever you have the air conditioning
system serviced, make sure the service
f acility uses a ref rigerant recycling
system. This system captures the
ref rigerant f or reuse. Releasing
ref rigerant into the atmosphere can
damage the environment.
The condenser and radiator f ins bend
easily. Only use a low-pressure spray
or sof t-bristle brush to clean them.