Page 48 of 399
CONT INUED
Your vehicle has attachment points
for a tether-style child seat to be
installed on the second or third row
as shown.
Since a tether can provide additional
security, we recommend using a
tether whenever one is required or
available.Each second row bucket seat has a
tether attachment point on the
underside of the seat cushion.Lift the head restraint, then route
the tether strap over the seat-back
between the legs of the head
restraint.
Second Seat Installation:
Driver and Passenger Saf ety
Protecting Children
Using Child Seats with T ethers
45
T T
E
ET
TH
H E
ER
R A
AT
TT
TA
A C
CHH M
M E
EN
NT T P
PO
OI INNT T
Page 50 of 399
CONT INUED
Put the child seat in a second row
vehicle seat and attach the child
seat to the lower anchors
according to the child seat maker’s
instructions.
Your vehicle is equipped with
LATCH (Lower Anchors and
Tethers f or Children) at the second
row seats. The lower anchors are
located between the seat-back and
seat bottom and are only to be used
with a child seat designed f or use
with LATCH. The exact location of each lower
anchorage is marked with a small
circle above the lower anchorage
point.
To install a LATCH-compatible child
seat:
Move the seat belt buckle or seat
belt tongue away f rom the lower
anchors.
Make sure there are no f oreign
objects around the anchors.
Foreign objects could get in the
way of a secure connection
between the child seat and the
anchors.
1.
2.
3.
Protecting Children
Driver and Passenger Saf ety
Using L A T CH
47
R RIIGGI IDD T
TY
YP PE
E
L
LO
OW WE ER
R
A
A N
NC CHH O
OR RSS
Page 51 of 399
Follow the child seat maker’s
instructions f or any additional
advice on adjusting or tightening
the fit.Attach the tether strap hook to the
tether anchorage point and tighten
the strap according to the child
seat maker’s instructions. Make
sure the strap is not twisted.
Push and pull the child seat
f orward and f rom side to side to
verif y that it is secure enough to
stay upright during normal driving
maneuvers.
4.
5.
6.
Protecting Children
Driver and Passenger Saf ety48
F FLLEE X
X I
IBBL LEE T
TY
YP PE
E
Page 53 of 399

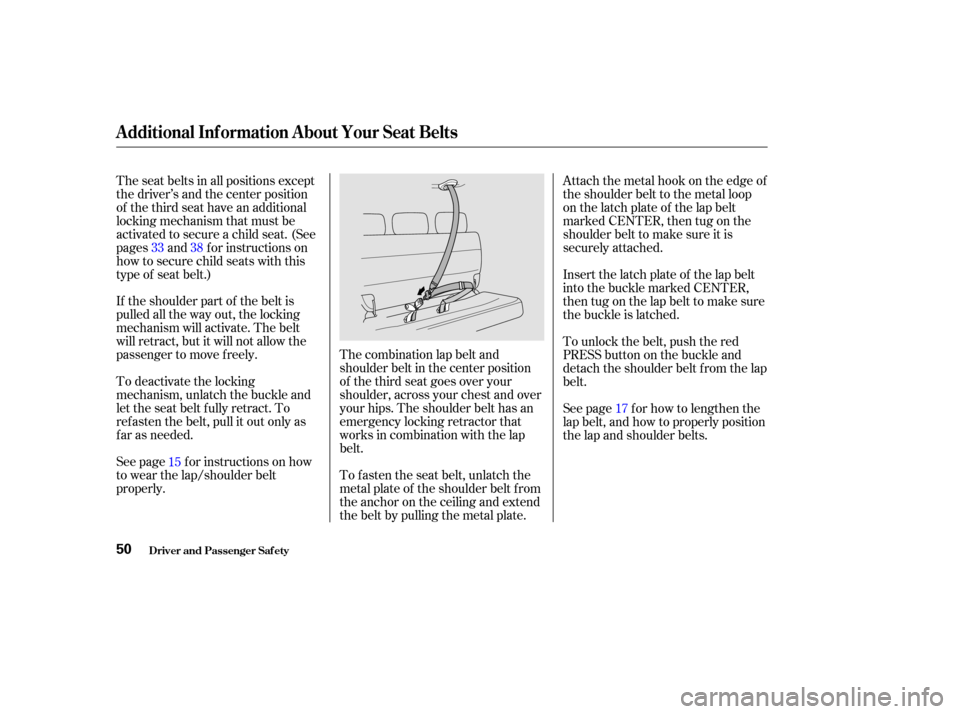
The combination lap belt and
shoulder belt in the center position
of the third seat goes over your
shoulder, across your chest and over
your hips. The shoulder belt has an
emergency locking retractor that
works in combination with the lap
belt.
The seat belts in all positions except
the driver’s and the center position
of the third seat have an additional
locking mechanism that must be
activated to secure a child seat. (See
pages and f or instructions on
how to secure child seats with this
type of seat belt.)
If the shoulder part of the belt is
pulled all the way out, the locking
mechanism will activate. The belt
will retract, but it will not allow the
passenger to move f reely.
To deactivate the locking
mechanism, unlatch the buckle and
let the seat belt f ully retract. To
ref asten the belt, pull it out only as
f ar as needed.
See page f or instructions on how
to wear the lap/shoulder belt
properly.
To f asten the seat belt, unlatch the
metal plate of the shoulder belt from
the anchor on the ceiling and extend
the belt by pulling the metal plate.Attach the metal hook on the edge of
the shoulder belt to the metal loop
on the latch plate of the lap belt
marked CENTER, then tug on the
shoulder belt to make sure it is
securely attached.
Insert the latch plate of the lap belt
into the buckle marked CENTER,
then tug on the lap belt to make sure
the buckle is latched.
To unlock the belt, push the red
PRESS button on the buckle and
detach the shoulder belt f rom the lap
belt.
See page f or how to lengthen the
lap belt, and how to properly position
the lap and shoulder belts.
15 17
33 38
Additional Inf ormation About Your Seat Belts
Driver and Passenger Saf ety50
Page 81 of 399
Push the lever up to lock the
steering wheel in that position.
Make sure you have securely
locked the steering wheel in place
by trying to move it up and down.
To adjust the steering wheel upward
or downward: Push the lever under the steering
column all the way down.
Move the steering wheel to the
desired position, making sure the
wheel points toward your chest,
not toward your f ace. Make sure
you can see the instrument panel
gauges and the indicator lights.
Make any steering wheel adjustment
bef ore you start driving.
3.
4.
1.
2.
See page f or important saf ety inf ormation about how to properlyposition the steering wheel. 19
Controls Near the Steering Wheel
Inst rument s and Cont rols
Steering Wheel A djustment
78
Adjusting the steering wheel
position while driving may
cause you to lose control of the
vehicle and be seriously injured
inacrash.
Adjust the steering wheel only
when the vehicle is stopped.
Page 94 of 399

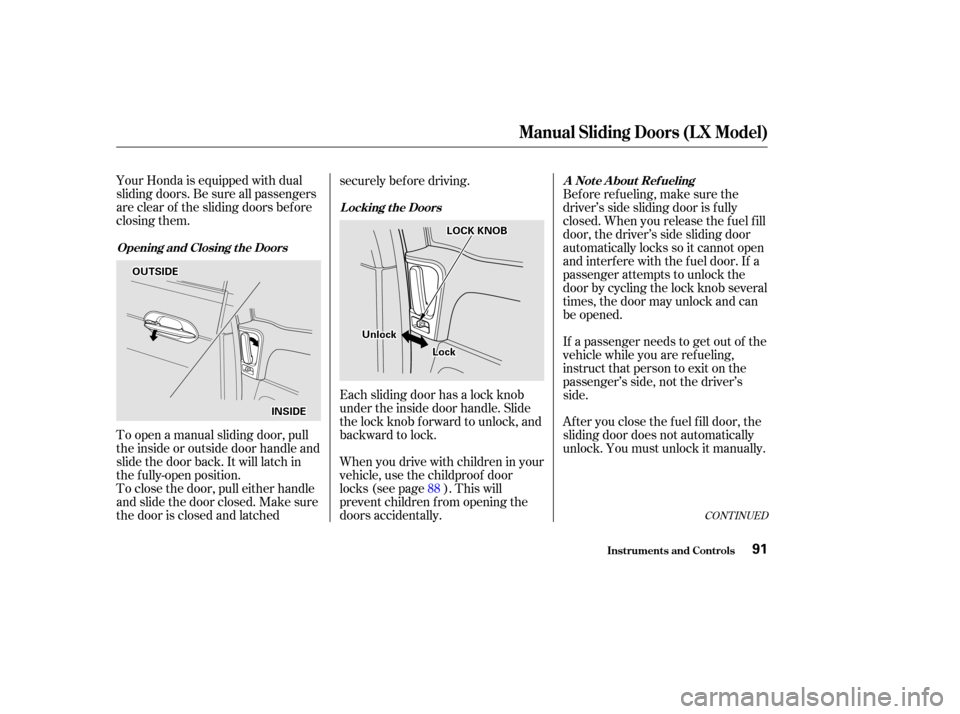
Your Honda is equipped with dual
sliding doors. Be sure all passengers
are clear of the sliding doors bef ore
closing them.
To open a manual sliding door, pull
the inside or outside door handle and
slide the door back. It will latch in
the f ully-open position.
To close the door, pull either handle
and slide the door closed. Make sure
the door is closed and latchedsecurely bef ore driving.
Each sliding door has a lock knob
under the inside door handle. Slide
the lock knob f orward to unlock, and
backward to lock.
Whenyoudrivewithchildreninyour
vehicle, use the childproof door
locks (see page ). This will
prevent children f rom opening the
doors accidentally.
Bef ore ref ueling, make sure the
driver’s side sliding door is f ully
closed. When you release the f uel f ill
door, the driver’s side sliding door
automatically locks so it cannot open
and interfere with the fuel door. If a
passenger attempts to unlock the
door by cycling the lock knob several
times, the door may unlock and can
be opened.
If a passenger needs to get out of the
vehicle while you are ref ueling,
instruct that person to exit on the
passenger’s side, not the driver’s
side.
Af ter you close the f uel f ill door, the
sliding door does not automatically
unlock. You must unlock it manually.
88
CONT INUED
Opening and Closing t he Doors L ocking t he Doors
A Not e A bout Ref ueling
Manual Sliding Doors (L X Model)
Inst rument s and Cont rols91
O OU
UTTS
SI IDD E
E
I
INNS SIIDD E
E U
Un
nl
loo c
ckk
L
Loo c
ckk
L
LO
OC CKK K
KNNO OBB
Page 109 of 399
The second row bucket seat on the
passenger’s side can be moved to the
center to provide access to the third
row seat.
Remove the two floor covers
between the bucket seats in the
second row by caref ully prying on
the back edge of the covers with a
f lat-tipped screwdriver.Unlock the seat f rom the f loor by
pulling the lock release lever under
the seat cushion’s f ront edge and
lifting the rear of the seat.
Slide the seat toward the center of
the vehicle.Push the back of the seat down over
the f loor hooks. Make sure the seat
is securely locked in place.
Seats
Inst rument s and Cont rols
Moving the Second Row Bucket
Seat
106
L LO
OC CKK
R
RE EL
LEE A
A S
SEE
L
LE E V
V E
ER
R
Page 110 of 399
Install the f loor covers over the outer
f loor hooks on the passenger’s side
as shown.Make sure the seat is securely
locked in place bef ore driving. A seat
thatisnotlockedinplacecouldfly
around and cause injury in a sudden
stop or crash.
Reversethisproceduretomovethe
seat back to the outside.
Seats
Inst rument s and Cont rols107