Page 116 of 399
Your vehicle’s f ront windows are
electrically-powered. Turn the
ignition switch to ON (II) to raise or
lower either window.
Therearwindowsarealso
electrically-powered (see page ).Each f ront door has a switch that
controls its window. To open the
window, push the switch down and
hold it. Release the switch when you
want the window to stop. Close the
window by pulling back on the
switch and holding it.The driver’s door armrest has a
master power window control panel.
To open the f ront passenger’s
window, push down on the switch
and hold it down until the window
reaches the desired position. To
close the window, pull back on the
window switch. Release the switch
when the window gets to the position
you want.
115
CONT INUED
Power Windows
Inst rument s and Cont rols113
D D
R
RIIVV E
ER
R’ ’SS W
WI INND DO
OW W
S
SW WI ITT C
CH H M
M
A
AI
INN S
SWWI ITT C
CH H
Page 117 of 399

�µ
The master control panel also con-
tains these extra features:
To open the driver’s
window f ully, push the window
switch f irmly down and release it.
The window automatically goes all
the way down. To stop the window
f rom going all the way down, pull
back on the window switch brief ly.
To open the driver’s window only
partially, push the window switch
down lightly and hold it. The window
will stop as soon as you release the
switch.
The AUTO f unction only works to
lower the driver’s window. To raise
the window, you must pull back on
the window switch and hold it until
the window reaches the desired
position. The MAIN switch controls power to
the f ront passenger’s window and
the rear power windows. With this
switch of f , the f ront passenger’s
window cannot be raised or lowered
and the rear windows cannot be
opened or closed. The MAIN switch
does not af f ect the driver’s window.
Keep the MAIN switch of f when you
have children in the vehicle so they
do not injure themselves by
operating the windows
unintentionally.
AUTO
Power Windows
Inst rument s and Cont rols114
Closing a power window on
someone’s hands or fingers can
cause serious injury.
Make sure your passengers are
away from the windows before
closing them.
Page 118 of 399
Youcanopenorcloseeachrear
window with the switches on the
driver’s door armrest. The right
switch controls the passenger’s side
rear window and the lef t switch
controls the driver’s side window. To
open the window, push the switch
downandholdit.Releasetheswitch
when you want the window to stop.
Close the window by pulling back on
the switch and holding it.
The power window system has a key-
of f delay f unction. The windows will
stilloperateforuptotenminutes
after you turn off the ignition.
Opening either f ront door cancels
the delay function. You must turn
the ignition switch ON (II) again
bef ore you can operate the windows.
Power Windows
Inst rument s and Cont rols115
R RE
EA
A R
R W
WI INND DO
OW W S
SWWI ITT C
CH H E
ES
S
Page 130 of 399

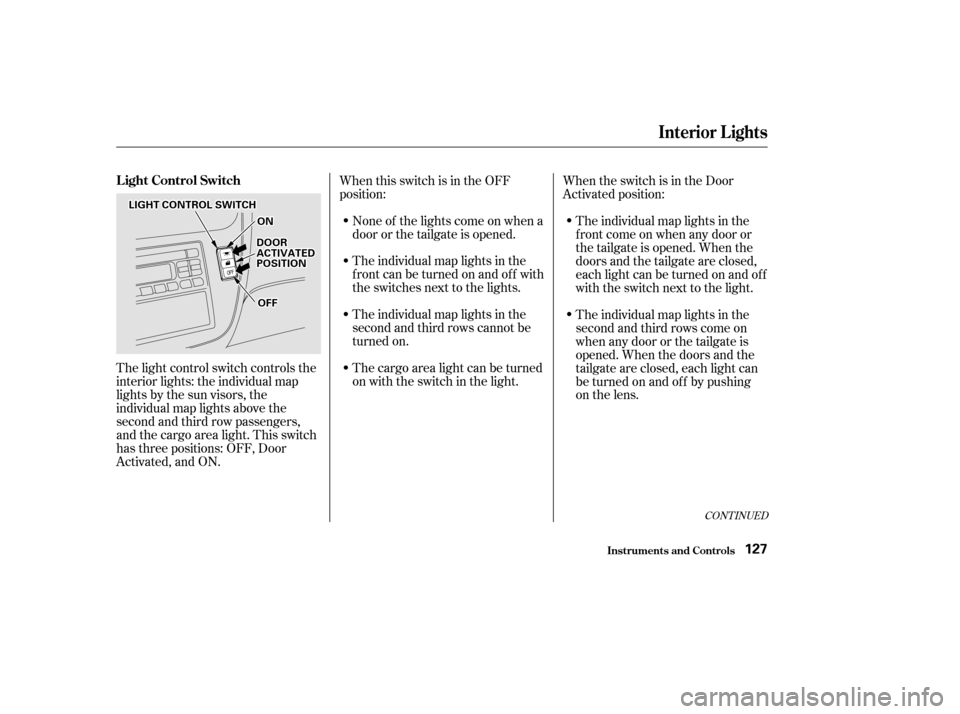
The light control switch controls the
interior lights: the individual map
lights by the sun visors, the
individual map lights above the
second and third row passengers,
and the cargo area light. This switch
has three positions: OFF, Door
Activated, and ON.When this switch is in the OFF
position:
None of the lights come on when a
door or the tailgate is opened.
The individual map lights in the
f ront can be turned on and of f with
the switches next to the lights.
The individual map lights in the
second and third rows cannot be
turned on.
The cargo area light can be turned
on with the switch in the light. The individual map lights in the
f ront come on when any door or
thetailgateisopened.Whenthe
doors and the tailgate are closed,
eachlightcanbeturnedonandoff
with the switch next to the light.
The individual map lights in the
second and third rows come on
when any door or the tailgate is
opened. When the doors and the
tailgate are closed, each light can
be turned on and of f by pushing
on the lens.
When the switch is in the Door
Activated position:
CONT INUED
Inst rument s and Cont rols
Interior Lights
L ight Control Switch
127
L LI
IGGH HT
T C
COON NTTR
RO OL L S
SWWI ITT C
CH H
O
ONN
D
D O
OO ORR
A
A C
CTTI
IVV A
AT
TE
ED
D
P
P O
OS SIITT I
IOON N
O
OF FFF
Page 134 of 399

.....................
Heating and Cooling .132
.........
What Each Control Does . 132
............
How to Use the System . 135
..........
To Turn Everything Of f . 139
...............
Climate Control System . 140
(EX model and EX-L model without Navigation System) .......
Fully-automatic Operation . 142
.......
Semi-automatic Operation . 144
(EX-L model with Navigation System) .......
Fully-automatic Operation . 148
.......
Semi-automatic Operation . 149
Sunlight Sensor/ ............
Temperature Sensor . 153
...........................
Rear A/C Unit .154
.......................
Audio System (LX) .157
AM/FM/Cassette Stereo ........................
Audio System .157
.................
Operating the Radio . 158
.................
Adjusting the Sound . 161
............
Audio System Lighting . 162
Operating the Cassette .....................................
Player .162
............
Tape Search Functions . 162Operating the Optional CD
....................
Player/Changer .165
CD Changer Error .............................
Indications .168
............
Audio System (EX, EX-L) . 169
....
AM/FM/CD Audio System . 169
.................
Operating the Radio . 170
.................
Adjusting the Sound . 174
............
Audio System Lighting . 175
....................
Radio Frequencies . 175
........................
Radio Reception .175
.........
Operating the CD Player . 177
.....
Operating the CD Changer . 179
.......
Protecting Compact Discs . 180
....
CD Player Error Indications . 181
CD Changer Error .............................
Indications .182
Operating the Cassette .....................................
Player .183
............
Tape Search Functions . 184
Caring f or the Cassette .....................................
Player .186
...........
Remote Audio Controls . 187
.......................
Thef t Protection .188 Audio System (Optional on
..................
U.S. EX-L model) . 189
AM/FM/CD/DVD Audio ....................................
System .189
.................
Operating the Radio . 191
.................
Adjusting the Sound . 195
............
Audio System Lighting . 196
Operating the Cassette .....................................
Player .197
.........
Operating the CD Player . 200
.....
Operating the CD Changer . 202
....
CD Player Error Indications . 203
CD Changer Error .............................
Indications .204
........
Rear Entertainment System . 205
............................
Security System .221
...............................
Cruise Control .222
HomeLink Universal .................................
Tranceiver .225
Comf ort and Convenience Features
Comf ort and Convenience Feat ures131
Page 135 of 399

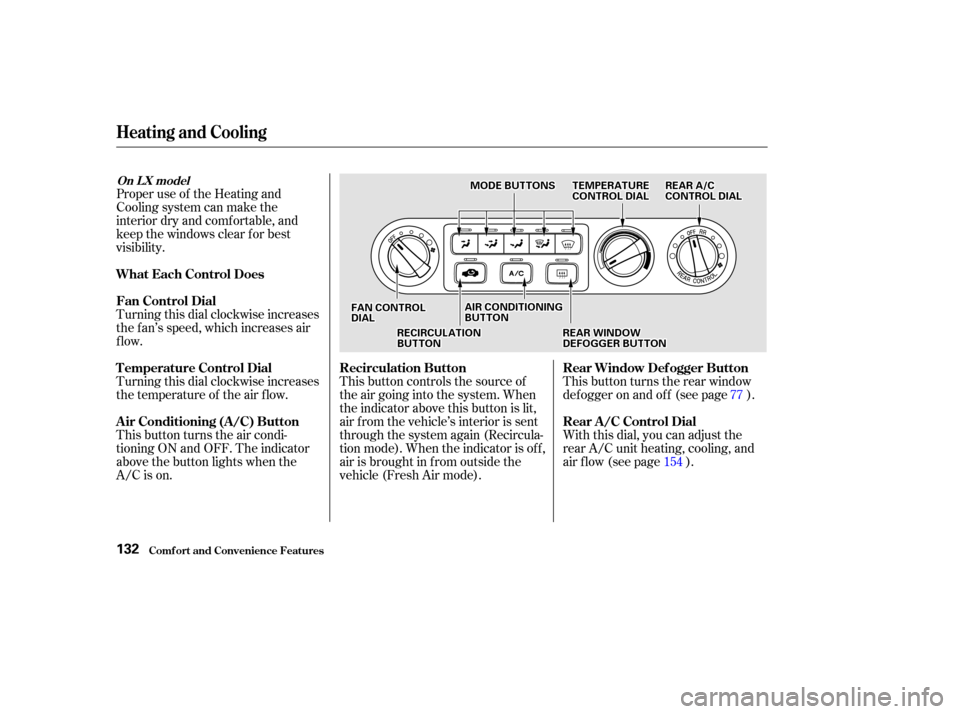
Proper use of the Heating and
Cooling system can make the
interior dry and comf ortable, and
keep the windows clear f or best
visibility.
Turning this dial clockwise increases
the f an’s speed, which increases air
flow.
Turning this dial clockwise increases
the temperature of the air flow.
This button turns the air condi-
tioning ON and OFF. The indicator
above the button lights when the
A/C is on.This button controls the source of
the air going into the system. When
the indicator above this button is lit,
air f rom the vehicle’s interior is sent
through the system again (Recircula-
tion mode). When the indicator is off,
air is brought in f rom outside the
vehicle (Fresh Air mode).
With this dial, you can adjust the
rear A/C unit heating, cooling, and
air flow (see page ). This button turns the rear window
def ogger on and of f (see page ).
15477
Comf ort and Convenience Feat ures
Heating and Cooling
What Each Control Does
Fan Control Dial
T emperature Control Dial
Air Conditioning (A/C) Button
Recirculation Button
Rear Window Def ogger Button
Rear A /C Control Dial
On L X model
132
F FAA N
N C
COON NTTR
RO OL L
D
D I
IAA L
L R
RE
EA
A R
R A
A/
/C
C
C
CO ON NTTR
RO OL L D
DI
IAA L
L
R
RE EC
CI IRRC CUUL LAA T
TI
IOON N
B
BU UT TT
TO
ON N A
A
I
IRR C
COON NDDI
ITT I
IOON NIINNG G
B
BU UT TT
TO
ON N
R
REEA
A R
R W
WI INND DO
OW W
D
D E
EF
FOOG GGGEER
R B
BUUT TT
TO
ON N
T
T
E
EM
M P
PE
ER
RA A T
TU
UR REE
C
CO ON NTTR
RO OL L D
DI
IAA L
L
M
M
O
ODDE
E B
BUUT TT
TO
ON NSS
Page 137 of 399
The vents in the corners of the
dashboard can be opened and closed
with the dials next to them.
You can adjust the direction of the
air coming f rom the dashboard vents
by moving the tab in the center of
each vent up-and-down and side-to-
side. There are f our vents in the ceiling
(see page ).
156
Heating and Cooling
Comf ort and Convenience Feat ures
Vent Controls
134
C COOR RNNE ER
R V
VE
EN
NT T
C
CE EN
NT TE
ER
R V
VE
EN
NT TS
S R
RE
EA
A R
R C
CEEI
ILLI INNG G V
VE
EN
NT T
Page 138 of 399

CONT INUED
This section covers how to set up the
system controls f or ventilation,
heating, cooling, dehumidif ying, and
def rosting.
The engine must be running f or the
heater and air conditioning to
generate hot and cold air. The heater
uses engine coolant to warm the air.
If the engine is cold, it will be several
minutes bef ore you f eel warm air
coming from the system.The f low-through ventilation system
draws in outside air, circulates it
through the interior, then exhausts it
through vents near the rear side
panels.Turn the temperature control dial
all the way to the lef t.
Make sure the A/C is of f .
Select and Fresh Air mode.
Set the f an to the desired speed.
The air conditioning does not rely on
engine temperature.
It is best to leave the system in Fresh
Air mode under almost all conditions.
Keeping the system in Recirculation
mode, particularly with the A/C of f ,
can cause the windows to fog up.
Switch to Recirculation mode when
you are driving through smoky or
dusty conditions, then switch back to
Fresh Air mode when the condition
clears. The outside air intakes f or the
heating and cooling system are at
the base of the windshield. Keep
these clear of leaves and other
debris.
1.
2.
3.
Heating and Cooling
Comf ort and Convenience Feat ures
Vent ilat ion
How to Use the System
135
F FAA N
N C
COON NTTR
RO OL L
D
D I
IAA L
L M
M
O
ODDE
E B
BUUT TT
TO
ON NSS T
T
E
EM
M P
PE
ER
RA A T
TU
UR REE
C
CO ON NTTR
RO OL L D
DI
IAA L
L
R
RE EC
CI IRRC CUUL LAA T
TI
IOON N
B
BU UT TT
TO
ON N A
A
I
IRR C
COON NDDI
ITT I
IOON NIINNG G
B
BU UT TT
TO
ON N