2002 HONDA CIVIC service
[x] Cancel search: servicePage 34 of 1139

Maintenance Schedule
Service atthe indicated distance ortime,whichever comes first.miles x 1,000t020304050708090 100110r20
km x 1,000163248648096112128144 160192
months12243486012
Replace engine oilooooaooaaoOa
Rotate tires{Check tire intlation and condition at least once per month)
Replace engine oil filterooaaaa
Inspect front and rear brakes
Check parking brake adjustment
Visually inspect the following items:. Tie-rod ends, steering gearbox and boots. Suspension components. Driveshaft boots. Brake hoses and lines (including ABSi. Allfluid levels and condition of{luids. Exhaust system*. Fuel lines and connections*
Inspect and adjust drive beltaaaa
Replace dust and pollen filter
Reolace transmission fluid
Servicethe following items at the recommended intervals
a
Replace air cleaner elementEvery 30,000 miles (48,000 km)
Replace spark plugsEvery 110,000 miles (176,000 Lm)
Inspect valve clearanceInspect every 110,000 miles {176,000 km), otherwise adiusl only if noisy.
Inspect idle speed*Every 160.000 mr es 1256,000 km) or 8 years
Replace engine coolantAt 120,000 miles (192,000 km) or 10 years, then every 60,000 miles (96,000 km) or 5
Replace brake fluidEvery 3 years
Listed by Maintenance ltem for Normal Conditions
Follow the Normal Schedule if the severe driving conditions specified in the lMaintenance Schedule for Severe Conditions on the next page do
not apply, and if only OCCASIONALLY driven in severe driving conditions.Follow the Severe Conditions schedule if the vehicle is driven MAINLY in Canada.
* : According to state and lederal regulations, failure to do the maintenance items marked with asterisk (*) will not void customer's emissions
warranties. However, Honda recommends that all maintenance service be done at the recommended interval to ensure long-term reliability-
c
3-8
Page 35 of 1139

Listed by Maintenance ltem for Severe Conditions
Use this schedule if the vehicle is driven MAINLY in Canada or in anv of the followina conditions.NOTE: it only OCCASIONALLY driven in theseconditions, use the Normal Conditions schedute.Sovere Driving Conditions. Driving less than 5 miles (8 km) per trip or, in lreezing temperatures, driving less than. Driving in extremely hot over 90 "F 132 'C)conditions.10 miles (16 km) per trip.
. Extensive idling, or long periods ot stop-and-go-driving, such as a taxi or a commercial delivery vehicle.. Trailer towing, driving with a cartop carrier, or driving in mountainous conditions.. Driving on muddy, dusty, or de iced roads.
Service at the indicated distance or time,whichever comes first.miles x 1,000102030405060708090100110120
km x 1,0001648648096112128144160176192
months122436486072
Replace engine oilReplace every 5,000 miies 18,000 km)or 6 months
Rotate tires{Checktire intlation and condition at leastonce per monthiaoaaoaaoaaao
Replace engine oil fiher
Inspect front and rear brakes
Lubricate all locks, hinges, and latches
Visually inspect the following items:. Tie rod ends, steering gearbox and boots. Suspension components' Driveshaft boots
Checl parking brale adjuslmentaaOaoa
Visually inspect the following items:. Brake hoses and lines {including ABSi. Allfluid levels and condition oflluids. Exhaust system*. Fuel lines and connections*. Lights and controls, vehicle underbody
Inspect and adjust drive behoaoa
Replace dust and pollen filter"o't'
Replace transmission lluidaa
Service the following items atthe recommended interuals
Replace air cleaner elementEvery 15,000 miies (24,000 km) in dusty conditions, otheMise use normal schedule.
Replace spark plugsEvery 110,000 miles (176,000 km)
Inspect valve clearanceInspect every 110,000 miles (176,000 km), otheMise adiust only if noisy.
Inspect idle speed'Every 160,000 miles (256,000 km)or8 vears
Replace engine coolantAt 120,000 miles (192,000 km) of 10 years,lhen every 60,000 miles (96,000 km)or 5
Replace brake fluidEvery 3 years
* : According to state and federal regulations, failure to do the maintenance items marked with asterisk 1*)will not void customer's emissionswarranties. However, Honda recommends that all maintenance service be done at the recommended interval to ensure long{erm reliabilitv.
NOTE 1: Replace the dust and pollen filter at 15,000 miles/24,000 km if the vehicle is driven mostly in urban areas that have high concentrationsof soot in the air from industrv and diesel-Dowered vehicles.
t,
3-9
Page 46 of 1139

\
?.-
Armature Inspection and Test
1. Remove the starter (see page 4-9).
2. Disassemble the starter as shown atthe beginning
of this procedure.
3. Inspect the armature for wear or damage from
contact with the permanent magnet. lf there is wear
or damage, replace the armature.
Check the commutator (A) surface. lf the surface is
dirty or burnt, resurface with emery cloth or a lathe
within the specifications in step 5, or recondition
with # 500 or # 600 sandpaper (B).
6.
5. Check the commutator diameter. lf the diameter is
below the service limit, replace the armature.
Commutator Diameter
Standard (Newl: 28.0 mm (1.10 in.l
Service Limit: 27.0 mm (1.06 in.)
Measure the commutator (A) runout.
. lf the commutator runout is within the service
limit, check the commutator for carbon dust or
brass chips between the segments.. lf the commutator runout is not within the service
limit, reolace the armature.
Commutator Runout
Standard lNew): 0.02 mm 10.001 in.) max.
Service Limit: 0.05 mm (0.002 in.)
(cont'd)
4-11
Page 47 of 1139

Starting System
Starter Overhaul (cont'dl
7. Check the mica depth (A). lf the mica is too high {B),undercut the mica with a hacksaw blade to theproper depth. Cut away allthe mica (C) between
the commutator segments. The undercut should
not be too shallow, too narrow, or V-shaped (D).
Commutator Mica Depth
Standard (New): 0.50-0.80 mm {0.020-0.031 in.)
Service Limit: 0.20 mm (0.008 in.)
Check for continuity between the segments of the
commutator. lf an open circuit exists between any
segments, replace the armature.
M
4-12
\
9. Place the armature (A) on an armature tester (B).
Hold a hacksaw blade (C) on the armature core. lf
the blade is attracted to the core or vibrates while
the core is turned, the armature is shoned. Replace
the armature.
Check with an ohmmeter that no continuity exists
between the commutator (A) and armature coll
core (B), and between the commutator and
armature shaft (C). lf continuity exists, replace the
armature.
10,
Page 48 of 1139

Starter Brush Inspection
11. lvleasure the brush length. lf it is not within the
service limit, replace the brush holder assembly.
Brush Length
Standard {New): 14.0-14.5 mm (0.55-0.57 in.)
Service Limit: 9.0 mm {0.35 in.)
Starter Field Winding Test
12. Check for continuity between the brushes (A). lf
there is no continuity. replace the armature
housing (B).
Check for continuity between each brush (A) and
the armature housing (B). li there is continuity,
replace the armature housing.
13.
Starter Brush Holder Test
14, Check that there is no continuity between the (+ )
brush holder {A) and ( ) brush holder (B}. lfthere
is continuity, replace the brush holder assembly.
Brush Spring Inspection
15. Insen the brush (A) into the brush holder, and bring
the brush into contact with the commutator, then
attach a spring scale (B) to the spring (C). Measure
the spring tension at the moment the spring lifts off
the brush. lf the spring tension is not within
specification, replace the spring.
Spring Tension: 13.7-17.7 N {1.40-1.80 kgf,
3.09 3.97 lbf)
(cont'd)
4-13
Page 52 of 1139

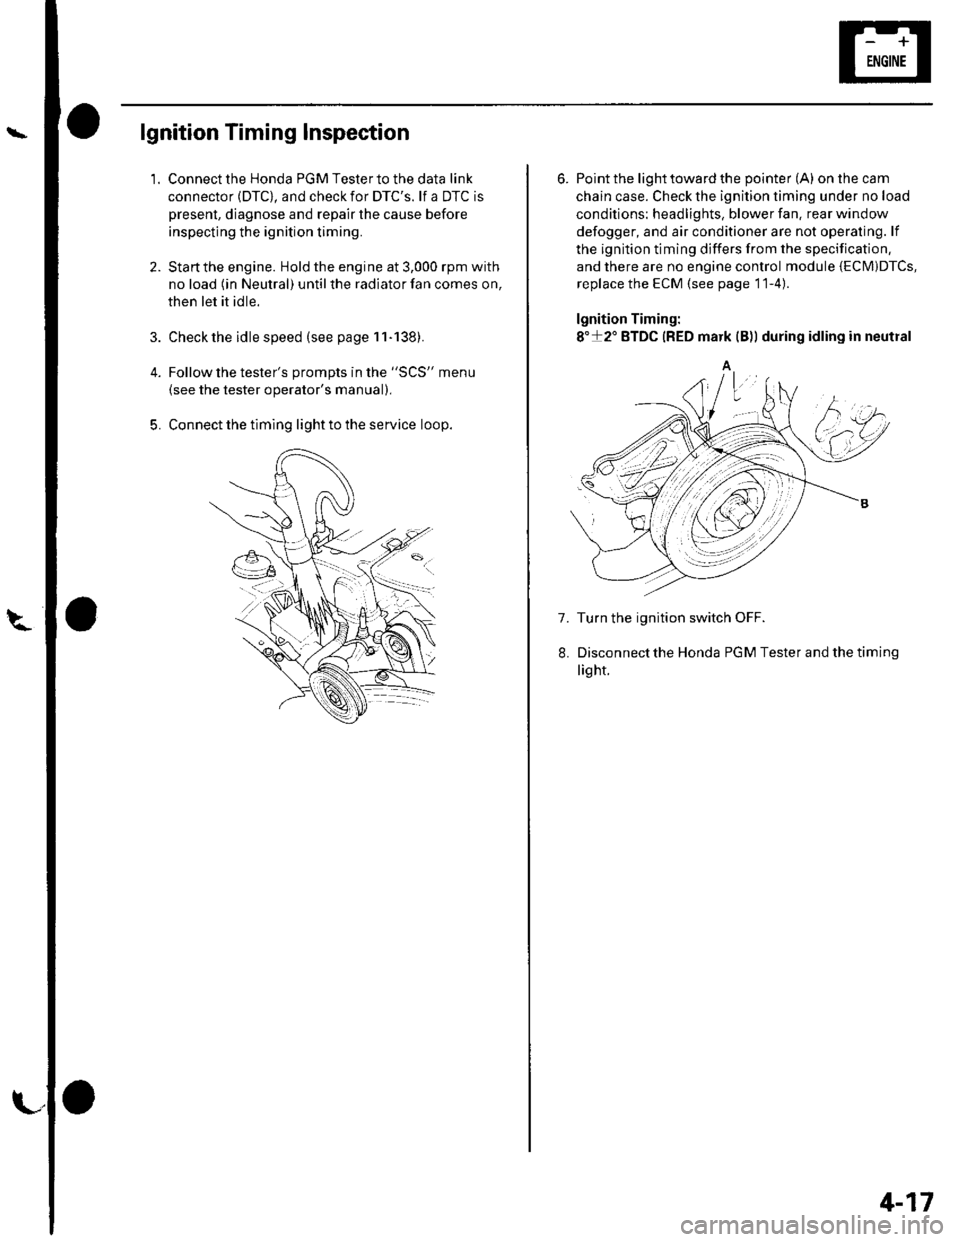
lgnition Timing Inspection
1.
4.
5.
Connect the Honda PGM Tester to the data link
connector (DTC), and check for DTC'S. lf a DTC is
present, diagnose and repair the cause before
inspecting the ignition timing.
Startthe engine. Hold the engine at 3,000 rpm with
no load (in Neutral) until the radiator fan comes on,
then let it idle.
Check the idle speed (see page 11-138).
Follow the tester's prompts in the "SCS" menu
{see the tester operator's manual),
Connect the timing light to the service loop.
o
6. Point the light toward the pointer (A) on the cam
chain case. Check the ignition timing under no load
conditions: headlights, blower fan. rear window
defogger, and air conditioner are not operaling. lf
the ignition timing differs from the specification,
and there are no engine control module {ECM)DTcs,
replace the ECM (see page 11-4)
lgnition Timing:
8"+2" BTDC {RED mark {B)) during idling in neutral
A
7. Turn the ignition switch OFF.
Disconnectthe Honda PGM Tester and thetiming
light.
4-17
Page 54 of 1139

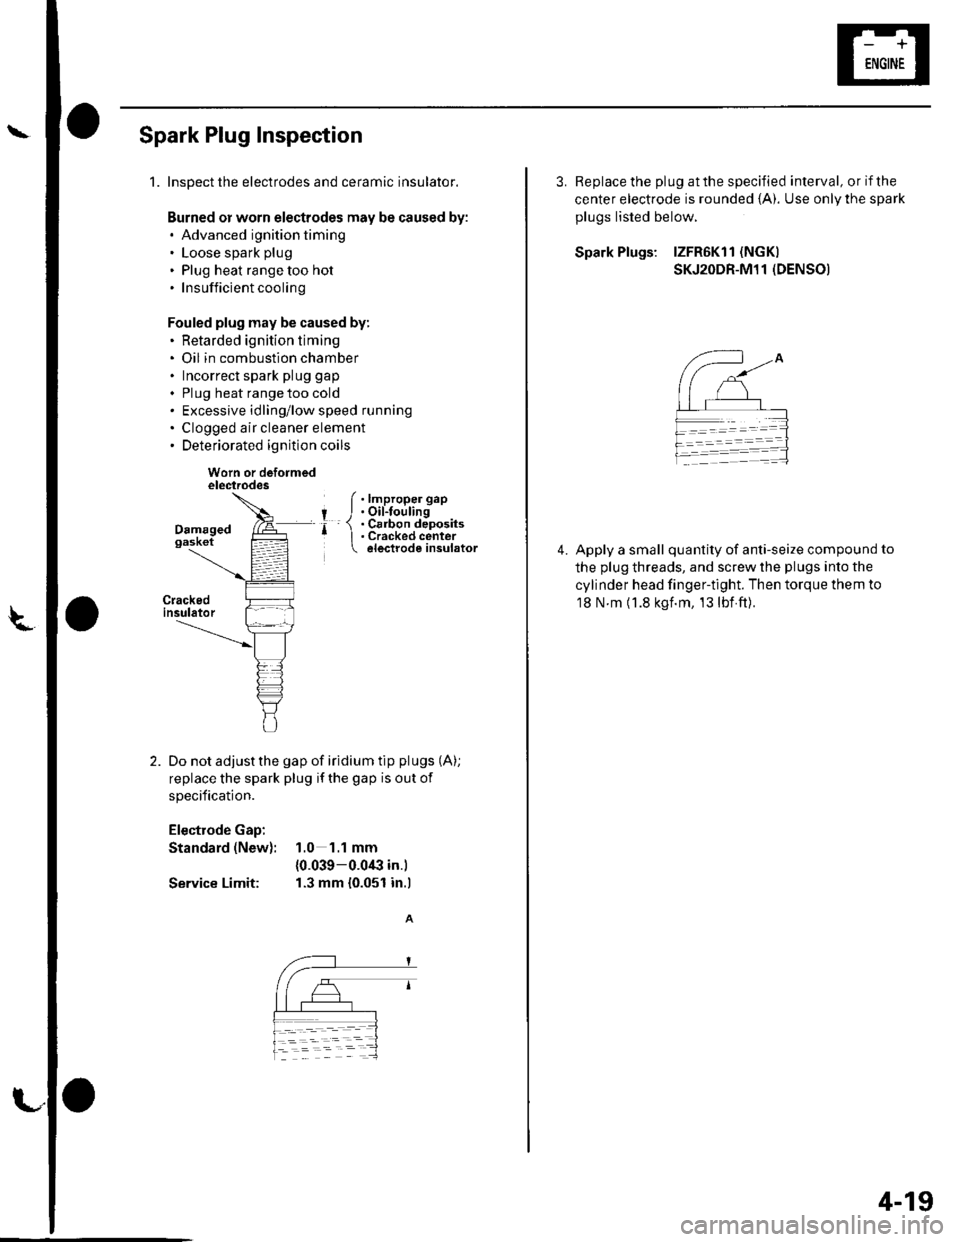
Spark Plug Inspection
1.Inspect the electrodes and ceramic insulator.
Burned or worn electrodes may be caused by:. Advanced ignition timing. Loose spark plug
. Plug heat range too hot.Insufficientcooling
Fouled plug may be caused by:. Retarded ignition timing. Oil in combustion chamber. Incorrect spark plug gap
. Plug heat range too cold. Excessive idling/low speed running. Clogged air cleaner element. Deteriorated ignition coils
Worn or deformedelectrodes
Do not adjust the gap of iridium tip plugs (A);
replace the spark plug if the gap is out of
specification.
Electrode Gap:
Standard (New): 1.0 1.1 mm
{0.039-0.0€ in.)
Service Limit: 1.3 mm {0.051 in.l
f .lmproper gap
I J.Oil-toulingr- 1 . Cs6on deposits' I . Cracked center electrode insulator
L
3. Replace the plug at the specified interval, or if the
center electrode is rounded {A). Use onlV the spark
plugs listed below.
Spark Plugs: lZFR6Kl1 (NGK)
SKJ2ODR-M11 (DENSO)
Apply a small quantity of anti-seize compound to
the plug threads, and screw the plugs into the
cylinder head finger-tight. Then torque them to
18 N m (1.8 kgf.m, 13lbf ft).
4.
4-19
Page 69 of 1139

Charging System
Alternator Overhaul (cont'd)
Rectitier Test
16. Check for continuity in each direction, between the
B terminal and P terminals, and between the E
terminal and P terminals of each diode pair.
All diodes should have continuity in only one
direction. Because the rectifier diodes are designed
to allow current to pass in one direction, and the
rectifier is made up of eight diodes (four pairs). you
musttest each diode in both directions for
continuity with an ohmmeter that has diode
checking capability: a total of 16 checks.
. lf any diode is faulty. replace the rectifier
assembly. {Diodes are not available separately.)' lf all the diodes are OK, go to step 17.
/--:',t- -L . --- -o \-- l'-=
BP"
P,
P.
P,
P.
4-34
19.
'a
Alternator Brush Inspection
17. Measure the length of both brushes (A)with a
vernier caliper {B).
. lf either brush isshorterthanthe service limit,
replace the brush assembly.. lf brush length is OK, go to step '18.
Alternator Brush Length:
Standard (New): 10.5 mm (0.41 in.)
Service Limit: 1.5 mm (0.06 in.)
Rotor Slip Bing Test
18. Check that there is continuity between the slip rings
{A).
. lf there is continuity, go to step 19.. lf there is no continuity, replacethe alternator.
Check that there is no continuity between each slip
ring and the rotor (B) and the rotor shaft (C).
. lf there is no continuity, goto step 20.. lf there is continuity, replace the alternator.
\"