Page 126 of 321

�µ�µ�µ
CONT INUED
You can use any of f ive methods to
f ind radio stations on the selected
band: TUNE, SEEK, SCAN, AUTO
SELECT, and the Preset buttons.
Use the TUNE knob to
tune the radio to a desired f requency.
Turn the TUNE knob to the right to
tune to a higher f requency, or to the
lef t to tune to a lower f requency.
Turn the knob right or lef t until the
display reaches the desired
f requency. The SEEK f unction
searches the band for a station with
a strong signal. To activate it, press
theSEEKbaroneitherthe or side, then release it.
Depending on which side you press,
the system scans upward or down-
ward f rom the current f requency. It
stops when it finds a station with a
strong signal. The SCAN function
samples all the stations with strong
signals on the selected band. To
activate it, press the SCAN button,
then release it. When the system is
in the SCAN mode, SCAN shows in
the display. The system will scan up
the band for a station with a strong
signal. When it f inds one, it will stop
and play that station for
approximately f ive seconds. If you do
nothing, the system will then scan
f or the next strong station and play
that f or f ive seconds. When it plays a
station that you want to continue
listening to, press the SCAN button
again.
Audio System
Comf ort and Convenience Feat ures
TUNE SEEK SCA N
127
Page 128 of 321

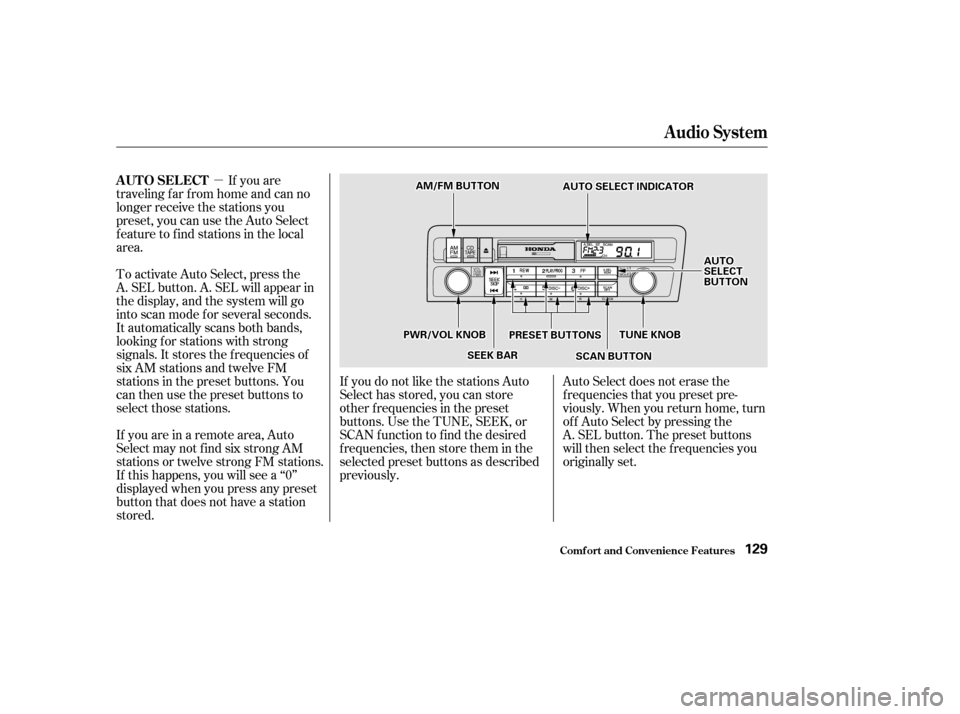
�µIf you are
traveling far from home and can no
longer receive the stations you
preset, you can use the Auto Select
feature to find stations in the local
area.
To activate Auto Select, press the
A. SEL button. A. SEL will appear in
the display, and the system will go
into scan mode f or several seconds.
It automatically scans both bands,
looking f or stations with strong
signals. It stores the f requencies of
six AM stations and twelve FM
stations in the preset buttons. You
can then use the preset buttons to
select those stations.
If you are in a remote area, Auto
Select may not f ind six strong AM
stations or twelve strong FM stations.
If this happens, you will see a ‘‘0’’
displayed when you press any preset
button that does not have a station
stored. Auto Select does not erase the
f requencies that you preset pre-
viously. When you return home, turn
of f Auto Select by pressing the
A. SEL button. The preset buttons
will then select the f requencies you
originally set.
If you do not like the stations Auto
Select has stored, you can store
other f requencies in the preset
buttons. Use the TUNE, SEEK, or
SCAN f unction to f ind the desired
f requencies, then store them in the
selected preset buttons as described
previously.
Audio System
Comf ort and Convenience Feat ures
AUTO SELECT
129
AAMM//FFMMBBUUTTTTOONN
SSCCAANNBBUUTTTTOONN
PPWWRR//VVOOLLKKNNOOBB
SSEEEEKKBBAARR
TTUUNNEEKKNNOOBB
AAUUTTOOSSEELLEECCTTIINNDDIICCAATTOORR
AAUUTTOOSSEELLEECCTTBBUUTTTTOONN
PPRREESSEETTBBUUTTTTOONNSS
Page 138 of 321

�µ�µ�µ
CONT INUED
You can use any of f ive methods to
f ind radio stations on the selected
band: TUNE, SEEK, SCAN, AUTO
SELECT, and the Preset buttons.
Use the TUNE knob to
tune the radio to a desired f requency.
Turn the TUNE knob to the right to
tune to a higher f requency, or to the
lef t to tune to a lower f requency.
Turn the knob right or lef t until the
display reaches the desired
f requency. The SEEK f unction
searches the band for a station with
a strong signal. To activate it, press
theSEEKbaroneitherthe or side, then release it.
Depending on which side you press,
the system scans upward or down-
ward f rom the current f requency. It
stops when it finds a station with a
strong signal. The SCAN function
samples all the stations with strong
signals on the selected band. To
activate it, press the SCAN button,
then release it. When the system is
in the SCAN mode, SCAN shows in
the display. The system will scan up
the band for a station with a strong
signal. When it f inds one, it will stop
and play that station for
approximately f ive seconds. If you do
nothing, the system will then scan
f or the next strong station and play
that f or f ive seconds. When it plays a
station that you want to continue
listening to, press the SCAN button
again.
Audio System
Comf ort and Convenience Feat ures
TUNE SEEK SCA N
139
Page 140 of 321

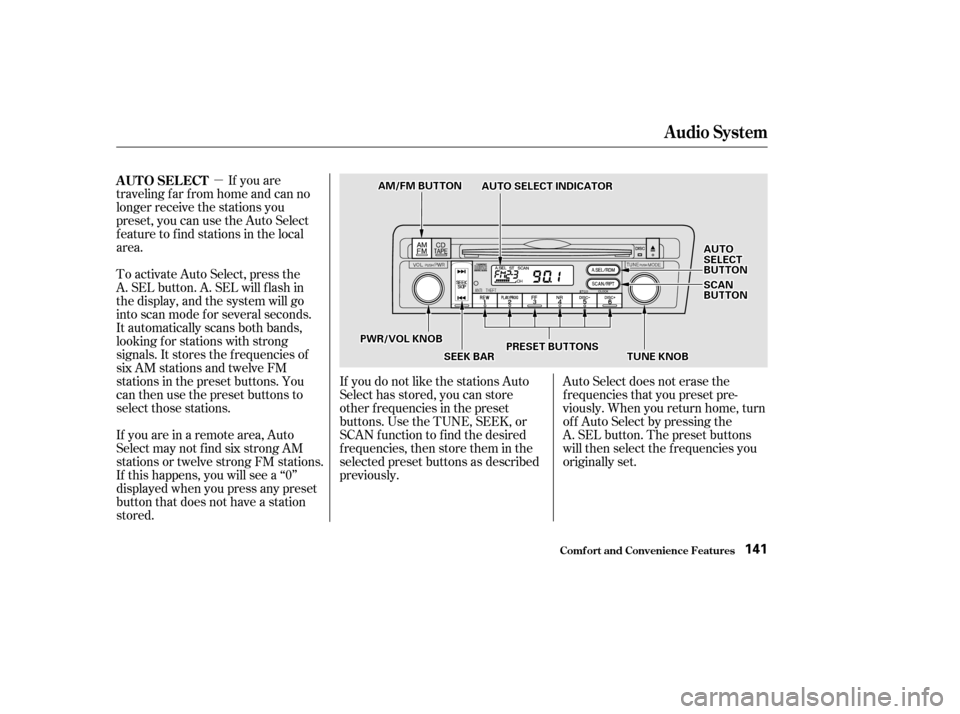
�µIf you are
traveling far from home and can no
longer receive the stations you
preset, you can use the Auto Select
feature to find stations in the local
area.
To activate Auto Select, press the
A. SEL button. A. SEL will f lash in
the display, and the system will go
into scan mode f or several seconds.
It automatically scans both bands,
looking f or stations with strong
signals. It stores the f requencies of
six AM stations and twelve FM
stations in the preset buttons. You
can then use the preset buttons to
select those stations. Auto Select does not erase the
f requencies that you preset pre-
viously. When you return home, turn
of f Auto Select by pressing the
A. SEL button. The preset buttons
will then select the f requencies you
originally set.
If you are in a remote area, Auto
Select may not f ind six strong AM
stations or twelve strong FM stations.
If this happens, you will see a ‘‘0’’
displayed when you press any preset
button that does not have a station
stored. If you do not like the stations Auto
Select has stored, you can store
other f requencies in the preset
buttons. Use the TUNE, SEEK, or
SCAN f unction to f ind the desired
f requencies, then store them in the
selected preset buttons as described
previously.
AUTO SELECT
Audio System
Comf ort and Convenience Feat ures141
AAMM//FFMMBBUUTTTTOONN
SSEEEEKKBBAARRPPRREESSEETTBBUUTTTTOONNSS
AAUUTTOOSSEELLEECCTTBBUUTTTTOONN
SSCCAANNBBUUTTTTOONN
AAUUTTOOSSEELLEECCTTIINNDDIICCAATTOORR
PPWWRR//VVOOLLKKNNOOBB
TTUUNNEEKKNNOOBB
Page 206 of 321
�µ�µ�µ �µ
�µ
�µ
�µ
Engine oil level Check every
time you fill the fuel tank. See
page .
Engine coolant level Check the
radiator reserve tank every time
you f ill the f uel tank. See page .
Windshield washer f luid Check
the level in the reservoir monthly.
If weather conditions cause you to
use the washers f requently, check
the reservoir each time you stop
f or f uel. See page .
Youshouldcheckthefollowing
items at the specif ied intervals. If
you are unsure of how to perf orm
any check, turn to the page given.
Lights Check the operation of
the headlights, parking lights,
taillights, high-mount brake light,
turn signals, brake lights, and
license plate lights monthly. See
page .
Tires Check the tire pressure
monthly. Examine the tread f or
wear and foreign objects. See page
.
Automatic transmission Check
the f luid level monthly. See page .
Brakes Check the f luid level
monthly. See page . 168
169
219
220 222 238
245
Owner Maintenance Checks
Maint enance207
Page 245 of 321
Check the f ollowing:Headlights (low and high beam)
Parking lights
Taillights
Brake lights
High-mount brake light
Turn signals
Back-up lights
Hazard light f unction
License plate light
Side marker lights
Daytime running lights
(Canadian models)
If you f ind any bulbs are burned out,
replace them as soon as possible.
Refer to the chart on page to
determine what type of replacement
bulb is needed. 297
Lights
Maint enance246
BBAACCKK--UUPPLLIIGGHHTT
LLIICCEENNSSEEPPLLAATTEELLIIGGHHTTSS
TTAAIILLLLIIGGHHTTHHIIGGHH--MMOOUUNNTTBBRRAAKKEELLIIGGHHTT
SSTTOOPP//TTAAIILLLLIIGGHHTT//RREEAARRSSIIDDEEMMAARRKKEERRLLIIGGHHTT
TTUURRNNSSIIGGNNAALLLLIIGGHHTT
Page 249 of 321
Open the trunk. Determine which of the two bulbsis burned out: stop/taillight/side
marker light or turn signal light.Pull the bulb straight out of its
socket.
Push the new bulb straight into
the socket until it bottoms.
Reinstall the socket into the light
assembly by turning it clockwise
until it locks.
Testthelightstomakesurethe
new bulb is working.
Remove the socket by turning it
one-quarter turn counterclockwise. Reinstall the trunk lining. Make
sure it is installed under the edge
of the trunk seal.
Remove the screws in the center
of each of the two f asteners on the
side of the trunk lining. Pull the
lining back. Put the f asteners into the holes on
the side of the trunk lining.
Reinstall the screws.
1.
2. 3.4. 5. 6. 7. 8.
Replacing Rear Bulbs
(in Fenders)
Lights
Maint enance250
FFAASSTTEENNEERRSS
Page 288 of 321
�µ�µ �µ �µ �µ
�Î
�Î
�Î
No. Amps. Circuits ProtectedNo. Amps. Circuits Protected
: On Canadian models
1 2345 15 A
20 A
10 A
10 A
Ignition Coil
LAF Heater
Daytime running lights
Alternator
Not Used 6789
10111213141516171819202122232425 7.5 A
20 A
7.5 A
7.5 A
7.5 A
7.5 A 10 A
10 A
15 A
15 A
7.5 A 20 A
20 A
20 A
20 A
20 A Power Window Relay
Moonroof
Accessory, Radio
Not Used
Meter
ABS
Daytime running lights
SRS
Remote Control Mirrors
Not Used
Not Used
Fuel Pump
Accessory Power Socket
Turn Signal Lights
Front Wiper
Not Used
Front Right Power Window
Front Left Power Window
Rear Lef t Power Window
Rear Right Power Window
Fuses
T aking Care of t he Unexpect ed289
INTERIOR FUSE BOX