Page 201 of 319
 or 6 months")
�µ
�Î �Î�Î�Ì�Î
�Ì�Ì
�Î
�Ì�Î
Maint enance202
Service at the indicated distance or time whichever comes first. miles x 1,000
km x 1,000
months Replace every 5,000 miles (8,000 km) or 6 months
At 120,000 miles (192,000 km) or 10 years,
then every 60,000 miles (96,000 km) or 5 years Every 110,000 miles (176,000 km) or 7 years
Inspect every 110,000 miles (176,000 km), otherwise adjust only if noisy Every 110,000 miles (176,000 km)
Every 15,000 miles (24,000 km) in dusty conditions,
otherwise use normal schedule
Service the following items at the recommended intervals.
2032
1016 30484064 5080 70
112 80
128 90
144 100160110176 120192
6096
Check oil and coolant at each fuel stop
See information on maintenance and emissions warranty, last column, page .
Refer to page for replacement information under special driving conditions.
Refer to page for replacement information under special driving conditions.
Every 3 years (independent of mileage)
Replace engine oil
Rotate tires (Check tire inflation and condition at least once per month)
Replace engine oil filter
Inspect front and rear brakes
Lubricate all hinges, locks and latches
Visually inspect the following items:
Tie rod ends, steering gear box and boots, Suspension components
Driveshaft boots
Check engine oil and coolant
Visually inspect the following items: Brake hoses and lines (including ABS)
All fluid levels and condition of fluidsExhaust system, Fuel lines and connections
Lights and controls, Vehicle underbody
Check parking brake adjustment
Inspect and adjust drive belts
Replace dust and pollen filter
Replace transmission fluid
Replace air cleaner element
Replace spark plugs
Inspect valve clearance
Replace timing belt , and inspect water pump
Inspect idle speed
Replace engine coolant
Replace brake fluid
Replace at 60,000 miles (96,000 km) or 3 years, then every 40,000 miles (64,000 km) or 2 years. 24 48 72
12 36 60
1: 2:3: : 235
237
199
M/T
A/TCVT
3
1
2
Maintenance Schedule for Severe Conditions
Page 202 of 319

�µ�µ
�Ø �Ø�Ø �Ø �Ø �Ø�Ø�Ø �Ø �Ø�Ø�Ø �Ø �Ø�Ø �Ø �Ø�Ø�Ø�Ø�Ø
�Ì�Ì
�Î
CONT INUED
Maint enance203
U.S. Owners
Canadian Owners B
A
C
D E
Service at the indicated distance or time, whichever comes first.
Refer to page to determine which schedule to use.Use the Maintenance Schedule for Severe Conditions.
Do items in A.
Do items in A, B.
Do items in A, C.
DoitemsinA,B,D.
Do items in A.
DoitemsinA,B,C,E.
Do items in A.
DoitemsinA,B,D.Replace brake fluid (independent of mileage)
Do items in A, C.
Do items in A, B.
Do items in A. Replace transmission fluid (CVT).
Replace transmission fluid (M/T, A/T).
DoitemsinA,B,C,D,E.
Do items in A.
Do items in A, B.
Do items in A, C.
DoitemsinA,B,D.
Do items in A.
Replace transmission fluid (A/T).
DoitemsinA,B,C,E. Replace engine oil.
Inspect front and rear brakes.
Rotate tires (follow pattern on page 241 ).
Lubricate all hinges, locks, and latches include thehood.
Inspect tie rod ends, steering gear box and boots.
Inspect suspension components.
Inspect driveshaft boots.
Replace air cleaner element.Every 15,000mi/24,000
km (independent of time) under dusty conditions,
otherwise use Normal Conditions schedule.
Check parking brake adjustment.
Inspect brake hoses and lines (including ABS).
Check all fluid levels, condition of fluids, and check
for leaks.
Inspect exhaust system.
Inspect fuel lines and connections.
Check all lights.
Inspect the underbody.
Inspect and adjust drive belts.
Replace dust and pollen filter .
5,000 mi/8,000 km/6 mos
10,000 mi/16,000 km/1 yr
15,000 mi/24,000 km/1-½ yrs
20,000 mi/32,000 km/1 yr
25,000 mi/40,000 km/2 yrs
30,000 mi/48,000 km/2 yrs
35,000 mi/56,000 km/2-½ yrs
40,000 mi/64,000 km/2 yrs
3yrs
45,000 mi/72,000 km/3 yrs
50,000 mi/80,000 km/3 yrs
55,000 mi/88,000 km/3-½ yrs
At 60,000 mi/96,000 km
or 3 yrs,
then every 40,000 mi/
64,000 km or 2 yrs
60,000 mi/96,000 km/3 yrs
65,000 mi/104,000 km/4 yrs
70,000 mi/112,000 km/4 yrs
75,000 mi/120,000 km/4-½ yrs
80,000 mi/128,000 km/4 yrs
85,000 mi/136,000 km/5 yrs
90,000 mi/144,000 km/5 yrs 198
1
Maintenance Schedule for Severe Conditions (listed by distance/time)
Page 223 of 319
A low power steering f luid level can
indicate a leak in the system. Check
the f luid level f requently and have
the system inspected as soon as
possible.
Always use Honda Power Steering
Fluid. If it is not available, you may
use another power steering f luid as
an emergency replacement.
However, continued use can cause
increased wear and poor steering in
cold weather. Have the power
steering system f lushed and ref illed
with Honda PSF as soon as possible.
You should check the f luid level in
the power steering reservoir at least
once a year. Check the level when
the engine is cold. Look at the side
of the reservoir. The f luid should be
between the UPPER LEVEL and
LOWER LEVEL. If it is below the
LOWER LEVEL, add power steering
f luid to the UPPER LEVEL.
Power Steering
Maint enance224
UUPPPPEERRLLEEVVEELL
LLOOWWEERRLLEEVVEELL
T urning the steering wheel to f ull lef t
or right lock and holding it there can
damage the power steering pump.
Page 236 of 319
�µ�µ
�µ�µ
�µ�µ �µ�µ
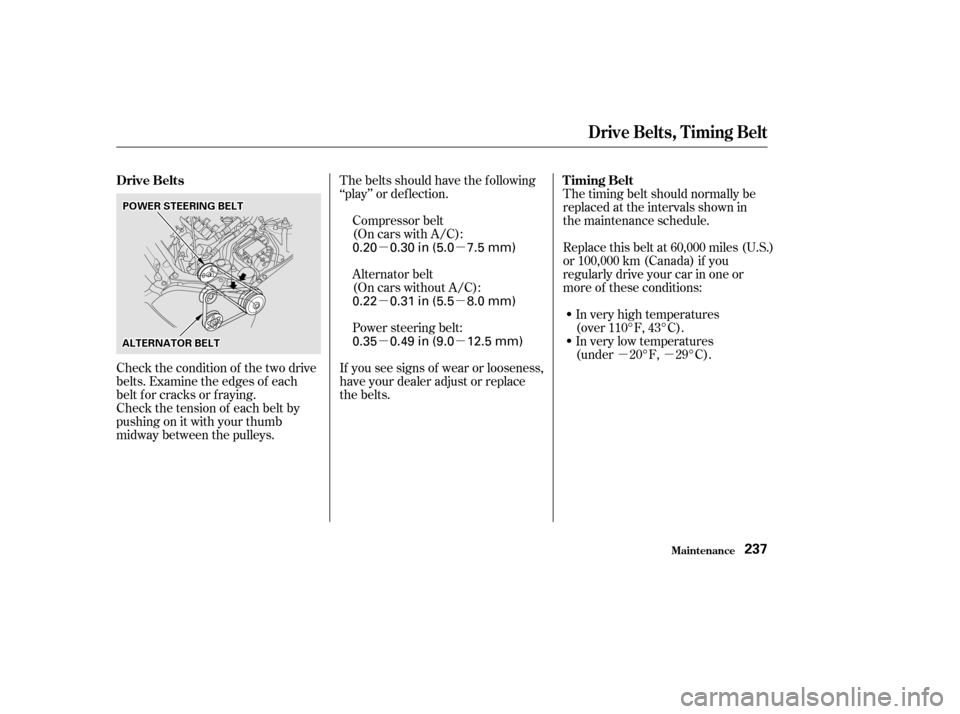
Check the tension of each belt by
pushingonitwithyourthumb
midway between the pulleys. The belts should have the f ollowing
‘‘play’’ or def lection. The timing belt should normally be
replaced at the intervals shown in
the maintenance schedule.
In very high temperatures
(over 110°F, 43°C).
In very low temperatures
(under 20°F, 29°C).
Replace this belt at 60,000 miles (U.S.)
or 100,000 km (Canada) if you
regularly drive your car in one or
more of these conditions:
Check the condition of the two drive
belts. Examine the edges of each
belt f or cracks or f raying. Power steering belt:
Alternator belt
(On cars without A/C):
Compressor belt
(On cars with A/C):
If you see signs of wear or looseness,
have your dealer adjust or replace
the belts.
Drive Belts
T iming Belt
Drive Belts, T iming Belt
Maint enance237
AALLTTEERRNNAATTOORRBBEELLTT
PPOOWWEERRSSTTEEEERRIINNGGBBEELLTT
0.35 0.49 in (9.0 12.5 mm)
0.20 0.30 in (5.0 7.5 mm)
0.22 0.31 in (5.5 8.0 mm)
Page 241 of 319

The tires that came with your car
were selected to match the perform-
ance capabilities of the car while
providing the best combination of
handling, ride comf ort, and long lif e.
Youshouldreplacethemwithradial
tires of the same size, load range,
speed rating, and maximum cold tire
pressure rating (as shown on the
tire’s sidewall). Mixing radial and
bias-ply tires on your car can reduce
its braking ability, traction, and
steering accuracy. It is best to replace all f our tires atthesametime.If thatisnotpossible
or necessary, then replace the two
f ront tires or the two rear tires as a
pair. Replacing just one tire can
seriously af f ect your car’s handling.TheABSworksbycomparingthe
speed of the wheels. When replacing
tires, use the same size originally
supplied with the car. Tire size and
construction can af f ect wheel speed
and may cause the system to work
inconsistently.
If you ever need to replace a wheel,
make sure the wheel’s specif ications
match those of the original wheel
that came on your car. Replacement
wheels are available at your Honda
dealer.
Replacing T ires and Wheels
Tires
Maint enance242
Installing improper tires on your
car can affect handling and
stability. This can cause a crash
in which you can be seriously
hurt or killed.
Always use the size and type of
tires recommended in this
owner’s manual.
Page 246 of 319
Open the hood.
If you need to change the head-
light bulb on the driver’s side,
remove the power steering
reservoir tank by pulling it out of
its holder.
Your car has halogen headlight
bulbs, one on each side. When
replacing a bulb, handle it by its steel
base and protect the glass from
contactwithyourskinorhard
objects. If you touch the glass, clean
it with denatured alcohol and a clean
cloth.
Theheadlightswereproperlyaimed
when your car was new. If you
regularly carry heavy items in the
trunk, readjustment may be required.
Adjustment of the headlights should
be perf ormed by a Honda technician
or other qualif ied mechanic.
1.
CONT INUED
Replacing a Headlight Bulb
Headlight A iming
Lights
Maint enance247
HHOOLLDDEERRHalogen headlight bulbs get very hot
when lit. Oil, perspiration, or a scratch
on the glass can cause the bulb to
overheat and shatter.
Page 247 of 319

If you are changing the bulb on
the driver’s side, start the engine,
turn the steering wheel all the way
to the right, and turn off the
engine. If you are changing the
bulb on the passenger’s side, turn
the steering wheel to the left.
Reinstall the power steering
reservoir.
(Driver’s side)
Push the electrical connector onto
the tabs of the new bulb. Make
sure it locks in place.
Turn on the headlights to test the
new bulb.
Insert the new bulb into the hole,
making sure the tabs are in their
slots. Pivot the hold-down wire
back in place and clip the end into
the slot.
Install the rubber seal over the
back of the headlight assembly.
Make sure it is right side up; it is
marked ‘‘TOP.’’
Unclip the end of the hold-down
wire f rom its slot. Pivot it out of
the way and remove the bulb.
Remove the rubber weather seal
by pulling on the tab.
Remove the electrical connector
f rom the bulb by squeezing the
connector on both sides to unlock
the tab. Pull the connector straight
off.
3. 4. 5. 6. 7. 8.
1.
2. Replacing the Front Side Marker/
Turn Signal and Parking L ightBulb
Lights
Maint enance248
WWEEAATTHHEERRSSEEAALLBBUULLBB
CCOONNNNEECCTTOORRHHOOLLDD--DDOOWWNNWWIIRREE
Page 283 of 319
All the electrical circuits in your car
have fuses to protect them from a
short circuit or overload. These
f uses are located in two f use boxes.The interior f use box is underneath
the steering column. To open it, turn
the knobs as shown.
The under-hood f use box is located
in the engine compartment on the
passenger’s side. To open it, push
thetabsasshown.
Fuses
T aking Care of t he Unexpect ed284
TTAABB
UUNNDDEERR--HHOOOODDIINNTTEERRIIOORR