Page 74 of 319
Push the lever up to lock the
steering wheel in that position.
Make sure you have securely
locked the steering wheel in place
by trying to move it up and down.
Move the steering wheel to the
desired position, making sure the
wheel points toward your chest,
not toward your f ace. Make sure
you can see the instrument panel
gauges and the indicator lights.
Push the lever under the steering
column all the way down.
To adjust the steering wheel upward
or downward:
Make any steering wheel adjustment
bef ore you start driving.
1.4.
3.
2.
See page f or important saf ety inf ormation about how to properlyposition the steering wheel. 17
Inst rument s and Cont rols
Controls Near the Steering Wheel
Steering Wheel A djustment
75
Adjusting the steering wheel
position while driving may
cause you to lose control of the
car and be seriously injured in acrash.
Adjust the steering wheel only
when the car is stopped.
Page 78 of 319
�µ
�µ �µ
In this position,
you can operate the audio system
and the accessory power socket.
This is the normal key
position when driving. All f eatures
and accessories on the car are usable.
Several of the lights on the instru-
ment panel come on as a test when
you turn the ignition switch f rom
ACCESSORY to ON. Use this position
only to start the engine. The switch
returns to ON (II) when you let go of
the key.
The engine will not start if the
Immobilizer System does not
recognize the key’s coding (see page ).
You will hear a reminder beeper if
you leave the key in the ignition
switch in the LOCK (0) or
ACCESSORY (I) position and open
the driver’s door. Remove the key to
turn of f the beeper. 77
A CCESSORY (I)
ON (II)
ST A RT (III)
Keys and Locks
Inst rument s and Cont rols79
Removing the key from the
ignition switch while driving
locks the steering. This can
cause you to lose control.
Remove the key from the
ignition switch only whenparked.
Page 80 of 319

CONT INUED
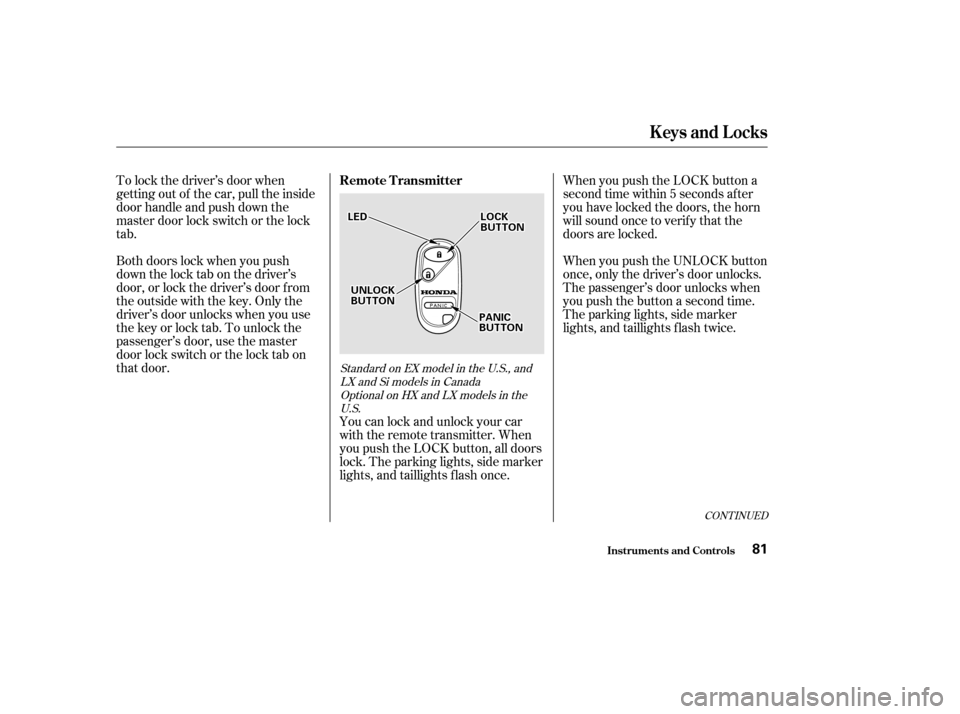
To lock the driver’s door when
getting out of the car, pull the inside
door handle and push down the
master door lock switch or the lock
tab.You can lock and unlock your car
with the remote transmitter. When
you push the LOCK button, all doors
lock. The parking lights, side marker
lights, and taillights f lash once.When you push the LOCK button a
second time within 5 seconds after
you have locked the doors, the horn
will sound once to verify that the
doors are locked.
Both doors lock when you push
down the lock tab on the driver’s
door, or lock the driver’s door f rom
the outside with the key. Only the
driver’s door unlocks when you use
the key or lock tab. To unlock the
passenger’s door, use the master
door lock switch or the lock tab on
that door. When you push the UNLOCK button
once, only the driver’s door unlocks.
The passenger’s door unlocks when
you push the button a second time.
The parking lights, side marker
lights, and taillights f lash twice.
Standard on EX model in the U.S., and
LXandSimodelsinCanada
Optional on HX and LX models in theU.S.
Keys and Locks
Inst rument s and Cont rols
Remote Transmitter
81
LLEEDD
PPAANNIICCBBUUTTTTOONN
UUNNLLOOCCKKBBUUTTTTOONN
LLOOCCKKBBUUTTTTOONN
Page 81 of 319

The ceiling light (if the ceiling light
switch is in the center position) will
come on when you press the
UNLOCK button. If you do not open
any of the doors, the light will go out
in about 30 seconds and the doors
will automatically relock. If you
relock the doors with the remote
transmitter before 30 seconds have
elapsed, the light will go of f
immediately.
You cannot lock or unlock the doors
with the remote transmitter if any
door is not f ully closed or the key is
in the ignition switch.Panic mode allows you to remotely
activate your car’s horn and exterior
lights to attract attention. When
activated, the horn will sound, and
the exterior lights will f lash, f or
about 30 seconds. To activate panic
mode,pressandholdthePANIC
button f or about one second.
To cancel PANIC mode bef ore 30
seconds, press any button on the
remote transmitter. You can also
turn the ignition switch to
ACCESSORY (I) or ON (II).
Panic mode will not activate if the
ignition switch is in the
ACCESSORY (I) or ON (II) position.
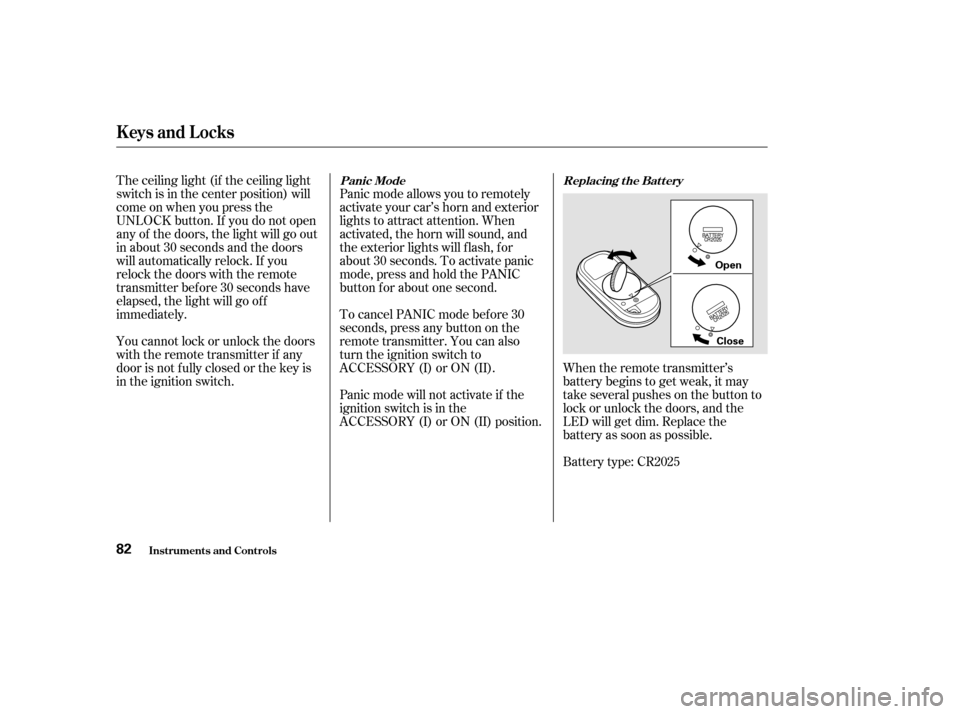
When the remote transmitter’s
battery begins to get weak, it may
take several pushes on the button to
lock or unlock the doors, and the
LED will get dim. Replace the
battery as soon as possible.
Battery type: CR2025Panic Mode Replacing t he Bat t ery
Keys and Locks
Inst rument s and Cont rols82
Open
Close
Page 94 of 319

Push the appropriate edge of the
adjustment switch to move the
mirrorright,left,up,ordown.
When you f inish, move the
selector switch to the center (off)
position. This turns of f the
adjustment switch so you can’t
move a mirror out of position by
accidentally bumping the switch.
Adjust the outside mirrors with the
adjustment switch on the lef t side of
the dashboard:
Turn the ignition switch ON (II).
Move the selector switch to L
(driver’s side) or R (passenger’s
side).
Keeptheinsideandoutsidemirrors
clean and adjusted f or best visibility.
Be sure to adjust the mirrors bef ore
you start driving.
The inside mirror has day and night
positions. The night position reduces
glare f rom headlights behind you.
Flip the tab on the bottom edge of
the mirror to select the day or night
position.
3. 4.
1. 2.
CONT INUED
On HX, LX and EX models in the U.S., and LX and Si models in Canada
Adjusting the Power Mirrors
Mirrors
Inst rument s and Cont rols95
SSEELLEECCTTOORRSSWWIITTCCHH
TTAABB
AADDJJUUSSTTMMEENNTTSSWWIITTCCHH
Page 100 of 319
The ceiling light (with the switch in
the center position) comes on when
you remove the key f rom the ignition
switch. If you do not open a door, the
light stays on, then f ades out in
about 10 seconds.
The ceiling light (with the switch in
the center position) also comes on
when you unlock the door with the
key or the remote transmitter (see
page ).Turn on the spotlight by pushing the
button next to each light. Push the
button again to turn it off. You can
use the spotlights at all times.Turn on the spotlight by pushing the
lens. Push the lens again to turn it
of f . You can use the spotlights at all
times.
84
On EX model in the U.S., and Si model
in Canada On LX model
Interior Lights
Inst rument s and Cont rols
Spotlights
101
LLXX
Page 101 of 319
Your car also has a courtesy light in
the ignition switch. This light comes
on when you open the driver’s door.
It remains on f or several seconds
af ter the door is closed.
On EX model in the U.S., and S modelin Canada
Interior Lights
Inst rument s and Cont rols
Courtesy Lights
102
Page 103 of 319

Proper use of the Heating and
Cooling system can make the
interior dry and comf ortable, and
keep the windows clear f or best
visibility.
If your car does not have air
conditioning, it can be installed at
any time. Your dealer can install a
genuine Honda air conditioning
system that meets Honda’s high
quality standards and is designed to
exactly f it your car. Please contact
your dealer f or more inf ormation.
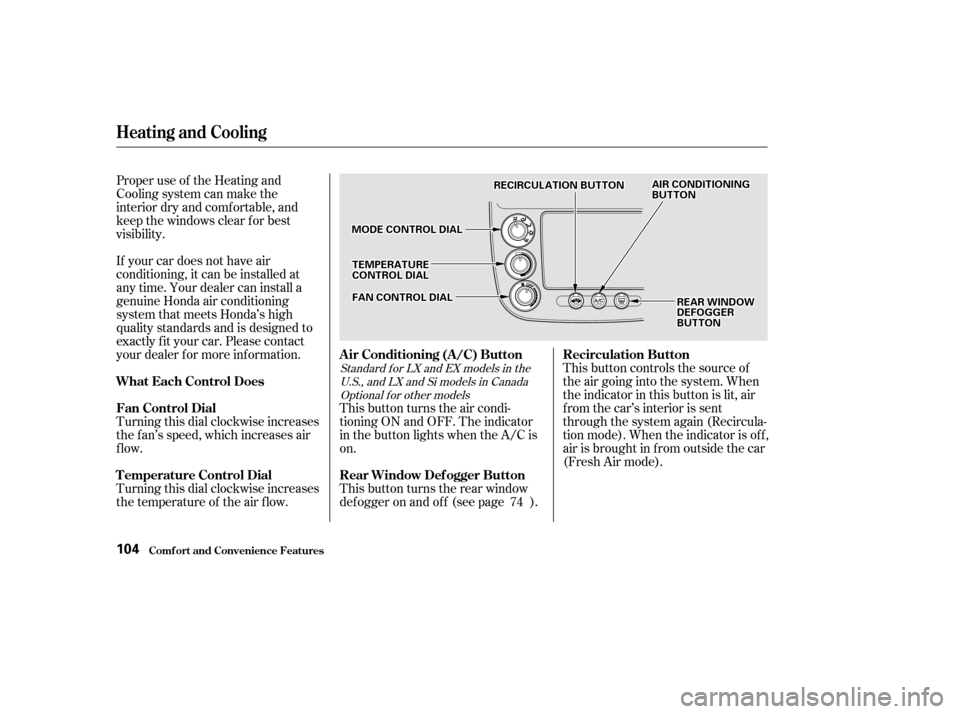
Turning this dial clockwise increases
the f an’s speed, which increases air
flow.This button controls the source of
the air going into the system. When
the indicator in this button is lit, air
from the car’s interior is sent
through the system again (Recircula-
tion mode). When the indicator is off,
air is brought in f rom outside the car
(Fresh Air mode).
Turning this dial clockwise increases
the temperature of the air flow. This button turns the air condi-
tioning ON and OFF. The indicator
in the button lights when the A/C ison.
This button turns the rear window
def ogger on and of f (see page ).
74
Standard f or LX and EX models in the
U.S.,andLXandSimodelsinCanada
Optional f or other models
Comf ort and Convenience Feat ures
Heating and Cooling
Recirculation Button
What Each Control Does
Fan Control Dial
T emperature Control Dial Air Conditioning (A/C) Button
Rear Window Def ogger Button
104
AAIIRRCCOONNDDIITTIIOONNIINNGGBBUUTTTTOONN
MMOODDEECCOONNTTRROOLLDDIIAALL
RREECCIIRRCCUULLAATTIIOONNBBUUTTTTOONN
RREEAARRWWIINNDDOOWWDDEEFFOOGGGGEERRBBUUTTTTOONN
FFAANNCCOONNTTRROOLLDDIIAALL
TTEEMMPPEERRAATTUURREECCOONNTTRROOLLDDIIAALL