Page 108 of 319

To warm the interior:Air conditioning, as it cools, removes
moisture from the air. When used in
combination with the heater, it
makes the interior warm and dry.To remove f og f rom the inside of the
windows:
This setting is suitable f or all driving
conditions whenever the outside
temperature is above 32°F (0°C).
Start the engine.
Select and Fresh Air mode.
Set the f an to the desired speed.
Adjust the warmth of the air with
the temperature control dial. Set the f an to the desired speed.
Turn on the air conditioning.
Select and Fresh Air mode.
Adjust the temperature control
dial so the mixture of heated and
cooled air f eels comf ortable.Set the f an to the desired speed.
Select .
When you select , the
system automatically switches to
Fresh Air mode and turns on the
A/C.
Adjust the temperature control
dial so the air flow from the
def roster vents f eels warm.
Turn on the rear window def ogger
to help clear the rear window.
When you switch to another mode
f rom , the A/C stays on.
PresstheA/Cbuttontoturnitoff.
1.2.3.4.
1.2.3.4.1.2. 3. 4.
CONT INUED
Heating and Cooling
Comf ort and Convenience Feat ures
T o Heat T o Heat and Dehumidif y wit h A ir
Condit ioningT o Def og and Def rost
109
Page 109 of 319
Start the engine.
Select .
When you select , the
system automatically switches to
Fresh Air mode and turns on the A
/C.
Set the f an and temperature
controls to maximum.
To rapidly remove exterior f rost or
ice f rom the windshield (on very cold
days), f irst select the Recirculation
mode. Once the windshield is clear,
select the Fresh Air mode to avoid
f ogging the windows.
To remove exterior f rost or ice f rom
the windshield and side windows
after the car has been sitting out in
cold weather: 1. 2. 3.
Comf ort and Convenience Feat ures
Heating and Cooling
110
MMOODDEECCOONNTTRROOLLDDIIAALL
TTEEMMPPEERRAATTUURREECCOONNTTRROOLLDDIIAALL
RREECCIIRRCCUULLAATTIIOONNBBUUTTTTOONN
AAIIRRCCOONNDDIITTIIOONNIINNGGBBUUTTTTOONN
FFAANNCCOONNTTRROOLLDDIIAALL
RREEAARRWWIINNDDOOWWDDEEFFOOGGGGEERRBBUUTTTTOONN
Page 110 of 319
These settings direct all the air f low
to the defroster vents at the base of
the windshield and the side window
def roster vents. The air f low will get
warmer and clear the windows faster
as the engine warms up. You can
close the side vents with the dial
beside each vent. This will send
more warm air to the windshield
defroster vents.
For saf ety, make sure you have a
clear view through all the windows
bef ore driving away.You should shut the system
completely of f only f or the f irst f ew
minutes of driving in cold weather,
until the engine coolant warms up
enough to operate the heater. Keep
the fan on at all other times so stale
air does not build up in the interior.
To shut of f the system temporarily,
turn the fan speed and temperature
control dials all the way to the lef t.
Heating and Cooling
Comf ort and Convenience Feat ures
To Turn Everything Of f
111
Page 194 of 319

This section also includes
Maintenance Schedules f or normal
driving and severe driving conditions,
a Maintenance Record, and instruc-
tions f or simple maintenance tasks
you may want to take care of
yourself .
If you have the skills and tools to per-
f orm more complex maintenance
tasks on your Honda, you may want
to purchase the Service Manual. See
page f or inf ormation on how to
obtain a copy, or see your Honda
dealer.
This section explains why it is
important to keep your car well
maintained and to f ollow basic
maintenance saf ety precautions.
......................
Maintenance Saf ety . 196
.
Important Safety Precautions . 197
.................
Maintenance Schedule . 198
...
Required Maintenance Record . 205
.......
Owner Maintenance Checks . 207
..............................
Fluid Locations . 208
......................................
Engine Oil . 209
..................................
Adding Oil . 209
....................
Recommended Oil . 209
..............................
Synthetic Oil . 210
....................................
Additives . 210
.....
Changing the Oil and Filter . 211
.............................
Cooling System . 213
............
Adding Engine Coolant . 213
.......
Replacing Engine Coolant . 215
....................
Windshield Washers . 219
.......................
Transmission Fluid . 220
Automatic .........................
Transmission . 220
5-speed Manual .........................
Transmission . 222
................
Brake and Clutch Fluid . 223
............................
Brake System . 223
...........................
Clutch System . 223
..............................
Power Steering . 224
.....................
Air Cleaner Element . 225 ....................................
Hood Latch . 226
....................................
Spark Plugs . 227
..............................
Replacement . 227
............................
Specif ications . 229
...........................................
Battery . 230
.................................
Wiper Blades . 232
..............
Air Conditioning System . 234
..................
Dust and Pollen Filter . 235
.....................................
Drive Belts . 237
....................................
Timing Belt . 237
...............................................
Tires . 238
......................................
Inf lation . 238
Recommended Tire Pressures ...........
f or Normal Driving . 239
..................................
Inspection . 240
..............................
Maintenance . 240
.............................
Tire Rotation . 241
...
Replacing Tires and Wheels . 242
......................
Wheels and Tires . 243
..........................
Winter Driving . 243
.............................
Snow Tires . 243
...................
Traction Devices . 244
.............................................
Lights . 245
.....................
Headlight Aiming . 247
........................
Replacing Bulbs . 250
...........................
Storing Your Car . 254
311
Maint enance
Maintenance
195
Page 212 of 319

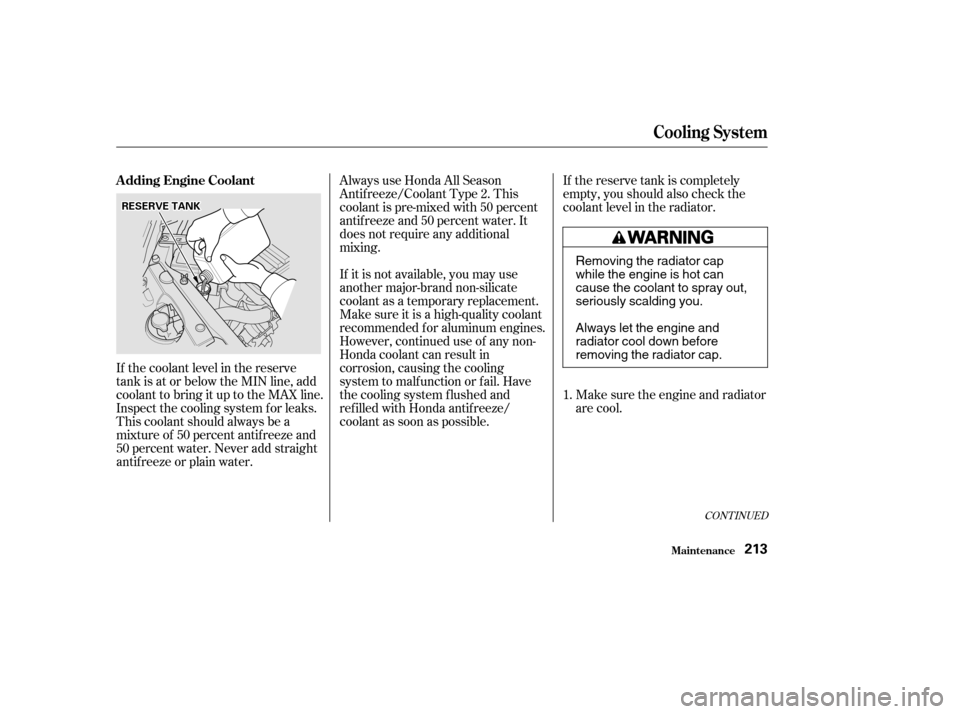
If the coolant level in the reserve
tank is at or below the MIN line, add
coolant to bring it up to the MAX line.
Inspect the cooling system f or leaks.
This coolant should always be a
mixtureof 50percentantifreezeand
50 percent water. Never add straight
antif reeze or plain water.If the reserve tank is completely
empty, you should also check the
coolant level in the radiator.
Make sure the engine and radiator
are cool.
Always use Honda All Season
Antif reeze/Coolant Type 2. This
coolant is pre-mixed with 50 percent
antif reeze and 50 percent water. It
does not require any additional
mixing.
If it is not available, you may use
another major-brand non-silicate
coolant as a temporary replacement.
Make sure it is a high-quality coolant
recommended f or aluminum engines.
However, continued use of any non-
Honda coolant can result in
corrosion, causing the cooling
system to malf unction or f ail. Have
the cooling system f lushed and
ref illed with Honda antif reeze/
coolant as soon as possible.
1.
CONT INUED
A dding Engine Coolant
Cooling Syst em
Maint enance213
RREESSEERRVVEETTAANNKK
Removing the radiator cap
while the engine is hot can
cause the coolant to spray out,
seriously scalding you.
Always let the engine and
radiator cool down before
removing the radiator cap.
Page 213 of 319
Remove the radiator cap by
pushing down and turning
counterclockwise.
Turn the radiator cap counter-
clockwise, without pressing down
on it, until it stops. This relieves
any pressure remaining in the
cooling system.
Pour coolant into the reserve tank.
Fill it to half way between the MAX
and MIN marks. Put the cap back
on the reserve tank.
Put the radiator cap back on.
Tighten it f ully.
The coolant level should be up to
the base of the f iller neck. Add
coolant if it is low. Do not add any rust inhibitors or
other additives to your car’s cooling
system. They may not be compatible
with the coolant or engine compo-
nents.
2. 3. 4. 5. 6.
Cooling Syst em
Maint enance214
RRAADDIIAATTOORRCCAAPPRREESSEERRVVEETTAANNKK
Page 214 of 319
CONT INUED
Remove the radiator cap.
Turn the ignition ON (II). Turn
the temperature control dial to
maximum heat. Turn of f the
ignition. Open the hood. Make
sure the engine and radiator are
cool to the touch.
Loosen the drain plug on the
bottom of the radiator. The
coolant will drain through the
splash guard. Remove the drain
bolt and washer f rom the engine
block.
Draining the coolant requires access
to the underside of the car. Unless
you have the tools and knowledge,
you should have this maintenance
done by a skilled mechanic.
Thecoolingsystemshouldbe
completely drained and ref illed with
new coolant according to the time
and distance recommendations in
the maintenance schedule. Only use
Honda All Season Antif reeze/
Coolant Type 2.
1.3.
2.
Replacing Engine Coolant
Cooling Syst em
Maint enance215
Page 215 of 319

�µ
�´ �´ �µ
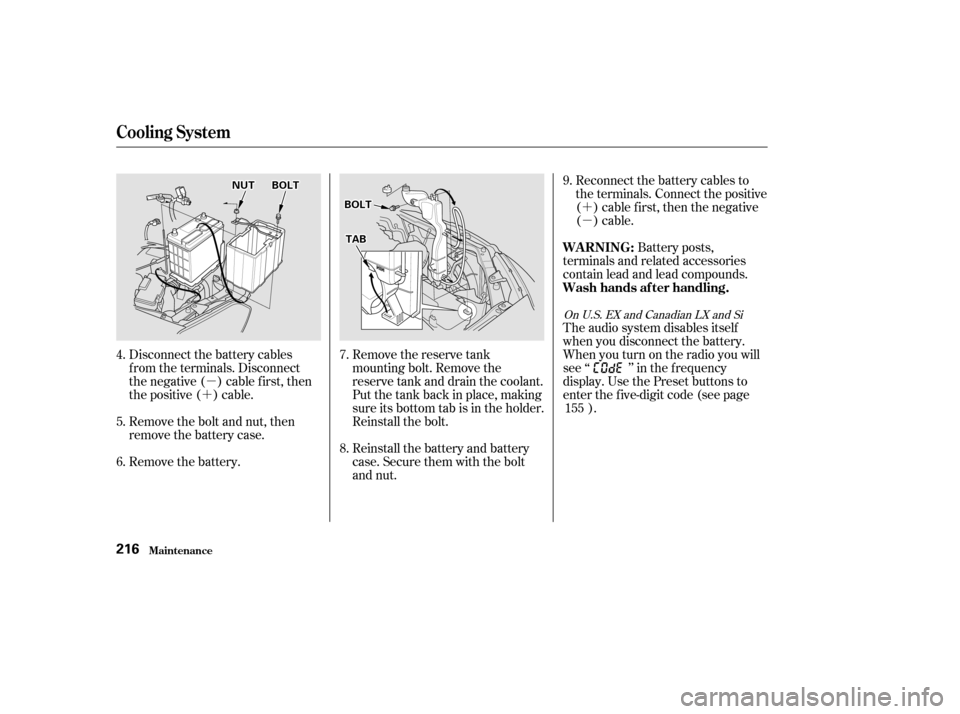
Disconnect the battery cables
f rom the terminals. Disconnect
the negative ( ) cable first, then
the positive ( ) cable.
Remove the bolt and nut, then
remove the battery case. Remove the reserve tank
mounting bolt. Remove the
reserve tank and drain the coolant.
Put the tank back in place, making
sure its bottom tab is in the holder.
Reinstall the bolt.
Reinstall the battery and battery
case. Secure them with the bolt
and nut.Reconnect the battery cables to
the terminals. Connect the positive
( ) cable f irst, then the negative
()cable.
Battery posts,
terminals and related accessories
contain lead and lead compounds.
Remove the battery. The audio system disables itself
when you disconnect the battery.
Whenyouturnontheradioyouwill
see ‘‘ ’’ in the f requency
display. Use the Preset buttons to
enter the f ive-digit code (see page
).
4. 6. 7.
5. 8.9.
155
On U.S. EX and Canadian LX and Si
Cooling Syst em
Maint enance
WARNING:
Wash hands af ter handling.
216
NNUUTTBBOOLLTT
BBOOLLTT
TTAABB