Page 172 of 411
: If CHK TAPE appears on
the radio display, the tape wont play because of one of
the following errors.
�The tape is tight and the player cant turn th")
3-33
Cassette Tape Messages
CHK TAPE (Check Tape): If CHK TAPE appears on
the radio display, the tape won't play because of one of
the following errors.
�The tape is tight and the player can't turn the
tape hubs. Remove the tape. Hold the tape with
the open end down and try to turn the right hub
counterclockwise with a pencil. Turn the tape over
and repeat. If the hubs do not turn easily, your tape
may be damaged and should not be used in the
player. Try a new tape to make sure your player is
working properly.
�The tape is broken. Try a new tape.
�The tape is wrapped around the tape head.
Attempt to get the cassette out. Try a new tape.
CLEAN: If this message appears on the display, the
cassette tape player needs to be cleaned. It will still play
tapes, but you should clean it as soon as possible to
prevent damage to the tapes and player. See ªCare of
Your Cassette Tape Playerº in the Index.
If any error occurs repeatedly or if an error can't be
corrected, contact your dealer.Playing a Compact Disc
Insert a disc partway into the slot, label side up. The
player will pull it in and the disc should begin playing.
The display will show the CD symbol. If you want to
insert a compact disc with the ignition off, first press
DISP or EJT.
If an error appears on the display, see ªCompact Disc
Messagesº later in this section.
1 PREV (Previous): Press this pushbutton to go to the
previous track if the current selection has been playing
for less than eight seconds. If this pushbutton is pressed
and the current selection has been playing for more than
eight seconds, it will go to the beginning of the current
selection. TRACK and the track number will appear on
the display. If you hold this pushbutton or press it more
than once, the player will continue moving back through
the disc. The sound will mute while seeking.
2 NEXT: Press this pushbutton to go to the next
track. TRACK and the track number will appear on the
display. If you hold this pushbutton or press it more than
once, the player will continue moving forward through
the disc. The sound will mute while seeking.
Page 174 of 411
3-35
Compact Disc Messages
If the disc comes out, it could be for one of the
following reasons:
�If you're driving on a very rough road. When the
road becomes smooth the disc should play.
�If it's very hot. When the temperature returns to
normal, the disc should play.
�The disc is upside down.
�It is dirty, scratched or wet.
�The air is very humid. (If so, wait about an hour
and try again.)
�If the CD is not playing correctly, for any other
reason, try a known good CD.
If any error occurs repeatedly or if an error can't be
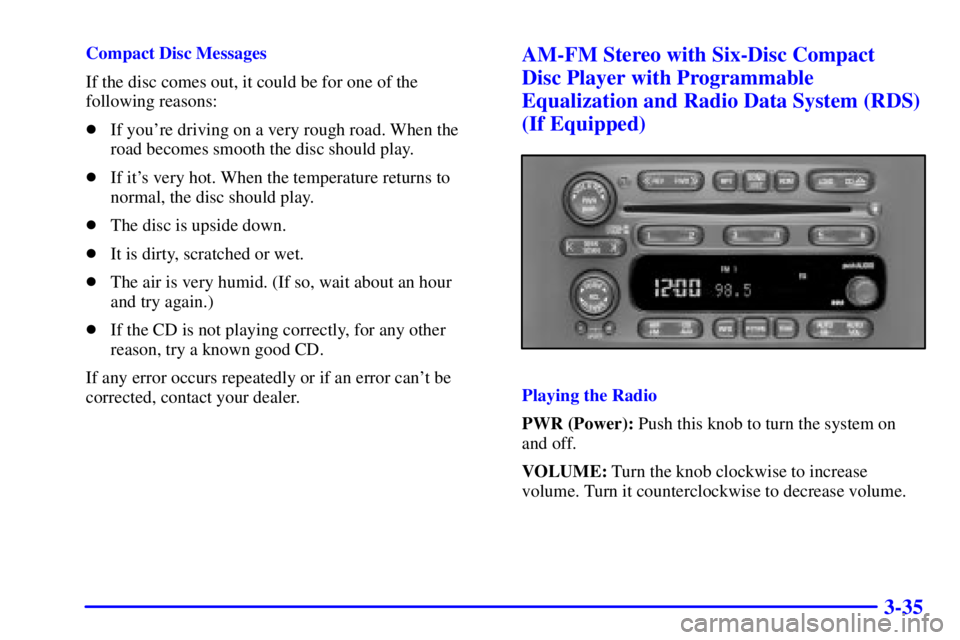
corrected, contact your dealer.AM-FM Stereo with Six-Disc Compact
Disc Player with Programmable
Equalization and Radio Data System (RDS)
(If Equipped)
Playing the Radio
PWR (Power): Push this knob to turn the system on
and off.
VOLUME: Turn the knob clockwise to increase
volume. Turn it counterclockwise to decrease volume.
Page 175 of 411
: Your system has a
feature called automatic volume. With this feature, your
audio system adjusts automatically to make up for road
and wind noise as you drive.
Set the")
3-36
AUTO VOL (Automatic Volume): Your system has a
feature called automatic volume. With this feature, your
audio system adjusts automatically to make up for road
and wind noise as you drive.
Set the volume at the desired level. Press this button to
select MIN, MED or MAX. Each higher choice allows
for more volume compensation at faster vehicle speeds.
Then, as you drive, automatic volume increases the
volume, as necessary, to overcome noise at any speed.
The volume level should always sound the same to you
as you drive. If you don't want to use automatic volume,
select OFF.
RCL (Recall): Push this knob to display the station
being played or to display the clock. Pushing this knob
with the ignition off will display the clockFinding a Station
AM FM: Press this button to switch between AM, FM1
and FM2. The display shows your selection.
TUNE: Turn this knob to select radio stations.
�
SEEK �: Press the right or left arrow to go to the
next or previous station and stay there. The sound will
mute while seeking.
�
SCAN �: Press and hold either SCAN arrow for
two seconds until SC appears on the display and you
hear a beep. The radio will go to a station, play for a few
seconds, then go on to the next station. Press either
SCAN arrow again to stop scanning. If you press SCAN
for more than four seconds, the radio will change to
preset scan mode. The sound will mute while scanning.
To scan preset stations, press and hold either SCAN
arrow for more than four seconds, PRESET SCAN
will appear on the display. You will hear a double beep.
The radio will go to a preset station stored on your
pushbuttons, play for a few seconds, then go on to
the next preset station. Press either SCAN arrow
again to stop scanning presets. The sound will mute
while scanning.
Page 185 of 411

3-46
Compact Disc Messages
CHECK CD: If this message appears on the radio
display, it could be due to one of the following reasons:
�The road is too rough. The disc should play when the
road is smoother.
�The disc is dirty, scratched, wet or upside down.
�The air is very humid. If so, wait about an hour and
try again.
If the CD is not playing correctly, for any other reason,
try a known good CD.
If any error occurs repeatedly or if an error can't be
corrected, contact your dealer. If your radio displays an
error message, write it down and provide it to your
dealer when reporting the problem.Theft-Deterrent Feature RDS Radios
(If Equipped)
THEFTLOCK� is designed to discourage theft of your
radio. The feature works automatically by learning a
portion of the Vehicle Identification Number (VIN).
If the radio is moved to a different vehicle, it will not
operate and LOCKED will be displayed.
When the radio and vehicle are turned off, the blinking
red light indicates that THEFTLOCK is armed.
With THEFTLOCK activated, your radio will not
operate if stolen.
Theft-Deterrent Feature Non-RDS Radios
(If Equipped)
THEFTLOCK� is designed to discourage theft of your
radio. The feature works automatically by learning a
portion of the Vehicle Identification Number (VIN).
If the radio is moved to a different vehicle, it will not
operate and LOC will be displayed.
With THEFTLOCK activated, your radio will not
operate if stolen.
Page 196 of 411

4-7
Avoid needless heavy braking. Some people drive
in spurts
-- heavy acceleration followed by heavy
braking
-- rather than keeping pace with traffic.
This is a mistake. Your brakes may not have time to
cool between hard stops. Your brakes will wear out
much faster if you do a lot of heavy braking. If you
keep pace with the traffic and allow realistic following
distances, you will eliminate a lot of unnecessary
braking. That means better braking and longer
brake life.
If your engine ever stops while you're driving, brake
normally but don't pump your brakes. If you do, the
pedal may get harder to push down. If your engine
stops, you will still have some power brake assist.
But you will use it when you brake. Once the power
assist is used up, it may take longer to stop and the
brake pedal will be harder to push.
Anti-Lock Brake System (ABS)
Your vehicle has anti-lock brakes. ABS is an advanced
electronic braking system that will help prevent a
braking skid.
When you start your engine and begin to drive away,
your anti
-lock brake system will check itself. You may
hear a momentary motor or clicking noise while this test
is going on. This is normal.
If there's a problem with
the anti
-lock brake system,
this warning light will stay
on. See ªAnti
-Lock Brake
System Warning Lightº in
the Index.
Page 197 of 411
4-8
Let's say the road is wet and you're driving safely.
Suddenly, an animal jumps out in front of you.
You slam on the brakes and continue braking.
Here's what happens with ABS:
A computer senses that wheels are slowing down. If one
of the wheels is about to stop rolling, the computer will
separately work the brakes at each front wheel and at
both rear wheels.The anti
-lock system can change the brake pressure faster
than any driver could. The computer is programmed to
make the most of available tire and road conditions.
This can help you steer around the obstacle while
braking hard.
As you brake, your computer keeps receiving updates on
wheel speed and controls braking pressure accordingly.
Page 198 of 411

4-9
Remember: Anti-lock doesn't change the time you need
to get your foot up to the brake pedal or always decrease
stopping distance. If you get too close to the vehicle in
front of you, you won't have time to apply your brakes
if that vehicle suddenly slows or stops. Always leave
enough room up ahead to stop, even though you have
anti
-lock brakes.
Using Anti
-Lock
Don't pump the brakes. Just hold the brake pedal down
firmly and let anti
-lock work for you. You may feel the
brakes vibrate, or you may notice some noise, but this
is normal.
Braking in Emergencies
With anti-lock, you can steer and brake at the same
time. In many emergencies, steering can help you more
than even the very best braking.
Steering
Power Steering
If you lose power steering assist because the engine
stops or the system is not functioning, you can steer but
it will take much more effort.
Steering Tips
Driving on Curves
It's important to take curves at a reasonable speed.
A lot of the ªdriver lost controlº accidents mentioned on
the news happen on curves. Here's why:
Experienced driver or beginner, each of us is subject to
the same laws of physics when driving on curves. The
traction of the tires against the road surface makes it
possible for the vehicle to change its path when you turn
the front wheels. If there's no traction, inertia will keep
the vehicle going in the same direction. If you've ever
tried to steer a vehicle on wet ice, you'll understand this.
Page 200 of 411

4-11
An emergency like this requires close attention and a
quick decision. If you are holding the steering wheel at
the recommended 9 and 3 o'clock positions, you can
turn it a full 180 degrees very quickly without removing
either hand. But you have to act fast, steer quickly, and
just as quickly straighten the wheel once you have
avoided the object.
The fact that such emergency situations are always
possible is a good reason to practice defensive driving
at all times and wear safety belts properly.
Off-Road Recovery
You may find that your right wheels have dropped off the
edge of a road onto the shoulder while you're driving.
If the level of the shoulder is only slightly below the
pavement, recovery should be fairly easy. Ease off the
accelerator and then, if there is nothing in the way, steer
so that your vehicle straddles the edge of the pavement.
You can turn the steering wheel up to one
-quarter turn
until the right front tire contacts the pavement edge. Then
turn your steering wheel to go straight down the roadway.