Page 100 of 429

2-38
Turn Signal/Multifunction Lever
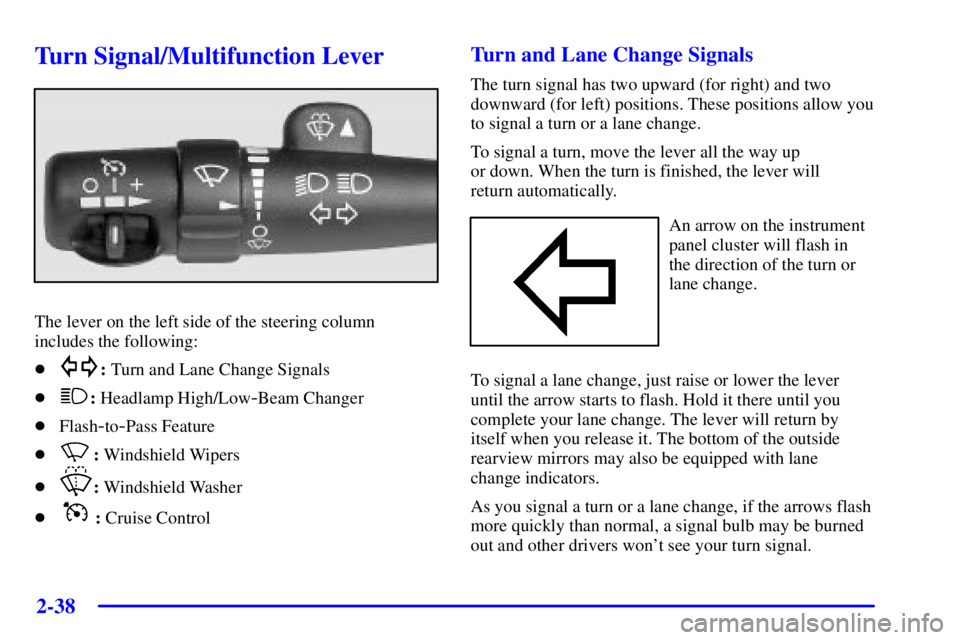
The lever on the left side of the steering column
includes the following:
�
: Turn and Lane Change Signals
�
: Headlamp High/Low-Beam Changer
�Flash
-to-Pass Feature
�
: Windshield Wipers
�
: Windshield Washer
�
: Cruise Control
Turn and Lane Change Signals
The turn signal has two upward (for right) and two
downward (for left) positions. These positions allow you
to signal a turn or a lane change.
To signal a turn, move the lever all the way up
or down. When the turn is finished, the lever will
return automatically.
An arrow on the instrument
panel cluster will flash in
the direction of the turn or
lane change.
To signal a lane change, just raise or lower the lever
until the arrow starts to flash. Hold it there until you
complete your lane change. The lever will return by
itself when you release it. The bottom of the outside
rearview mirrors may also be equipped with lane
change indicators.
As you signal a turn or a lane change, if the arrows flash
more quickly than normal, a signal bulb may be burned
out and other drivers won't see your turn signal.
Page 101 of 429

2-39
If a bulb is burned out, replace it to help avoid an
accident. If the arrows don't go on at all when you
signal a turn, check the fuse (see ªFuses and Circuit
Breakersº in the Index) and for burned
-out bulbs.
If you have a trailer towing option with added wiring for
the trailer lamps, a different turn signal flasher is used.
With this flasher installed, the signal indicator will flash
even if a turn signal bulb is burned out. Check the front
and rear turn signal lamps regularly to make sure they
are working.
Turn Signal On Chime
If your turn signal is left on for more than 3/4 of a mile
(1.2 km), a chime will sound at each flash of the turn
signal. To turn off the chime, move the turn signal lever
to the off position.
Headlamp High/Low-Beam Changer
To change the headlamps from low to high beam, push
the lever toward the instrument panel. To return to
low
-beam headlamps, pull the multifunction lever
toward you. Then release it.
When the high beams are
on, this indicator light on
the instrument panel cluster
will also be on.
Page 210 of 429

3-43
TUNE RCL P-TYPE: Press this control to see how
long the current track has been playing. To change what
is normally shown on the display (track or elapsed
time), press the control until you see the display you
want, then hold the control until the display flashes.
AM FM: Press this button to play the radio when a disc
is in the player.
Using Song List Mode
The integrated 6
-disc CD changer has a feature
called song list. This feature is capable of
saving 20 track selections.
To save tracks into SONG LIST perform the
following steps:
1. Turn the disc player on and load it with at least one
disc. See ªLOAD CDº mentioned previously for
more information.
2. Check to see that the disc changer is not in song list
mode. S
-LIST should not appear in the display.
If S
-LIST is present, press SONG LIST to turn it off.3. Select the desired disc by pressing the numbered
pushbutton and then use the SEEK SCAN right
arrow button to locate the track that you want to
save. The track will begin to play.
4. Press and hold the SONG LIST button for two
or more seconds to save the track into memory.
When SONG LIST is pressed a beep will be heard
immediately. After two seconds of pressing SONG
LIST continuously, two beeps will sound to confirm
that the track has been saved.
5. Repeat Steps 3 and 4 for saving other selections.
If you attempt to save more than 20 selections, S
-LIST
FULL will appear on the display.
To play the song list, press SONG LIST. One beep will
be heard and S
-LIST will appear on the display.
The recorded tracks will begin to play in the order that
they were saved.
You may seek through the song list by using the SEEK
SCAN arrows. Seeking past the last saved track will
return you to the first saved track.
Page 225 of 429

3-58
SEEK: Press the SEEK button to tune to the next
higher station and stay there. The display will show
your selection. The sound will mute while seeking.
Press and hold the SEEK button to seek through
your preset radio stations set on your primary radio
pushbuttons. The display will show your selections.
The SEEK button is inactive if the AM FM mode on
the front radio is in use.
While listening to a cassette tape, press the SEEK button
to hear the next selection on the tape. Press and hold
the SEEK button to go to the other side of the tape.
The SEEK button is inactive if the tape mode on the
front radio is in use.
While listening to a CD, press the SEEK button to
hear the next selection on the CD. The SEEK button
is inactive if the CD mode on the front radio or the
CD changer is in use.Theft-Deterrent Feature RDS Radios
THEFTLOCK� is designed to discourage theft of
your radio. The feature works automatically by learning
a portion of the Vehicle Identification Number (VIN).
If the radio is moved to a different vehicle, it will not
operate and LOCKED will be displayed.
When the radio and vehicle are turned off, the blinking
red light indicates that THEFTLOCK is armed.
With THEFTLOCK activated, your radio will not
operate if stolen.
Page 226 of 429

3-59 Audio Steering Wheel Controls
(If Equipped)
If your vehicle has this
feature, certain radio
functions can be operated
by using the controls on
your steering wheel.
AM/FM: Press this control to tune to the next radio
station. When playing a cassette tape or compact disc,
press AM/FM to switch to the radio.
(Program): Press this control to tune to a higher
preset radio station. When playing a cassette tape, press
program to hear the other side of a tape that is playing.
When using the CD changer, this control will seek to the
next selection.
(Volume): Press the up or down arrow to increase
or decrease volume.
Understanding Radio Reception
AM
The range for most AM stations is greater than for FM,
especially at night. The longer range, however, can
cause stations to interfere with each other. AM can pick
up noise from things like storms and power lines.
Try reducing the treble to reduce this noise if you
ever get it.
FM Stereo
FM stereo will give you the best sound, but FM signals
will reach only about 10 to 40 miles (16 to 65 km).
Tall buildings or hills can interfere with FM signals,
causing the sound to come and go.
Understanding DVD Distortion
You may experience audio distortion in the IR
headphones when operating cellular phones, scanners,
CB radios, Global Position Systems (GPS)*, two
-way
radios, mobile fax, or walkie talkies.
It may be necessary to turn off the DVD player when
operating one of these devices in or near the vehicle.
* Excludes the OnStar
� System.