Page 230 of 264

²Anticipate stopping; slowing down may eliminate
the need to stop.
²Sudden or hard accelerations may reduce fuel
economy.
²Slow down gradually.
²Driving at reasonable speeds (traveling at 88 km/h
[55 mph] uses 15% less fuel than traveling at
105 km/h [65 mph]).
²Revving the engine before turning it off may
reduce fuel economy.
²Using the air conditioner or defroster may reduce
fuel economy.
²You may want to turn off the speed control in
hilly terrain if unnecessary shifting between third
and fourth gear occurs. Unnecessary shifting of
this type could result in reduced fuel economy.
²Warming up a vehicle on cold mornings is not
required and may reduce fuel economy.
²Resting your foot on the brake pedal while driving
may reduce fuel economy.
²Combine errands and minimize stop-and-go
driving.
Maintenance
²Keep tires properly inflated and use only
recommended size.
²Operating a vehicle with the wheels out of
alignment will reduce fuel economy.
²Use recommended engine oil. Refer toLubricant
specificationsin this chapter.
²Perform all regularly scheduled maintenance
items. Follow the recommended maintenance
schedule and owner maintenance checks found in
your vehicle scheduled maintenance guide.
Maintenance and Specifications
230
Page 232 of 264

EMISSION CONTROL SYSTEM
Your vehicle is equipped with various emission
control components and a catalytic converter which
will enable your vehicle to comply with applicable
exhaust emission standards. To make sure that the
catalytic converter and other emission control
components continue to work properly:
²Use only the specified fuel listed.
²Avoid running out of fuel.
²Do not turn off the ignition while your vehicle is
moving, especially at high speeds.
²Have the items listed in your scheduled
maintenance guide performed according to the
specified schedule.
The scheduled maintenance items listed in the
scheduled maintenance guide are essential to the life
and performance of your vehicle and to its emissions
system.
If other than Ford, Motorcraft or Ford-authorized parts
are used for maintenance replacements or for service
of components affecting emission control, such
non-Ford parts should be equivalent to genuine Ford
Motor Company parts in performance and durability.
Do not park, idle, or drive your vehicle in
dry grass or other dry ground cover. The
emission system heats up the engine compartment
and exhaust system, which can start a fire.
Illumination of the ªService Engine Soonº light,
charging system warning light or the temperature
warning light, fluid leaks, strange odors, smoke or
loss of engine power, could indicate that the
emission control system is not working properly.
Exhaust leaks may result in entry of harmful
and potentially lethal fumes into the
passenger compartment.
Maintenance and Specifications
232
Page 234 of 264

CHECKING AND ADDING POWER STEERING
FLUID
Check the power steering fluid. Refer to the
scheduled maintenance guide for the service interval
schedules. If adding fluid is necessary, use only
MERCONtAT F.
If your vehicle is
equipped with the
3.8L V6 engine,check
the power steering
fluid level with the
engine at normal
operating temperature.
1. Start the engine and
let it run until it
reaches normal
operating temperature
(the engine coolant
temperature gauge
indicator will be near
the center of the
normal area between H
and C).
2. While the engine idles, turn the steering wheel
left and right several times.
3. Turn the engine off.
4. Check the fluid level on the dipstick. It should be
within the FULL HOT range. Do not add fluid if the
level is within this range.
5. If the fluid is low, add fluid in small amounts,
continuously checking the level until it reaches the
correct operating range. Be sure to put the cap back
on the reservoir.
FILL
HOT
Maintenance and Specifications
234
Page 235 of 264
If your vehicle is
equipped with a 4.6L
V8 engine,check the
power steering fluid
level with the engine at
ambient temperature.
Allow at least one-half
hour after driving for
the power steering
fluid to cool.
1. Start the engine and
allow the engine to
idle.
2. Turn the steering
wheel left and right
several times.
3. Turn the engine off.
4. Check the fluid level in the reservoir. It should be
between the MIN and MAX lines. Do not add fluid if
the level is within this range.
5. If the fluid is low, add fluid in small amounts,
continuously checking the level until it reaches the
correct operating range. Be sure to put the cap back
on the reservoir.
BRAKE FLUID
Checking and adding brake fluid
Brake fluid should be checked and refilled as
needed. Refer to the scheduled maintenance guide
for the service interval schedules.
MAXMIN
Maintenance and Specifications
235
Page 237 of 264
Brake fluid is toxic. If brake fluid contacts
the eyes, flush eyes with running water for
15 minutes. Seek medical attention if irritation
persists. If taken internally, drink water and induce
vomiting. Seek medical attention immediately.
If you use a brake fluid that is not DOT 3,
you will cause permanent damage to your
brakes.
Do not let the reservoir for the master
cylinder run dry. This may cause the brakes
to fail.
CLUTCH ADJUSTMENT (IF EQUIPPED)
Check the clutch
adjustment. Refer to
the scheduled
maintenance guide for
the service interval
schedules.
The clutch on your
vehicle is operated by
a cable. As necessary, adjust the clutch as described
below.
1. Turn the engine off and shift into 1 (First).
2. Put your foot under the clutch pedal and gently
pull it up until the pedal stops.
3. Push the clutch pedal down slowly. You will hear a
click as the clutch adjusts itself.
Maintenance and Specifications
237
Page 238 of 264

TRANSMISSION FLUID
Checking automatic transmission fluid
(if equipped)
Refer to your scheduled maintenance guide for
scheduled intervals for fluid checks and changes. Your
transmission does not consume fluid. However, the
fluid level should be checked if the transmission is not
working properly, i.e., if the transmission slips or shifts
slowly or if you notice some sign of fluid leakage.
Automatic transmission fluid expands when warmed.
To obtain an accurate fluid check, drive the vehicle
until it is at normal operating temperature
(approximately 30 km [20 miles]). If your vehicle has
been operated for an extended period at high
speeds, in city traffic during hot weather or pulling a
trailer, the vehicle should be turned off for about 30
minutes to allow fluid to cool before checking.
1. Drive the vehicle 30 km (20 miles) or until it
reaches normal operating temperature.
2. Park the vehicle on a level surface and engage the
parking brake.
3. With the parking brake engaged and your foot on
the brake pedal, start the engine and move the
gearshift lever through all of the gear ranges. Allow
sufficient time for each gear to engage.
4. Latch the gearshift lever in P (Park) and leave the
engine running.
5. Remove the dipstick, wiping it clean with a clean,
dry lint free rag. If necessary, refer toIdentifying
components in the engine compartmentin this
chapter for the location of the dipstick.
6. Install the dipstick making sure it is fully seated in
the filler tube.
7. Remove the dipstick and inspect the fluid level.
The fluid should be in the designated area for
normal operating temperature or ambient
temperature.
Maintenance and Specifications
238
Page 243 of 264

The temperature grade for this tire is
established for a tire that is properly inflated
and not overloaded. Excessive speed,
underinflation, or excessive loading, either
separately or in combination, can cause heat
buildup and possible tire failure.
SERVICING YOUR TIRES
Checking the tire pressure
²Use an accurate tire pressure gauge.
²Check the tire pressure when tires are cold, after
the vehicle has been parked for at least one hour
or has been driven less than 5 km (3 miles).
²Adjust tire pressure to recommended
specifications found on the tire pressure label
inside the glove compartment door.
Improperly inflated tires can affect vehicle
handling and can fail suddenly, possibly
resulting in loss of vehicle control.
Tire rotation
Because your vehicle's tires perform different jobs,
they often wear differently. To make sure your tires
wear evenly and last longer, rotate them as indicated
in the scheduled maintenance guide. If you notice
that the tires wear unevenly, have them checked.
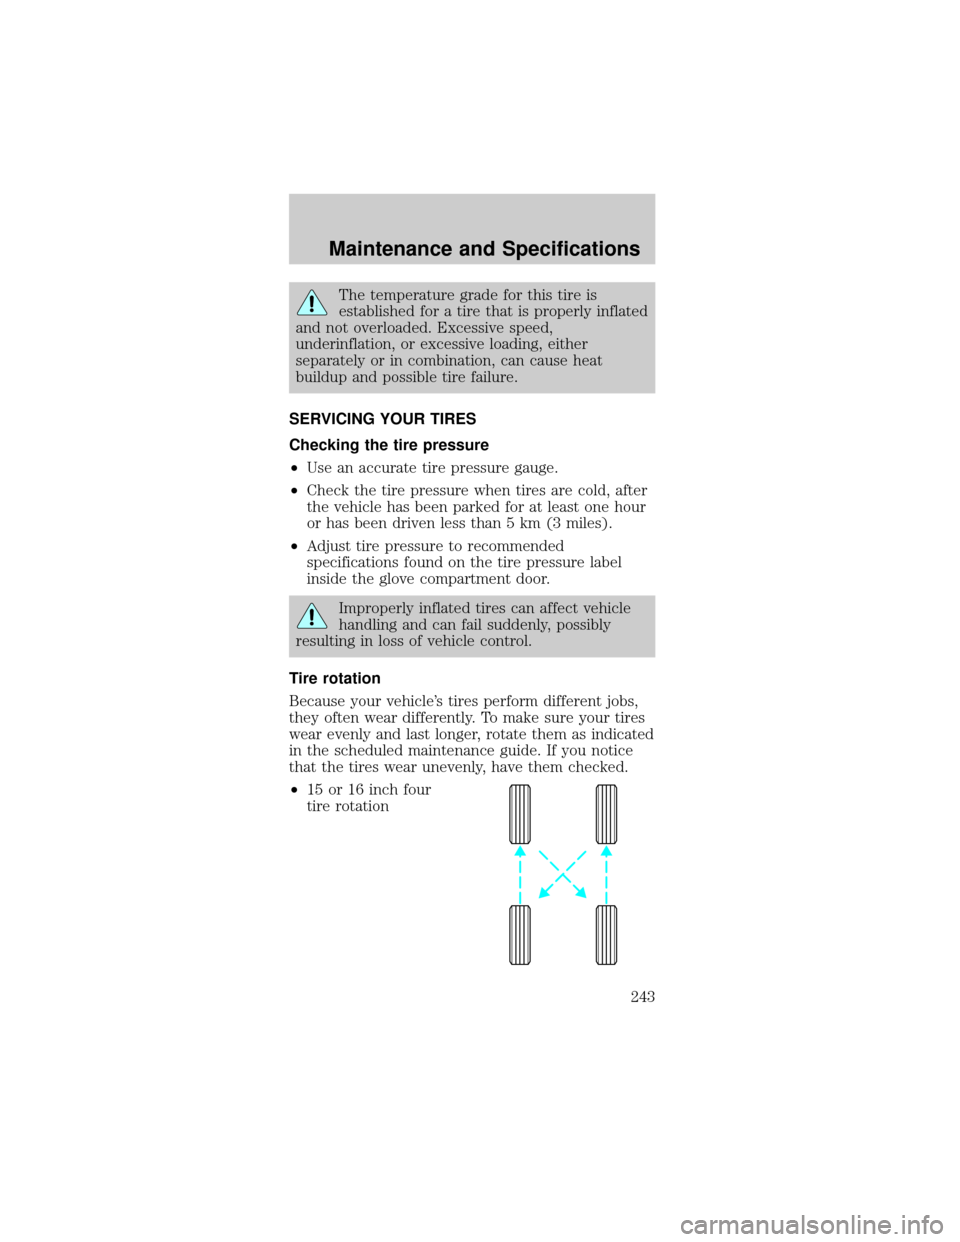
²15 or 16 inch four
tire rotation
Maintenance and Specifications
243
Page 248 of 264

Fluid Ford Part
NameApplication Capacity
Fuel tank N/A All 59.4L
(15.7 gallons)
Transmission
fluid
3Motorcraft
MERCONtV
AT FAutomatic
with 3.8L
OHV V6
engine13.1L
(13.9 quarts)
4
Automatic
with 4.6L
SOHC V8
engine12.0L
(12.8 quarts)
4
Motorcraft
MERCONt
AT FManual with
3.8L OHV V6
engine2.6L
(5.6 pints)5
Synthetic
MERCONt
AT FManual with
4.6L SOHC
V8 engine3.8L
(8.0 pints)5
Windshield
washer fluidUltra-Clear
Windshield
Washer
ConcentrateAll 3.8L
(4.0 quarts)
1Add the coolant type originally equipped in your
vehicle.
2Rear axle lubricants do not need to be checked or
changed unless a leak is suspected, service is
required or the axle assembly has been submerged
in water. The axle lubricant should be changed any
time the rear axle has been submerged in water. Fill
6 mm to 14 mm (1/4 inch to 9/16 inch) below
bottom of fill hole. Add 118 ml (4 oz.) of Additive
Friction Modifier C8AZ-19B546-A or equivalent
meeting Ford specification EST-M2C118±A for
complete refill of Traction-Lok axles.
3Ensure the correct automatic transmission fluid is
used. Transmission fluid requirements are indicated
on the dipstick or on the dipstick handle. MERCONt
and MERCONtV are not interchangeable. DO NOT
mix MERCONtand MERCONtV. Refer to your
scheduled maintenance guide to determine the
correct service interval.
Maintenance and Specifications
248