2002 FORD F350 belt
[x] Cancel search: beltPage 156 of 264

Removing snowplow
After removing a snowplow from the vehicle, ensure the vehicle’s front
toe alignment and front ride height are within specification (reset if
required).
Snowplowing with your air bag-equipped vehicle
Your vehicle is equipped with a driver and passenger air bag
Supplemental Restraint System (SRS) The SRS is designed to activate in
certain frontal and offset frontal collisions when the vehicle sustains
sufficient longitudinal deceleration.
Careless or high speed driving while plowing snow which results in
sufficient vehicle decelerations can deploy the air bag. Such driving also
increases the risk of accidents.
All occupants of the vehicle, including the driver, should always
properly wear their safety belts, even when an air bag (SRS) is
provided.
Never remove or defeat the “tripping mechanisms” designed into the
snow removal equipment by its manufacturer. Doing so may cause
damage to the vehicle and the snow removal equipment as well as
possible air bag deployment.
Do not attempt to service, repair, or modify the Air Bag
Supplemental Restraint System or its fuses. See your Ford or
Lincoln Mercury dealer.
Additional equipment such as snowplow equipment may effect
the performance of the air bag sensors increasing the risk of
injury. Please refer to the Body Builders Layout Book for instructions
about the appropriate installation of additional equipment.
Engine temperature while plowing
When driving with a snowplow, your engine may run at a higher
temperature than normal because the attached snowplow blade will
restrict airflow to the radiator.
If you are driving more than 24 km (15 miles) at temperatures above
freezing, angle the plow blade either full left or full right to provide
maximum airflow to the radiator.
If you are driving less than 24 km (15 miles) at speeds up to 64 km/h
(40 mph) in cold weather, you will not need to worry about blade
position to provide maximum airflow.
Driving
156
ProCarManuals.com
Page 176 of 264

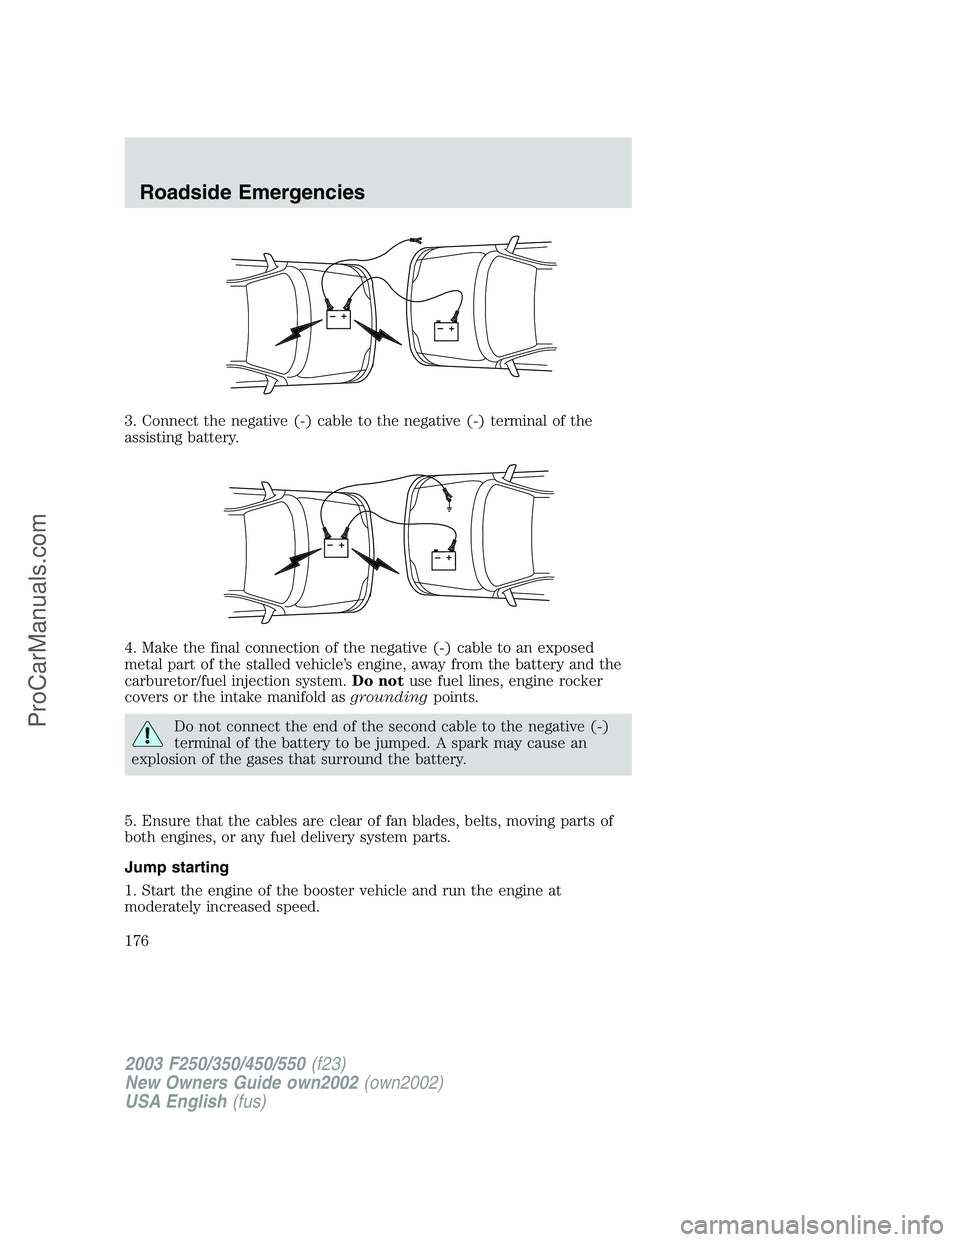
3. Connect the negative (-) cable to the negative (-) terminal of the
assisting battery.
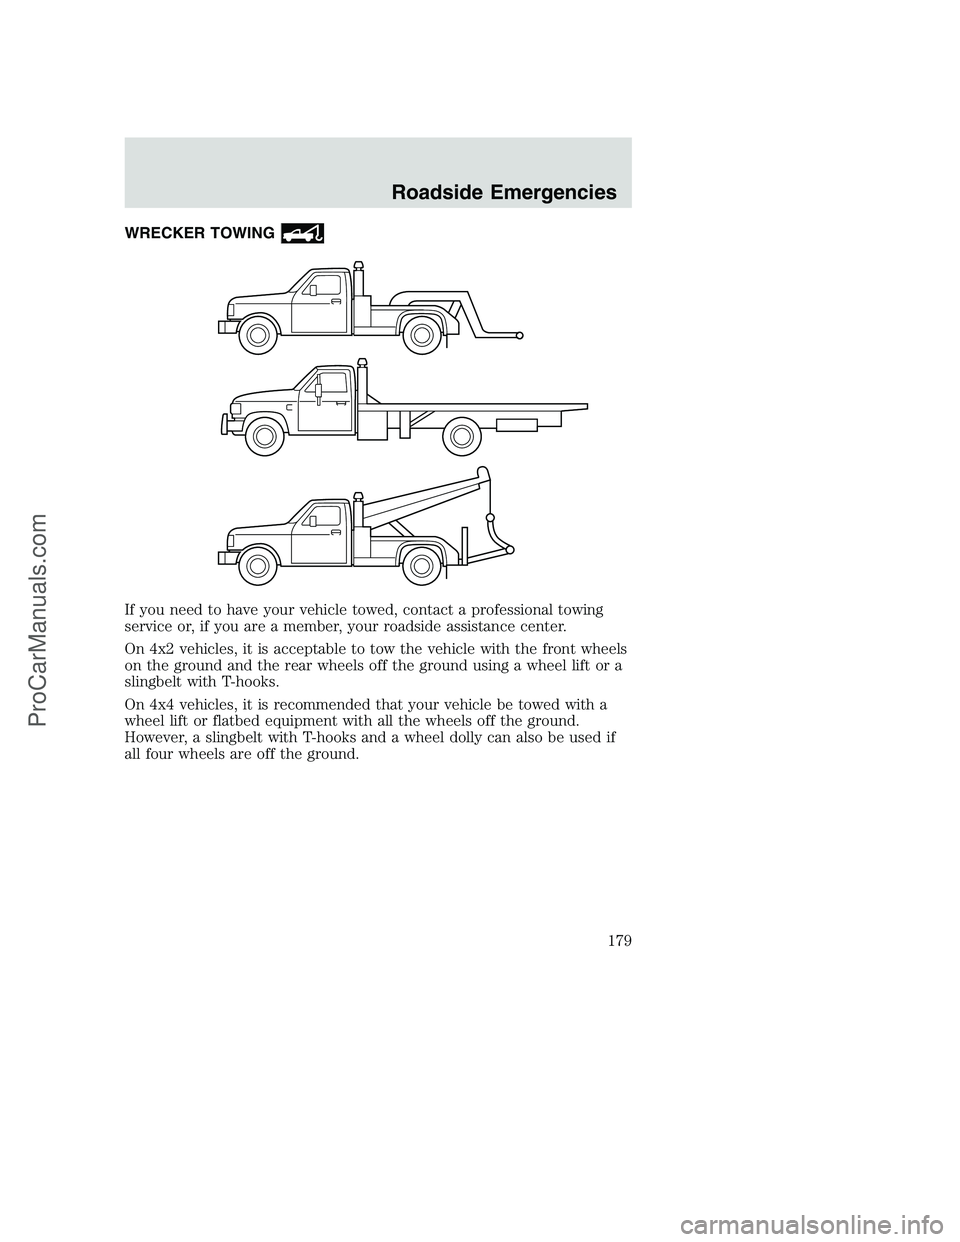
4. Make the final connection of the negative (-) cable to an exposed
metal part of the stalled vehicle’s engine, away from the battery and the
carburetor/fuel injection system.Do notuse fuel lines, engine rocker
covers or the intake manifold asgroundingpoints.
Do not connect the end of the second cable to the negative (-)
terminal of the battery to be jumped. A spark may cause an
explosion of the gases that surround the battery.
5. Ensure that the cables are clear of fan blades, belts, moving parts of
both engines, or any fuel delivery system parts.
Jump starting
1. Start the engine of the booster vehicle and run the engine at
moderately increased speed.
+–+–
+–+–
2003 F250/350/450/550(f23)
New Owners Guide own2002(own2002)
USA English(fus)
Roadside Emergencies
176
ProCarManuals.com
Page 179 of 264

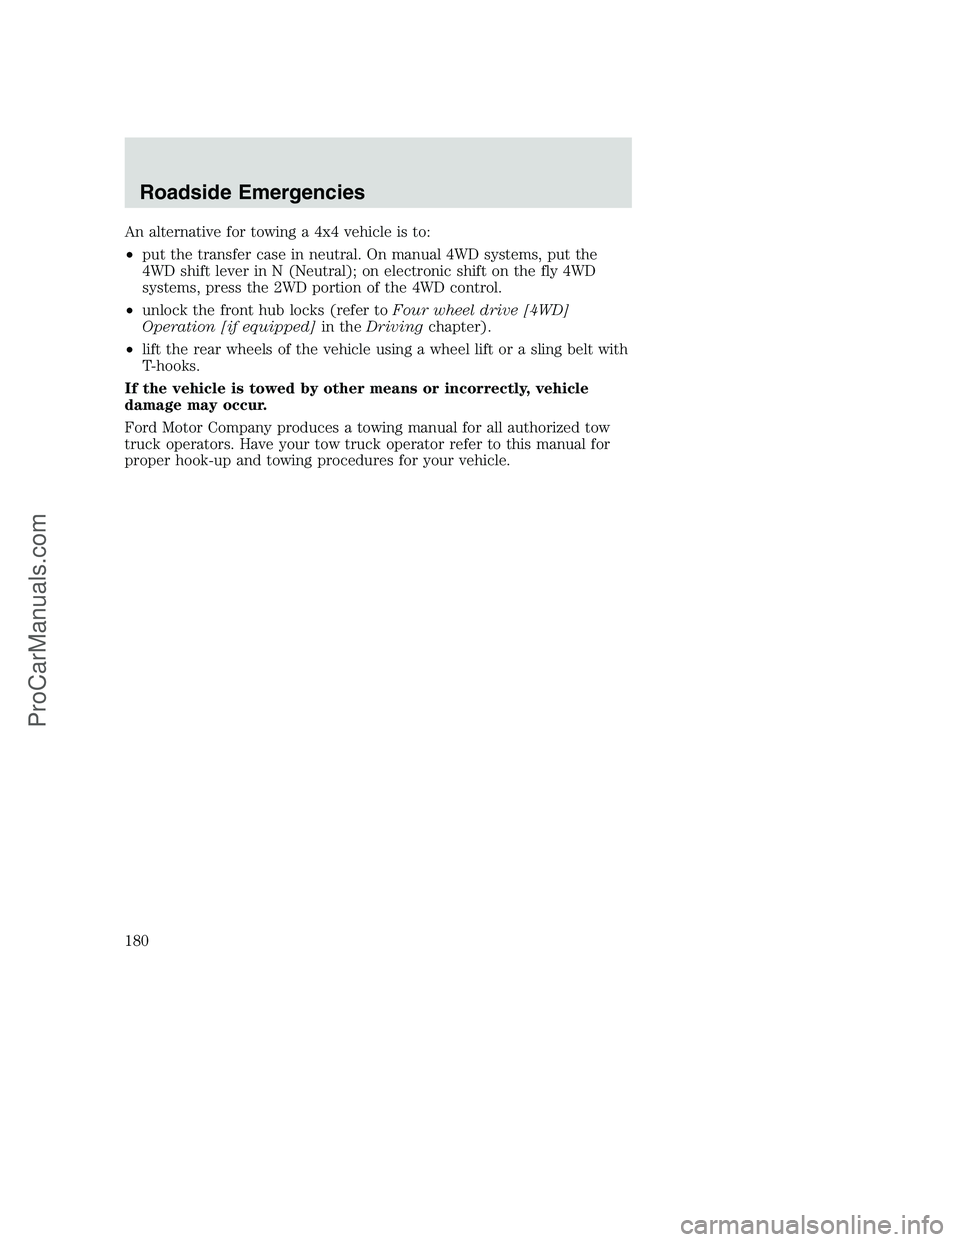
WRECKER TOWING
If you need to have your vehicle towed, contact a professional towing
service or, if you are a member, your roadside assistance center.
On 4x2 vehicles, it is acceptable to tow the vehicle with the front wheels
on the ground and the rear wheels off the ground using a wheel lift or a
slingbelt with T-hooks.
On 4x4 vehicles, it is recommended that your vehicle be towed with a
wheel lift or flatbed equipment with all the wheels off the ground.
However, a slingbelt with T-hooks and a wheel dolly can also be used if
all four wheels are off the ground.
Roadside Emergencies
179
ProCarManuals.com
Page 180 of 264

An alternative for towing a 4x4 vehicle is to:
•put the transfer case in neutral. On manual 4WD systems, put the
4WD shift lever in N (Neutral); on electronic shift on the fly 4WD
systems, press the 2WD portion of the 4WD control.
•unlock the front hub locks (refer toFour wheel drive [4WD]
Operation [if equipped]in theDrivingchapter).
•lift the rear wheels of the vehicle using a wheel lift or a sling belt with
T-hooks.
If the vehicle is towed by other means or incorrectly, vehicle
damage may occur.
Ford Motor Company produces a towing manual for all authorized tow
truck operators. Have your tow truck operator refer to this manual for
proper hook-up and towing procedures for your vehicle.
Roadside Emergencies
180
ProCarManuals.com
Page 193 of 264

INSTRUMENT PANEL AND CLUSTER LENS
Clean the instrument panel with a damp cloth, then dry with a dry cloth.
•Avoid cleaners or polish that increase the gloss of the upper portion of
the instrument panel. The dull finish in this area helps protect the
driver from undesirable windshield reflection.
Do not use chemical solvents or strong detergents when cleaning
the steering wheel or instrument panel to avoid contamination of
the air bag system.
•Be certain to wash or wipe your hands clean if you have been in
contact with certain products such as insect repellent and suntan
lotion in order to avoid possible damage to the painted surfaces.
WOOD-TONE TRIM
•Clean the area with a damp cloth, then dry by wiping with a dry, soft,
clean cloth.
•Do not use household or glass cleaners as these may damage the
finish.
INTERIOR
For fabric, carpets, cloth seats and safety belts:
•Remove dust and loose dirt with a vacuum cleaner.
•Remove light stains and soil with Ford Extra Strength Upholstery
Cleaner (E8AZ-19523–AA).
•If grease or tar is present on the material, spot-clean the area first
with Motorcraft Spot and Stain Remover (ZC-14).
•Never saturate the seat covers with cleaning solution.
•Do not use household cleaning products or glass cleaners, which can
stain and discolor the fabric and affect the flame retardant abilities of
the seat materials.
Do not use cleaning solvents, bleach or dye on the vehicle’s
seatbelts, as these actions may weaken the belt webbing.
Cleaning
193
ProCarManuals.com
Page 232 of 264

•DRW – Six tire rotation
If you vehicle is equipped with dual
rear wheels it is recommended that
front and rear tires (in pairs) be
rotated only side to side, with the
rear tires maintaining original
vehicle position. After tire rotation,
inflation pressures must be adjusted
for the tires new positions in
accordance with vehicle
requirements.
Replacing the tires
Replace the tires when the wear
band is visible through the tire
treads. Due to exposure to the
elements and exhaust you should
replace the spare tire when you
replace the other tires.
When replacing full size tires, never mix radial bias-belted, or
bias-type tires. Use only the tire sizes that are listed on the
Certification Label. Make sure that all tires are the same size, speed
rating, and load-carrying capacity. Use only the tire combinations
recommended on the label. If you do not follow these precautions,
your vehicle handling may be effected which can lead to loss of vehicle
control, vehicle rollover and/or personal injury.
Maintenance and Specifications
232
ProCarManuals.com
Page 255 of 264

A
Accessory delay ..........................48
Air bag supplemental restraint
system ..........................................82
and child safety seats ..............83
description ................................82
disposal ......................................86
driver air bag ............................84
indicator light ...........................85
operation ...................................84
passenger air bag .....................84
passenger deactivation
switch ........................................86
Air cleaner filter .......226–227, 234
Ambulance packages ....................6
Antifreeze
(see Engine coolant) ................204
Anti-lock brake system
(see Brakes) ......................106–107
Audio system
(see Radio) ................17, 19, 22, 26
Automatic transmission ............109
driving an automatic
overdrive .................................110
fluid, adding ............................222
fluid, checking ........................222
fluid, refill capacities ..............234
fluid, specification ..................240
Auxiliary power point .................47
Axle
lubricant specifications ..237, 240
refill capacities ........................234
traction lok ..............................108
B
Battery .......................................202
acid, treating emergencies .....202jumping a disabled battery ....174
maintenance-free ....................202
replacement, specifications ...234
servicing ..................................202
BeltMinder ...................................77
Brakes ........................................105
anti-lock ...........................105–107
anti-lock brake system (ABS)
warning light ...........................106
fluid, checking and adding ....221
fluid, refill capacities ..............234
fluid, specifications .........237, 240
lubricant specifications ..237, 240
parking ....................................107
pedals (see Power adjustable
foot pedals) ...............................49
shift interlock ..........................109
Break-in period .............................4
Bulbs ............................................39
C
Capacities for refilling fluids ....234
Cassette tape player ...................26
CD changer .................................28
CD-single premium .........17, 19, 22
Certification Label ....................249
Child safety restraints ................91
child safety belts ......................91
Child safety seats ........................93
attaching with tether straps ....97
in front seat ..............................95
in rear seat ................................95
Cleaning your vehicle
engine compartment ..............191
instrument panel ....................193
interior .....................................193
plastic parts ............................192
Index
255
ProCarManuals.com
Page 259 of 264

fluid, specifications .........237, 240
Preparing to drive
your vehicle ...............................108
R
Radio ..........................17, 19, 22, 26
Relays ........................................160
Remote entry system .................60
illuminated entry ......................63
locking/unlocking doors ...........58
Reverse sensing system ...........114
Roadside assistance ..................158
S
Safety belts (see Safety
restraints) ........................70–73, 75
Safety defects, reporting ..........189
Safety restraints ....................70–75
belt minder ...............................77
cleaning the safety belts ..........81
extension assembly ..................81
for adults .............................71–73
for children .........................90–91
lap belt ......................................76
warning light and chime ..........77
Safety seats for children ............93
Seat belts
(see Safety restraints) ...............70
Seats ............................................65
child safety seats ......................93
Servicing your vehicle ..............196
Snowplowing .................6, 154–156
Spare tire (see Changing
the Tire) ....................................165Spark plugs,
specifications .............234, 240–241
Special notice ................................7
ambulance conversions ..............6
diesel-powered vehicles .............5
four-wheel drive
vehicles ............................156–157
utility-type vehicles ....................6
Specification chart,
lubricants ...........................237, 240
Speed control ..............................50
Starting your
vehicle ........................101–102, 104
jump starting ..........................174
Steering wheel
tilting .........................................46
T
Tailgate ........................................57
Tires ...................................227–229
changing ..........................165, 167
checking the pressure ............229
replacing ..................................232
rotating ....................................230
snow tires and chains ............233
tire grades ...............................228
treadwear ................................228
Towing .......................................130
trailer towing ..........................130
wrecker ....................................179
Traction-lok rear axle ...............108
Transfer case
fluid checking .........................226
Transmission
automatic operation ...............109
fluid, checking and adding
(automatic) .............................222
Index
259
ProCarManuals.com