Page 121 of 264

If your vehicle gets stuck
If your vehicle gets stuck in mud or snow it may be rocked out by
shifting between forward and reverse gears, stopping between shifts, in a
steady pattern. Press lightly on the accelerator in each gear.
Do not rock the vehicle if the engine is not at normal operating
temperature or damage to the transmission may occur.
Do not rock the vehicle for more than a few minutes or damage
to the transmission and tires may occur or the engine may
overheat.
Always set the parking brake fully and make sure the gearshift is
latched in P (Park). Turn the ignition to the LOCK position and
remove the key whenever you leave your vehicle.
If the parking brake is fully released, but the brake warning lamp
remains illuminated, the brakes may not be working properly.
See your dealer or a qualified service technician.
Do not spin the wheels at over 56 km/h (35 mph). The tires may
fail and injure a passenger or bystander.
Refer toTransmission temperature gaugein theInstrument cluster
chapter for transmission fluid temperature information.
Emergency maneuvers
•In an unavoidable emergency situation where a sudden sharp turn
must be made, remember to avoid “over-driving” your vehicle, i.e.,
turn the steering wheel only as rapidly and as far as required to avoid
the emergency. Excessive steering will result in less vehicle control,
not more. Additionally, smooth variations of the accelerator and/or
brake pedal pressure should be utilized if changes in vehicle speed are
called for. Avoid abrupt steering, acceleration or braking which could
result in an increased risk of loss of vehicle control, vehicle rollover
and/or personal injury. Use all available road surface to return the
vehicle to a safe direction of travel.
•In the event of an emergency stop, avoid skidding the tires and do not
attempt any sharp steering wheel movements.
Driving
121
ProCarManuals.com
Page 160 of 264
This switch is located in the
passenger’s footwell, by the kick
panel.
To reset the switch:
1. Turn the ignition OFF.
2. Check the fuel system for leaks.
3. If no leaks are apparent, reset the
switch by pushing in on the reset
button.
4. Turn the ignition ON.
5. Wait a few seconds and return
the key to OFF.
6. Make another check of leaks.
FUSES AND RELAYS
Fuses
If electrical components in the
vehicle are not working, a fuse may
have blown. Blown fuses are
identified by a broken wire within
the fuse. Check the appropriate
fuses before replacing any electrical
components.
Note:Always replace a fuse with one that has the specified amperage
rating. Using a fuse with a higher amperage rating can cause severe wire
damage and could start a fire.
15
Roadside Emergencies
160
ProCarManuals.com
Page 166 of 264

If your vehicle is equipped with a tire pressure monitoring
system, refer to Tire Pressure Monitoring System (if equipped)
in the Maintenance and specifications section for important information
before changing your tires. If the tire pressure monitoring system
becomes damaged, it will no longer function.
Location of the spare tire and tools
The spare tire and tools for your vehicle are stowed in the following
locations:
Tool Location
Spare tire (pick-up trucks only) Under the vehicle, just forward of
the rear bumper
Jack, jack handle and lug wrench Regular cab, crew cab and
SuperCab without rear bench seat:
Fastened to floor pan behind
rearmost seat on passenger side
SuperCab with rear bench seat:
Under rear bench on passenger
side
Key, spare tire lock In the glove box
Removing the spare tire (with spare tire carrier only)
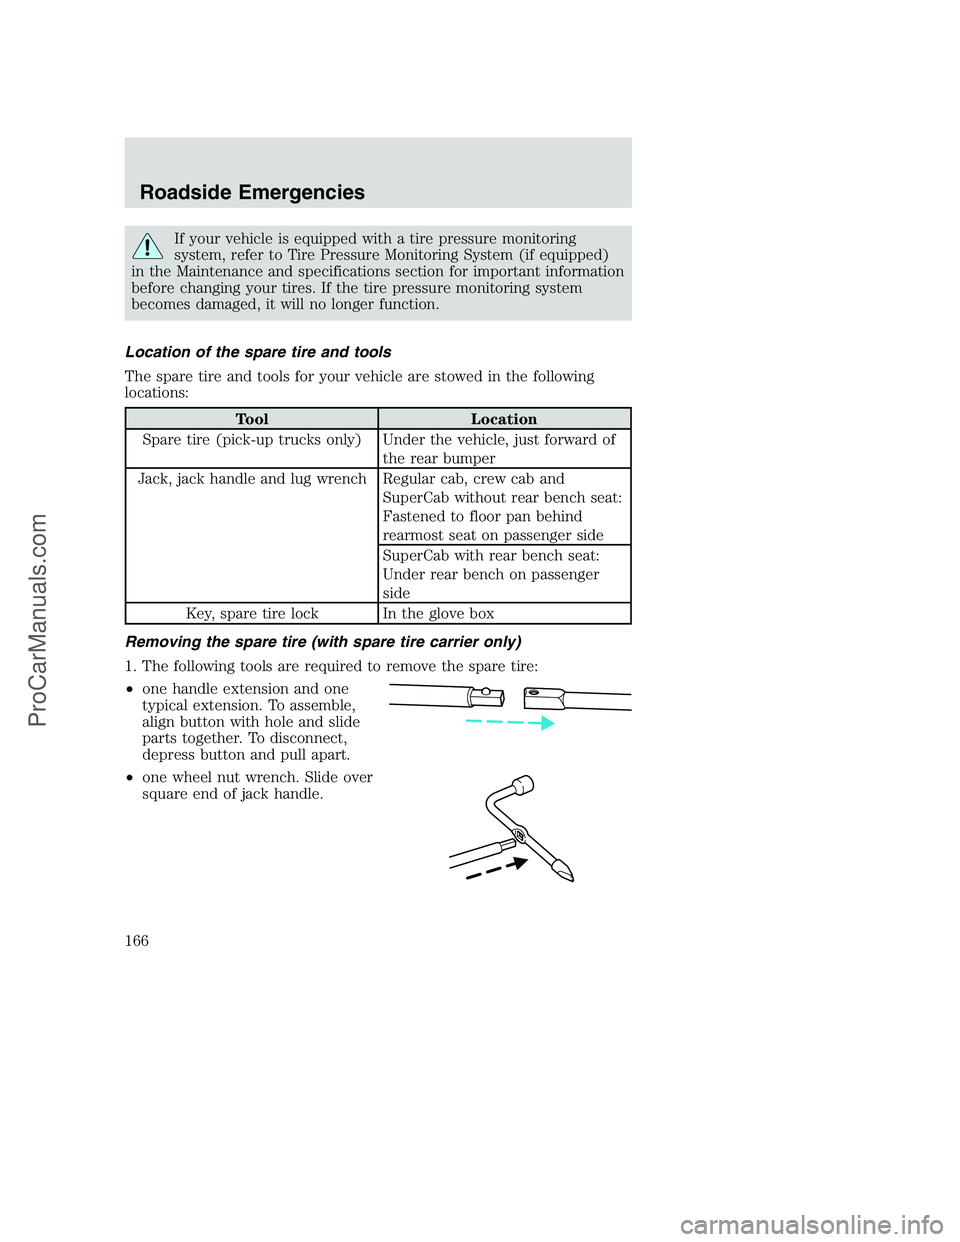
1. The following tools are required to remove the spare tire:
•one handle extension and one
typical extension. To assemble,
align button with hole and slide
parts together. To disconnect,
depress button and pull apart.
•one wheel nut wrench. Slide over
square end of jack handle.
Roadside Emergencies
166
ProCarManuals.com
Page 167 of 264
2. Attach the spare tire lock key (A)
to the jack handle (B).
3. Fully insert the jack handle
through the bumper hole and into
the guide tube. The key and lock
will engage with a slight push and
counterclockwise turn. Some
resistance will be felt when turning
the jack handle assembly.
4. Turn the handle counterclockwise
and lower the spare tire until you
can slide the tire rearward and the
cable is slack.
5. Remove the retainer through the center of the wheel.
Tire change procedure
1. Park on a level surface, activate
hazard flashers and set the parking
brake.
•Automatic transmission: Place
gearshift lever in P (Park).
•Manual transmission: Place
gearshift lever in R (Reverse).
•Electronic Shift On the Fly 4WD:
Place transfer case in any
position.
•Manual shift transfer case 4WD:
Place transfer case in 2H, 4H or
4L.
Roadside Emergencies
167
ProCarManuals.com
Page 174 of 264

Stowing the flat/spare tire
1.
Lay the tire on the ground with the valve stem facing in the direction
specified on the Tire Changing Instructions located with the jack hardware.
2. Slide the wheel partially under the vehicle and install the retainer
through the wheel center. Pull on the cable to align the components at
the end of the cable.
3. Turn the jack handle clockwise until the tire is raised to its stowed
position underneath the vehicle. The effort to turn the jack handle
increases significantly and the spare tire carrier ratchets or slips when
the tire is raised to the maximum tightness. Tighten to the best of your
ability, to the point where the ratchet/slip occurs, if possible. The spare
tire carrier will not allow you to overtighten. If the spare tire carrier
ratchets or slips with little effort, take the vehicle to your dealer for
assistance at your earliest convenience.
4. Check that the tire lies flat against the frame and is properly
tightened. Try to push or pull, then turn the tire to be sure it will not
move. Loosen and retighten, if necessary. Failure to properly stow the
spare tire may result in failure of the winch cable and loss of the tire.
5.
Repeat this tightness check procedure when servicing the spare tire
pressure (every six months, per scheduled maintenance guide), or at any
time that the spare tire is disturbed through service of other components.
6. If removed, install the spare tire lock (if equipped) into the bumper
drive tube with the spare tire lock key (if equipped) and jack handle.
JUMP STARTING YOUR VEHICLE
The gases around the battery can explode if exposed to flames,
sparks, or lit cigarettes. An explosion could result in injury or
vehicle damage.
Batteries contain sulfuric acid which can burn skin, eyes and
clothing, if contacted.
Do not attempt to push-start your vehicle. Automatic
transmissions do not have push-start capability; also, the
catalytic converter may become damaged.
Preparing your vehicle
When the battery is disconnected or a new battery is installed, the
transmission must relearn its shift strategy. As a result, the transmission
may have firm and/or soft shifts. This operation is considered normal and
will not affect function or durability of the transmission. Over time, the
adaptive learning process will fully update transmission operation.
2003 F250/350/450/550(f23)
New Owners Guide own2002(own2002)
USA English(fus)
Roadside Emergencies
174
ProCarManuals.com
Page 196 of 264

SERVICE RECOMMENDATIONS
To help you service your vehicle:
•We highlight do-it-yourself items in the engine compartment for easy
location.
•We provide a scheduled maintenance guide which makes tracking
routine service easy.
If your vehicle requires professional service, your dealership can provide
the necessary parts and service. Check yourWarranty Guide/Owner
Information Guideto find out which parts and services are covered.
Use only recommended fuels, lubricants, fluids and service parts
conforming to specifications. Motorcraft parts are designed and built to
provide the best performance in your vehicle.
PRECAUTIONS WHEN SERVICING YOUR VEHICLE
•Do not work on a hot engine.
•Make sure that nothing gets caught in moving parts.
•Do not work on a vehicle with the engine running in an enclosed
space, unless you are sure you have enough ventilation.
•Keep all open flames and other burning (cigarettes) material away
from the battery and all fuel related parts.
Working with the engine off
•Automatic transmission:
1. Set the parking brake and shift to P (Park).
2. Turn off the engine and remove the key.
3. Block the wheels.
•Manual transmission:
1. Set the parking brake, depress the clutch and place the gearshift in 1
(First).
2. Turn off the engine and remove the key.
3. Block the wheels.
Maintenance and Specifications
196
ProCarManuals.com
Page 251 of 264

FORD ACCESSORIES FOR YOUR VEHICLE
A wide selection of genuine Ford accessories are available for your
vehicle through your local authorized Ford, Lincoln, Mercury or Ford of
Canada dealer. These quality accessories have been specifically
engineered to fulfill your automotive needs; they are custom designed to
complement the style and aerodynamic appearance of your vehicle. In
addition, each accessory is made from high quality materials and meets
or exceeds Ford’s rigorous engineering and safety specifications. Ford
Motor Company will repair or replace any properly dealer-installed Ford
accessory found to be defective in factory-supplied materials or
workmanship during the warranty period, as well as any component
damaged by the defective accessory. The accessory will be warranted for
whichever provides you the greatest benefit:
•12 months or 20,000 km (12,000 miles) (whichever occurs first), or
•the remainder of your new vehicle limited warranty.
This means that genuine Ford accessories purchased along with your
new vehicle and installed by the dealer are covered for the full length of
your New Vehicle’s Limited Warranty — 3 years or 60,000 km (36,000
miles) (whichever occurs first). Contact your dealer for details and a
copy of the warranty.
Not all accessories are available for all models.
Vehicle Security
Remote keyless entry
Styled wheel protector locks
Vehicle security systems
Comfort and convenience
Cargo organizers
Cargo storage bin
Cargo trays
Cell phone holder
Engine block heaters
Manual sliding rear window
Power sliding rear window
Tire step
Accessories
251
ProCarManuals.com
Page 253 of 264
Carpet floor mats
Cap (hard, color keyed – Leer supplier branded)
Cap (commercial – Leer supplier branded)
Cleaners, waxes and polishes
Diamond plate bed rail caps
Diamond plate front box protection
Diamond plate splash guards
Diamond plate tool box
Door edge guards
Fender flares
Flat splash guards
Front end covers (full)
Hood deflectors
Leather wrap steering wheel
Locking gas cap
Lubricants and oils
Molded splash guards
Rear window deflector
Side window air deflectors
Spare tire lock
Stainless steel grill insert
Step bumpers
Tailgate covers (Diamond plate)
Tonneau cover (soft)
Tonneau cover (hard, color keyed – Leer supplier branded)
Touch-up paint
Truck cover
Universal floor mats
Wheels
Wheel covers
Wood trim
Accessories
253
ProCarManuals.com