2002 FORD F350 child lock
[x] Cancel search: child lockPage 83 of 264

Never place your arm over the air bag module as a deploying air
bag can result in serious arm fractures or other injuries.
To properly position yourself away from the air bag:
•Move your seat to the rear as far as you can while still reaching the
pedals comfortably.
•Recline the seat slightly one or two degrees from the upright position.
Do not put anything on or over the air bag module. Placing
objects on or over the air bag inflation area may cause those
objects to be propelled by the air bag into your face and torso causing
serious injury.
Do not attempt to service, repair, or modify the air bag
supplemental restraint systems or its fuses. See your Ford or
Lincoln Mercury dealer.
The front passenger air bag is not designed to offer protection to
an occupant in the center front seating position.
Modifying or adding equipment to the front end of the vehicle
(including frame, bumper, front end body structure and tow
hooks) may affect the performance of the air bag system, increasing
the risk of injury. Do not modify the front end of the vehicle.
Additional equipment such as snowplow equipment may effect
the performance of the air bag sensors increasing the risk of
injury. Please refer to the Body Builders Layout Book for instructions
about the appropriate installation of additional equipment.
Removing the blocker beam without installing snow plow
attachment hardware may effect air bag deployment in a crash.
Do not operate the truck unless either the blocker beam or snow plow
attachment hardware is installed on the vehicle.
Children and air bags
For additional important safety information, read all information on
safety restraints in this guide.
Seating and Safety Restraints
83
ProCarManuals.com
Page 94 of 264

safety seat you put in your vehicle. If you do not install and use the
safety seat properly, the child may be injured in a sudden stop or
collision.
When installing a child safety seat:
•Review and follow the information
presented in theAir bag
supplemental restraint system
(SRS) section in this chapter.
•Use the correct safety belt buckle
for that seating position (the
buckle closest to the direction the
tongue is coming from).
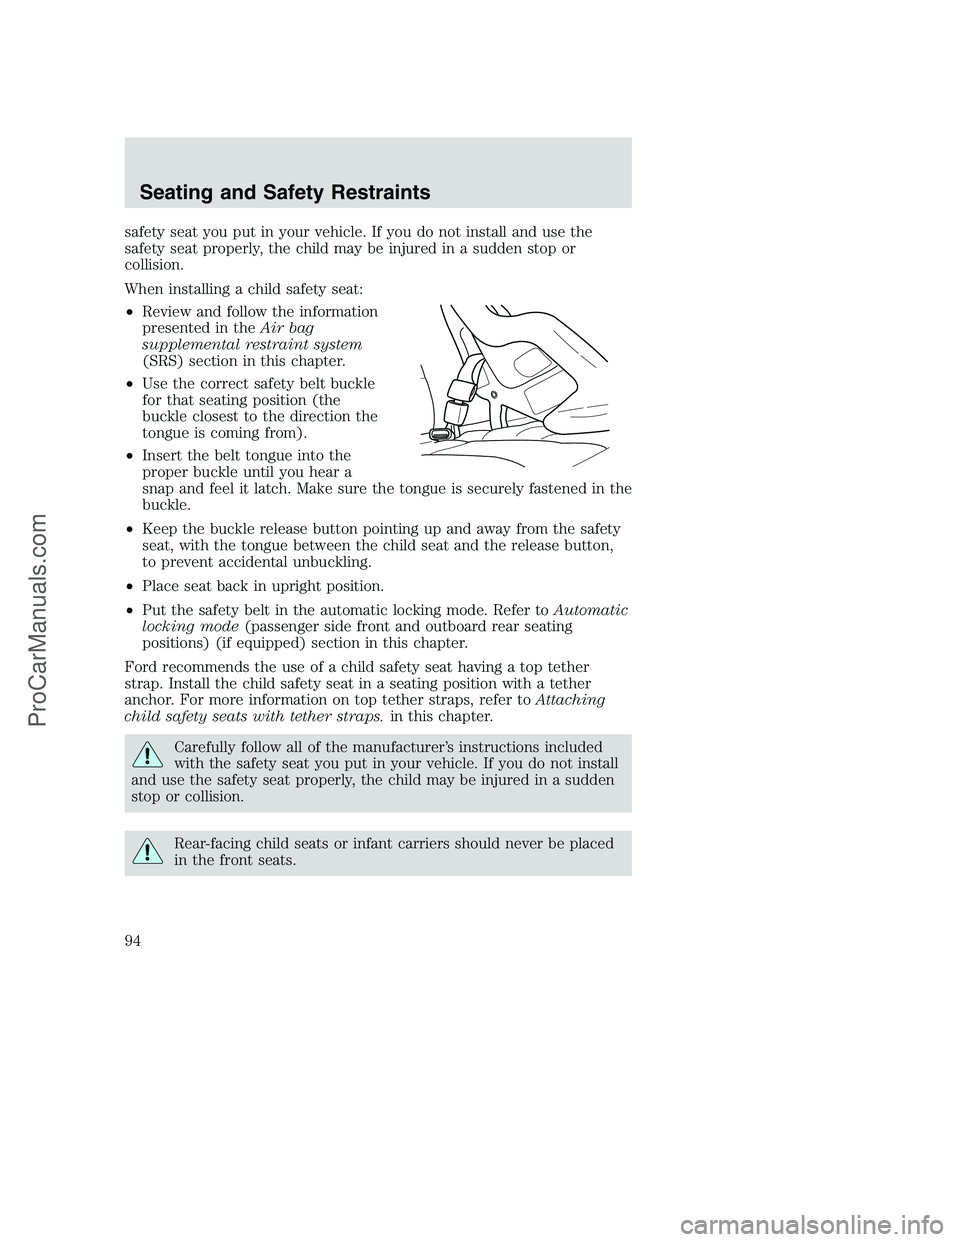
•Insert the belt tongue into the
proper buckle until you hear a
snap and feel it latch. Make sure the tongue is securely fastened in the
buckle.
•Keep the buckle release button pointing up and away from the safety
seat, with the tongue between the child seat and the release button,
to prevent accidental unbuckling.
•Place seat back in upright position.
•Put the safety belt in the automatic locking mode. Refer toAutomatic
locking mode(passenger side front and outboard rear seating
positions) (if equipped) section in this chapter.
Ford recommends the use of a child safety seat having a top tether
strap. Install the child safety seat in a seating position with a tether
anchor. For more information on top tether straps, refer toAttaching
child safety seats with tether straps.in this chapter.
Carefully follow all of the manufacturer’s instructions included
with the safety seat you put in your vehicle. If you do not install
and use the safety seat properly, the child may be injured in a sudden
stop or collision.
Rear-facing child seats or infant carriers should never be placed
in the front seats.
Seating and Safety Restraints
94
ProCarManuals.com
Page 96 of 264

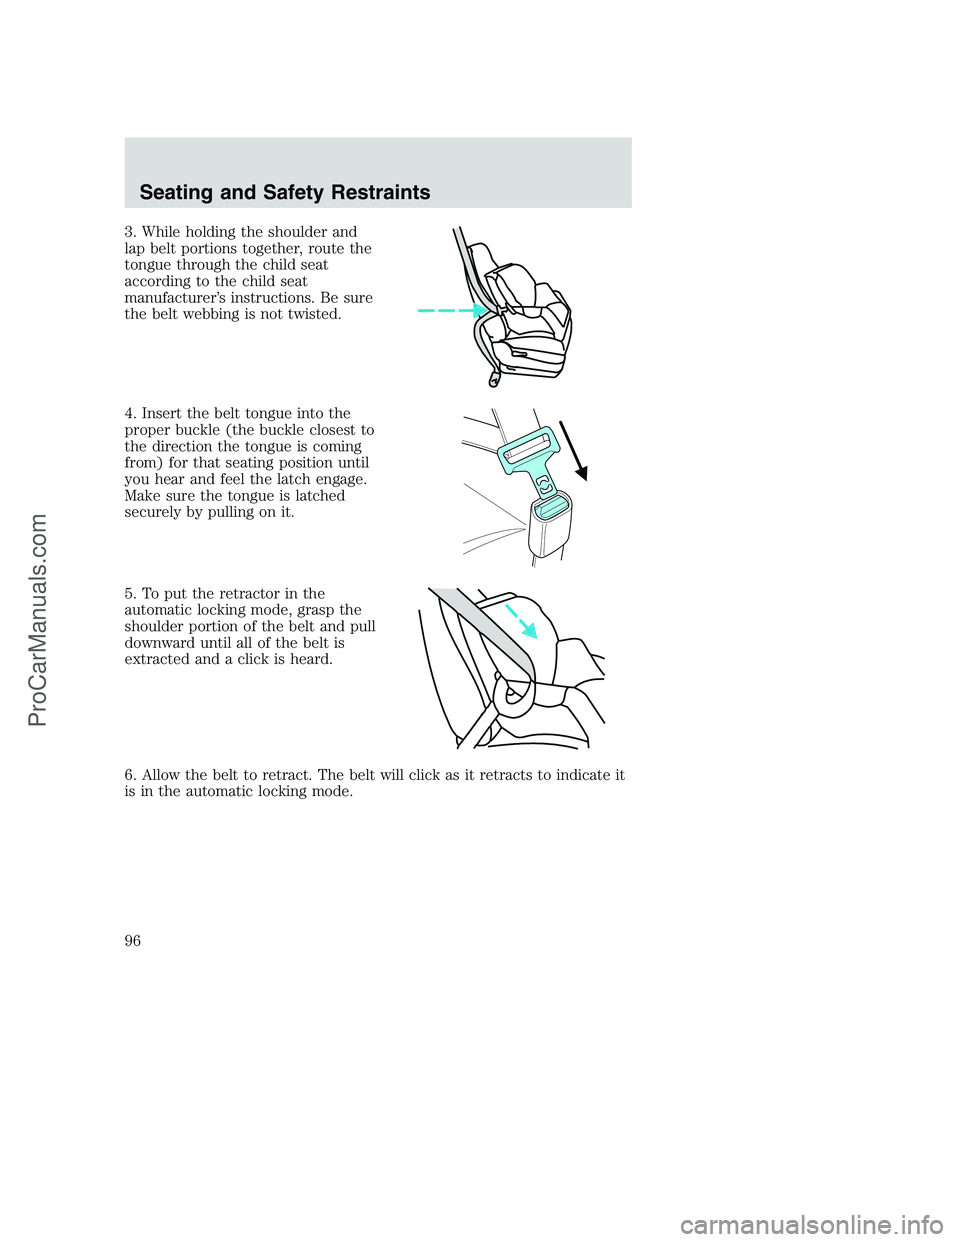
3. While holding the shoulder and
lap belt portions together, route the
tongue through the child seat
according to the child seat
manufacturer’s instructions. Be sure
the belt webbing is not twisted.
4. Insert the belt tongue into the
proper buckle (the buckle closest to
the direction the tongue is coming
from) for that seating position until
you hear and feel the latch engage.
Make sure the tongue is latched
securely by pulling on it.
5. To put the retractor in the
automatic locking mode, grasp the
shoulder portion of the belt and pull
downward until all of the belt is
extracted and a click is heard.
6. Allow the belt to retract. The belt will click as it retracts to indicate it
is in the automatic locking mode.
Seating and Safety Restraints
96
ProCarManuals.com
Page 97 of 264

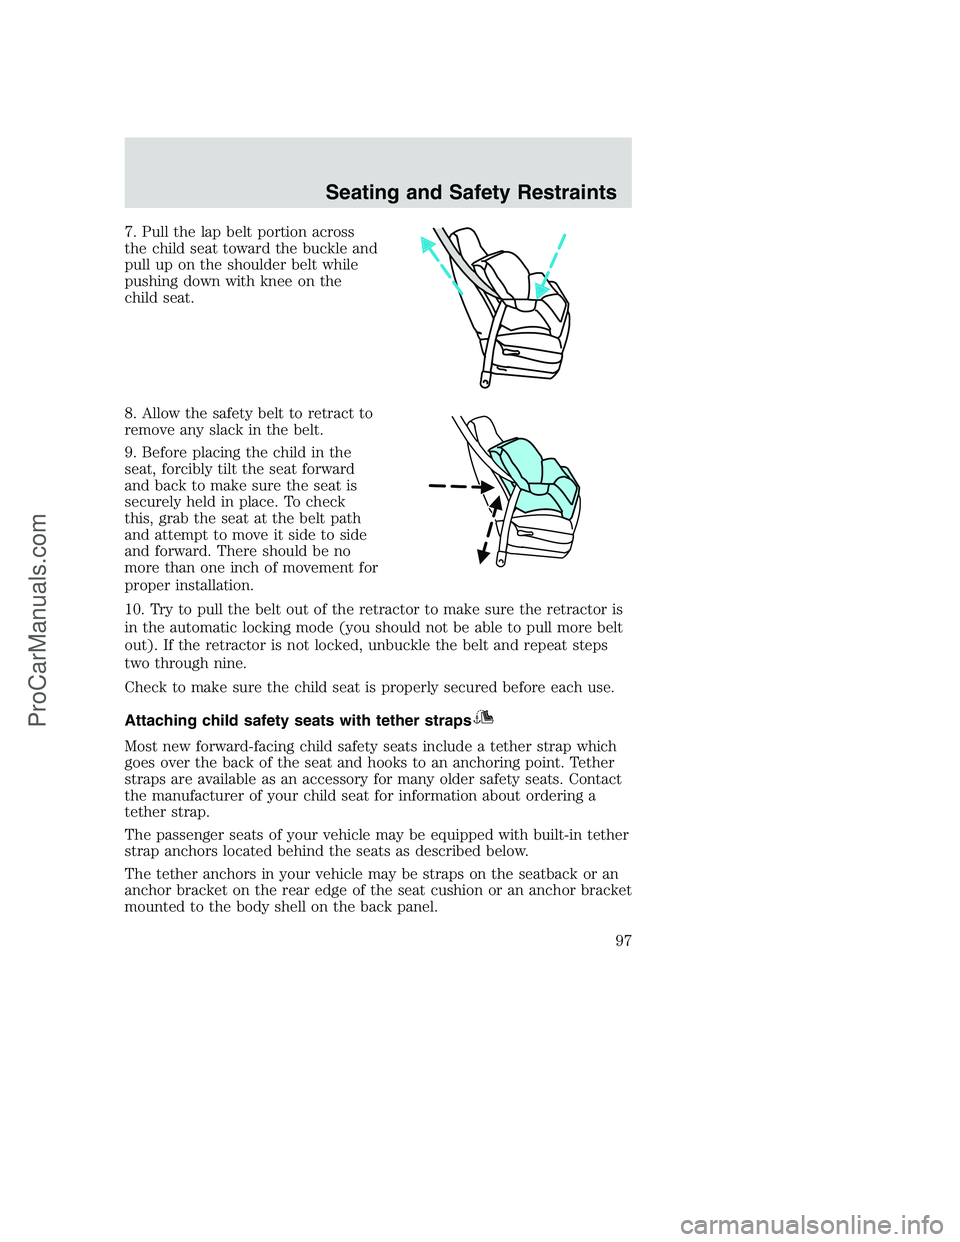
7. Pull the lap belt portion across
the child seat toward the buckle and
pull up on the shoulder belt while
pushing down with knee on the
child seat.
8. Allow the safety belt to retract to
remove any slack in the belt.
9. Before placing the child in the
seat, forcibly tilt the seat forward
and back to make sure the seat is
securely held in place. To check
this, grab the seat at the belt path
and attempt to move it side to side
and forward. There should be no
more than one inch of movement for
proper installation.
10. Try to pull the belt out of the retractor to make sure the retractor is
in the automatic locking mode (you should not be able to pull more belt
out). If the retractor is not locked, unbuckle the belt and repeat steps
two through nine.
Check to make sure the child seat is properly secured before each use.
Attaching child safety seats with tether straps
Most new forward-facing child safety seats include a tether strap which
goes over the back of the seat and hooks to an anchoring point. Tether
straps are available as an accessory for many older safety seats. Contact
the manufacturer of your child seat for information about ordering a
tether strap.
The passenger seats of your vehicle may be equipped with built-in tether
strap anchors located behind the seats as described below.
The tether anchors in your vehicle may be straps on the seatback or an
anchor bracket on the rear edge of the seat cushion or an anchor bracket
mounted to the body shell on the back panel.
Seating and Safety Restraints
97
ProCarManuals.com
Page 98 of 264

The SuperCab rear seat has three straps behind the top of the seat back
that function as both routing loops for the tether straps and anchor
loops.
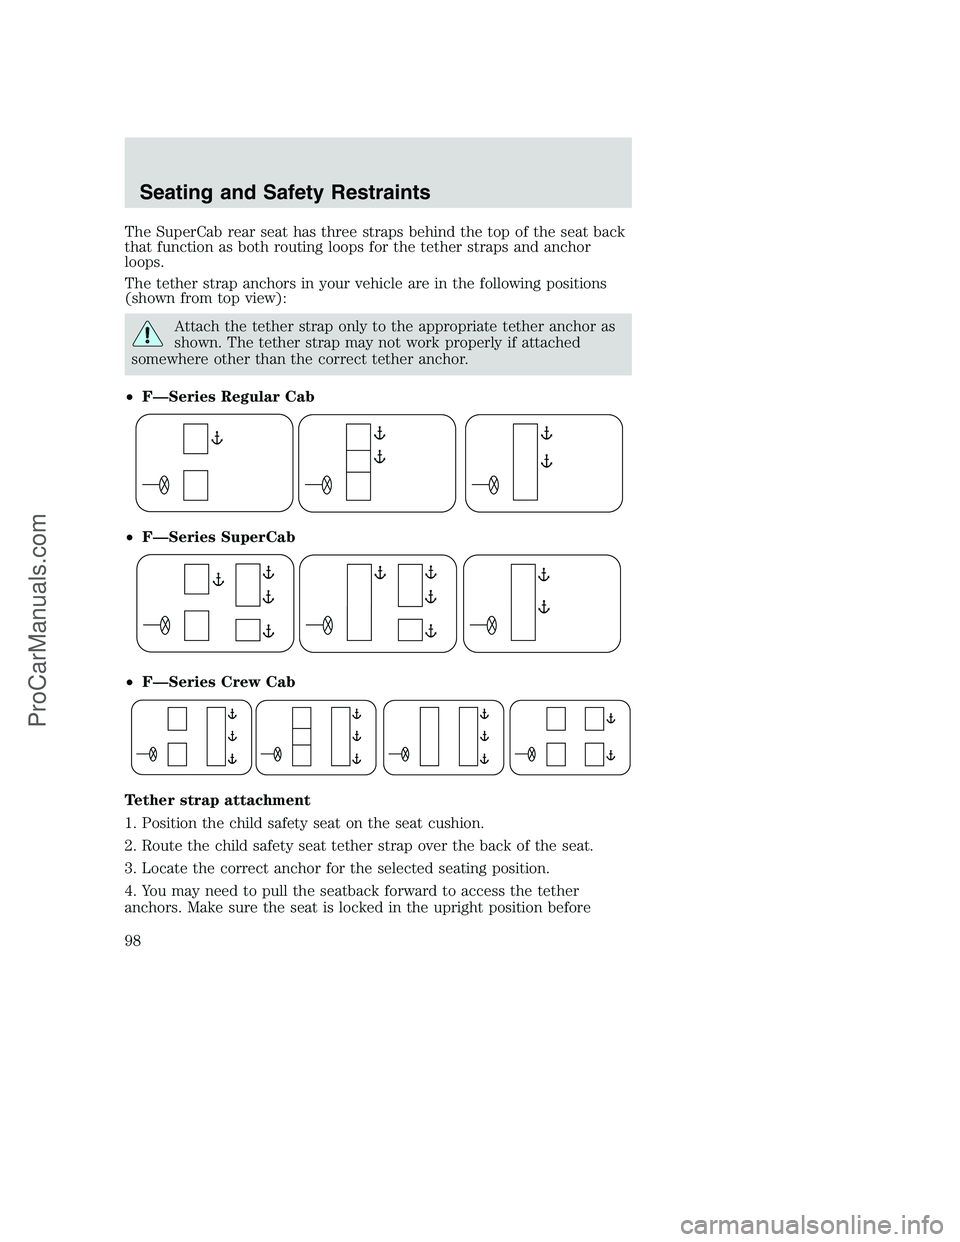
The tether strap anchors in your vehicle are in the following positions
(shown from top view):
Attach the tether strap only to the appropriate tether anchor as
shown. The tether strap may not work properly if attached
somewhere other than the correct tether anchor.
•F—Series Regular Cab
•F—Series SuperCab
•F—Series Crew Cab
Tether strap attachment
1. Position the child safety seat on the seat cushion.
2. Route the child safety seat tether strap over the back of the seat.
3. Locate the correct anchor for the selected seating position.
4. You may need to pull the seatback forward to access the tether
anchors. Make sure the seat is locked in the upright position before
Seating and Safety Restraints
98
ProCarManuals.com
Page 203 of 264

When lifting a plastic-cased battery, excessive pressure on the
end walls could cause acid to flow through the vent caps,
resulting in personal injury and/or damage to the vehicle or battery.
Lift the battery with a battery carrier or with your hands on opposite
corners.
Keep batteries out of reach of children. Batteries contain sulfuric
acid. Avoid contact with skin, eyes or clothing. Shield your eyes
when working near the battery to protect against possible splashing of
acid solution. In case of acid contact with skin or eyes, flush
immediately with water for a minimum of 15 minutes and get prompt
medical attention. If acid is swallowed, call a physician immediately.
Battery posts, terminals and related accessories contain lead and
lead compounds.Wash hands after handling.
For information on transmission operation after the battery has been
disconnected see “Shift strategy” in the driving section.
Because your vehicle’s engine is also electronically controlled by a
computer, some control conditions are maintained by power from the
battery. When the battery is disconnected or a new battery is installed,
the engine must relearn its idle and fuel trim strategy for optimum
driveability and performance. To begin this process:
1. With the vehicle at a complete stop, set the parking brake.
2. Put the gearshift in P (Park) (automatic transmission) or the neutral
position (manual transmission), turn off all accessories and start the
engine.
3. Run the engine until it reaches normal operating temperature.
4. Allow the engine to idle for at least one minute.
5. Turn the A/C on and allow the engine to idle for at least one minute.
6. Drive the vehicle to complete the relearning process.
•The vehicle may need to be driven 16 km (10 miles) or more to
relearn the idle and fuel trim strategy.
•If you do not allow the engine to relearn its idle trim, the idle
quality of your vehicle may be adversely affected until the idle
trim is eventually relearned.
If the battery has been disconnected or a new battery has been installed,
the clock and the preset radio stations must be reset once the battery is
reconnected.
Maintenance and Specifications
203
ProCarManuals.com
Page 255 of 264

A
Accessory delay ..........................48
Air bag supplemental restraint
system ..........................................82
and child safety seats ..............83
description ................................82
disposal ......................................86
driver air bag ............................84
indicator light ...........................85
operation ...................................84
passenger air bag .....................84
passenger deactivation
switch ........................................86
Air cleaner filter .......226–227, 234
Ambulance packages ....................6
Antifreeze
(see Engine coolant) ................204
Anti-lock brake system
(see Brakes) ......................106–107
Audio system
(see Radio) ................17, 19, 22, 26
Automatic transmission ............109
driving an automatic
overdrive .................................110
fluid, adding ............................222
fluid, checking ........................222
fluid, refill capacities ..............234
fluid, specification ..................240
Auxiliary power point .................47
Axle
lubricant specifications ..237, 240
refill capacities ........................234
traction lok ..............................108
B
Battery .......................................202
acid, treating emergencies .....202jumping a disabled battery ....174
maintenance-free ....................202
replacement, specifications ...234
servicing ..................................202
BeltMinder ...................................77
Brakes ........................................105
anti-lock ...........................105–107
anti-lock brake system (ABS)
warning light ...........................106
fluid, checking and adding ....221
fluid, refill capacities ..............234
fluid, specifications .........237, 240
lubricant specifications ..237, 240
parking ....................................107
pedals (see Power adjustable
foot pedals) ...............................49
shift interlock ..........................109
Break-in period .............................4
Bulbs ............................................39
C
Capacities for refilling fluids ....234
Cassette tape player ...................26
CD changer .................................28
CD-single premium .........17, 19, 22
Certification Label ....................249
Child safety restraints ................91
child safety belts ......................91
Child safety seats ........................93
attaching with tether straps ....97
in front seat ..............................95
in rear seat ................................95
Cleaning your vehicle
engine compartment ..............191
instrument panel ....................193
interior .....................................193
plastic parts ............................192
Index
255
ProCarManuals.com
Page 258 of 264

Instrument panel
cleaning ...................................193
cluster ........................................10
lighting up panel and
interior .......................................38
J
Jump-starting your vehicle ......174
K
Keyless entry system
autolock .....................................63
Keys
positions of the ignition .........101
L
Lamps
autolamp system .......................36
bulb replacement
specifications chart ..................39
cargo lamps ...............................38
daytime running light ...............37
fog lamps ...................................37
headlamps .................................36
headlamps, flash to pass ..........38
instrument panel, dimming .....38
interior lamps ...........................39
replacing bulbs ...................39–44
Lane change indicator
(see Turn signal) ........................38
Lights, warning and indicator ....10
anti-lock brakes (ABS) ..........106
speed control ............................52
Load limits .................................128
GAWR ......................................128
GVWR ......................................128
trailer towing ..........................128
Loading instructions .................130Locks
autolock .....................................63
childproof ..................................59
Lubricant specifications ...237, 240
Lumbar support, seats ...............69
M
Manual transmission .................112
fluid capacities ........................234
lubricant specifications ..........240
reverse .....................................113
Message center ...........................53
english/metric button ...............54
menu button .............................54
Mirrors .........................................46
fold away ...................................49
side view mirrors (power) .......49
Motorcraft parts ................214, 234
O
Octane rating ............................213
Oil (see Engine oil) ..................199
P
Parking brake ............................107
Parts (see Motorcraft parts) ....234
Pedals (see Power adjustable
foot pedals) .................................49
Power distribution box
(see Fuses) ...............................161
Power door locks ..................58, 63
Power point .................................47
Power steering ..........................108
fluid, checking and adding ....220
fluid, refill capacity ................234
Index
258
ProCarManuals.com