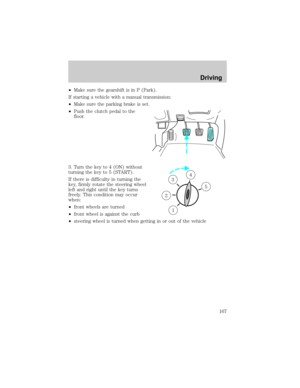
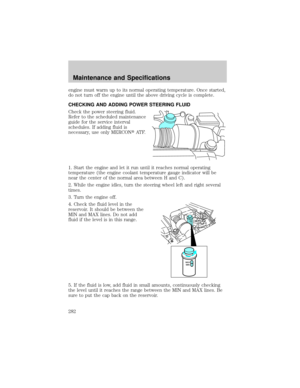
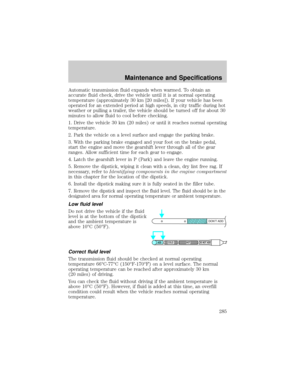
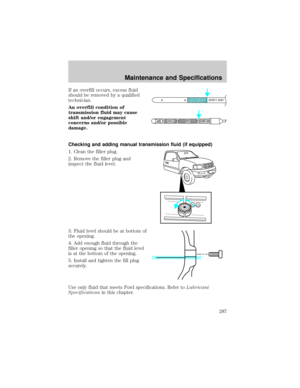
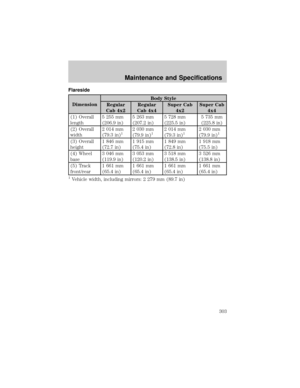
Page 249 of 320

To clean the leather seats, simply use a soft cloth with Deluxe Leather
and Vinyl Cleaner (F2AZ-19521±WA). Dry the area with a soft cloth.
It is recommended that you use the Deluxe Leather Care Kit
(F8AZ-19G253±AA), available from your authorized Ford, Lincoln or
Mercury dealer. The mild cleaner and special pad available in the kit
cleans the leather and maintains its natural beauty. For best results,
follow the instructions printed on the cleaner label. Regular cleaning of
your leather upholstery helps maintain its resiliency and color.
Do not use household cleaning products, alcohol solutions,
solvents or cleaners intended for rubber, vinyl and plastics, or
oil/petroleum-based leather conditioners. These products may
cause premature wearing of the clear, protective coating.
CLEANING LEATHER SEATS FOR THE KING RANCH F-150
SUPERCREW ONLY (IF EQUIPPED)
Your King Ranch F-150 SuperCrew is equipped with seating covered in
premium, top-grain leather which is extremely durable, but still requires
special care and maintenance in order to ensure longevity and comfort.
As with all premium leather products such as saddles, color variations
and scratches will develop in the course of normal wear and will add
character and distinctiveness to the leather over time.
Regular cleaning and conditioning will maintain the appearance of the
leather. Failure to care for the leather can result in drying out and fading
of the material.
CLEANING
Surface dirt and dust can be abrasive and may scratch the leather if not
regularly cleaned. In order to remove dirt and dust from the leather
surface, use a vacuum cleaner. If dirt remains, use a clean, damp cloth or
soft brush.
For spills: first use a dry cloth in order to absorb as much of the liquid
as possible. Wipe the area clean with a damp cloth. Allow the area to dry,
then apply King Ranch F-150 Leather Conditioner as directed in the
Conditioningsection.To reduce the likelihood of staining, clean
spills as quickly as possible.
For stains: use Deluxe Leather and Vinyl Cleaner (F2AZ-19521±AA) and
a dry, soft cloth. The Deluxe Leather and Vinyl Cleaner Kit
(F8AZ-19G253±AA) is also available, and includes a sponge that will not
damage the leather surface.Be sure to first test any stain remover
Cleaning
249
Page 250 of 320

on an inconspicuous part of the leather as cleaners may darken
the leather. Certain stains, such as coffee, ketchup, mustard,
orange juice and oil-based products are especially difficult to
remove, even after treatment with cleaners and conditioners. If
your leather stains, it will stay in the leather for life.
Do not use household cleaning products, alcohol solutions,
solvents or cleaners intended for rubber, vinyl or plastics.
CONDITIONING
Conditioning is a vital step in maintaining the leather interior over time.
Condition the leather twice yearly in order to replenish lost oils and
revitalize the aroma, suppleness and resilience.
Apply your first conditioning treatment within six months of taking
delivery of your King Ranch F-150 SuperCrew. Conditioning every six
months thereafter will lessen the effects of drying out and fading.
In order to condition the leather seats, first clean the surfaces using the
steps outlined in theCleaningsection. After you have allowed the leather
to dry completely and return to its original color, shake the bottle of King
Ranch F-150 Leather Conditioner thoroughly and apply a nickel-sized
amount to a clean, dry cloth. Rub the conditioner into leather until it
disappears. Allow the conditioner to dry and repeat the process for the
entire interior. If a film appears, wipe off film with a dry, clean cloth.
SCRATCHES
In order to lessen the appearance of certain scratches and other wear
marks, apply King Ranch F-150 Leather Conditioner on the affected area
following the same instructions as in theConditioningsection.
Additional bottles of King Ranch F-150 Leather Conditioner are available
at the King Ranch Saddle Shop. Visit the Web site at
www.krsaddleshop.com, or telephone (in the United States)
1±800±282±KING (5464). If you are unable to obtain King Ranch F-150
Leather Conditioner, use another premium leather conditioner.
CLEANING THE INSIDE WINDOWS
Use Ultra Clear Spray Glass Cleaner (E4AZ-19C507±AA) for the inside
windows if they become fogged.
To clean, use two lint-free, soft towels, folded into a pad-shape. Mist the
glass completely with cleaner, and use one of the towels to evenly agitate
the surface. Use the other towel to remove the residue.
Cleaning
250
Page 251 of 320

CLEANING AND MAINTAINING THE SAFETY BELTS
Clean the safety belts with Extra Strength Upholstery Cleaner
(E8AZ-19523±AA), available from your authorized Ford, Lincoln or
Mercury dealer.
Do not use bleach, dye or any other solvent to clean the belts, as
these actions may weaken the belt webbing.
UNDERBODY
Flush the complete underside of your vehicle frequently. Keep body and
door drain holes free from packed dirt.
TONNEAU COVER CARE (IF EQUIPPED)
To avoid damage to the vinyl tonneau cover, do not use any silicone
based cleaner or conditioner. Do not use stiff bristle brushes or abrasive
materials or cleaners.
Hot waxes applied by commercial car washes can affect the cleanability
of vinyl material.
Using high water pressure or wand-type car washes against the vinyl
cover and tonneau frame rails may cause water leaks and possible seal
damage.
FORD, LINCOLN AND MERCURY CAR CARE PRODUCTS
Your Ford, Lincoln or Mercury dealer has many quality products available
to clean your vehicle and protect its finishes. These quality products
have been specifically engineered to fulfill your automotive needs; they
are custom designed to complement the style and appearance of your
vehicle. Each product is made from high quality materials that meet or
exceed rigid specifications. For best results, use the following or
products of equivalent quality:
Ford Custom Clearcoat Polish*
Ford Custom Silicone Gloss Polish
Ford Custom Vinyl Protectant* (not available in Canada)
Motorcraft Vinyl Conditioner (Canada only)
Ford Deluxe Leather and Vinyl Cleaner (not available in Canada)
Motorcraft Vinyl Cleaner (Canada only)
Ford Extra Strength Tar and Road Oil Remover* (not available in
Canada)
Cleaning
251
Page 252 of 320
Ford Extra Strength Upholstery Cleaner (not available in Canada)
Ford Custom Bright Metal Cleaner
Motorcraft Premium Car Wash Concentrate
Motorcraft Carlite Glass Cleaner (Canada only)
Ford Spot and Stain Remover*
Ford Super Premium Tire and Trim Dressing
Ford Triple Clean
Ford Ultra-Clear Spray Glass Cleaner (not available in Canada)
Ford Engine Shampoo and Degreaser
* May be sold with the Motorcraft name
Cleaning
252
Page 253 of 320

SERVICE RECOMMENDATIONS
To help you service your vehicle:
²We highlight do-it-yourself items in the engine compartment for easy
location.
²We provide a scheduled maintenance guide which makes tracking
routine service easy.
If your vehicle requires professional service, your dealership can provide
the necessary parts and service. Check yourWarranty Guideto find out
which parts and services are covered.
Use only recommended fuels, lubricants, fluids and service parts
conforming to specifications. Motorcraft parts are designed and built to
provide the best performance in your vehicle.
PRECAUTIONS WHEN SERVICING YOUR VEHICLE
Be especially careful when inspecting or servicing your vehicle.
²Do not work on a hot engine.
²When the engine is running, keep loose clothing, jewelry or long hair
away from moving parts.
²Do not work on a vehicle with the engine running in an enclosed
space, unless you are sure you have enough ventilation.
²Keep all lit cigarettes, open flames and other lit material away from
the battery and all fuel related parts.
If you disconnect the battery, the engine must ªrelearnº its idle
conditions before your vehicle will drive properly, as explained in the
Batterysection in this chapter.
Working with the engine off
²Automatic transmission:
1. Set the parking brake and ensure the gearshift is securely latched in P
(Park).
2. Turn off the engine and remove the key.
3. Block the wheels to prevent the vehicle from moving unexpectedly.
²Manual transmission:
1. Set the parking brake.
2. Depress the clutch and place the gearshift in 1 (First).
Maintenance and Specifications
253
Page 254 of 320

3. Turn off the engine and remove the key.
4. Block the wheels to prevent the vehicle from moving unexpectedly.
Working with the engine on
²Automatic transmission:
1. Set the parking brake and ensure the gearshift is securely latched in P
(Park).
2. Block the wheels to prevent the vehicle from moving unexpectedly.
Note:Do not start your engine with the air cleaner removed and do not
remove it while the engine is running.
²Manual transmission:
1. Set the parking brake, depress the clutch and place the gearshift in
neutral.
2. Block the wheels to prevent the vehicle from moving unexpectedly.
Note:Do not start your engine with the air cleaner removed and do not
remove it while the engine is running.
The cooling fan is automatic and may come on at any time.
Always disconnect the negative terminal of the battery before
working near the fan.
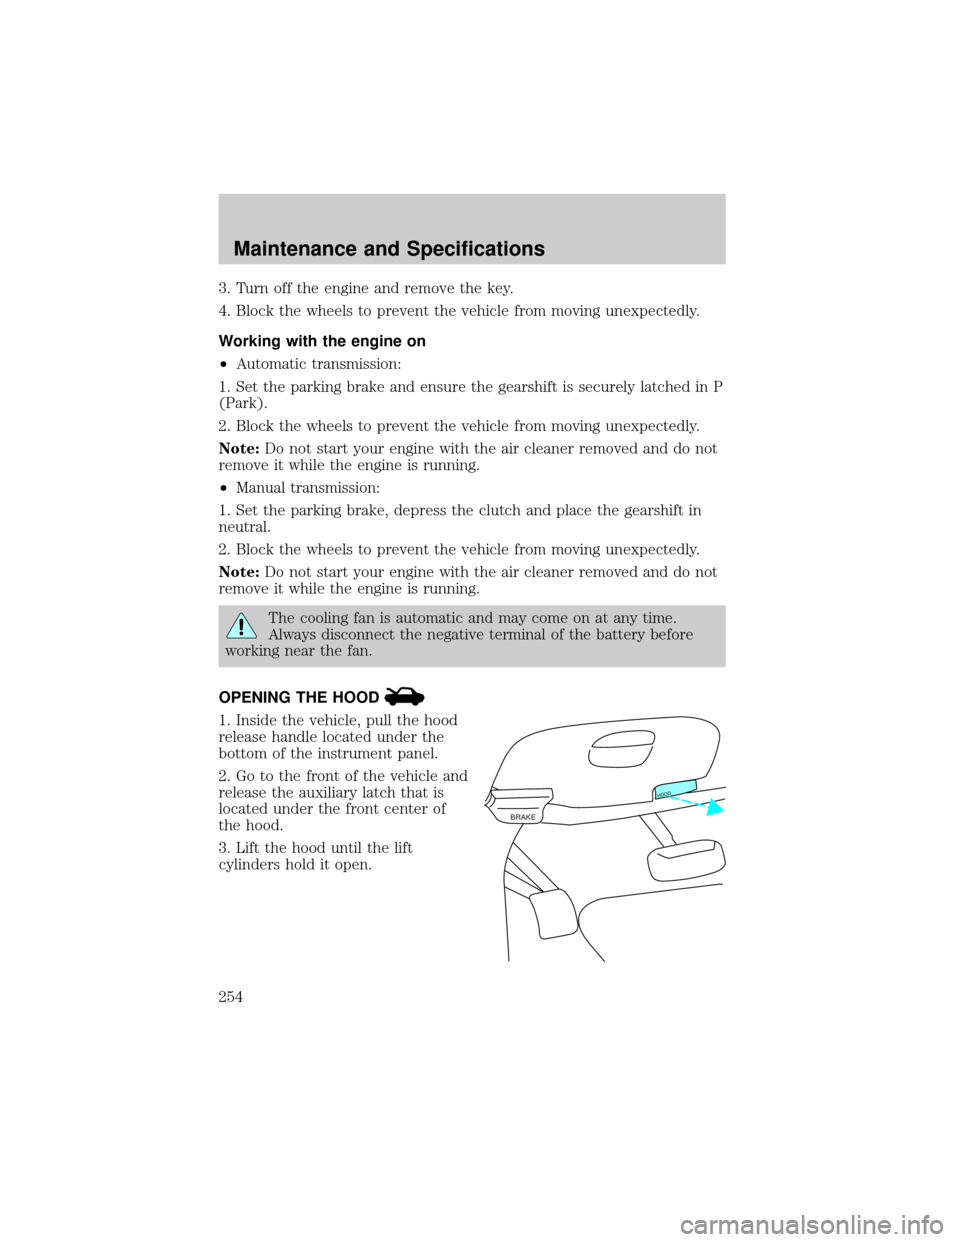
OPENING THE HOOD
1. Inside the vehicle, pull the hood
release handle located under the
bottom of the instrument panel.
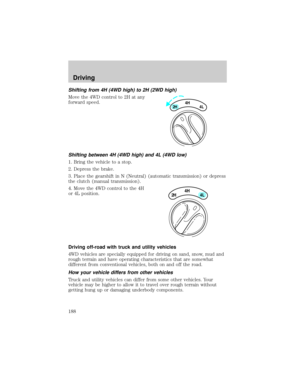
2. Go to the front of the vehicle and
release the auxiliary latch that is
located under the front center of
the hood.
3. Lift the hood until the lift
cylinders hold it open.
BRAKE
HOOD
Maintenance and Specifications
254
Page 255 of 320
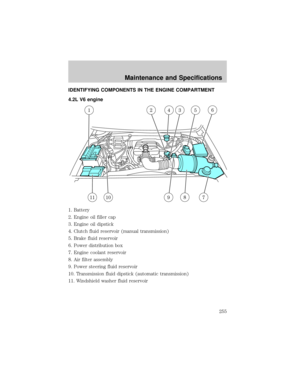
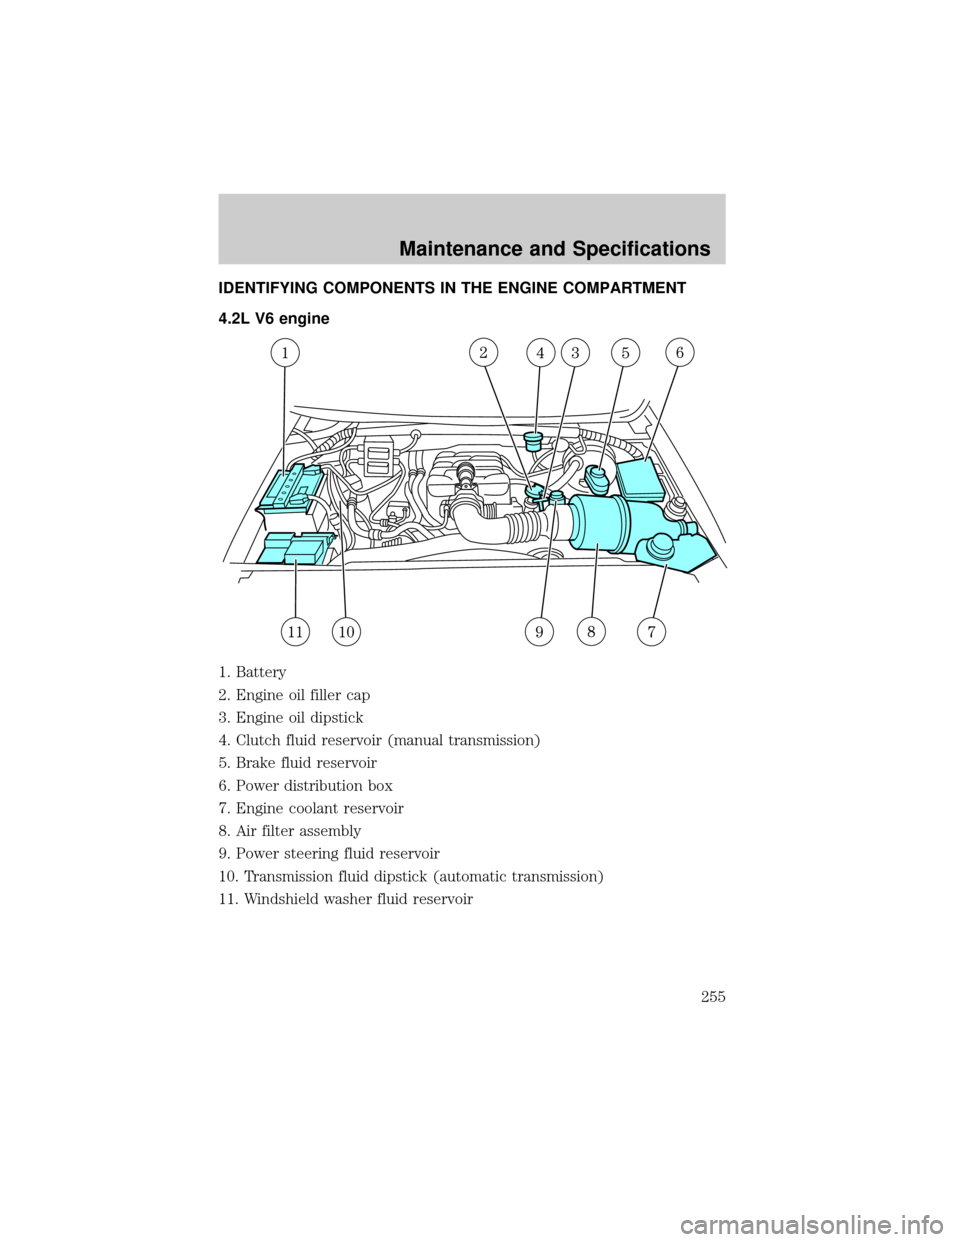
IDENTIFYING COMPONENTS IN THE ENGINE COMPARTMENT
4.2L V6 engine
1. Battery
2. Engine oil filler cap
3. Engine oil dipstick
4. Clutch fluid reservoir (manual transmission)
5. Brake fluid reservoir
6. Power distribution box
7. Engine coolant reservoir
8. Air filter assembly
9. Power steering fluid reservoir
10. Transmission fluid dipstick (automatic transmission)
11. Windshield washer fluid reservoir
Maintenance and Specifications
255
Page 256 of 320
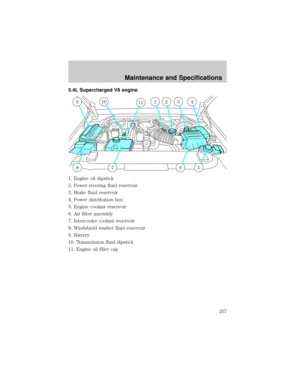
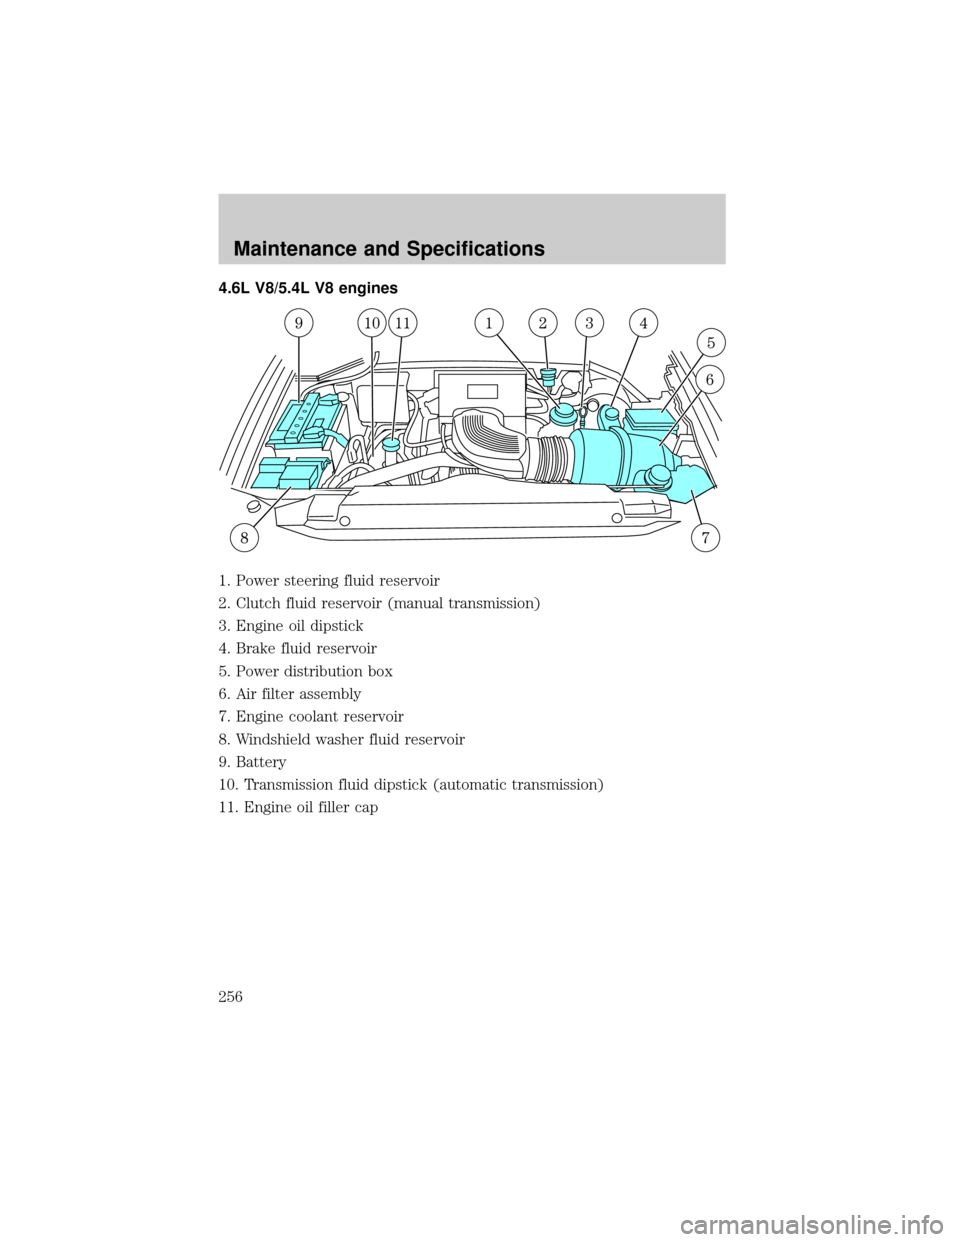
4.6L V8/5.4L V8 engines
1. Power steering fluid reservoir
2. Clutch fluid reservoir (manual transmission)
3. Engine oil dipstick
4. Brake fluid reservoir
5. Power distribution box
6. Air filter assembly
7. Engine coolant reservoir
8. Windshield washer fluid reservoir
9. Battery
10. Transmission fluid dipstick (automatic transmission)
11. Engine oil filler cap
Maintenance and Specifications
256