Page 10 of 104
Charging system
Illuminates when the battery is not
charging properly.
Oil pressure/Engine coolant
Illuminates when the engine coolant
temperature is above the normal
range or the engine oil pressure is
below normal range. Check the
engine oil and coolant level refer toAdding engine oilandAdding
coolantin theMaintenance and specifications chapter.
Low fuel
Illuminates when the fuel level in
the fuel tank is at, or near, empty
(refer toFuel gaugein this chapter
for more information).
Fuel reset
Illuminates when the fuel pump
shut-off switch has been triggered.
For more information, refer toFuel
pump shut-off switchin the
Roadside emergencieschapter.
Turn signal
Illuminates when the left or right
turn signal or the hazard lights are
turned on. Refer toBulbsin the
Maintenance and carechapter.
LOW
FUEL
FUEL
RESET
Instrumentation
10
Page 46 of 104
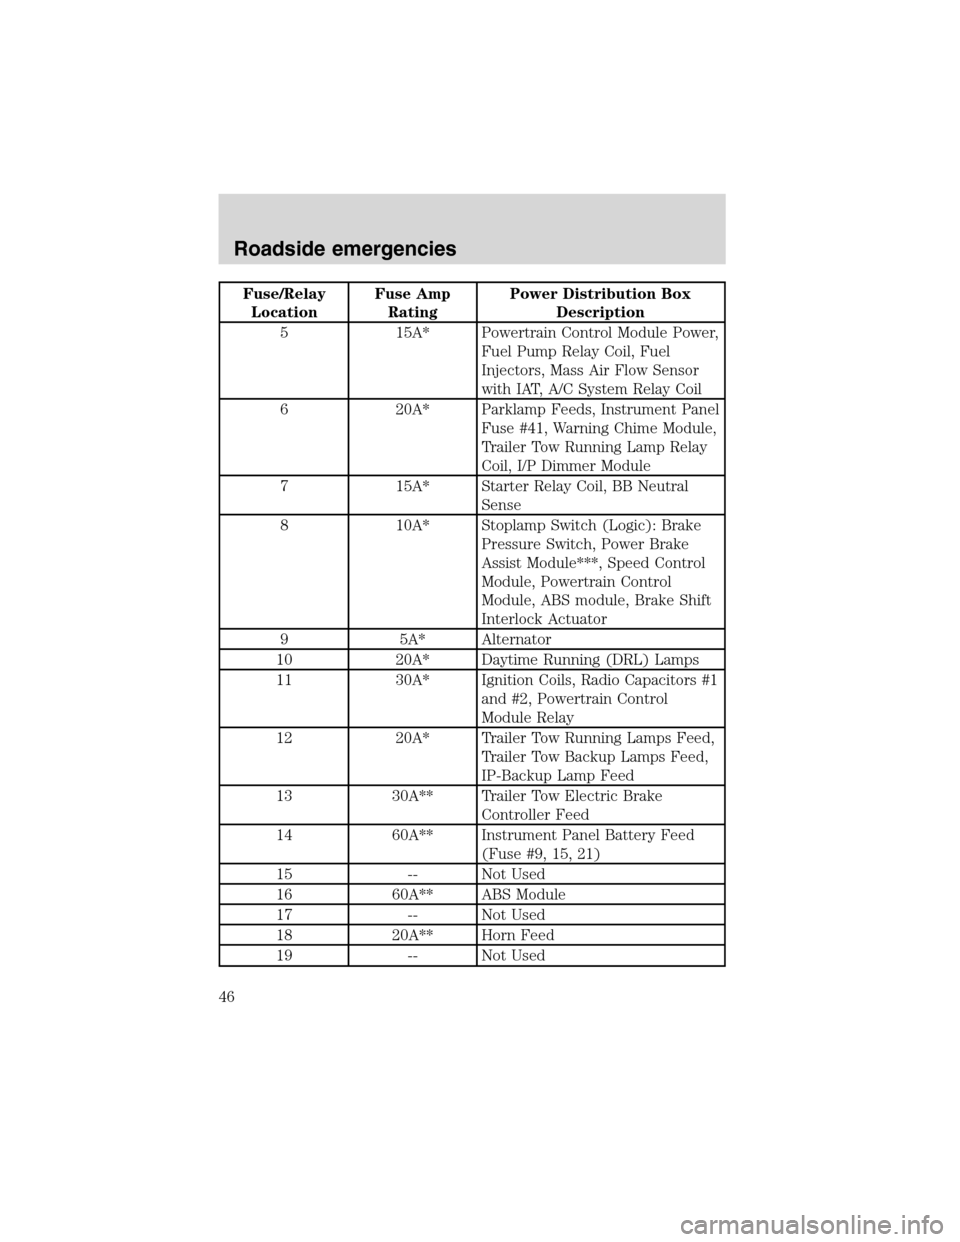
Fuse/Relay
LocationFuse Amp
RatingPower Distribution Box
Description
5 15A* Powertrain Control Module Power,
Fuel Pump Relay Coil, Fuel
Injectors, Mass Air Flow Sensor
with IAT, A/C System Relay Coil
6 20A* Parklamp Feeds, Instrument Panel
Fuse #41, Warning Chime Module,
Trailer Tow Running Lamp Relay
Coil, I/P Dimmer Module
7 15A* Starter Relay Coil, BB Neutral
Sense
8 10A* Stoplamp Switch (Logic): Brake
Pressure Switch, Power Brake
Assist Module***, Speed Control
Module, Powertrain Control
Module, ABS module, Brake Shift
Interlock Actuator
9 5A* Alternator
10 20A* Daytime Running (DRL) Lamps
11 30A* Ignition Coils, Radio Capacitors #1
and #2, Powertrain Control
Module Relay
12 20A* Trailer Tow Running Lamps Feed,
Trailer Tow Backup Lamps Feed,
IP-Backup Lamp Feed
13 30A** Trailer Tow Electric Brake
Controller Feed
14 60A** Instrument Panel Battery Feed
(Fuse #9, 15, 21)
15 -- Not Used
16 60A** ABS Module
17 -- Not Used
18 20A** Horn Feed
19 -- Not Used
Roadside emergencies
46
Page 58 of 104
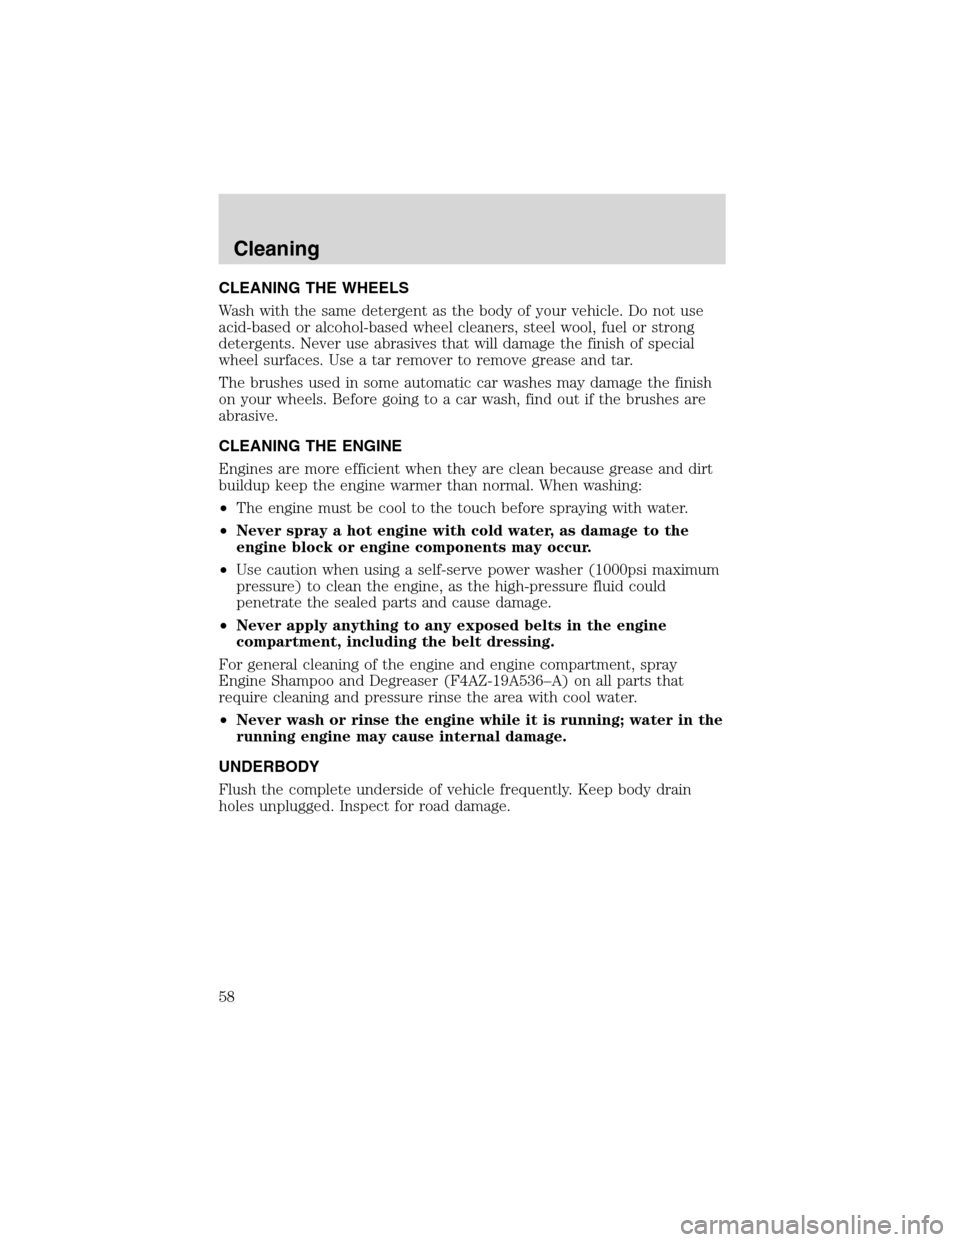
CLEANING THE WHEELS
Wash with the same detergent as the body of your vehicle. Do not use
acid-based or alcohol-based wheel cleaners, steel wool, fuel or strong
detergents. Never use abrasives that will damage the finish of special
wheel surfaces. Use a tar remover to remove grease and tar.
The brushes used in some automatic car washes may damage the finish
on your wheels. Before going to a car wash, find out if the brushes are
abrasive.
CLEANING THE ENGINE
Engines are more efficient when they are clean because grease and dirt
buildup keep the engine warmer than normal. When washing:
•The engine must be cool to the touch before spraying with water.
•Never spray a hot engine with cold water, as damage to the
engine block or engine components may occur.
•Use caution when using a self-serve power washer (1000psi maximum
pressure) to clean the engine, as the high-pressure fluid could
penetrate the sealed parts and cause damage.
•Never apply anything to any exposed belts in the engine
compartment, including the belt dressing.
For general cleaning of the engine and engine compartment, spray
Engine Shampoo and Degreaser (F4AZ-19A536–A) on all parts that
require cleaning and pressure rinse the area with cool water.
•Never wash or rinse the engine while it is running; water in the
running engine may cause internal damage.
UNDERBODY
Flush the complete underside of vehicle frequently. Keep body drain
holes unplugged. Inspect for road damage.
Cleaning
58
Page 72 of 104
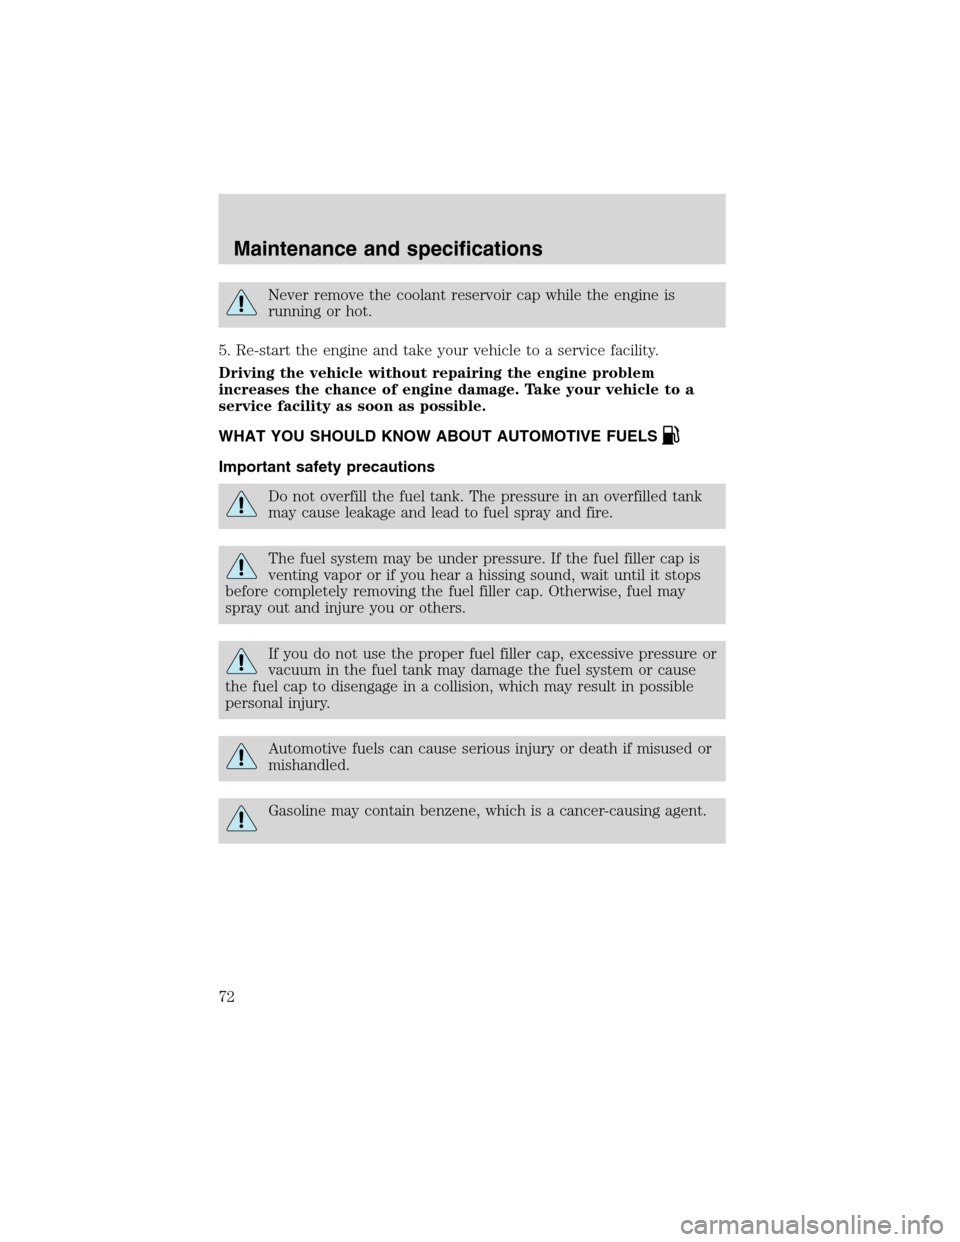
Never remove the coolant reservoir cap while the engine is
running or hot.
5. Re-start the engine and take your vehicle to a service facility.
Driving the vehicle without repairing the engine problem
increases the chance of engine damage. Take your vehicle to a
service facility as soon as possible.
WHAT YOU SHOULD KNOW ABOUT AUTOMOTIVE FUELS
Important safety precautions
Do not overfill the fuel tank. The pressure in an overfilled tank
may cause leakage and lead to fuel spray and fire.
The fuel system may be under pressure. If the fuel filler cap is
venting vapor or if you hear a hissing sound, wait until it stops
before completely removing the fuel filler cap. Otherwise, fuel may
spray out and injure you or others.
If you do not use the proper fuel filler cap, excessive pressure or
vacuum in the fuel tank may damage the fuel system or cause
the fuel cap to disengage in a collision, which may result in possible
personal injury.
Automotive fuels can cause serious injury or death if misused or
mishandled.
Gasoline may contain benzene, which is a cancer-causing agent.
Maintenance and specifications
72
Page 76 of 104
Fuel filter replacement
The fuel filter assembly is located inside the driver side frame rail, near
the transmission.
The fuel filter should be replaced every 24 000 km (15 000 miles).
Removal
If the fuel filter is being serviced with the rear of the vehicle
higher than the front, or if the fuel tank is pressurized, fuel
leakage or siphoning from the tank fuel tubes could occur. To prevent
this condition, maintain the vehicle front end at or above the level of
the rear of the vehicle.
Do not smoke or carry lighted tobacco or open flame of any type
when working on or near any fuel related component. Highly
flammable mixtures are always present and may be ignited, resulting in
possible personal injury.
Fuel in the fuel system remains under high pressure even when
the engine is not running. Before servicing or disconnecting any
of the fuel lines or fuel system components, the fuel system pressure
must be relieved in order to prevent accidental spraying of fuel,
causing personal injury or a fire hazard.
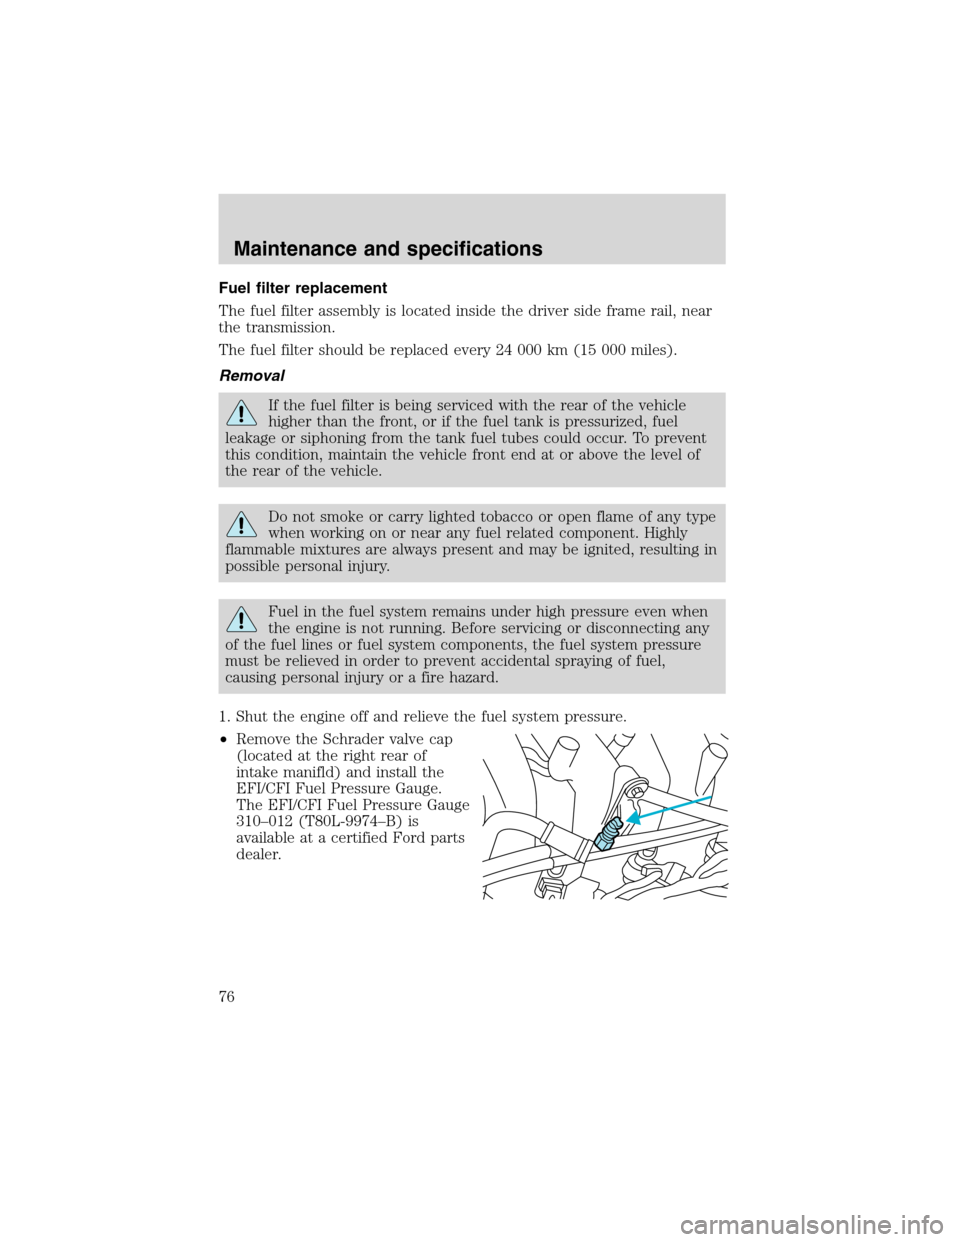
1. Shut the engine off and relieve the fuel system pressure.
•Remove the Schrader valve cap
(located at the right rear of
intake manifld) and install the
EFI/CFI Fuel Pressure Gauge.
The EFI/CFI Fuel Pressure Gauge
310–012 (T80L-9974–B) is
available at a certified Ford parts
dealer.
Maintenance and specifications
76
Page 77 of 104
•Open the manual valve slowly on
the EFI/CFI Fuel Pressure Gauge
and relieve the fuel pressure. This
will drain some fuel out of the
system; place the fuel in a
suitable container.
2. Use the fuel line disconnect tool
to disconnect the fuel lines from the
fuel filter. The Fuel Line Disconnect
Tool 310–S039 (T90T-9550–S) is
available at a certified Ford parts
dealer.
•Disconnect the safety clip from
the male hose.
•Install the fuel line disconnect
tool and push into the fitting.
•Separate the fittings. Clean the
fittings and inspect the fittings for
damage.
Maintenance and specifications
77
Page 78 of 104
Installation
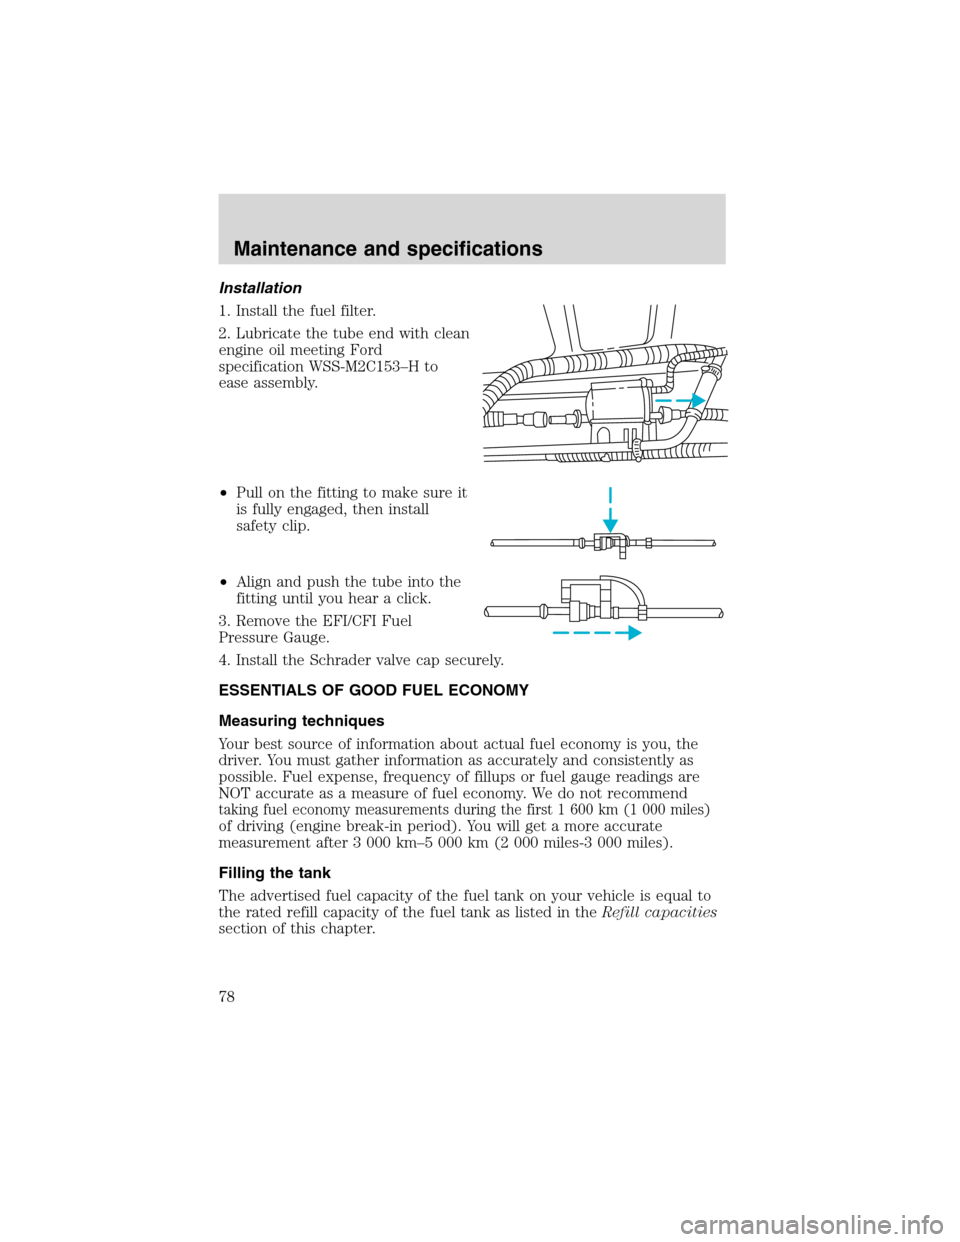
1. Install the fuel filter.
2. Lubricate the tube end with clean
engine oil meeting Ford
specification WSS-M2C153–H to
ease assembly.
•Pull on the fitting to make sure it
is fully engaged, then install
safety clip.
•Align and push the tube into the
fitting until you hear a click.
3. Remove the EFI/CFI Fuel
Pressure Gauge.
4. Install the Schrader valve cap securely.
ESSENTIALS OF GOOD FUEL ECONOMY
Measuring techniques
Your best source of information about actual fuel economy is you, the
driver. You must gather information as accurately and consistently as
possible. Fuel expense, frequency of fillups or fuel gauge readings are
NOT accurate as a measure of fuel economy. We do not recommend
taking fuel economy measurements during the first 1 600 km (1 000 miles)
of driving (engine break-in period). You will get a more accurate
measurement after 3 000 km–5 000 km (2 000 miles-3 000 miles).
Filling the tank
The advertised fuel capacity of the fuel tank on your vehicle is equal to
the rated refill capacity of the fuel tank as listed in theRefill capacities
section of this chapter.
Maintenance and specifications
78
Page 81 of 104
Maintenance
•Keep tires properly inflated and use only recommended size.
•Operating a vehicle with the wheels out of alignment will reduce fuel
economy.
•Use recommended engine oil. Refer toLubricant specificationsin
this chapter.
•Perform all regularly scheduled maintenance items. Follow the
recommended maintenance schedule and owner maintenance checks
found in your vehicle scheduled maintenance guide.
Conditions
•Heavily loading a vehicle or towing a trailer may reduce fuel economy
at any speed.
•Carrying unnecessary weight may reduce fuel economy (approximately
0.4 km/L [1 mpg] is lost for every 180 kg [400 lb] of weight carried).
•Adding certain accessories to your vehicle (for example bug
deflectors, rollbars/light bars, running boards, ski/luggage racks) may
reduce fuel economy.
•Using fuel blended with alcohol may lower fuel economy.
•Fuel economy may decrease with lower temperatures during the first
12–16 km (8–10 miles) of driving.
•Driving on flat terrain offers improved fuel economy as compared to
driving on hilly terrain.
•Transmissions give their best fuel economy when operated in the top
cruise gear and with steady pressure on the gas pedal.
•Close windows for high speed driving.
EPA window sticker
Every new vehicle should have the EPA window sticker. Contact your
dealer if the window sticker is not supplied with your vehicle. The EPA
window sticker should be your guide for the fuel economy comparisons
with other vehicles.
It is important to note the box in the lower left corner of the window
sticker. These numbers represent the Range of L/100 km (MPG)
expected on the vehicle under optimum conditions. Your fuel economy
may vary depending upon the method of operation and conditions.
Maintenance and specifications
81