Page 43 of 104
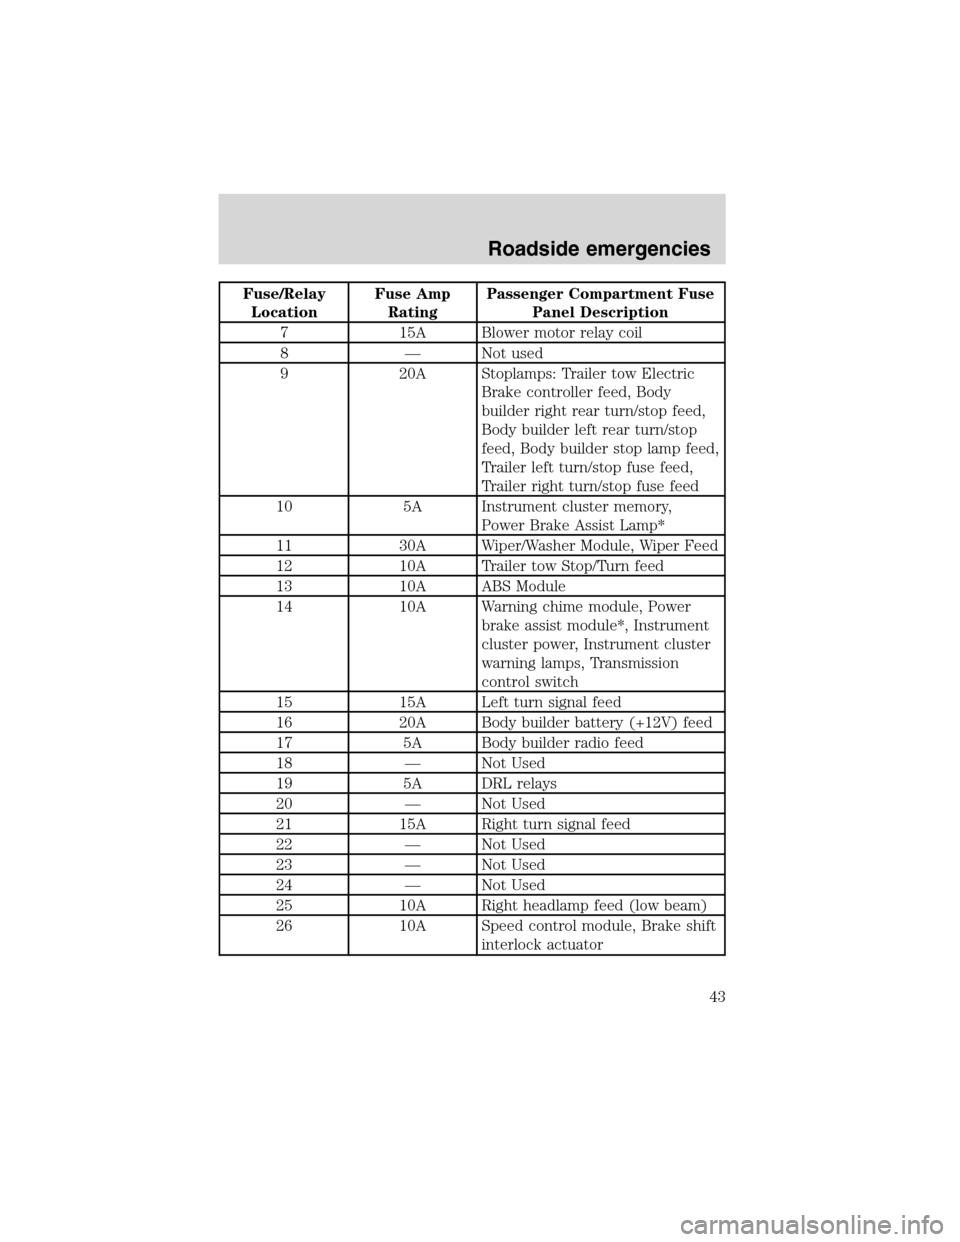
Fuse/Relay
LocationFuse Amp
RatingPassenger Compartment Fuse
Panel Description
7 15A Blower motor relay coil
8 — Not used
9 20A Stoplamps: Trailer tow Electric
Brake controller feed, Body
builder right rear turn/stop feed,
Body builder left rear turn/stop
feed, Body builder stop lamp feed,
Trailer left turn/stop fuse feed,
Trailer right turn/stop fuse feed
10 5A Instrument cluster memory,
Power Brake Assist Lamp*
11 30A Wiper/Washer Module, Wiper Feed
12 10A Trailer tow Stop/Turn feed
13 10A ABS Module
14 10A Warning chime module, Power
brake assist module*, Instrument
cluster power, Instrument cluster
warning lamps, Transmission
control switch
15 15A Left turn signal feed
16 20A Body builder battery (+12V) feed
17 5A Body builder radio feed
18 — Not Used
19 5A DRL relays
20 — Not Used
21 15A Right turn signal feed
22 — Not Used
23 — Not Used
24 — Not Used
25 10A Right headlamp feed (low beam)
26 10A Speed control module, Brake shift
interlock actuator
Roadside emergencies
43
Page 46 of 104
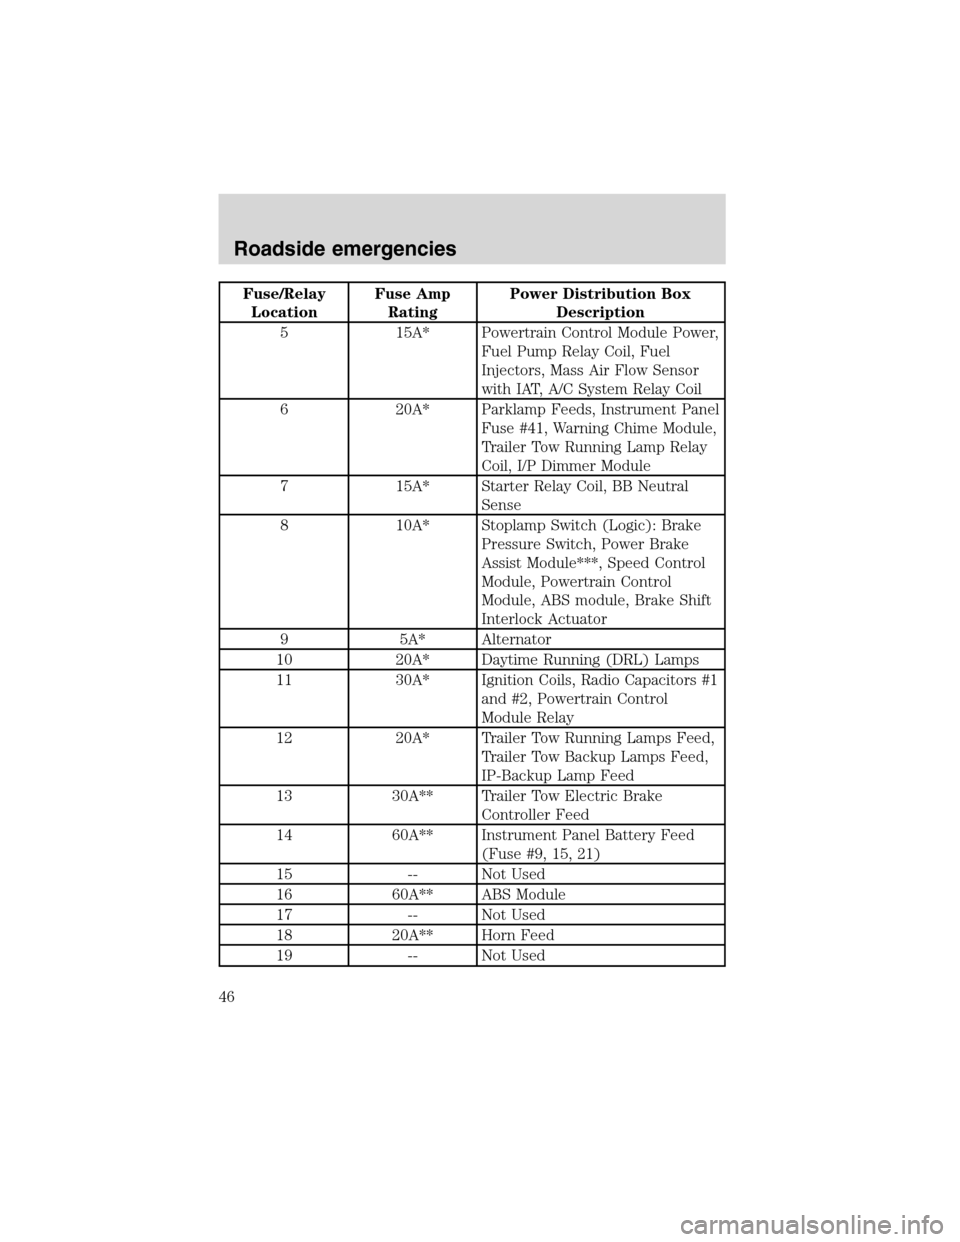
Fuse/Relay
LocationFuse Amp
RatingPower Distribution Box
Description
5 15A* Powertrain Control Module Power,
Fuel Pump Relay Coil, Fuel
Injectors, Mass Air Flow Sensor
with IAT, A/C System Relay Coil
6 20A* Parklamp Feeds, Instrument Panel
Fuse #41, Warning Chime Module,
Trailer Tow Running Lamp Relay
Coil, I/P Dimmer Module
7 15A* Starter Relay Coil, BB Neutral
Sense
8 10A* Stoplamp Switch (Logic): Brake
Pressure Switch, Power Brake
Assist Module***, Speed Control
Module, Powertrain Control
Module, ABS module, Brake Shift
Interlock Actuator
9 5A* Alternator
10 20A* Daytime Running (DRL) Lamps
11 30A* Ignition Coils, Radio Capacitors #1
and #2, Powertrain Control
Module Relay
12 20A* Trailer Tow Running Lamps Feed,
Trailer Tow Backup Lamps Feed,
IP-Backup Lamp Feed
13 30A** Trailer Tow Electric Brake
Controller Feed
14 60A** Instrument Panel Battery Feed
(Fuse #9, 15, 21)
15 -- Not Used
16 60A** ABS Module
17 -- Not Used
18 20A** Horn Feed
19 -- Not Used
Roadside emergencies
46
Page 48 of 104
Relay module
The relay box is located by the power distribution box in front of the
radiator in the engine compartment.
The relays are coded as follows:
Relay location Description
1 Back up Lamp
2 Running Lamp
3 Not Used
4 Headlamp DRL
CHANGING THE TIRES
If you get a flat tire while driving, do not apply the brake heavily.
Instead, gradually decrease your speed. Hold the steering wheel firmly
and slowly move to a safe place on the side of the road.
Tire change procedure
Preparing to change the tire
To prevent the vehicle from moving when you change a tire, be
sure the parking brake is set, then block (in both directions) the
wheel that is diagonally opposite (other side and end of the vehicle) to
the tire being changed.
1. Park on a level surface.
2. Activate the warning flashers.
3. Place the gearshift in P (Park).
12 43
Roadside emergencies
48
Page 49 of 104
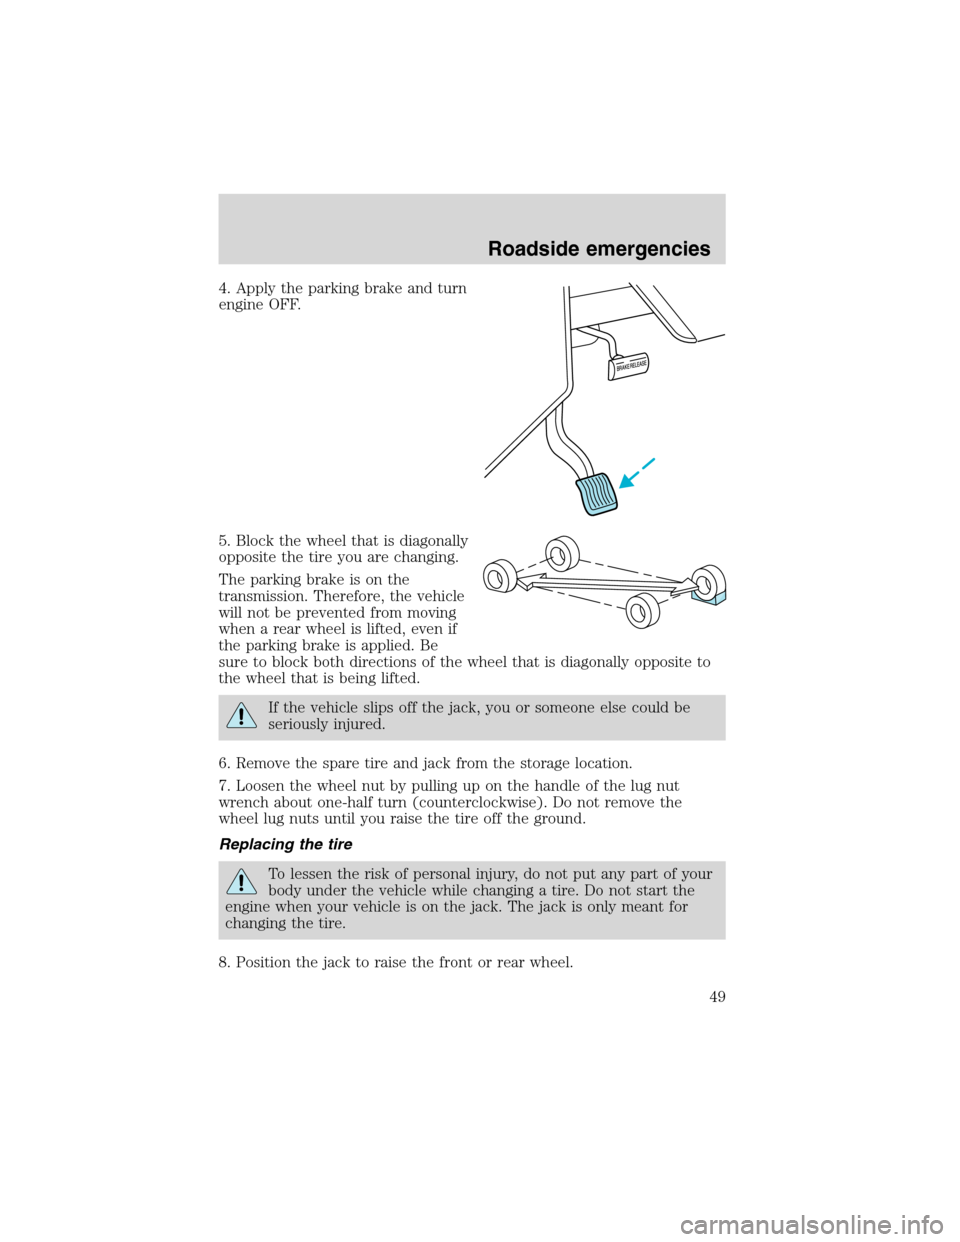
4. Apply the parking brake and turn
engine OFF.
5. Block the wheel that is diagonally
opposite the tire you are changing.
The parking brake is on the
transmission. Therefore, the vehicle
will not be prevented from moving
when a rear wheel is lifted, even if
the parking brake is applied. Be
sure to block both directions of the wheel that is diagonally opposite to
the wheel that is being lifted.
If the vehicle slips off the jack, you or someone else could be
seriously injured.
6. Remove the spare tire and jack from the storage location.
7. Loosen the wheel nut by pulling up on the handle of the lug nut
wrench about one-half turn (counterclockwise). Do not remove the
wheel lug nuts until you raise the tire off the ground.
Replacing the tire
To lessen the risk of personal injury, do not put any part of your
body under the vehicle while changing a tire. Do not start the
engine when your vehicle is on the jack. The jack is only meant for
changing the tire.
8. Position the jack to raise the front or rear wheel.
Roadside emergencies
49
Page 51 of 104
Never use wheels or lug
nuts different than the
original equipment as this could
damage the wheel or mounting
system. This damage could allow
the wheels to come off while the
vehicle is being driven.
15. Replace any wheel trim.
16. Stow the jack, handle and lug wrench.
17. Unblock the wheels.
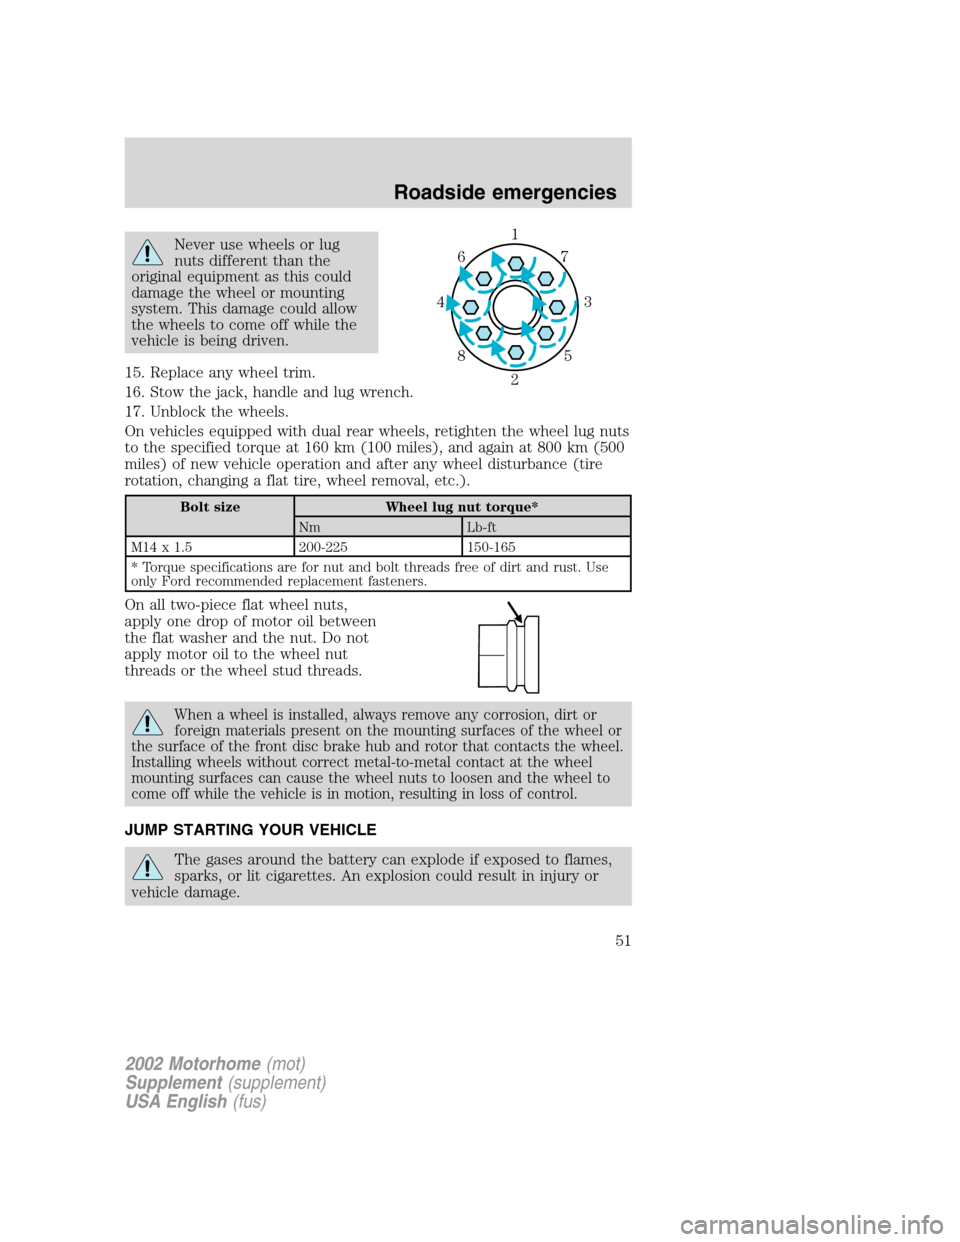
On vehicles equipped with dual rear wheels, retighten the wheel lug nuts
to the specified torque at 160 km (100 miles), and again at 800 km (500
miles) of new vehicle operation and after any wheel disturbance (tire
rotation, changing a flat tire, wheel removal, etc.).
Bolt size Wheel lug nut torque*
Nm Lb-ft
M14 x 1.5 200-225 150-165
* Torque specifications are for nut and bolt threads free of dirt and rust. Use
only Ford recommended replacement fasteners.
On all two-piece flat wheel nuts,
apply one drop of motor oil between
the flat washer and the nut. Do not
apply motor oil to the wheel nut
threads or the wheel stud threads.
When a wheel is installed, always remove any corrosion, dirt or
foreign materials present on the mounting surfaces of the wheel or
the surface of the front disc brake hub and rotor that contacts the wheel.
Installing wheels without correct metal-to-metal contact at the wheel
mounting surfaces can cause the wheel nuts to loosen and the wheel to
come off while the vehicle is in motion, resulting in loss of control.
JUMP STARTING YOUR VEHICLE
The gases around the battery can explode if exposed to flames,
sparks, or lit cigarettes. An explosion could result in injury or
vehicle damage.
1
3 4
27 6
5 8
2002 Motorhome(mot)
Supplement(supplement)
USA English(fus)
Roadside emergencies
51
Page 58 of 104
CLEANING THE WHEELS
Wash with the same detergent as the body of your vehicle. Do not use
acid-based or alcohol-based wheel cleaners, steel wool, fuel or strong
detergents. Never use abrasives that will damage the finish of special
wheel surfaces. Use a tar remover to remove grease and tar.
The brushes used in some automatic car washes may damage the finish
on your wheels. Before going to a car wash, find out if the brushes are
abrasive.
CLEANING THE ENGINE
Engines are more efficient when they are clean because grease and dirt
buildup keep the engine warmer than normal. When washing:
•The engine must be cool to the touch before spraying with water.
•Never spray a hot engine with cold water, as damage to the
engine block or engine components may occur.
•Use caution when using a self-serve power washer (1000psi maximum
pressure) to clean the engine, as the high-pressure fluid could
penetrate the sealed parts and cause damage.
•Never apply anything to any exposed belts in the engine
compartment, including the belt dressing.
For general cleaning of the engine and engine compartment, spray
Engine Shampoo and Degreaser (F4AZ-19A536–A) on all parts that
require cleaning and pressure rinse the area with cool water.
•Never wash or rinse the engine while it is running; water in the
running engine may cause internal damage.
UNDERBODY
Flush the complete underside of vehicle frequently. Keep body drain
holes unplugged. Inspect for road damage.
Cleaning
58
Page 59 of 104
SERVICE RECOMMENDATIONS
To help you service your vehicle:
•We highlight do-it-yourself items in the engine compartment for easy
location.
•We provide a scheduled maintenance guide which makes tracking
routine service easy.
If your vehicle requires professional service, your dealership can provide
the necessary parts and service. Check yourWarranty Guideto find out
which parts and services are covered.
Use only recommended fuels, lubricants, fluids and service parts
conforming to specifications. Motorcraft parts are designed and built to
provide the best performance in your vehicle.
PRECAUTIONS WHEN SERVICING YOUR VEHICLE
Be especially careful when inspecting or servicing your vehicle.
•Do not work on a hot engine.
•When the engine is running, make sure that loose clothing, jewelry or
long hair does not get caught up in moving parts.
•Do not work on a vehicle with the engine running in an enclosed
space, unless you are sure you have enough ventilation.
•Keep all lit cigarettes, open flames and other lit material away from
the battery and all fuel related parts.
If you disconnect the battery, the engine must “relearn” its idle
conditions before your vehicle will drive properly, as explained inBattery
in this chapter.
Working with the engine off
1. Set the parking brake and ensure the gearshift is securely latched in P
(Park).
2. Turn off the engine and remove the key.
3. Block the wheels to prevent the vehicle from moving unexpectedly.
Working with the engine on
1. Set the parking brake and ensure the gearshift is securely latched in P
(Park).
2. Block the wheels to prevent the vehicle from moving unexpectedly.
Note:Do not start your engine with the air cleaner removed and do not
remove it while the engine is running.
Maintenance and specifications
59
Page 62 of 104
Adding engine oil
1. Check the engine oil. For instructions, refer toChecking the engine
oilin this chapter.
2. If the engine oil level is not within the MIN and MAX ranges, add only
certified engine oil of the recommended viscosity. Remove the engine oil
filler cap and use a funnel to pour the engine oil into the opening.
3. Recheck the engine oil level. Make sure the oil level is not above the
MAX mark on the engine oil level indicator (dipstick).
4. Install the indicator and ensure it is fully seated.
5. Fully install the engine oil filler cap by turning the filler cap clockwise
until three clicks can be heard.
To avoid possible oil loss, DO NOT operate the vehicle with the
engine oil level indicator and/or the engine oil filler cap removed.
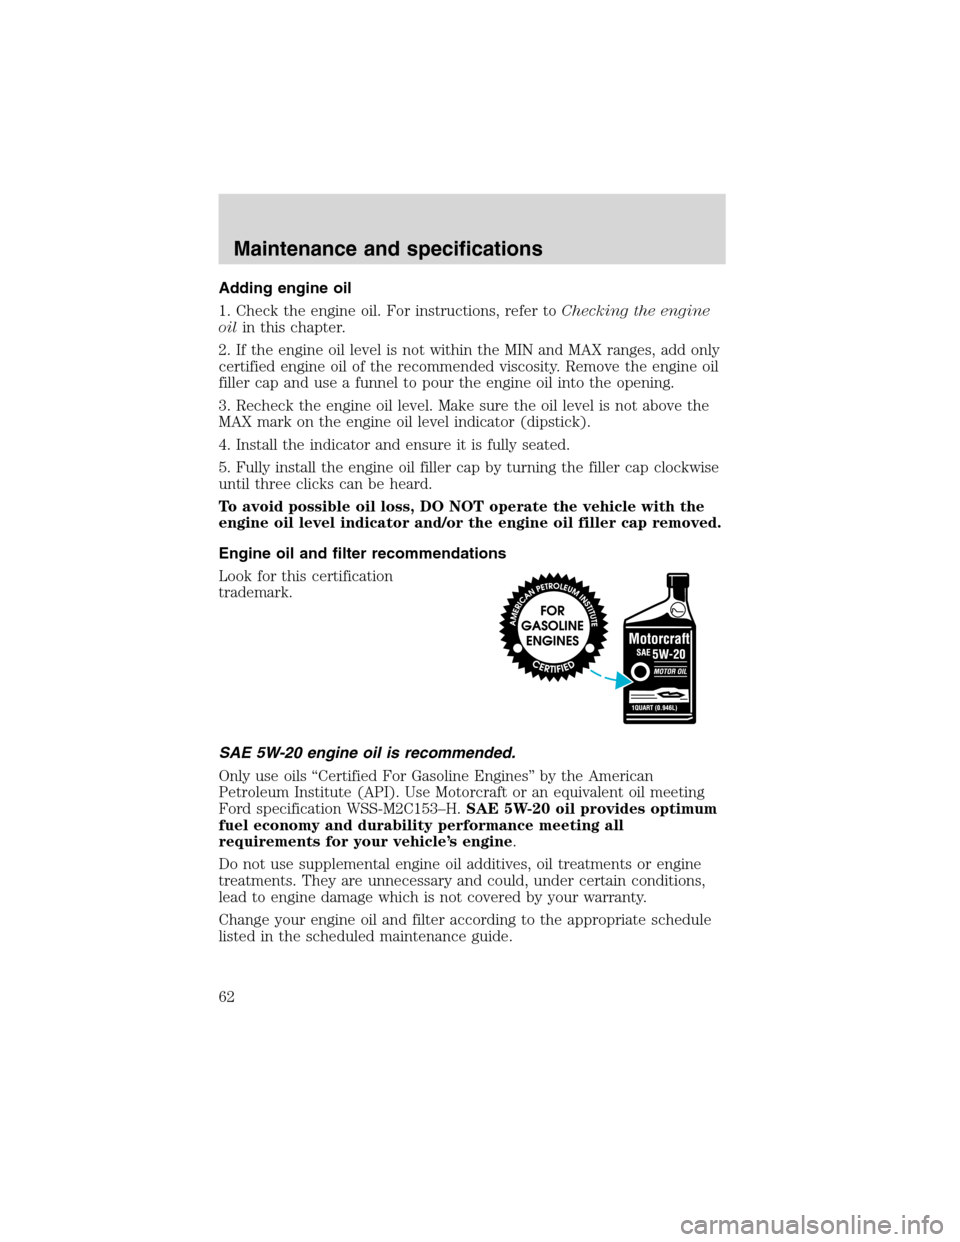
Engine oil and filter recommendations
Look for this certification
trademark.
SAE 5W-20 engine oil is recommended.
Only use oils “Certified For Gasoline Engines” by the American
Petroleum Institute (API). Use Motorcraft or an equivalent oil meeting
Ford specification WSS-M2C153–H.SAE 5W-20 oil provides optimum
fuel economy and durability performance meeting all
requirements for your vehicle’s engine.
Do not use supplemental engine oil additives, oil treatments or engine
treatments. They are unnecessary and could, under certain conditions,
lead to engine damage which is not covered by your warranty.
Change your engine oil and filter according to the appropriate schedule
listed in the scheduled maintenance guide.
Maintenance and specifications
62