Page 38 of 200
6. Carefully pull old bulb out of the
lamp assembly
Handle a halogen headlamp bulb carefully and keep out of
children’s reach. Grasp the bulb only by its plastic base and do
not touch the glass. The oil from your hand could cause the bulb to
break the next time the headlamps are operated.
Install the new bulb in reverse order.
Replacing front parking lamp/turn signal bulbs
1. Remove screw from the lamp
assembly.
2. Disengage lamp assembly.
3. Remove the bulb socket.
4. Carefully pull bulb straight out of
the socket.
Install the new bulb(s) in reverse order.
Lights
38
Page 39 of 200
Replacing tail lamp/turn/backup lamp bulbs
1. Open the liftgate.
2. Remove the two screws from the
lamps assembly.
3. Remove the lamp assembly.
4. Rotate the bulb socket
counterclockwise and remove it
from the lamp assembly.
5. Carefully pull the bulb straight
out of the socket.
Install the new bulb(s) in reverse order.
Replacing foglamp bulbs
1. Remove the bulb socket from the
foglamp by turning it
counterclockwise.
2. Disconnect the electrical
connector.
Install the new bulb(s) in reverse order.
Lights
39
Page 40 of 200

Replacing license plate lamp bulbs
1. Remove two screws and the
license plate lamp assembly.
2. Remove the bulb socket from the
lamp assembly by turning
counterclockwise.
Install the new bulb(s) in reverse order.
Replacing high-mount brakelamp bulb
1. Remove the two screws and lamp assembly from vehicle.
2. Remove the bulb socket from the lamp assembly by turning
counterclockwise and pull the bulb straight out.
Install new bulbs in reverse order.
Replacement bulbs
Function Number of bulbs Trade number
Headlamps 2 9007
Park/turn/side marker lamps 2 3157 AK (Amber)
Rear stop/tail/turn lamps 2 3157K
Backup lamps 2 3156K
Foglamps 2 9145
Rear license plate lamps 2 168
Overhead map lamps 2 PC579
(XU5B-13466–AA)
Cargo lamp 1 211–2
Map lamps 2 168 (T10)
Dome lamp 1 906
Front door courtesy lamp (if equipped) 1 168
Ashtray lamp 1 161
All replacement bulbs are clear in color except where noted.
To replace all instrument panel lights–see your dealer.
Replacing the interior bulbs
Check the operation of the bulbs frequently. To replace any of the
interior bulbs, see a dealer or qualified technician.
Lights
40
Page 48 of 200

SETTING AUTOLAMP (IF EQUIPPED)
1. Make sure the headlamp control
is in the OFF position. Leaving the
headlamp control on will override
the autolamp.
2. Turn the ignition to the ON
position or start the vehicle.
3. Slide the delay control all the way
to the left.
The further you move the knob to
the right, the longer the headlamps
stay on after the ignition is turned
to the OFF position. The autolamp
will keep the headlamps on for a maximum of three minutes after the
ignition is turned to OFF.
Automatic dimming rear view mirror
The autolamp/automatic dimming
mirror is equipped with an
automatic dimming feature. This
feature will change from the normal
state to the non-glare“active”state
when bright lights (glare) reach the
mirror. When the mirror detects bright light from front or behind, it will
adjust automatically to minimize glare.
The mirror will automatically return to the normal position whenever the
vehicle is placed in R (Reverse) (when the mirror is in the ON position).
This helps to ensure a bright clear view in the mirror when backing up.
Power side view mirrors
To adjust your mirrors
1. Select
to adjust the left
mirror or
to adjust the right
mirror.
2. Move the control in the direction
you wish to tilt the mirror.
3. Return to the center position to
disable the adjust function.
OFF
AUTOLAMP
OFFMAX.DELAY
AUTOLAMP
OFFMAX.DELAY
Driver Controls
48
Page 61 of 200

REMOTE ENTRY SYSTEM (IF EQUIPPED)
This device complies with part 15 of the FCC rules and with RS-210 of
Industry Canada. Operation is subject to the following two conditions:
(1) This device may not cause harmful interference, and (2) This device
must accept any interference received, including interference that may
cause undesired operation.
Changes or modifications not expressly approved by the party
responsible for compliance could void the user’s authority to
operate the equipment.
The remote entry system allows you
to lock or unlock all vehicle doors
without a key.Note:lock and
unlock will work in any ignition
position.
If there is a problem with the
remote entry system make sure to
takeALL remote entry
transmitterswith you to the
dealership, this will aid in
troubleshooting the problem.
Unlocking the doors
1. Pressand release to unlock the driver’s door.Note:The interior
lamps will illuminate.
2. Press
and release again within three seconds to unlock all the
doors.
The remote entry system activates the illuminated entry feature. This
feature turns on the interior lamps for 25 seconds or until the ignition is
turned to the ON position. If the dome lamp control is in theoffposition
the illuminated entry feature will not work.
The inside lights will not turn off if:
•they have been turned on using the dimmer control or
•any door is open.
The battery saver feature will turn off the interior lamps 30 minutes after
the ignition is turned to the OFF position.
Locking the doors
1. Pressand release to lock all the doors.Note:the interior lamps
will turn off.
Locks and Security
61
Page 99 of 200

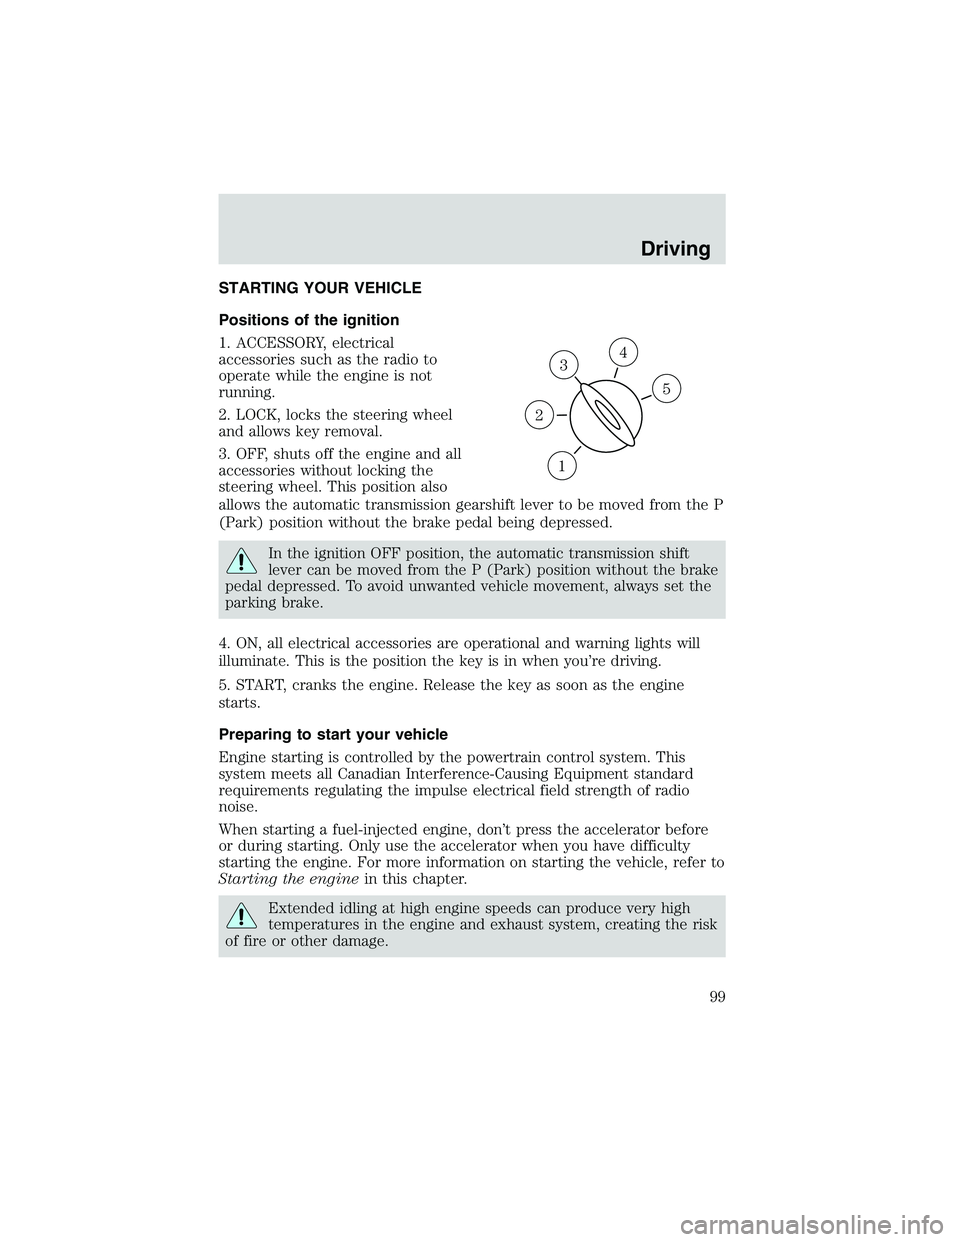
STARTING YOUR VEHICLE
Positions of the ignition
1. ACCESSORY, electrical
accessories such as the radio to
operate while the engine is not
running.
2. LOCK, locks the steering wheel
and allows key removal.
3. OFF, shuts off the engine and all
accessories without locking the
steering wheel. This position also
allows the automatic transmission gearshift lever to be moved from the P
(Park) position without the brake pedal being depressed.
In the ignition OFF position, the automatic transmission shift
lever can be moved from the P (Park) position without the brake
pedal depressed. To avoid unwanted vehicle movement, always set the
parking brake.
4. ON, all electrical accessories are operational and warning lights will
illuminate. This is the position the key is in when you’re driving.
5. START, cranks the engine. Release the key as soon as the engine
starts.
Preparing to start your vehicle
Engine starting is controlled by the powertrain control system. This
system meets all Canadian Interference-Causing Equipment standard
requirements regulating the impulse electrical field strength of radio
noise.
When starting a fuel-injected engine, don’t press the accelerator before
or during starting. Only use the accelerator when you have difficulty
starting the engine. For more information on starting the vehicle, refer to
Starting the enginein this chapter.
Extended idling at high engine speeds can produce very high
temperatures in the engine and exhaust system, creating the risk
of fire or other damage.
3
1
2
5
4
Driving
99
Page 101 of 200
•Make sure the gearshift is in P
(Park).
If starting a vehicle with a manual
transmission:
1. Make sure the parking brake is
set.
2. Push the clutch pedal to the floor.
•Turn the key to 4 (ON) without
turning the key to 5 (START).
Make sure the corresponding lights illuminate or illuminate briefly. If a
light fails to illuminate, have the vehicle serviced.
•If the driver’s safety belt is fastened, the
light may not illuminate.
1
2
34
5
C12345
6
RPMx1000
ABS
CHECK
ENGINE
EFH
H
H
PRN D 2 1THEFT
SPEED
CONT
4WD
HIGH
4WD
LOW
O/D
OFFL
L
MPH 2060
4080
km/h
00
1
20
160100
140
180
20
DOOR
AJAR
CHECK
GAGE
!
BRAKE
CHECK
FUEL
CAP
Driving
101
Page 111 of 200

Do not park your vehicle in Neutral, it may move unexpectedly
and injure someone. Use 1 (First) gear and set the parking brake
fully.
FOUR-WHEEL DRIVE (4WD) OPERATION (IF EQUIPPED)
Four–wheel drive (4WD) supplies power to all four wheels. 4WD should
not be operated on dry pavement; driveline damage may occur.
4WD system indicator lights
•4WD HIGH- illuminates when
4x4 HIGH is selected.
•4WD LOW–illuminates when 4x4
LOW is selected.
If these lights illuminate when driving in 2WD, contact your Ford dealer
as soon as possible.
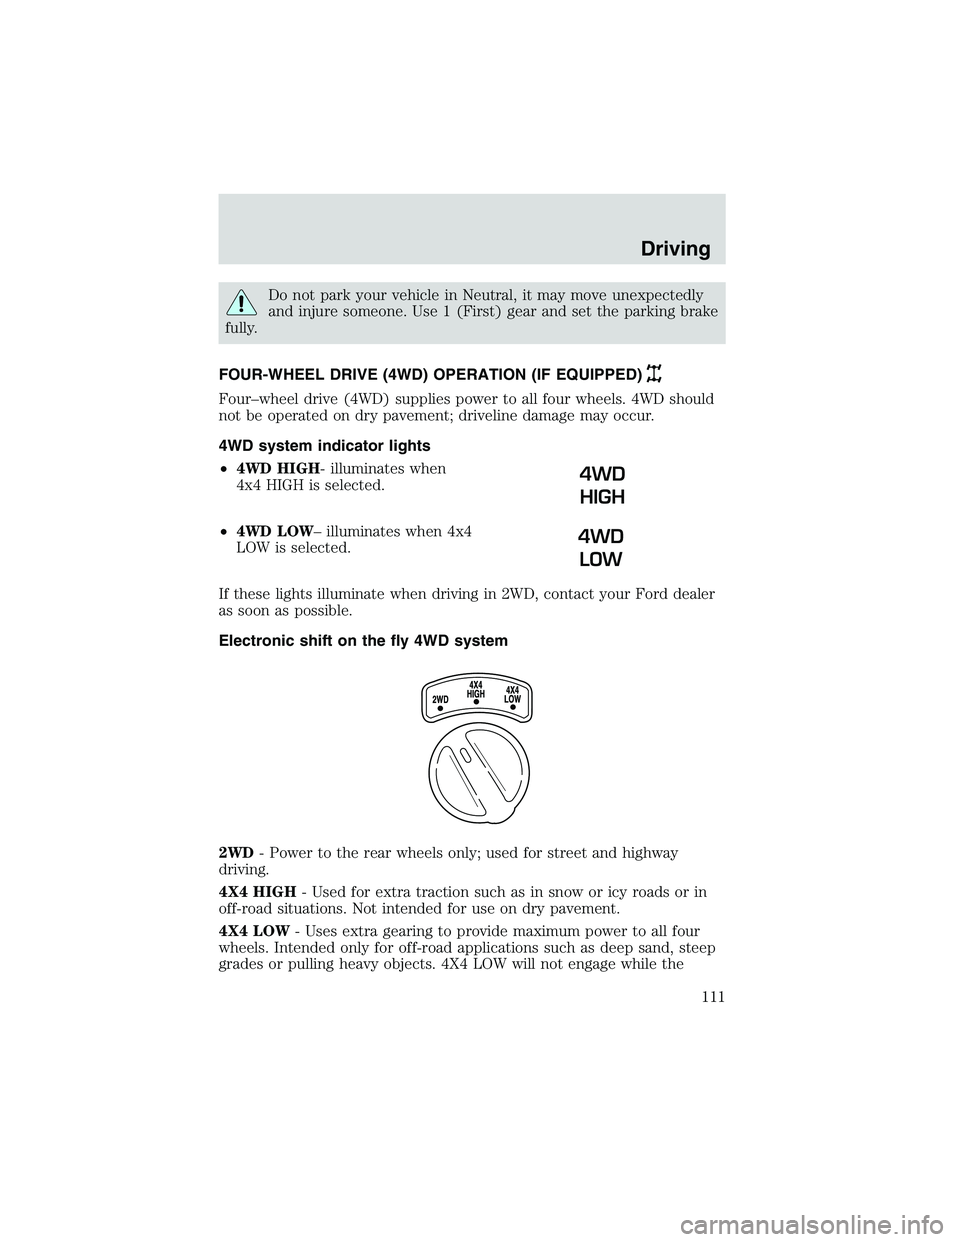
Electronic shift on the fly 4WD system
2WD- Power to the rear wheels only; used for street and highway
driving.
4X4 HIGH- Used for extra traction such as in snow or icy roads or in
off-road situations. Not intended for use on dry pavement.
4X4 LOW- Uses extra gearing to provide maximum power to all four
wheels. Intended only for off-road applications such as deep sand, steep
grades or pulling heavy objects. 4X4 LOW will not engage while the
4WD
HIGH
4WD
LOW
Driving
111