Page 47 of 256
 and right (R)
audio jacks.
3. Ensure that the system")
To play a video game:
1. Connect the video line from your game device to the VIDEO jack.
2. Connect the left and right audio cables to the left (L) and right (R)
audio jacks.
3. Ensure that the system is in AUX mode. The LCD screen will turn on
and the AUX indicator will illuminate.
4. If desired, press the
/control and plug a 3.5mm headphone into
the headphone jack. With the headphones ON, the rear speakers will not
operate.
Your AutoVision�System allows you to watch movie rentals and your
favorite home videocassettes. It also allows you to plug in and play a
variety of standard video games. Please review this user manual to
become familiar with the AutoVision�features and controls as well as
the very important safety information.
Should you have any questions regarding your AutoVision�System,
please feel free to call the toll free assistance hotline at 1 (877)
848–6434.
Safety information
Read all of the safety and operating instructions before operating the
system and retain for future reference.
Do not attempt to service, repair or modify the AutoVision�System. See
your Ford or Lincoln Mercury dealer.
Entertainment Systems
47
ProCarManuals.com
Page 55 of 256
If you will not be using the remote control for a considerably long time,
remove the batteries.
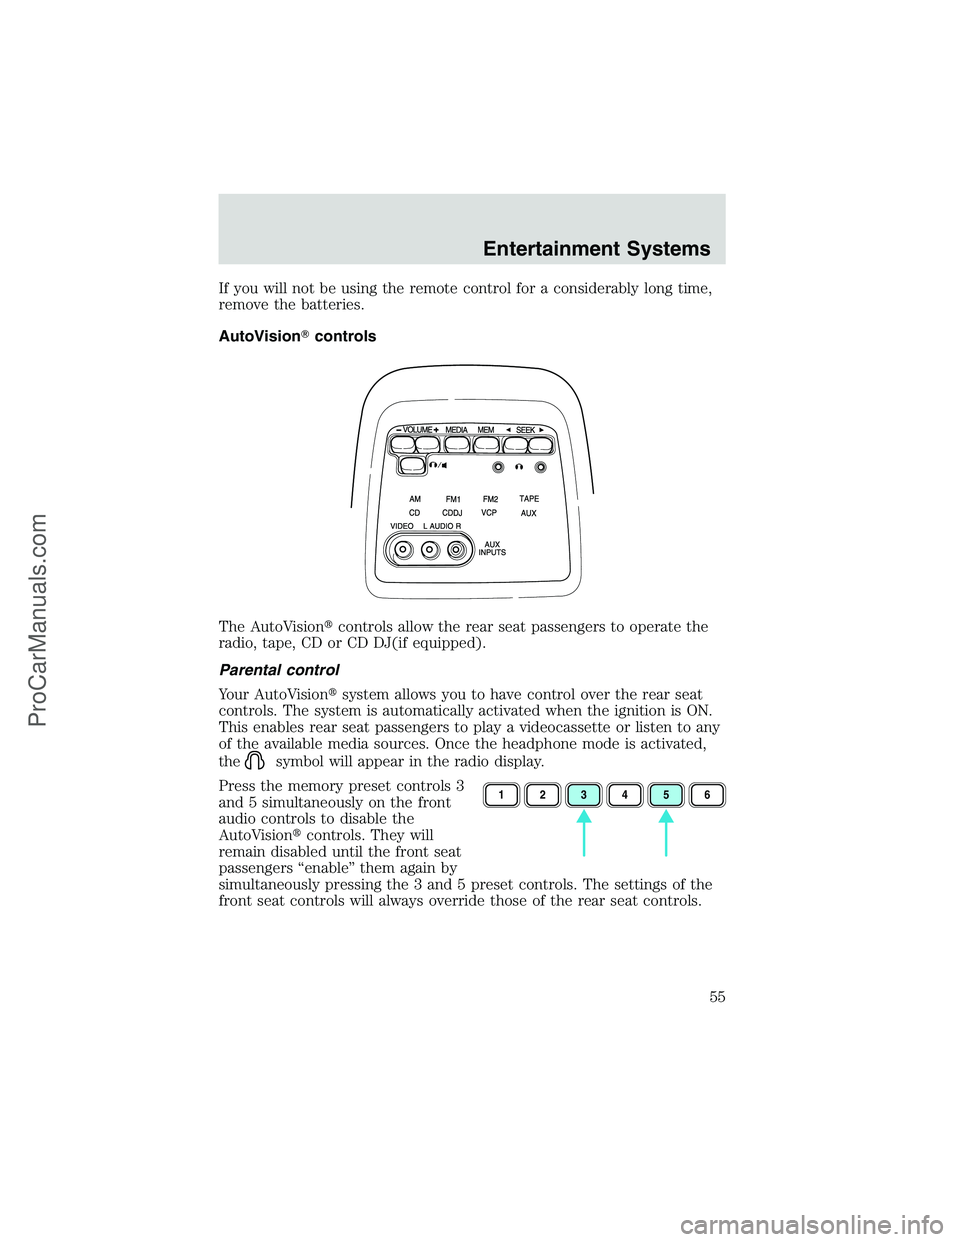
AutoVision�controls
The AutoVision�controls allow the rear seat passengers to operate the
radio, tape, CD or CD DJ(if equipped).
Parental control
Your AutoVision�system allows you to have control over the rear seat
controls. The system is automatically activated when the ignition is ON.
This enables rear seat passengers to play a videocassette or listen to any
of the available media sources. Once the headphone mode is activated,
the
symbol will appear in the radio display.
Press the memory preset controls 3
and 5 simultaneously on the front
audio controls to disable the
AutoVision�controls. They will
remain disabled until the front seat
passengers“enable”them again by
simultaneously pressing the 3 and 5 preset controls. The settings of the
front seat controls will always override those of the rear seat controls.
123456
Entertainment Systems
55
ProCarManuals.com
Page 56 of 256

Adjusting the volume
This control allows the rear seat
passengers to adjust the volume
level of the audio system.
Press the + control to increase the
volume.
Press the—control to decrease the
volume.
From the AutoVision�controls, the speaker volume cannot be set higher
than the current volume radio setting. When in headphone mode, the
AutoVision�controls can change the volume setting to any desired level.
Using headphones/Personal Audio Feature
The Personal Audio Feature allows
the rear seat passengers to listen to
one media source (radio, TAPE, CD,
CDDJ, VCP, or AUX) while the front
seat passengers listen to another.
To activate, press the
/
control and plug a 3.5mm
headphone into the headphone jack.
With the headphones ON, the rear
speakers will not operate.
Press the MEDIA control to toggle
to the desired media source.
Use the SEEK, VOLUME and MEM
controls to make any desired
adjustments.
Press the
/control again to engage the rear speakers and
deactivate the Personal Audio Feature.
Entertainment Systems
56
ProCarManuals.com
Page 57 of 256
Speakers ON/OFF mode
With the speakers ON, you can adjust the audio output to all system
speakers—front and rear together (headphones are disabled in this
mode). The rear seat passengers can not raise the volume of the system
above the level on the front radio bezel.
With the speakers OFF, the headphones are enabled. The rear seat
passengers have control over the desired volume levels.
Media select
Press the MEDIA control to toggle
between AM, FM1, FM2, TAPE, CD,
CDDJ, VCP and AUX modes. When
selected, the media source will
illuminate.
•AM—AM radio frequency band
•FM1, FM2—FM radio frequency bands
•TAPE—cassette tape (if equipped)
•CD—single cd player (if equipped)
•CDDJ—compact disc changer (if equipped)
•VCP—video cassette player
•AUX—auxiliary jack input
Entertainment Systems
57
ProCarManuals.com
Page 59 of 256
Flip-down screens
The screens rotate down to view and up into the housing to store when
not in use. Ensure that the screens are latched into the housing when
being stored.
1. 6.4”(diagonal) color liquid crystal display (LCD) screen.
2. Screen housing.
3. Dimmer switch. Rotate to increase/decrease the brightness of the
screen.
General operation
•When the engine is not running, use the system sparingly otherwise it
will run the battery down.
•Do not leave the videocassette in the VCP overnight or for long
periods of time.
•When the ignition is turned ON, audio is through the headphones as
LOW volume. Press the (+) control to increase volume. To listen
through the vehicle’s speaker system, press the speaker button (
)
on the media control panel.
13
2
Entertainment Systems
59
ProCarManuals.com
Page 60 of 256

Inserting/removing cassette
Inserting cassette
•Open the AutoVision�console cover.
•Insert the videocassette into the cassette compartment.
Inserting a videocassette into the VCP automatically turns the power ON
(the indicator lamp will illuminate) and the tape will begin playback.
If the vehicle is traveling over rough terrain, it may be difficult to insert
the cassette because the machine attempts to hold the cassette firmly to
prevent vibration. If this condition is encountered, either press firmly or
remove the cassette and insert it again.
The system will not allow a cassette to be inserted in the wrong position.
•Once the cassette is completely inserted, close the VCP and console
covers.
Removing cassette
1. Open the console cover, open the VCP cover and press the STOP
button.
2. Press the EJECT button.
Do not insert any foreign substances into the cassette compartment.
After removing the cassette from the VCP, close the door.
When the engine is turned OFF, the cassette is ejected from the
compartment.
To play a video game
1. Connect the video line from your video game device to the YELLOW
jack.
2. Connect the left and right audio cables to the WHITE and RED jacks
respectively.
3. Ensure that the system is in AUX mode. The LCD screen will turn on
and the AUX indicator will illuminate.
Entertainment Systems
60
ProCarManuals.com
Page 62 of 256

•Press the ENCORE control while in playback mode.
The VCP will reverse to the previous five seconds of the selection and
then operate at normal playback mode.
Auxiliary in")
Encore (on remote control)
•Press the ENCORE control while in playback mode.
The VCP will reverse to the previous five seconds of the selection and
then operate at normal playback mode.
Auxiliary input jacks
The auxiliary input jacks on the
AutoVision�control panel accepts
video and audio connectors for all
standard video games (Nintendo�,
PlayStation�, etc.) Other compatible
devices such as DVD players,
camcorders and portable CD players
can also be connected to the
auxiliary jacks.
The auxiliary jack is color-coded for
identification purposes. They are as
follows:
•YELLOW (1)—video input
•WHITE (2)—left channel audio
input
•RED (3)—right channel audio
input
Press the MEDIA control until AUX is illuminated in the control panel.
This will allow you to view the video and listen to the audio from the
auxiliary input.
To listen to another audio source while viewing video from the auxiliary
input, press the MEDIA control until the desired media source is
illuminated.
321
Entertainment Systems
62
ProCarManuals.com
Page 63 of 256
 is seen on the AutoVision�
screen.
When the vehicle ignition is ON and
the system is not in VCP mode, the
AutoV")
Video source selection
The MEDIA control determines
which video (VCP or Auxiliary
input) is seen on the AutoVision�
screen.
When the vehicle ignition is ON and
the system is not in VCP mode, the
AutoVision�selects the Auxiliary
input as the video source. (If there
is not a video source connected to
the Auxiliary input jack, the screen
will be blank.)
AutoPlay feature
Your AutoVision�system is equipped with an AutoPlay Feature. When a
video cassette is inserted into the player, video and audio sources are
automatically switched to VCP. This will override any other selections
currently made.
Indications on the VCP
The operation and status of the VCP can be checked by the indications
appearing on the LED display.
1. ThePower indicatorflashes on
during POWER ON and will blink
when in emergency mode.
2. TheHI-FI indicatorilluminates
when a HI-FI tape is loaded.
3. TheHP1 indicatorilluminates
when the headphone jack 1 is
plugged in.
4. TheHP2 indicatorilluminates
when the headphone jack 2 is
plugged in.
5. TheOperation indicatorsilluminate when the system is powered
ON, a HIFI tape is being played, or headphones are being used.
43
215
Entertainment Systems
63
ProCarManuals.com
. The rear seat passengers can not rai")
 color li")