2002 FORD CROWN VICTORIA brakes
[x] Cancel search: brakesPage 147 of 240
If you cannot move the gearshift lever out of P (Park) with ignition in
the ON position and the brake pedal depressed:
1. Apply the parking brake, turn ignition key to LOCK, then remove the
key.
2. Insert the key and turn it to OFF.Apply the brake pedal and shift
to N (Neutral).
In the OFF position, the automatic transmission shift lever can
be moved from the P (Park) position without the brake pedal
depressed. To avoid unwanted movement, always set the parking
brake.
3. Start the vehicle.
If it is necessary to use the above procedure to move the gearshift lever,
it is possible that a fuse has blown or the vehicle's brakelamps are not
operating properly. Refer toFuses and relaysin theRoadside
emergencieschapter.
Do not drive your vehicle until you verify that the brakelamps
are working.
If your vehicle gets stuck in mud or snow it may be rocked out by
shifting from forward and reverse gears, stopping between shifts, in a
steady pattern. Press lightly on the accelerator in each gear.
Do not rock the vehicle if the engine is not at normal operating
temperature or damage to the transmission may occur.
Do not rock the vehicle for more than a few minutes or damage
to the transmission and tires may occur or the engine may
overheat.
Always set the parking brake fully and make sure the gearshift is
latched in P (Park). Turn the ignition to the LOCK position and
remove the key whenever you leave your vehicle.
If the parking brake is fully released, but the brake warning lamp
remains illuminated, the brakes may not be working properly.
See your dealer or a qualified service technician.
Driving
147
Page 151 of 240

Once through the water, always try the brakes. Wet brakes do not stop the
vehicle as effectively as dry brakes. Drying can be improved by moving
your vehicle slowly while applying light pressure on the brake pedal.
Driving through deep water where the transmission vent tube is
submerged may allow water into the transmission and cause
internal transmission damage. Have the fluid checked and, if
water is found, replace the fluid.
VEHICLE LOADING
Before loading a vehicle, familiarize yourself with the following terms:
²Base Curb Weight:Weight of the vehicle including any standard
equipment, fluids, lubricants, etc. It does not include occupants or
aftermarket equipment.
²Payload:Combined maximum allowable weight of cargo, occupants
and optional equipment. The payload equals the gross vehicle weight
rating minus base curb weight.
²GVW (Gross Vehicle Weight):Base curb weight plus payload
weight. The GVW is not a limit or a specification.
²GVWR (Gross Vehicle Weight Rating):Maximum permissible total
weight of the base vehicle, occupants, optional equipment and cargo.
The GVWR is specific to each vehicle and is listed on the Safety
Certification Label on the driver's door pillar.
²GAWR (Gross Axle Weight Rating):Carrying capacity for each axle
system. The GAWR is specific to each vehicle and is listed on the
Safety Certification Label on the driver's door pillar.
²GCW (Gross Combined Weight):The combined weight of the
towing vehicle (including occupants and cargo) and the loaded trailer.
²GCWR (Gross Combined Weight Rating):Maximum permissible
combined weight of the towing vehicle (including occupants and
cargo) and the loaded trailer.
²Maximum Trailer Weight Rating:Maximum weight of a trailer the
vehicle is permitted to tow. The maximum trailer weight rating is
determined by subtracting the vehicle curb weight for each
engine/transmission combination, any required option weight for trailer
towing and the weight of the driver from the GCWR for the towing
vehicle.
²Maximum Trailer Weight:Maximum weight of a trailer the loaded
vehicle (including occupants and cargo) is permitted to tow. It is
determined by subtracting the weight of the loaded trailer towing
vehicle from the GCWR for the towing vehicle.
Driving
151
Page 152 of 240
²Trailer Weight Range:Specified weight range that the trailer must
fall within that ranges from zero to the maximum trailer weight rating.
Remember to figure in the tongue load of your loaded trailer when
figuring the total weight.
Do not exceed the GVWR or the GAWR specified on the
certification label.
Do not use replacement tires with lower load carrying capacities than the
originals because they may lower the vehicle's GVWR and GAWR
limitations. Replacement tires with a higher limit than the originals do
not increase the GVWR and GAWR limitations.
The Certification Label, found on the inside pillar of the driver's door,
lists several important vehicle weight rating limitations. Before adding
any additional equipment, refer to these limitations. If you are adding
weight to your vehicle, always ensure that the weight of occupants, cargo
and equipment being carried is within the weight limitations that have
been established for your vehicle including both gross vehicle weight and
front and rear gross axle weight rating limits. Under no circumstance
should these limitations be exceeded.
Never exceed the GVWR specified on the certification label as
this could result in serious damage to the vehicle and/or personal
injury.
The weight of your loaded trailer should not exceed 907 kg (2 000 lbs).
The GCW of your vehicle and trailer should not exceed 2 993 kg
(6 600 lbs).
TRAILER TOWING
Your vehicle is classified as a light duty towing vehicle. Do not tow a
trailer until your vehicle has been driven at least 3,200 km (2,000 miles).
Towing a trailer places an additional load on your vehicle's engine,
transmission, brakes, tires and suspension. Inspect these components
carefully after towing.
Your loaded trailer should weigh no more than 907 kg (2,000 lbs.).Do
not exceed the GVWR specified on the certification label.
Towing trailers beyond the maximum recommended gross trailer
weight could result in engine damage, transmission/axle damage,
structural damage, loss of control, and personal injury.
Driving
152
Page 153 of 240
Preparing to tow
Use the proper equipment for towing a trailer, and make sure it is
properly attached to your vehicle. See your dealer or a reliable trailer
dealer if you require assistance.
Hitches
Do not use hitches that clamp onto the vehicle bumper. Use a load
carrying hitch. You must distribute the load in your trailer so that 10% of
the total weight of the trailer is on the tongue.
Safety chains
Always connect the trailer's safety chains to the frame or hook retainers
of the vehicle hitch. To connect the trailer's safety chains, cross the
chains under the trailer tongue and allow slack for turning corners.
If you use a rental trailer, follow the instructions that the rental agency
gives to you.
Do not attach safety chains to the bumper.
Trailer brakes
Electric brakes and manual, automatic or surge-type trailer brakes are
safe if installed properly and adjusted to the manufacturer's
specifications. The trailer brakes must meet local and Federal
regulations.
Do not connect a trailer's hydraulic brake system directly to your
vehicle's brake system. Your vehicle may not have enough
braking power and your chances of having a collision greatly increase.
The braking system of the tow vehicle is rated for operation at the
GVWR not GCWR.
Trailer lamps
Trailer lamps are required on most towed vehicles. Make sure your
trailer lamps conform to local and Federal regulations. See your dealer or
trailer rental agency for proper instructions and equipment for hooking
up trailer lamps.
Driving
153
Page 154 of 240

Driving while you tow
When towing a trailer:
²Ensure that you turn off your speed control. The speed control may
shut off automatically when you are towing on long, steep grades.
²Consult your local motor vehicle speed regulations for towing a trailer.
²To eliminate excessive shifting, use a lower gear. This will also assist
in transmission cooling. (For additional information, refer to the
Driving with a 4±speed automatic transmissionsection in this
chapter.
²Anticipate stops and brake gradually.
²Do not exceed the GCWR rating or transmission damage may occur.
Servicing after towing
If you tow a trailer for long distances, your vehicle will require more
frequent service intervals. Refer to your scheduled maintenance guide for
more information.
Trailer towing tips
²Practice turning, stopping and backing up before starting on a trip to
get the feel of the vehicle trailer combination. When turning, make
wider turns so the trailer wheels will clear curbs and other obstacles.
²Allow more distance for stopping with a trailer attached.
²If you are driving down a long or steep hill, shift to a lower gear. Do
not apply the brakes continuously, as they may overheat and become
less effective.
²The trailer tongue weight should be 10±15% of the loaded trailer
weight.
²After you have traveled 80 km (50 miles), thoroughly check your
hitch, electrical connections and trailer wheel lug nuts.
²To aid in engine/transmission cooling and A/C efficiency during hot
weather while stopped in traffic, place the gearshift lever in P (Park).
²Vehicles with trailers should not be parked on a grade. If you must
park on a grade, place wheel chocks under the trailer's wheels.
Launching or retrieving a boat
Disconnect the wiring to the trailer before backing the trailer
into the water. Reconnect the wiring to the trailer after the
trailer is removed from the water.
Driving
154
Page 161 of 240
Fuse/Relay
LocationFuse Amp
RatingPassenger Compartment Fuse
Panel Description
8 25A Power Train Control Module
(PCM) Power Relay, Coil-on
-Plugs, Radio Noise Capacitor,
Passive Anti-theft System (PATS)
9 Ð Not Used
10 10A Rear Window Defrost
11 Ð Not Used
12 Ð Not Used
13 5A Radio
14 10A Traction Control Switch, Anti-lock
Brakes (ABS), Instrument Cluster
15 15A Speed Control Servo, Main Light
Switch Illumination, Lighting
Control Module (LCM), Clock,
Police Power Relay
16 15A Reversing lamps, Turn Signals,
Shift Lock, DRL Module, EVO
Steering, Electronic Day/Night
Mirror
17 30A Wiper Motor, Wiper Control
Module
18 30A Heater Blower Motor
19 20A Auxiliary Power Point
20 Ð Not Used
21 15A Multifunction Switch, Lighting
Control Module (LCM), PATS
Indicator, Parking Lamps,
Instrument Panel Light
22 15A Speed Control Servo, Hazard
Lights
Roadside Emergencies
161
Page 216 of 240
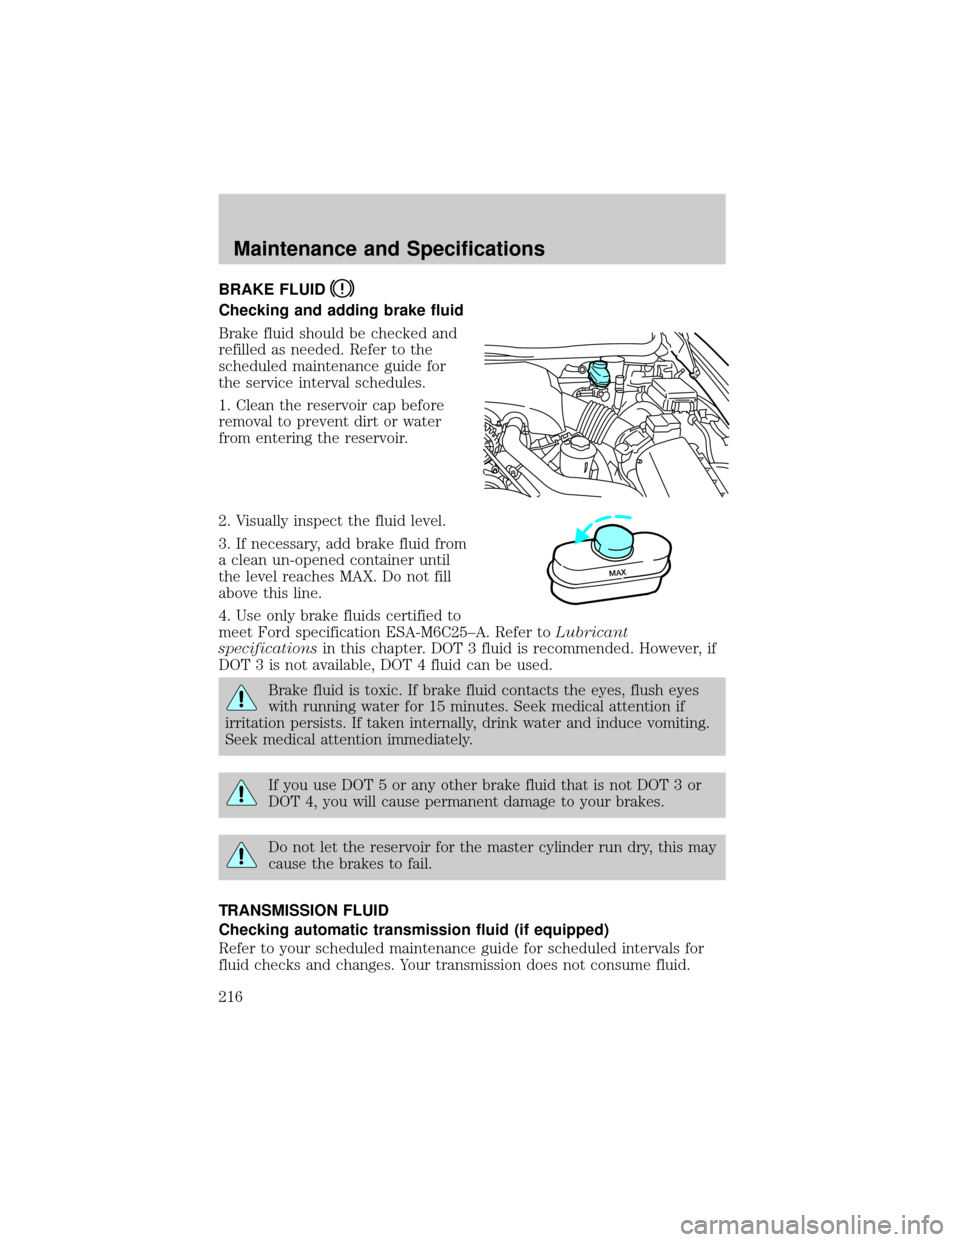
BRAKE FLUID
Checking and adding brake fluid
Brake fluid should be checked and
refilled as needed. Refer to the
scheduled maintenance guide for
the service interval schedules.
1. Clean the reservoir cap before
removal to prevent dirt or water
from entering the reservoir.
2. Visually inspect the fluid level.
3. If necessary, add brake fluid from
a clean un-opened container until
the level reaches MAX. Do not fill
above this line.
4. Use only brake fluids certified to
meet Ford specification ESA-M6C25±A. Refer toLubricant
specificationsin this chapter. DOT 3 fluid is recommended. However, if
DOT 3 is not available, DOT 4 fluid can be used.
Brake fluid is toxic. If brake fluid contacts the eyes, flush eyes
with running water for 15 minutes. Seek medical attention if
irritation persists. If taken internally, drink water and induce vomiting.
Seek medical attention immediately.
If you use DOT 5 or any other brake fluid that is not DOT 3 or
DOT 4, you will cause permanent damage to your brakes.
Do not let the reservoir for the master cylinder run dry, this may
cause the brakes to fail.
TRANSMISSION FLUID
Checking automatic transmission fluid (if equipped)
Refer to your scheduled maintenance guide for scheduled intervals for
fluid checks and changes. Your transmission does not consume fluid.
MAX
Maintenance and Specifications
216
Page 233 of 240

A
ABS (see Brakes) .....................142
Air bag supplemental restraint
system ................................122±123
and child safety seats ............124
description ..............................123
disposal ....................................127
driver air bag ..........................125
indicator light ...................13, 126
operation .................................125
passenger air bag ...................125
Air cleaner filter ...............219, 224
Air conditioning ..........................56
manual heating and air
conditioning system .................54
Air suspension ...........................146
description ..............................146
warning light .............................14
Antifreeze (see Engine
coolant) .....................................199
Anti-lock brake system
(see Brakes) ..............................142
Audio system (see Radio) .........26
Automatic transmission
driving an automatic
overdrive .................................148
fluid, adding ............................216
fluid, checking ........................216
fluid, refill capacities ..............225
fluid, specification ..................228
Auxiliary power point .................74
Axle
lubricant specifications ..226, 228
refill capacities ........................225
traction lok ..............................150B
Battery .......................................197
acid, treating emergencies .....197
charging system warning light 13
jumping a disabled battery ....169
maintenance-free ....................197
replacement, specifications ...224
servicing ..................................197
voltage gauge ............................19
BeltMinder .................................118
Brakes ........................................141
anti-lock ...................................142
anti-lock brake system (ABS)
warning light .....................12, 143
brake warning light ..................12
fluid, checking and adding ....216
fluid, refill capacities ..............225
fluid, specifications .........226, 228
lubricant specifications ..226, 228
pedals (see Power adjustable
foot pedals) ...............................78
shift interlock ..........................146
Break-in period .............................5
Bulbs ............................................65
C
Capacities for refilling fluids ....225
Cassette tape player ...................39
CD changer .................................49
CD-single .....................................33
Certification Label ....................229
Changing a tire .........................164
Child safety restraints ..............127
Index
233