2002 FIAT DUCATO 244 change time
[x] Cancel search: change timePage 14 of 246

CONNECT Nav
13
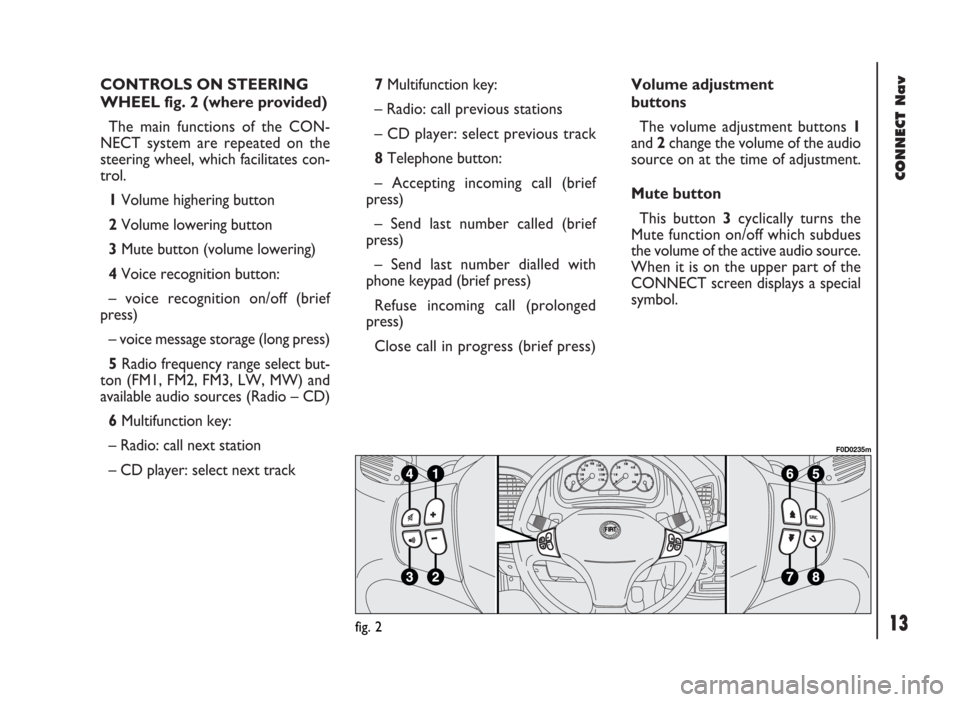
CONTROLS ON STEERING
WHEEL fig. 2 (where provided)
The main functions of the CON-
NECT system are repeated on the
steering wheel, which facilitates con-
trol.
1Volume highering button
2Volume lowering button
3Mute button (volume lowering)
4Voice recognition button:
– voice recognition on/off (brief
press)
– voice message storage (long press)
5Radio frequency range select but-
ton (FM1, FM2, FM3, LW, MW) and
available audio sources (Radio – CD)
6Multifunction key:
– Radio: call next station
– CD player: select next track 7Multifunction key:
– Radio: call previous stations
– CD player: select previous track
8Telephone button:
– Accepting incoming call (brief
press)
– Send last number called (brief
press)
– Send last number dialled with
phone keypad (brief press)
Refuse incoming call (prolonged
press)
Close call in progress (brief press)Volume adjustment
buttons
The volume adjustment buttons 1
and 2change the volume of the audio
source on at the time of adjustment.
Mute button
This button 3cyclically turns the
Mute function on/off which subdues
the volume of the active audio source.
When it is on the upper part of the
CONNECT screen displays a special
symbol.
fig. 2
F0D0235m
Page 21 of 246

CONNECT Nav
20
VIDEO
Selecting and confirming “VIDEO” by
rotating and pressing the knob 22-
fig. 1will allow the following settings:
1)“DAYTIME BRIGHTNESS”: en-
ables to adjust the display brightness
in day mode. To perform the adjust-
ment, select and confirm this option
by rotating and pressing the knob 22-
fig. 1. Rotate the knob 22-fig. 1
clockwise to increase brightness and
counterclockwise to decrease it.
2)“DAYTIME CONTRAST”: to ad-
just contrast in daytime brightness
mode. To perform the adjustment, se-
lect and confirm this option by rotat-
ing and pressing the knob 22-fig. 1.
Rotate the knob 22-fig. 1clockwise
to increase contrast and counter-
clockwise to decrease it. A special message will then be dis-
played, asking the user to insert the
provided SETUP CD or to wait if the
SETUP CD is already inserted. A series
of messages will inform the user about
procedure progress and end: it is es-
sential to not “disturb” the system dur-
ing this operation.
Do not start the engine or disconnect
the battery during the language change
operation.
Should this take place, the first time
you turn the system on, a special mes-
sage will be displayed communicating
that the language change operation shall
be concluded inserting the SETUP CD:
“WARNING: LANGUAGE CHANGE
FAILED. PLEASE REPEAT PROCE-
DURE”.Selecting CONNECT by turning and
pressing the knob 22-fig. 1, the display
will show the following submenu:
– VIDEO
– POWER OFF
– SERIAL DATA INTERFACE
– FLEET MANAGEMENT.
Page 35 of 246

CONNECT Nav
34
The operations to be carried out for
each of the above described conditions
are listed below.
1) To receive stations enabled to
broadcast traffic information:
– choose band FM1, FM2 or FM3;
– turn on the TA function so that the
display shows “TA”;
– start seeking the frequencies.
2) If you wish to receive traffic infor-
mation while listening to a CD, before
inserting the CD, tune to a station en-
abled to broadcast traffic information
(TP) and turn the TA function on. If,
while playing the CD, this station
broadcasts traffic information, CD
playing will be temporarily stopped and
resumed automatically at the end of
the message.
If the CD player is already working
and at the same time you wish to re-
ceive traffic information, turning on theTA function, the radio tunes to the last
station heard in the FM band and the
traffic announcements are transmitted.
If the station selected does not broad-
cast traffic information, an enabled sta-
tion is sought automatically.
To stop traffic announcement, turn
off the TA function while receiving traf-
fic messages.
If the tuned station belongs to the
EON (ENHANCED OTHER NET-
WORK) circuit, the display will show
“EON”
A telephone call has higher priority
than traffic message.
IMPORTANT In certain countries,
radio stations exist which though the
TP function is active (the display shows
“TP”), do not broadcast traffic infor-
mation.If the radio is working in the AM
band, choosing the FM band tunes to
the last station heard. If the chosen
station does not broadcast traffic in-
formation (“TP” not shown on the dis-
play), an automatic search is started
for an enabled station.
If the volume is changed during a traf-
fic bulletin the value is not shown on
the display and the new value is kept
only for the bulletin in progress.
IMPORTANTIf the TA function is
on and the station tuned is not enabled
to provide traffic information or is no
longer able to broadcast this informa-
tion (the display does not show “TP”),
after about 1 minute in which the ra-
dio is in these conditions:
– if a CD is being played another sta-
tion enabled to broadcast traffic in-
formation is sought automatically.
Page 41 of 246

CONNECT Nav
40
“NEWS” FUNCTION
This function shortly enables or not
the PTY code News.
To turn this function on/off, select
and confirm “NEWS” with the knob
22-fig. 1.
Select “ENABLED” or “DISABLED”
rotating and pressing the knob 22-
fig. 1to confirm.
This function is only available on FM
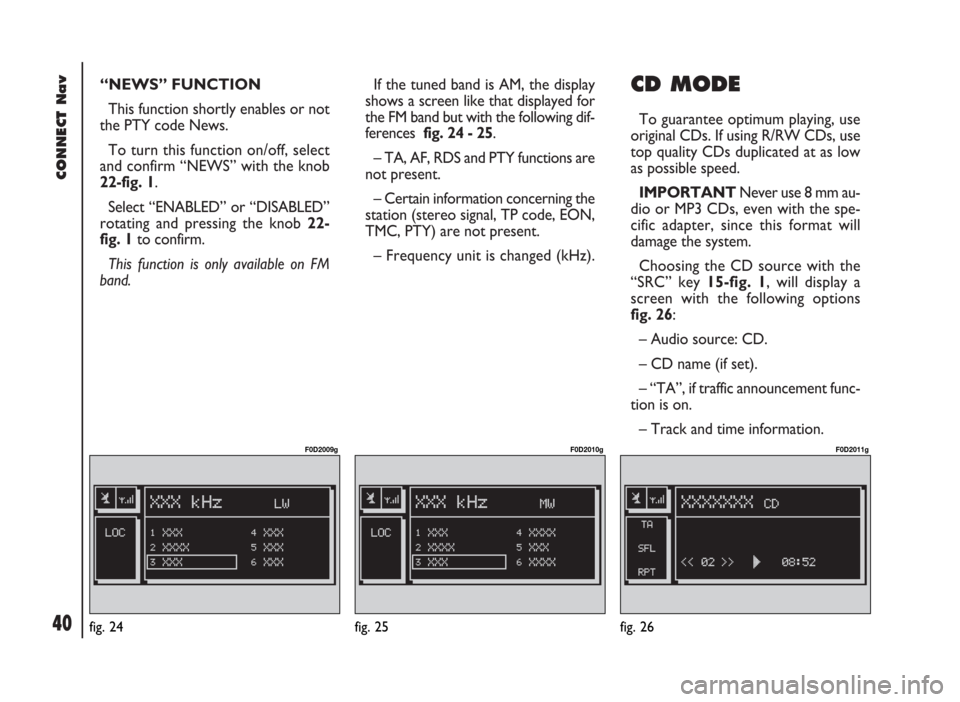
band. If the tuned band is AM, the display
shows a screen like that displayed for
the FM band but with the following dif-
ferences fig. 24 - 25.
– TA, AF, RDS and PTY functions are
not present.
– Certain information concerning the
station (stereo signal, TP code, EON,
TMC, PTY) are not present.
– Frequency unit is changed (kHz). CD MODE
To guarantee optimum playing, use
original CDs. If using R/RW CDs, use
top quality CDs duplicated at as low
as possible speed.
IMPORTANTNever use 8 mm au-
dio or MP3 CDs, even with the spe-
cific adapter, since this format will
damage the system.
Choosing the CD source with the
“SRC” key 15-fig. 1, will display a
screen with the following options
fig. 26:
– Audio source: CD.
– CD name (if set).
– “TA”, if traffic announcement func-
tion is on.
– Track and time information.
fig. 24
F0D2009g
fig. 25
F0D2010g
fig. 26
F0D2011g
Page 58 of 246

57
CONNECT Nav
– current status of MP3 CD source
(play, pause, stop);
– CD time information;
– TA, SFL, RPT… according to the
active function.
“DEFINE PLAYLIST” and
“PLAYLIST” can be activated after
stopping MP3 CD playing (“Stop”).
When playing MP3 CD, buttons
÷
11-fig. 1and ˜12-fig. 1perform
the following functions:
– with short push skips to previ-
ous/next track in playlist (if any), any
change from one folder to another dis-
plays the name of the new folder for
5 seconds;
– with long push skips to previ-
ous/next not-empty folder (directory).
During this operation the name of the
new folder is displayed for five sec-
onds.DEFINE PLAYLIST
The “DEFINE PLAYLIST” function
enables to create a playlist fig. 42.
Select and confirm “DEFINE
PLAYLIST” on the main screen, with
the knob 22-fig. 1.
To define the playlist proceed as fol-
lows:
– select the preferred track scrolling
the available ones rotating the knob
22-fig. 1;
– press the knob to confirm.
Proceed in the same way for all the
tracks you want to add to the playlist.When the max. limit is reached (100
max.), the display will show the fol-
lowing message: “Playlist is full. Elimi-
nate at least one track in order to en-
ter the current track” fig. 43.
Pressing “ESC” 23-fig. 1willdisplay a
screen for storing performed settings.
After this operation you go back to MP3
mode main screen.
fig. 42
F0D2026g
fig. 43
F0D2027g
Page 88 of 246

CONNECT Nav
87
•“PREFERENTIAL”: operator is cho-
sen manually. In this case “OPERA-
TOR” is enabled, and if chosen oper-
ator is no longer able to provide an ad-
equate GSM field, the system auto-
matically looks for another available
operator.
“OK”: always active (“automatic”,
“manual”, “preferential”) after valid op-
erator selection. Select and confirm
this option to accept and store previ-
ous settings.Pin
This function enables to display the
relevant menu with the following op-
tions fig. 97:
CHANGE PIN: enables to enter new
PIN code fig. 98, proceed as follows:
– enter the old PIN code; the user
is asked to enter twice the new PIN
code and then to confirm.
If the user commits a mistake in re-
typing the PIN code, the message
“WARNING: YOU HAVE ENTERED
DIFFERENT PINS! PLEASE REPEAT
PROCEDURE” is displayed for 5 sec-
onds. In this case restart the entire
procedure.“ENABLE PIN REQUEST”: en-
ables/disables PIN check on inserted
SIM card. This setting is saved in SIM
card memory.
•if current setting of “ENABLE PIN
REQUEST” is enabled and the current
setting of “RECALL LAST PIN” is dis-
abled, each time the SIM card is in-
serted the display will show “PIN RE-
QUEST”.
fig. 97
F0D2078g
fig. 98
F0D2079g
Page 92 of 246

91
CONNECT Nav
IMPORTANT NOTES
– Accurate self-adjustment of the nav-
igation system requires approx. 100
km of travel the first time and when
tyres are changed; during this stage the
calculated position could be less accu-
rate.
– Continuous lack of grip at the
wheels (for example skidding on ice),
makes the system temporarily detect
an incorrect position.The navigation system is completely
managed by the telematic system,
therefore the only operations that may
be required are replacement of the
CD-ROM to set the map of another
area or an updated map.
Access to the navigation main func-
tions is gained by short push on
“NAV” 20-fig. 1.
A long push on the “NAV” key 20-
fig. 1turns the NAV MUTE function
on and therefore voice instructions will
be muted. To turn the NAV MUTE
function off, press again the “NAV” key
20-fig. 1at length.Each time you start the engine and se-
lect the navigation function, the display
will show the cautions for using the sys-
tem; the text displayed is as follows:
“The FIAT navigation system guides
you in traffic and helps you reach your
destination. Local traffic regulations
must take precedence over the ma-
noeuvres indicated by the navigation
system. The driver is responsible for
operating the vehicle and observing all
traffic regulations”.
This page will not be displayed as long
as the ignition key is to MAR.
Page 112 of 246

CONNECT Nav
111
TRIP SUBMENU
To display the trip computer sub-
menu, press “TRIP” key 21-fig. 1and
when the above described list of in-
formation is displayed press the knob
22-fig. 1. The following menu will be
displayed fig. 147:
– GENERAL TRIP
– SETUP
– SPEED
To select the required menu, rotate
the knob 22-fig. 1and then press it to
confirm.GENERAL TRIP
Selecting “GENERAL TRIP” with the
knob 22-fig. 1and pressing it to con-
firm will display the following menu:
– TIME TO DESTINATION
– DISTANCE TO DESTINATION
– SPEED LIMIT
– DISTANCE TRAVELED
– AVERAGE SPEED
– TRIP TIME.TRIP: SETUP
This function enables to change the
units of measure relevant to distance,
speed and fuel consumption.
Selecting SETUP with the knob 22-
fig. 1and pressing it to confirm will
display the following menu fig. 148:
– INFO
– DISTANCE UNITS
– OK.
fig. 147
F0D2141g
fig. 148
F0D2177g