2002 CHRYSLER TOWN AND COUNTRY rear door
[x] Cancel search: rear doorPage 576 of 2399
(9) Remove side door lower sill plate. Refer to
Body for the procedure.
(10) Pull back the rearward edge of the B-pillar
trim to access the wire harness connector and discon-
nect connector.
(11) Remove the wire harness assembly from the
vehicle.
INSTALLATION
(1) Position the wire harness assembly in the vehi-
cle.
(2) Connect the wire harness connector located at
the rearward edge of the B-pillar.
(3) Install the side door lower sill plate. Refer to
the Body section for the procedure.
(4) Snap the wire harness retaining pushpins in
the rocker panel.
(5) Slide the wire harness on the lower drive unit
stud.
(6) Install the wire harness retaining clip on the
lower drive unit stud.
(7) Connect the power side door electrical connec-
tor, located just behind the lower drive unit.
(8) Install the lower drive unit cover and retaining
screws.(9) Install the appropriate door trim panel on the
sliding side door. Refer to the Body section for the
procedure.
(10) Connect the negative battery cable.
FLEX DRIVE
DESCRIPTION
Vehicles equipped with a power sliding side door
utilize a flex drive assembly. The flex drive assembly
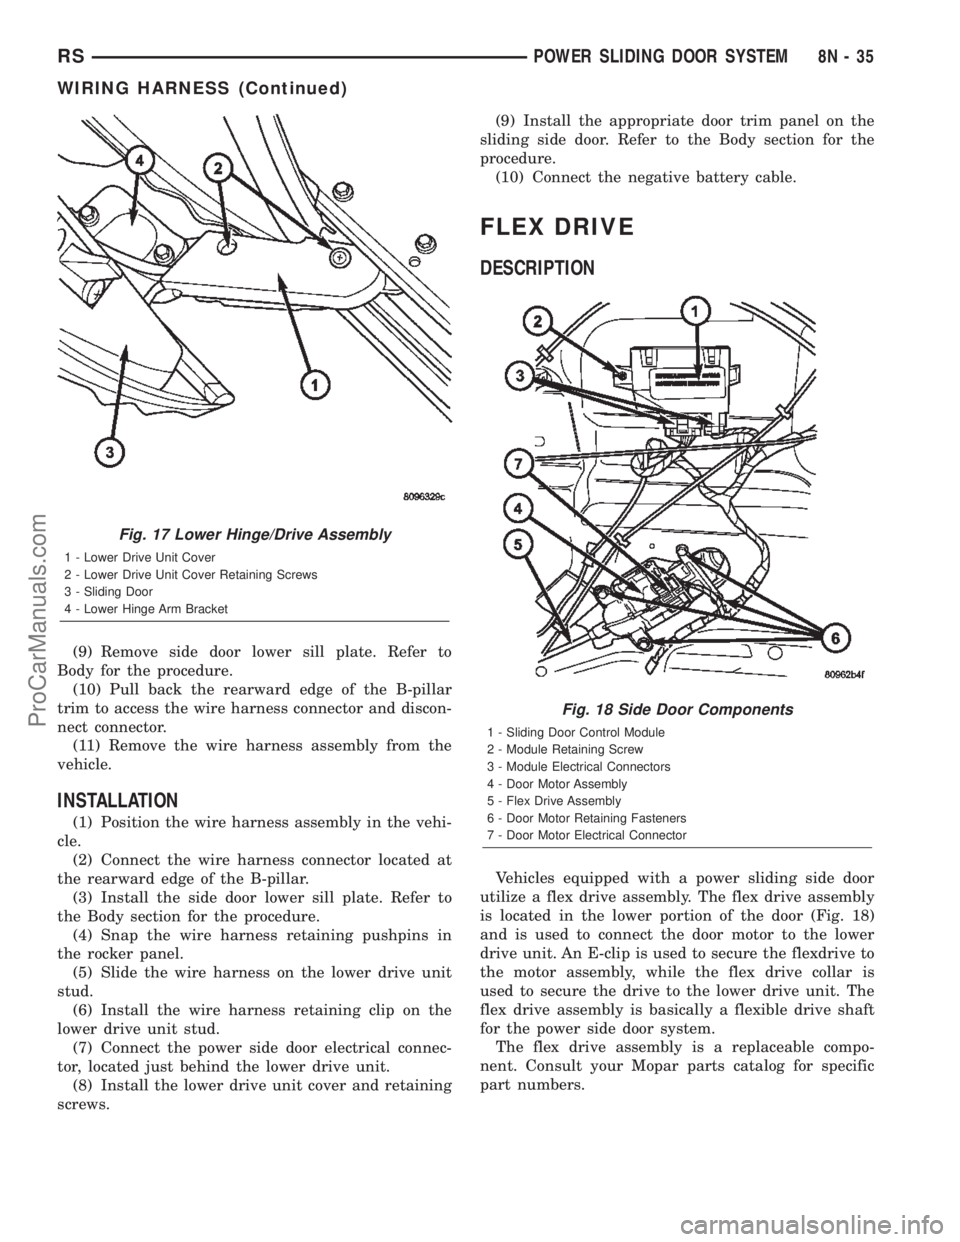
is located in the lower portion of the door (Fig. 18)
and is used to connect the door motor to the lower
drive unit. An E-clip is used to secure the flexdrive to
the motor assembly, while the flex drive collar is
used to secure the drive to the lower drive unit. The
flex drive assembly is basically a flexible drive shaft
for the power side door system.
The flex drive assembly is a replaceable compo-
nent. Consult your Mopar parts catalog for specific
part numbers.
Fig. 17 Lower Hinge/Drive Assembly
1 - Lower Drive Unit Cover
2 - Lower Drive Unit Cover Retaining Screws
3 - Sliding Door
4 - Lower Hinge Arm Bracket
Fig. 18 Side Door Components
1 - Sliding Door Control Module
2 - Module Retaining Screw
3 - Module Electrical Connectors
4 - Door Motor Assembly
5 - Flex Drive Assembly
6 - Door Motor Retaining Fasteners
7 - Door Motor Electrical Connector
RSPOWER SLIDING DOOR SYSTEM8N-35
WIRING HARNESS (Continued)
ProCarManuals.com
Page 581 of 2399

REMOTE KEYLESS ENTRY SYSTEM
The key fob transmitter (Fig. 1) has six buttons.
Three of them, LOCK, UNLOCK, and PANIC, are
used to actuate parts of, and program the Remote
Keyless Entry (RKE) system via the customer pro-
gramming mode. It is not necessary to use the
PANIC button with the DRB IIItscan tool mode of
programming.
OPERATION
POWER DOOR LOCK SYSTEM
The Body Control Module (BCM) locks or unlocks
the doors when an actuation input signal from a door
lock switch or Remote Keyless Entry Module (RKE)
is received. The BCM turns on the output drivers
and provides a voltage level to the door lock motor
for a specified time. The BCM locks the doors auto-
matically when the vehicle is driven beyond the
speed of 25.7 Km/h (16 mph). The rolling door lock
feature can be disabled if desired. All doors and lift-
gate can be locked or unlocked using mechanical but-
ton or key cylinder methods (Liftgate cylinder does
not lock/unlock vehicle. It only unlocks the liftgate).
AUTOMATIC DOOR LOCKS
The BCM is equipped with a disable feature to
stop the speed sensitive automatic door locks from
functioning. The DISABLE feature can be switched
ON or OFF as desired. When the system is DIS-
ABLED the door locks will operate normally, but will
not lock automatically when the vehicle is rolling.
When the door locks are ENABLED the door locks
will automatically lock when the vehicle is moving at
about 25.7 Km/h (16 mph). All doors are closed, the
PCM has set the ªOK TO LOCKº bit, and doors were
not previously locked.
DOOR LOCK INHIBIT
If the key is in the ignition, in any position, and
either front door is ajar, all power door lock function-
ing shall be disabled when activating either door lock
switch. Also, if the Vehicle Theft Alarm (VTA) is
armed, the door lock switch ªUNLOCKº feature will
be disabled until the vehicle is disarmed. Pressing
the RKE lock/unlock button under these conditions
will result in a normal lock/unlock activation.
After the key is removed from the Ignition Switch,
or the doors are closed, the power door locks will
operate normally.
CENTRAL LOCKING
If equipped with Vehicle Theft Security System
(VTSS), all the doors can be locked with the key by
using any of the door lock cylinders. Turning the key
to the LOCK position will lock all the doors.
When either of the front key cylinder switches is
detected active, the BCM will activate the illumi-
nated entry feature and the individual front doors
will become mechanically unlocked. To central unlock
all doors, a second transition from OFF to UNLOCK
has to occur within 2 seconds of the first complete
UNLOCK cycle.
To central unlock the driver door, turn the key to
the rear of the vehicle. This indicates an unlock sig-
nal to the BCM. For the passenger door, turn the key
toward the front of the vehicle. When either key cyl-
inder switch is detected as active, the BCM will acti-
vate the illuminated entry feature. The individual
doors will become mechanically unlocked.
To central lock the vehicle, the driver door lock cyl-
inder is turned toward the front of the vehicle. The
passenger door lock cylinder is turned toward the
rear of the vehicle. When a lock input from either
key cylinder is detected as active, the BCM will can-
cel the illuminated entry feature and perform the
central lock operation.
Fig. 1 KEY FOB
1 - LEFT SLIDING DOOR BUTTON
2 - RIGHT SLIDING DOOR BUTTON
3 - LIFTGATE SWITCH
8N - 40 POWER LOCKSRS
POWER LOCKS (Continued)
ProCarManuals.com
Page 582 of 2399

DOOR LOCK CIRCUIT PROTECTION
The BCM controls the door lock output drivers. If
the door lock switch is actuated continuously for
more than one second the BCM will turn the output
driver OFF (the BCM would consider the switch
stuck). The lock motors are protected with Positive
Temperature Coefficient (PTC) device that prevents
motor burn out.
REMOTE KEYLESS ENTRY SYSTEM
²LOCK: Pressing the LOCK button locks all
doors and sounds horn (chirp) and arm the Vehicle
Theft Security System, if equipped. The chirp verifies
that the RKE receiver has sent a message to the
BCM for door lock operation. If a door has not been
closed before pressing the LOCK button, the vehicle
may not be secured and the VTSS will not arm until
the door is closed.
²UNLOCK: Pressing the UNLOCK button once
will unlock the driver's side doors and activate the
illuminated entry system and disarm Vehicle Theft
Security System, if equipped. Pressing the UNLOCK
button twice within five seconds will unlock all doors
and activate the illuminated entry system.
²LEFT SLIDING DOOR: Pressing the LEFT
SLIDING DOOR BUTTON opens/closes the left
power sliding door remotely.
²RIGHT SLIDING DOOR: Pressing the RIGHT
SLIDING DOOR BUTTON opens/closes the right
power sliding door remotely.
²LIFTGATE:
Pressing the LIFTGATE BUTTON
opens/closes the liftgate remotely, if equipped.If not
equipped with power liftgate, pressing the liftgate but-
ton will allow a one time 30 second access to liftgate.
²PANIC: Pressing the PANIC button sounds the
horns at half second intervals, flashes the exterior
lamps, and turns ON the interior lamps. The panic
alarm will remain on for three minutes, or until the
PANIC button is actuated again or the ignition
switch is turned to the RUN position.
The Remote Keyless Entry Module is capable of
retaining the transmitter Vehicle Access Code(s)
(VAC) in its memory even after vehicle power has
been interrupted.
NOTE: Additional features available to the customer
are described in the Vehicle Owners Manual.
The RKE system activates the optional memory
seat, mirror system and adjustable pedals, if
equipped. Two primary key fob transmitters can be
programmed to actuate memory seat and mirror set-
ting 1 or 2. Two additional key fob transmitters can be
added, but they will not be able to operate the mem-
ory seat and mirror system (Refer to 8 - ELECTRI-
CAL/POWER SEATS - OPERATION) and (Refer to 8 -
ELECTRICAL/POWER MIRRORS - OPERATION).
DOOR CYLINDER LOCK
SWITCH
DESCRIPTION
The Door Cylinder Lock Switch is used to:
²Unlock/Lock all the doors via the Central Lock-
ing feature.
²Arm/Disarm the Vehicle Theft Security System.
²Trigger the Illuminated Entry feature.
The door cylinder lock switch is mounted to the
rear of the driver and passenger door lock cylinders.
When installed on the rear of the cylinder, there is a
tab on the lock cylinder that aligns with the switch
to prevent it from turning. An anti-rotating device.
The door cylinder lock switch is a one time use
switch. Once it is removed from the rear of the door
lock cylinder, it may not be reinstalled and a new
switch must be used.
OPERATION
When the Door Cylinder Lock Switch is turned
either way using the door key cylinder, the BCM
reads a direct message signal from the switch, via
the Programmable Communication Interface (PCI)
bus.
If turning the key cylinder once, toward the front
of the vehicle (for either driver or passenger doors),
this will:
(1) Mechanically unlock the door lock.
(2) Disarm the Vehicle Theft Security System (if
equipped).
(3) Turn on the Illuminated Entry (if equipped) for
approximately 30 seconds.
If the key cylinder is turned to the unlock position
(toward the front of vehicle) twice within two sec-
onds, all the doors and liftgate will unlock (if
equipped with the central locking feature).
To lock the vehicle using the door cylinder lock
switch, turn the key cylinder toward the rear of the
vehicle (either passenger or driver doors) once. This
will lock the door that you are using the key on. If
equipped with the central locking feature, this will
lock all the other doors and liftgate. Furthermore,
this will arm the vehicle theft security system and
turn off the illuminated entry.
DIAGNOSIS AND TESTING - DOOR CYLINDER
LOCK SWITCH
(1) Visually inspect the switch for proper installa-
tion. Make sure it is seated on the rear of the key
cylinder, with the tab of the door key cylinder prop-
erly aligned with the slot on the door cylinder lock
switch.
(2) Disconnect the switch at the harness connector
and check the resistance in each switch position.
RSPOWER LOCKS8N-41
POWER LOCKS (Continued)
ProCarManuals.com
Page 583 of 2399
CAUTION: Do not disconnect the switch from the
rear of the door key cylinder. This switch is a one
time use switch. Once it is removed from the rear of
the switch, it is not reusable and must be replaced.
Test the switch at the harness connector.
DOOR CYLINDER LOCK SWITCH RESISTANCE
SWITCH POSITION RESISTANCE VALUE
COUNTERCLOCKWISE 5.4K OHMS
NEUTRAL 18.4K OHMS
CLOCKWISE 2K OHMS
REMOVAL
(1) Disconnect and isolate the battery negative
cable.
(2) Remove the door trim panel of the effected door
cylinder lock switch (Refer to 23 - BODY/DOOR -
FRONT/TRIM PANEL - REMOVAL).
(3) Close the door window.
(4) Disconnect the door cylinder lock switch wire
connector from the door harness, and wiring clip
from the impact beam.
(5) Remove the outer door handle from the door.
(6) Remove the switch from the key cylinder in the
door handle and remove from vehicle.
INSTALLATION
(1) Install the switch on the key cylinder in the
door handle.
(2) Install the door handle.
(3) Connect the door cylinder lock switch wire con-
nector to the door harness, and the wiring clip to the
impact beam.
(4) Install the door trim panel of the affected door
cylinder lock switch (Refer to 23 - BODY/DOOR -
FRONT/TRIM PANEL - INSTALLATION).
(5) Connect the battery negative cable.
(6) Verify system operation.
DOOR LOCK MOTOR
DIAGNOSIS AND TESTING - DOOR LOCK
MOTOR
Verify battery condition before testing door lock
motor(s) (Refer to 8 - ELECTRICAL/BATTERY SYS-
TEM/BATTERY - DIAGNOSIS AND TESTING).
To determine which motor is faulty, check each
individual door for electrical lock and unlock or dis-
connect the motor connectors one at a time, while
operating the door lock switch. In the event that
none of the motors work, the problem may be caused
by a shorted motor or a bad switch. Disconnecting
the defective motor will allow the others to work.To test an individual door lock motor, disconnect
the electrical connector from the motor. To lock the
door, connect a 12 volt power source to the positive
pin of the lock motor and a ground wire to the other
pin. Refer to the appropriate wiring information. The
wiring information includes wiring diagrams, proper
wire and connector repair procedures, further details
on wire harness routing and retention, as well as
pin-out and location views for the various wire har-
ness connectors, splices and grounds. To unlock the
door reverse the wire connections at the motor pin
terminals. If these results are NOT obtained, replace
the motor.
DOOR LOCK SWITCH
DIAGNOSIS AND TESTING - DOOR LOCK
SWITCH
(1) Remove door trim panel. Refer to Body, Door -
Front, Trim Panel, Removal and Installation.
(2) Disconnect wire connector from back of door
lock switch.
(3) Depress switch to LOCK position.
(4) Using an ohmmeter, test switch resistance
between Pins 2 and 3. Refer to the DOOR LOCK
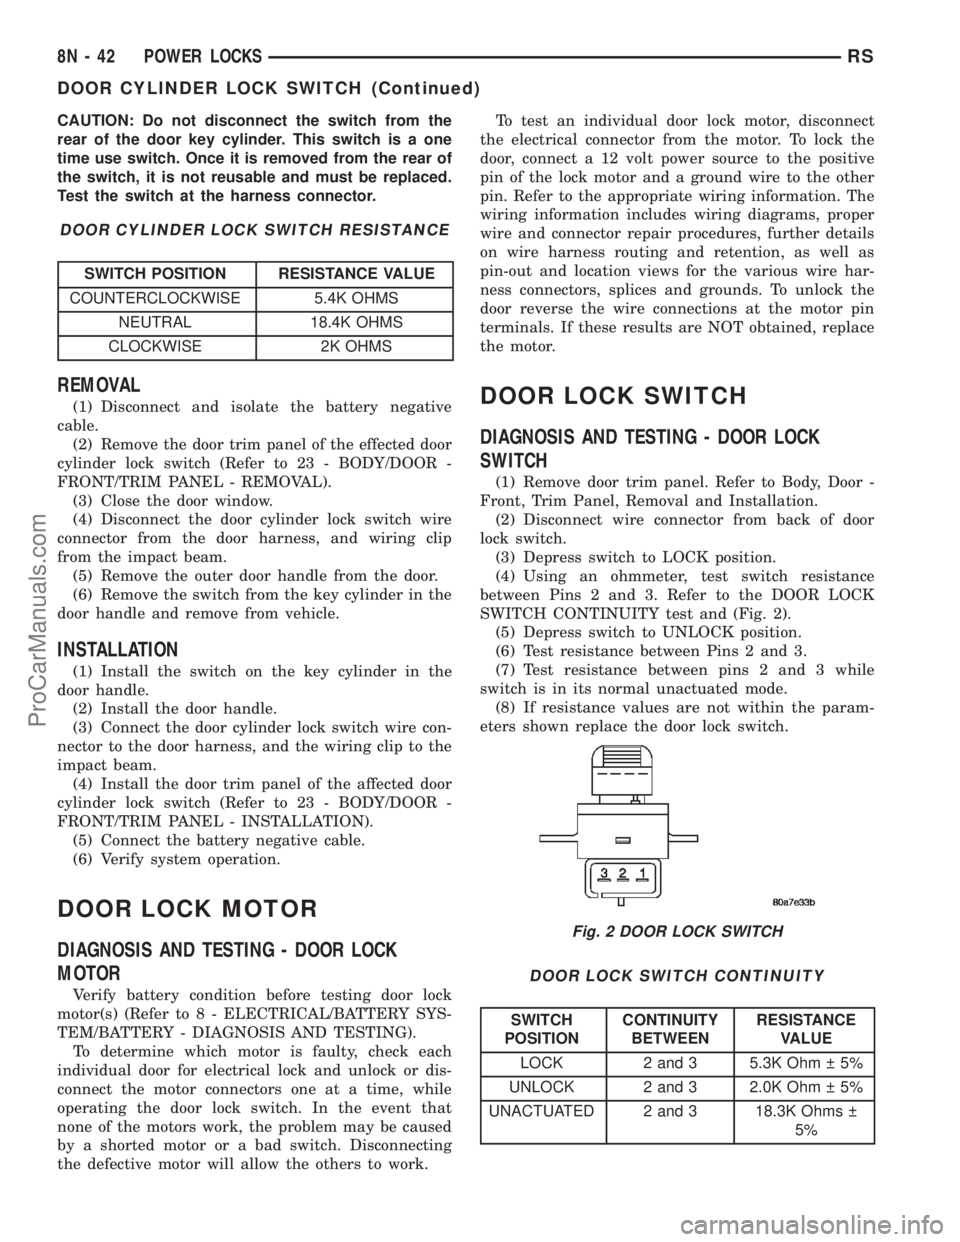
SWITCH CONTINUITY test and (Fig. 2).
(5) Depress switch to UNLOCK position.
(6) Test resistance between Pins 2 and 3.
(7) Test resistance between pins 2 and 3 while
switch is in its normal unactuated mode.
(8) If resistance values are not within the param-
eters shown replace the door lock switch.
DOOR LOCK SWITCH CONTINUITY
SWITCH
POSITIONCONTINUITY
BETWEENRESISTANCE
VALUE
LOCK 2 and 3 5.3K Ohm 5%
UNLOCK 2 and 3 2.0K Ohm 5%
UNACTUATED 2 and 3 18.3K Ohms
5%
Fig. 2 DOOR LOCK SWITCH
8N - 42 POWER LOCKSRS
DOOR CYLINDER LOCK SWITCH (Continued)
ProCarManuals.com
Page 605 of 2399
POWER WINDOWS
TABLE OF CONTENTS
page page
POWER WINDOWS
DESCRIPTION.........................64
OPERATION...........................64
DIAGNOSIS AND TESTING - POWER
WINDOWS...........................64
VENT WINDOW MOTOR
DIAGNOSIS AND TESTING - VENT WINDOW
MOTOR .............................65
REMOVAL.............................65INSTALLATION.........................65
WINDOW MOTOR
REMOVAL.............................66
WINDOW SWITCH
DIAGNOSIS AND TESTING - WINDOW
SWITCH............................66
REMOVAL.............................67
INSTALLATION.........................67
POWER WINDOWS
DESCRIPTION
The Power Window System is activated through
switches mounted on the driver and passenger door
panels.
OPERATION
Front door window lift motors use permanent type
magnets. The B+ and ground applied at the motor
terminal pins will cause the motor to rotate in one
direction. Reversing current through the motor ter-
minals will cause the motor to rotate in the opposite
direction.
The power window motors ground through the
master switch in the driver door by a black wire
attached to the left cowl panel. Refer to the appropri-
ate wiring information. The wiring information
includes wiring diagrams, proper wire and connector
repair procedures, details of wire harness routing
and retention, connector pin-out information and
location views for the various wire harness connec-
tors, splices and grounds.
The power rear vent windows, if equipped, are
operated by switches mounted in the driver door
switch bezel. A separate switch is used for each win-
dow. Permanent magnet type motors connected to a
crank system are used to open and close the rear
vent windows. A battery positive and negative con-
nection to either of the two motor terminals will
cause the motor to rotate in one direction. Reversing
current through these same two connections will
cause the motor to rotate in the opposite direction.
Refer to the appropriate wiring information. The wir-
ing information includes wiring diagrams, proper
wire and connector repair procedures, details of wire
harness routing and retention, connector pin-outinformation and location views for the various wire
harness connectors, splices and grounds.
DIAGNOSIS AND TESTING - POWER
WINDOWS
POWER WINDOW MOTOR TEST
If the power window motor is receiving proper cur-
rent and ground and does not operate, proceed with
motor test. Refer to the appropriate wiring informa-
tion. The wiring information includes wiring dia-
grams, proper wire and connector repair procedures,
details of wire harness routing and retention, connec-
tor pin-out information and location views for the
various wire harness connectors, splices and grounds.
(1) Remove front door trim panel and sound pad as
necessary to gain access to power window motor wire
connector, (Refer to 23 - BODY/DOOR - FRONT/
TRIM PANEL - REMOVAL).
(2) Disconnect power window motor wire connector
from door harness.
(3) Using two jumper wires, connect one to a bat-
tery (+) source and the other to a good ground (-).
(4) Connect the Negative (-) jumper probe to one of
the motor connector terminals.
(5) Momentarily touch the Positive (+) jumper
probe to the other motor connector terminal.
When positive probe is connected the motor should
rotate in one direction to either move window up or
down. If window is all the way up or down the motor
will grunt and the inner door panel will flex when
actuated in that one direction.
(6) Reverse jumper probes at the motor connector
terminals and window should now move in opposite
direction. If window does not move or grunt, replace
the motor.
8N - 64 POWER WINDOWSRS
ProCarManuals.com
Page 610 of 2399
RESTRAINTS
TABLE OF CONTENTS
page page
RESTRAINTS
DESCRIPTION..........................2
OPERATION............................2
WARNING.............................2
DIAGNOSIS AND TESTING - AIRBAG SYSTEM . 2
CLOCK SPRING
DESCRIPTION..........................3
OPERATION............................3
STANDARD PROCEDURE - CLOCK SPRING
CENTERING..........................3
REMOVAL.............................3
INSTALLATION..........................3
DRIVER AIRBAG
DESCRIPTION..........................3
OPERATION............................3
STANDARD PROCEDURE - CLEAN UP.......4
REMOVAL.............................4
INSTALLATION..........................4
DRIVER AIRBAG TRIM COVER
REMOVAL.............................4
INSTALLATION..........................5
OCCUPANT RESTRAINT CONTROLLER
DESCRIPTION..........................5
OPERATION............................5
REMOVAL.............................5
INSTALLATION..........................5
PASSENGER AIRBAG
DESCRIPTION..........................6
OPERATION............................6
STANDARD PROCEDURE - CLEAN UP.......6
REMOVAL.............................6
INSTALLATION..........................6
SEAT AIRBAG
DESCRIPTION..........................7
OPERATION............................7
SEAT BELT OUTBOARD FRONT
REMOVAL.............................7
INSTALLATION..........................7
SEAT BELT FIRST ROW ANCHOR BRACKET -
LW B
REMOVAL.............................8
INSTALLATION..........................8
SEAT BELT LEFT FIRST ROW OUTBOARD -
SWB THREE DOOR
REMOVAL.............................8
INSTALLATION..........................8SEAT BELT FIRST ROW OUTBOARD - SWB
FOUR DOOR
REMOVAL.............................9
INSTALLATION..........................9
SEAT BELT FIRST ROW OUTBOARD - LWB
FOUR DOOR
REMOVAL.............................10
INSTALLATION.........................10
SEAT BELT SECOND RIGHT ROW OUTBOARD
-LWB
REMOVAL.............................10
INSTALLATION.........................10
SEAT BELT SECOND RIGHT ROW OUTBOARD
- LBW WITH REAR HVAC
REMOVAL.............................11
INSTALLATION.........................11
SEAT BELT SECOND ROW OUTBOARD - SWB
REMOVAL.............................12
INSTALLATION.........................12
SEAT BELT BUCKLE - FRONT INBOARD
REMOVAL.............................13
INSTALLATION.........................13
SEAT BELT BUCKLE FIRST ROW QUAD
BUCKET
REMOVAL.............................13
INSTALLATION.........................13
SEAT BELT BUCKLE FIRST ROW - TWO
PASSENGER BENCH
REMOVAL.............................14
INSTALLATION.........................14
SEAT BELT BUCKLE SECOND ROW - THREE
PASSENGER BENCH
REMOVAL.............................14
INSTALLATION.........................14
SEAT BELT TENSIONER
DESCRIPTION.........................14
OPERATION...........................14
SHOULDER BELT HEIGHT ADJUSTER
REMOVAL.............................15
INSTALLATION.........................15
SHOULDER BELT HEIGHT ADJUSTER KNOB
REMOVAL.............................15
INSTALLATION.........................15
SIDE IMPACT AIRBAG CONTROL MODULE
DESCRIPTION.........................16
OPERATION...........................16
REMOVAL.............................16
INSTALLATION.........................16
RSRESTRAINTS8O-1
ProCarManuals.com
Page 615 of 2399
PASSENGER AIRBAG
DESCRIPTION
WARNING: NEVER DISASSEMBLE THE PASSEN-
GER AIRBAG, THE PASSENGER AIRBAG HAS NO
SERVICEABLE PARTS.
The Passenger Airbag is located beneath the
instrument panel and pad assembly. The airbag is
mounted to the back side of the instrument panel
reinforcement.
The instrument panel top pad is the most visible
part of the passenger airbag system. Located under
the instrument panel top pad are the airbag door, the
passenger airbag cushion and the airbag cushion
supporting components.
The passenger airbag includes a magnesium hous-
ing within which the cushion and inflator are
mounted and sealed.
Following a passenger airbag deployment, the pas-
senger airbag and the instrument panel must be
replaced. The passenger airbag cannot be repaired,
and must be replaced if deployed or damaged in any
way.
OPERATION
The passenger airbag is equipped with two infla-
tors, each with three levels of pressure output. The
inflators seal the hole in the airbag cushion so it can
discharge the gas it produces directly into the cush-
ion when supplied with the proper electrical signal.
Following an airbag deployment, the airbag cushion
quickly deflates by venting this gas through the
cushion material towards the instrument panel.
The passenger airbag is secured with screws to the
instrument panel beneath the instrument panel top
pad and above the glove box opening. The instrument
panel top pad above the glove box opening conceals
the airbag door and a predetermined hinge line
beneath its decorative cover. Upon airbag deploy-
ment, the top pad will bend at the hinge line and the
door will fold back out of the way onto the top of the
instrument panel.
When the front airbag system is deployed, the fol-
lowingMUSTbe replaced:
²Complete Steering Column Assembly.
²Lower Steering Column Coupler.
²Steering Wheel.
²Clock Spring.
²Driver Airbag.
²Passenger Airbag.
²Upper Instrument Panel with Pad.
CARE OF UNDEPLOYED AIRBAGS
Airbags must be stored in their original special
container until used for service. At no time should a
source of electricity be permitted near the inflator on
the back of an airbag. When carrying or handling an
undeployed airbag, the trim side of the airbag should
be pointing away from the body to minimize possibil-
ity of injury if accidental deployment occurs. Do not
place undeployed airbag face down on a solid surface,
the airbag will propel into the air if accidental
deployment occurs.
STANDARD PROCEDURE - CLEAN UP
Roll or fold the passenger airbag towards the
instrument panel surface and close the door over the
folded bag. Then tape the door shut.
Use a vacuum cleaner to remove any residual pow-
der from the vehicle interior. Work from the outside
in to avoid kneeling or sitting in a contaminated
area. Vacuum the heater and A/C outlets as well. If
HVAC was in RECIRC mode at time of airbag
deployment, operate HVAC blower on low speed/heat
and vacuum powder residue expelled from the heat
outlets. Multiple vacuum cleaning may be necessary
to decontaminate the interior of the vehicle.
REMOVAL
DEPLOYED AIRBAG
(1) Clean powder residue from interior of vehicle.
Refer to Electrical, Restraints, Passenger Airbag,
Standard Procedure - Passenger Airbag Clean Up.
(2) Remove instrument panel. Refer to Body,
Instrument Panel, Removal.
(3) Remove all reusable components from the
upper instrument panel and transfer to the new
instrument panel.
UNDEPLOYED AIRBAG
(1) Remove instrument panel. Refer to Body,
Instrument Panel, Removal.
(2) De-trim the instrument panel enough to gain
access to the passenger airbag fasteners.
(3) Disconnect yellow wire connector from passen-
ger airbag.
(4) Remove three bolts to the passenger airbag.
(5) Remove airbag from instrument panel through
rear of instrument panel.
INSTALLATION
DEPLOYED AIRBAG
Transfer all reusable components to the new
instrument panel.
(1) Install new Passenger Airbag into instrument
panel.
8O - 6 RESTRAINTSRS
ProCarManuals.com
Page 633 of 2399

Passive disarming occurs upon normal vehicle
entry by unlocking either door with the ignition key/
remote transmitter. This disarming will also halt the
alarm once it has been activated.
A tamper alert exists to notify the driver that the
VTSS had been activated. This alert consists of 3
horn pulses when the vehicle is disarmed.
NOTE: The VTSS will not arm by pushing down the
door lock mechanism. This will manually override
the system.
For Door Cylinder Lock Switch Removal and
Installation, refer to Electrical, Power Locks, Door
Cylinder Lock Switch.
If the VTSS is triggered, the horn will pulse, head-
lamps/marker lamps will flash, and the VTSS warn-
ing lamp will flash. If BCM determines the threat to
be false and the VTSS is not triggered again, the sys-
tem will shut down and rearm itself after three min-
utes. If a trigger is still active, the alarm will
continue for an additional 15 minutes without the
horn. The VTSS monitoring portion of the system is
split into two sections. The engine compartment sec-
tion and the passenger compartment section. If a
malfunction occurs in the engine compartment sec-
tion, the passenger compartment section would still
arm and function normally.
NOTE: If hood is not secure during the arming
sequence, the lamp will stay lit and not flash. The
system will arm with hood not secured (hood ajar
switch closed) and the liftgate open (liftgate ajar
switch closed). System will not arm if passenger
compartment is not secure (all switches closed)
ARMING THE VTSS - METHOD A
(1) With the key removed from the ignition lock
and any door open (excluding liftgate), actuate one of
the following:
²Power door lock button to LOCK,
²Key fob LOCK button
²Door lock key cylinder to locked position.
(2) Close all opened doors. Liftgate can remain
open.
(3) After the last door is closed, an arming time-
out period of sixteen seconds will start, then the
VTSS will become armed.
ARMING THE VTSS - METHOD B
Actuating the key fob transmitter LOCK button,
key locking the front doors with the doors closed and
the ignition locked will begin the arming time-out
period. If method A, 16 second time-out sequence was
in process when method B was actuated, the 16 sec-ond time-out will restart from the time of the second
actuation.
If the security lamp does not illuminate at all upon
final door closure, it indicates that the system is not
arming.
The current VTSS status armed or disarmed shall
be maintained in memory to prevent battery discon-
nects from disarming the system.
TRIGGERING THE VTSS
After the VTSS is armed, the following actions will
trigger the alarm:
²Opening any door (excluding liftgate).
²Opening the hood
²Turning the ignition to the ACC, or UNLOCK
position.
NOTE: When the VTSS is ARMED, the interior
power door lock switch ªUNLOCKº will be disabled
until the vehicle is disarmed.
CAUTION: The VTSS indicator LED will trigger and
engine will continue to run if the vehicle is
equipped with SKIS and the proper key is used to
start the vehicle. This condition will occur if the
VTSS has been triggered. If valid key is used, VTSS
will disarm
SENTRY KEY IMMOBILIZER SYSTEM
The SKIS includes keys from the factory which are
pre-programmed. Each SKIM will recognize a maxi-
mum of eight Sentry Keys. If the customer would
like to own additional keys other than those provided
with the vehicle, they can be purchased from any
authorized dealer. These keys must be programmed
to the SKIM on the vehicle in order for the system to
recognize them as valid keys. This can be done by
the dealer with a DRB IIItscan tool or by a cus-
tomer if this feature is available in their market and
they have two (2) valid keys already available to
them. Refer to the Service Procedures portion of this
system for additional details. The SKIS performs a
self-test each time the ignition switch is turned to
the ON position and will store Diagnostic Trouble
Codes (DTC's) if a system malfunction is detected.
The SKIS can be diagnosed and any stored DTC's
can be retrieved using a DRB IIItscan tool as
described in the appropriate Body Diagnostic Proce-
dures manual.
8Q - 2 VEHICLE THEFT SECURITYRS
VEHICLE THEFT SECURITY (Continued)
ProCarManuals.com