Page 6 of 432
iv
Table of Contents (cont'd)
Maintenance Schedule Service and Appearance Care
Section
7
Section
6
Scheduled Maintenance
Owner Checks and Services
Periodic Maintenance InspectionsRecommended Fluids and Lubricants
Maintenance Records Tires and Wheels
Appearance Care
Electrical System/Fuses and Circuit Breakers
Capacities and Specifications
Normal Maintenance Replacement Parts Fuel
Checking Fluids and Lubricants
Engine Air Cleaner/Filter
Brakes
Bulb Replacement
Windshield Wiper Blade Replacement
Page 161 of 432

2-92
The DIC does not replace the need to maintain your
vehicle as recommended in the Maintenance Schedule
in this manual. Also, the oil change reminder will not
detect dusty conditions or engine malfunctions that may
affect the oil. If you drive in dusty areas, change your
oil after every 3,000 miles (5 000 km) or three months,
whichever occurs first, unless the DIC instructs you to
do so sooner. Also, the oil change reminder does not
measure how much oil you have in your engine. So, be
sure to check your oil level often. See ªEngine Oilº in
the Index.
Personalization Button
You can program certain features to a preferred setting
for up to two people. Press the personalization button to
scroll through the following personalization features. All
of the personalization options may not be available on
your vehicle. Only the options available will be
displayed on your DIC.
�ALARM WARNING TYPE
�AUTOMATIC LOCKING
�AUTOMATIC UNLOCKING�SEAT POSITION RECALL (If Equipped)
�PERIMETER LIGHTING
�REMOTE LOCK FEEDBACK
�REMOTE UNLOCK FEEDBACK
�HEADLAMPS ON AT EXIT
�TILT MIRROR IN REVERSE (If Equipped)
�EASY EXIT SEAT (If Equipped)
�DISPLAY UNITS (E/M)
�DISPLAY LANGUAGE
The driver's preferences are recalled by pressing the
unlock button on the remote keyless entry transmitter
or by pressing the appropriate memory button 1 or 2
located on the driver's door.
Page 262 of 432

4-30
If the water isn't too deep, then drive through it slowly.
At fast speeds, water splashes on your ignition system
and your vehicle can stall. Stalling can also occur if you
get your tailpipe under water. And, as long as your
tailpipe is under water, you'll never be able to start
your engine. When you go through water, remember
that when your brakes get wet, it may take you longer
to stop.
CAUTION:
Driving through rushing water can be dangerous.
Deep water can sweep your vehicle downstream
and you and your passengers could drown.
If it's only shallow water, it can still wash away
the ground from under your tires, and you could
lose traction and roll the vehicle over. Don't drive
through rushing water.
See ªDriving Through Waterº in the Index for more
information on driving through water.
After Off-Road Driving
Remove any brush or debris that has collected on the
underbody, chassis or under the hood. These accumulations
can be a fire hazard.
After operation in mud or sand, have the brake linings
cleaned and checked. These substances can cause
glazing and uneven braking. Check the body structure,
steering, suspension, wheels, tires and exhaust system
for damage. Also, check the fuel lines and cooling
system for any leakage.
Your vehicle will require more frequent service due to
off
-road use. Refer to the Maintenance Schedule for
additional information.
Page 291 of 432
4-59 When You Are Ready to Leave After
Parking on a Hill
1. Apply your regular brakes and hold the pedal down
while you:
�start your engine,
�shift into a gear, and
�release the parking brake.
2. Let up on the brake pedal.
3. Drive slowly until the trailer is clear of the chocks.
4. Stop and have someone pick up and store the chocks.
Maintenance When Trailer Towing
Your vehicle will need service more often when you're
pulling a trailer. See the Maintenance Schedule for
more on this. Things that are especially important
in trailer operation are automatic transmission fluid
(don't overfill), engine oil, axle lubricant, belt, cooling
system and brake system. Each of these is covered in
this manual, and the Index will help you find them
quickly. If you're trailering, it's a good idea to review
these sections before you start your trip.
Check periodically to see that all hitch nuts and bolts
are tight.
Page 344 of 432

6-18
Automatic Transmission Fluid
When to Check and Change
A good time to check your automatic transmission fluid
level is when the engine oil is changed.
Change both the fluid and filter every 50,000 miles
(83 000 km) if the vehicle is mainly driven under one
or more of these conditions:
�In heavy city traffic where the outside temperature
regularly reaches 90�F (32�C) or higher.
�In hilly or mountainous terrain.
�When doing frequent trailer towing.
�Uses such as found in taxi, police or delivery service.
If you do not use your vehicle under any of
these conditions, change the fluid and filter
every 100,000 miles (166 000 km).
See ªScheduled Maintenance Servicesº in the Index.
How to Check
Because this operation can be a little difficult, you may
choose to have this done at the dealership service department.
If you do it yourself, be sure to follow all the instructions
here, or you could get a false reading on the dipstick.
NOTICE:
Too much or too little fluid can damage your
transmission. Too much can mean that some of
the fluid could come out and fall on hot engine
parts or exhaust system parts, starting a fire.
Too little fluid could cause the transmission to
overheat. Be sure to get an accurate reading if
you check your transmission fluid.
Wait at least 30 minutes before checking the
transmission fluid level if you have been driving:
�When outside temperatures are above 90�F (32�C).
�At high speed for quite a while.
�In heavy traffic
-- especially in hot weather.
�While pulling a trailer.
Page 346 of 432

6-20
Then, without shutting off the engine, follow
these steps:
Locate the handle with the
transmission and lock
symbols for the automatic
transmission dipstick in
the engine compartment
on the passenger's side of
the vehicle.
See ªEngine Compartment Overviewº
in the Index for more information on location.
1. Flip the handle up and then pull out the dipstick and
wipe it with a clean rag or paper towel.
2. Push it back in all the way, wait three seconds and
then pull it back out again.
3. If the fluid level is in the acceptable range, push
the dipstick back in all the way; then flip the handle
down to lock the dipstick in place.
How to Add Fluid
Refer to the Maintenance Schedule to determine what
kind of transmission fluid to use. See ªRecommended
Fluids and Lubricantsº in the Index.
Add fluid only after checking the transmission fluid
while it is hot. (A cold check is used only as a reference.)
If the fluid level is low, add only enough of the proper
fluid to bring the level up to the HOT area for a hot
check. It doesn't take much fluid, generally less than
one pint (0.5 L). Don't overfill.
Page 347 of 432
6-21
NOTICE:
We recommend you use only fluid labeled
DEXRON�-III, because fluid with that label is
made especially for your automatic transmission.
Damage caused by fluid other than DEXRON
�-III
is not covered by your new vehicle warranty.
�After adding fluid, recheck the fluid level as
described under ªHow to Check.º
�When the correct fluid level is obtained, push the
dipstick back in all the way; then flip the handle
down to lock the dipstick in place.
Rear Axle
When to Check Lubricant
Refer to the Maintenance Schedule to determine
how often to check the lubricant. See ªScheduled
Maintenance Servicesº in the Index.
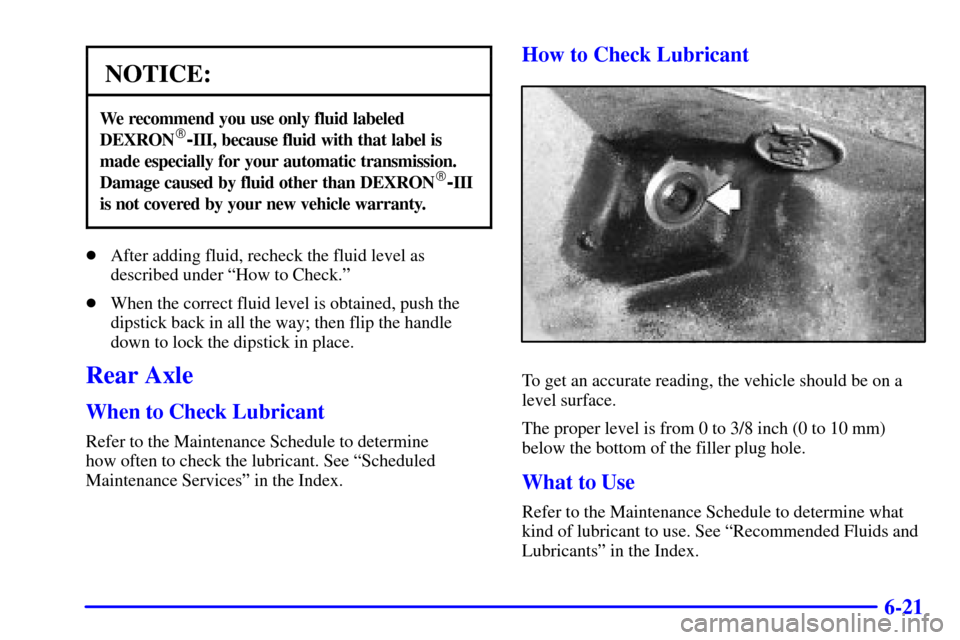
How to Check Lubricant
To get an accurate reading, the vehicle should be on a
level surface.
The proper level is from 0 to 3/8 inch (0 to 10 mm)
below the bottom of the filler plug hole.
What to Use
Refer to the Maintenance Schedule to determine what
kind of lubricant to use. See ªRecommended Fluids and
Lubricantsº in the Index.
Page 348 of 432
6-22
Four-Wheel Drive
Lubricant checks in this section also apply to these
vehicles. However, there are two additional systems
that need lubrication.
Transfer Case
When to Check Lubricant
Refer to the Maintenance Schedule to determine how
often to check the lubricant. See ªPeriodic Maintenance
Inspectionsº in the Index.How to Check Lubricant
To get an accurate reading, the vehicle should be on a
level surface.
If the level is below the bottom of the filler plug hole,
you'll need to add some lubricant. Add enough lubricant
to raise the level to the bottom of the filler plug hole.
Use care not to overtighten the plug.
What to Use
Refer to the Maintenance Schedule to determine what
kind of lubricant to use. See ªRecommended Fluids and
Lubricantsº in the Index.

Maintenance Schedule Service and Appearance Care
Section
7
Section
6
Scheduled Maintenance
Owner Checks and Services
Periodic Maintenance InspectionsRecommended Fluid")