Page 12 of 497

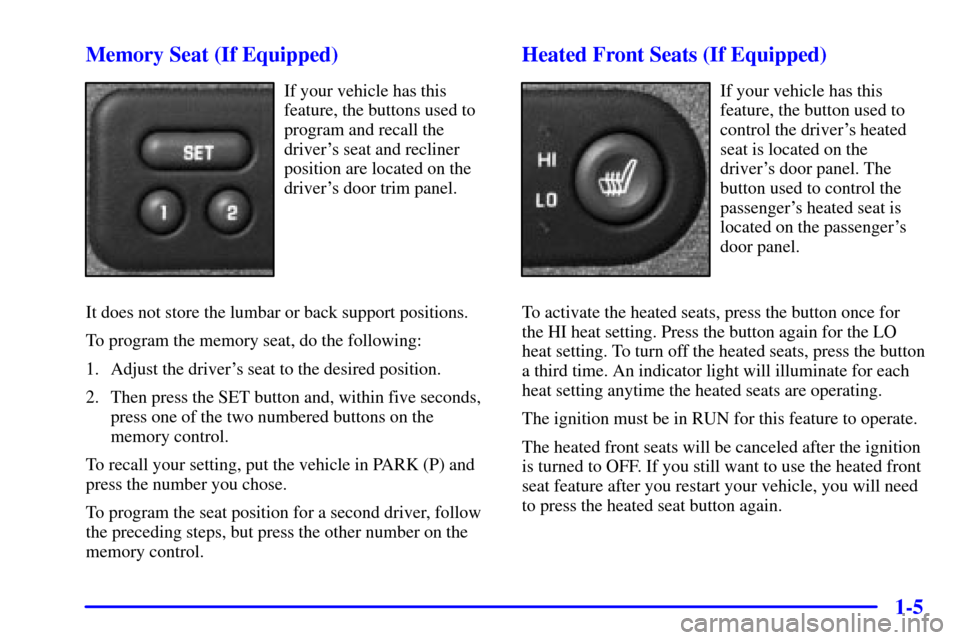
1-5 Memory Seat (If Equipped)
If your vehicle has this
feature, the buttons used to
program and recall the
driver's seat and recliner
position are located on the
driver's door trim panel.
It does not store the lumbar or back support positions.
To program the memory seat, do the following:
1. Adjust the driver's seat to the desired position.
2. Then press the SET button and, within five seconds,
press one of the two numbered buttons on the
memory control.
To recall your setting, put the vehicle in PARK (P) and
press the number you chose.
To program the seat position for a second driver, follow
the preceding steps, but press the other number on the
memory control.
Heated Front Seats (If Equipped)
If your vehicle has this
feature, the button used to
control the driver's heated
seat is located on the
driver's door panel. The
button used to control the
passenger's heated seat is
located on the passenger's
door panel.
To activate the heated seats, press the button once for
the HI heat setting. Press the button again for the LO
heat setting. To turn off the heated seats, press the button
a third time. An indicator light will illuminate for each
heat setting anytime the heated seats are operating.
The ignition must be in RUN for this feature to operate.
The heated front seats will be canceled after the ignition
is turned to OFF. If you still want to use the heated front
seat feature after you restart your vehicle, you will need
to press the heated seat button again.
Page 95 of 497
2-15
Resynchronization
Resynchronization may be necessary due to the security
method used by this system. The transmitter does not
send the same signal twice to the receiver. The receiver
will not respond to a signal that has been sent
previously. This prevents anyone from recording and
playing back the signal from the transmitter.
To resynchronize your transmitter, stand close to your
vehicle and press and hold the LOCK and UNLOCK
buttons on the transmitter at the same time for seven
seconds. The door locks should cycle to confirm
synchronization. If the locks do not cycle, see your
dealer for service.
Rear Doors
Your vehicle may be equipped with a rear access
door(s) that allows easier access to the rear area of the
extended cab.
To open a rear access door
from the outside, first open
the front door. Then, use the
handle located on the front
edge of the rear access door
to open it.
You must fully close a rear access door before you can
close the front door.
Page 128 of 497
2-48
To shift into or out of 4-Wheel Low (4LO)
or NEUTRAL (N):
1. Slow the vehicle to a roll, about 1 to 3 mph
(2 to 5 km/h) and shift an automatic transmission
into NEUTRAL (N), or with a manual transmission,
press the clutch pedal.
2. Shift the transfer case shift lever in one
continuous motion.
Don't pause in NEUTRAL (N) as you shift the
transfer case into 4
-Wheel Low (4LO), or your
gears could clash.
Remember that driving in 4
-Wheel High (4HI) or
4
-Wheel Low (4LO) may reduce fuel economy. Also,
driving in four
-wheel drive on dry pavement could
cause your tires to wear faster and make your transfer
case harder to shift and run noisier.
Automatic Transfer Case (If Equipped)
The transfer case buttons
are located to the left of the
instrument panel cluster.
Use these switches to shift into and out of
four
-wheel drive.
Page 131 of 497

2-51
Shifting Out of 4LO
To shift from 4LO to 4HI, AUTO 4WD or 2HI your
vehicle must be stopped or moving less than 3 mph
(4.8 km/h) with the transmission in NEUTRAL (N) and
the ignition in RUN. The preferred method for shifting
out of 4LO is to have your vehicle moving 1 to 2 mph
(1.6 to 3.2 km/h). Press and release the 4HI, AUTO
4WD or 2HI switch. You must wait for the 4HI, AUTO
4WD or 2HI indicator light to stop flashing and remain
illuminated before shifting your transmission into gear.
If the 4HI, AUTO 4WD or 2HI switch is pressed when
your vehicle is in gear and/or moving, the 4HI, AUTO
4WD or 2HI indicator light will flash for 30 seconds but
will not complete the shift unless your vehicle is moving
less than 3 mph (4.8 km/h) and the transmission is
in NEUTRAL (N).Shifting into NEUTRAL
To shift the transfer case to NEUTRAL do
the following:
1. Make sure the vehicle is parked so that it will
not roll:
2. Set the parking brake.
3. Start the vehicle or turn the ignition to RUN.
4. Connect the vehicle to the towing vehicle.
5. Put the transmission in NEUTRAL (N).
6. Shift the transfer case to 2HI.
7. Simultaneously press and hold the 2HI and 4LO
buttons for 10 seconds. The red NEUTRAL light
will come on when the transfer case shift to
NEUTRAL is complete.
8. Shift the transmission to REVERSE (R) for one
second, then shift the transmission to DRIVE (D)
for one second.
9. Turn the ignition to OFF.
10. Place the transmission shift lever in PARK (P).
11. Release the parking brake prior to towing.
Page 135 of 497

2-55
Shifting into NEUTRAL
To shift the transfer case to NEUTRAL, first make sure
the vehicle is parked so that it will not roll:
1. Set the parking brake.
2. Start the vehicle or turn the ignition to RUN.
3. Connect the vehicle to the towing vehicle.
4. Put the transmission in NEUTRAL (N).
5. Shift the transfer case to 2HI.
6. Simultaneously press and hold the 2HI and 4LO
buttons for 10 seconds. The red NEUTRAL light
will come on when the transfer case shift to
NEUTRAL is complete.
7. Shift the transmission to REVERSE (R) for
one second, then shift the transmission to
DRIVE (D) for one second.
8. Turn the ignition to OFF.
9. Place the transmission shift lever in PARK (P).
10. Release the parking brake prior to towing.Shifting Out of NEUTRAL
To shift out of NEUTRAL:
1. Set the parking brake and apply the regular
brake pedal.
2. Shift the transmission to NEUTRAL (N) and turn the
ignition to RUN with the engine off.
3. Press the button for the desired transfer case shift
position (2HI, 4HI, AUTO 4WD or 4LO).
4. After the transfer case has shifted out of NEUTRAL
the red light will go out.
5. You may start the engine and shift the transmission
to the desired position.
Page 170 of 497

2-90
OnStar� System (If Equipped)
OnStar is a vehicle communications system that offers a
variety of services and provides a one
-touch hands-free
communication link between you and the OnStar Center.
To receive OnStar services, a service subscription
agreement is required and an additional fee may be
required. Services are available 24 hours a day, 7 days a
week. For more information, call 1
-888-ONSTAR-7
(1
-888-667-8277).
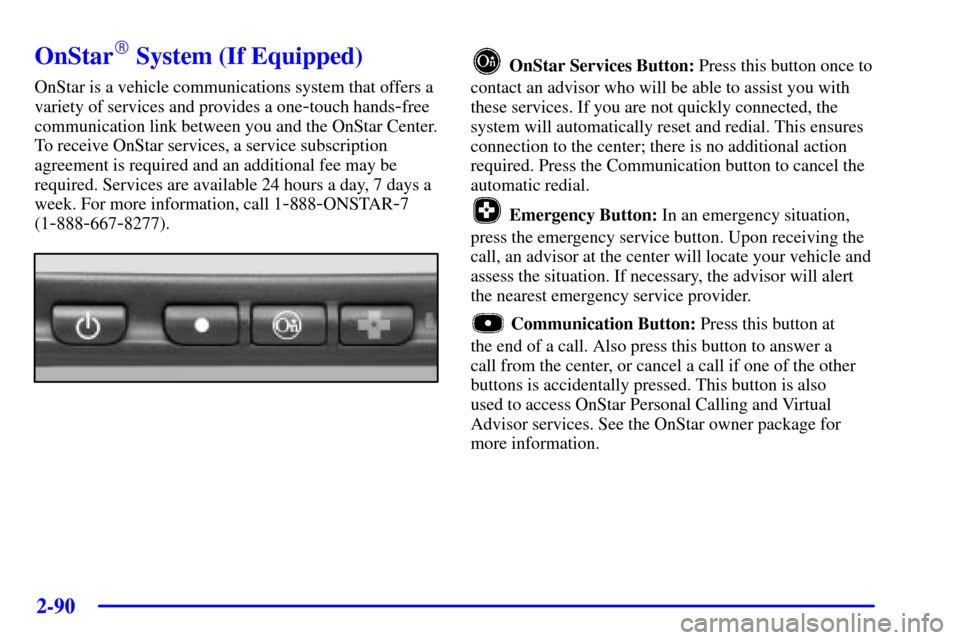
OnStar Services Button: Press this button once to
contact an advisor who will be able to assist you with
these services. If you are not quickly connected, the
system will automatically reset and redial. This ensures
connection to the center; there is no additional action
required. Press the Communication button to cancel the
automatic redial.
Emergency Button: In an emergency situation,
press the emergency service button. Upon receiving the
call, an advisor at the center will locate your vehicle and
assess the situation. If necessary, the advisor will alert
the nearest emergency service provider.
Communication Button: Press this button at
the end of a call. Also press this button to answer a
call from the center, or cancel a call if one of the other
buttons is accidentally pressed. This button is also
used to access OnStar Personal Calling and Virtual
Advisor services. See the OnStar owner package for
more information.
Page 203 of 497

3-
3-1
Section 3 Comfort Controls and Audio Systems
In this section, you'll find out how to operate the comfort control and audio systems offered with your vehicle.
Be sure to read about the particular systems supplied with your vehicle.
3
-2 Comfort Controls
3
-2 Standard Comfort Controls
3
-3 Heater and Air Conditioning Comfort
Controls (If Equipped)
3
-5 Electronic Climate Control System
(If Equipped)
3
-9 Air Conditioning
3
-10 Heating
3
-10 Defogging and Defrosting
3
-10 Rear Window Defogger (If Equipped)
3
-11 Ventilation System
3
-13 Audio Systems
3
-13 Setting the Clock for Systems with
SET Button3
-13 Setting the Clock for Systems with HR and
MN Buttons
3
-14 AM-FM Stereo
3
-16 AM-FM Stereo with Compact Disc Player and
Automatic Tone Control (If Equipped)
3
-20 Remote Cassette Tape Player (If Equipped)
3
-22 Theft-Deterrent Feature (If Equipped)
3
-25 Understanding Radio Reception
3
-25 Tips About Your Audio System
3
-26 Care of Your Compact Discs
3
-26 Care of Your Compact Disc Player
3
-26 Fixed Mast Antenna
Page 215 of 497

3-13
Audio Systems
Your audio system has been designed to operate easily
and give years of listening pleasure. You will get the
most enjoyment out of it if you acquaint yourself with it
first. Find out what your audio system can do and how
to operate all of its controls to be sure you're getting the
most out of the advanced engineering that went into it.
Your vehicle has a feature called Retained Accessory
Power (RAP). With RAP, you can play your audio
system even after the ignition is turned off. See
ªRetained Accessory Powerº in the Index.
Setting the Clock for Systems with the
Set Button
Press SET. Within five seconds, press and hold the right
SEEK arrow until the correct minute appears on the
display. Press and hold the left SEEK arrow until the
correct hour appears on the display.
Setting the Clock for Systems with HR
and MN Buttons
Press and hold HR until the correct hour appears on the
display. Press and hold MN until the correct minute
appears on the display. To display the clock with the
ignition off, press RECALL or HR/MN and the time
will be displayed for a few seconds. There is an initial
two
-second delay before the clock goes into the
time
-set mode.