Page 407 of 497

6-42
So, it isn't a good idea to ªtop offº your brake fluid.
Adding brake fluid won't correct a leak. If you add fluid
when your linings are worn, then you'll have too much
fluid when you get new brake linings. You should add
(or remove) brake fluid, as necessary, only when work is
done on the brake hydraulic system.
CAUTION:
If you have too much brake fluid, it can spill on
the engine. The fluid will burn if the engine is
hot enough. You or others could be burned,
and your vehicle could be damaged. Add brake
fluid only when work is done on the brake
hydraulic system. See ªChecking Brake Fluidº in
this section.
Refer to the Maintenance Schedule to determine when to
check your brake fluid. See ªPeriodic Maintenance
Inspectionsº in the Index.Checking Brake Fluid
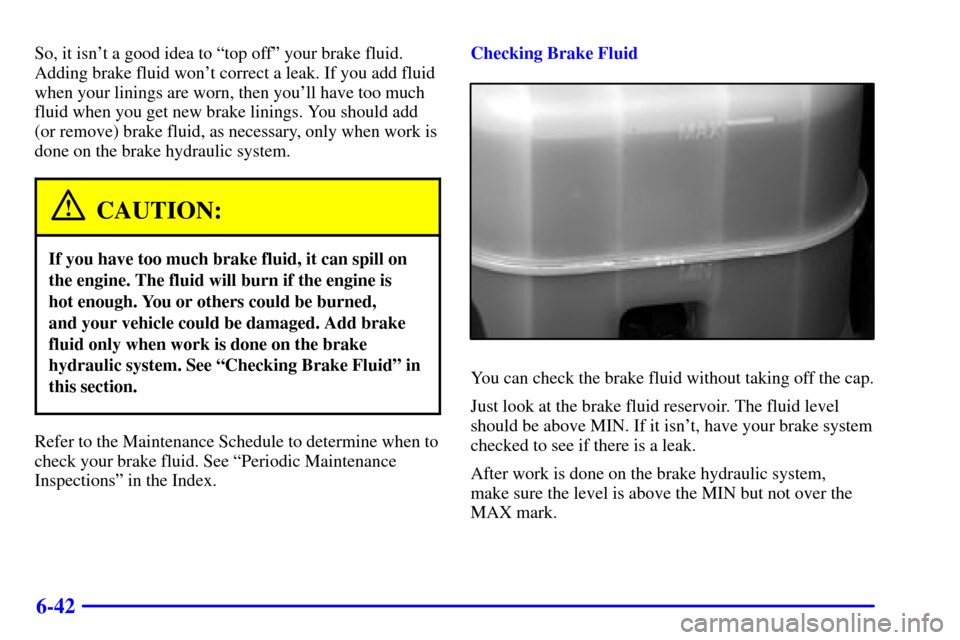
You can check the brake fluid without taking off the cap.
Just look at the brake fluid reservoir. The fluid level
should be above MIN. If it isn't, have your brake system
checked to see if there is a leak.
After work is done on the brake hydraulic system,
make sure the level is above the MIN but not over the
MAX mark.
Page 408 of 497

6-43
What to Add
When you do need brake fluid, use only DOT
-3 brake
fluid. Refer to ªRecommended Fluids and Lubricantsº
in the Index. Use new brake fluid from a sealed
container only.
Always clean the brake fluid reservoir cap and the area
around the cap before removing it. This will help keep
dirt from entering the reservoir.
CAUTION:
With the wrong kind of fluid in your brake
system, your brakes may not work well, or they
may not even work at all. This could cause a
crash. Always use the proper brake fluid.
NOTICE:
�Using the wrong fluid can badly damage
brake system parts. For example, just a few
drops of mineral
-based oil, such as engine
oil, in your brake system can damage brake
system parts so badly that they'll have to be
replaced. Don't let someone put in the
wrong kind of fluid.
�If you spill brake fluid on your vehicle's
painted surfaces, the paint finish can be
damaged. Be careful not to spill brake fluid
on your vehicle. If you do, wash it off
immediately. See ªAppearance Careº in
the Index.
Page 410 of 497

6-45 Replacing Brake System Parts
The braking system on a vehicle is complex. Its many
parts have to be of top quality and work well together if
the vehicle is to have really good braking. Your vehicle
was designed and tested with top
-quality GM brake
parts. When you replace parts of your braking
system
-- for example, when your brake linings wear
down and you need new ones put in
-- be sure you get
new approved GM replacement parts. If you don't, your
brakes may no longer work properly. For example, if
someone puts in brake linings that are wrong for your
vehicle, the balance between your front and rear brakes
can change
-- for the worse. The braking performance
you've come to expect can change in many other ways if
someone puts in the wrong replacement brake parts.
Battery
Your new vehicle comes with a maintenance free
ACDelco� battery. When it's time for a new battery, get
one that has the replacement number shown on the
original battery's label. We recommend an ACDelco
battery. See ªEngine Compartment Overviewº in the
Index for battery location.
WARNING: Battery posts, terminals and related
accessories contain lead and lead compounds, chemicals
known to the State of California to cause cancer and
reproductive harm. Wash hands after handling.
Page 441 of 497
6-76
Vehicle Identification Number (VIN)
This is the legal identifier for your vehicle. It appears on
a plate in the front corner of the instrument panel, on the
driver's side. You can see it if you look through the
windshield from outside your vehicle. The VIN also
appears on the Vehicle Certification and Service Parts
labels and the certificates of title and registration.
Engine Identification
The 8th character in your VIN is the engine code. This
code will help you identify your engine, specifications
and replacement parts.
Service Parts Identification Label
You'll find this label on the inside of the glove box. It's
very helpful if you ever need to order parts. On this
label is:
�your VIN,
�the model designation,
�paint information and
�a list of all production options and
special equipment.
Be sure that this label is not removed from the vehicle.
Page 446 of 497
6-81
Underhood Fuse BlockThe underhood fuse block in the engine compartment on
the driver's side of the vehicle near the battery. Lift the
cover for access to the fuse/relay block.
Once you remove the cover, you will see some fuses to
the top right of the fuse/relay block. These are spare
fuses and can be used accordingly.
You can remove fuses with a fuse extractor. The fuse
extractor is located in the underhood electrical center. To
remove fuses if you don't have a fuse extractor, hold the
end of the fuse between your thumb and index finger
and pull straight out.
See ªEngine Compartment Overviewº in the Index for
more information on its location.
Page 448 of 497

6-83
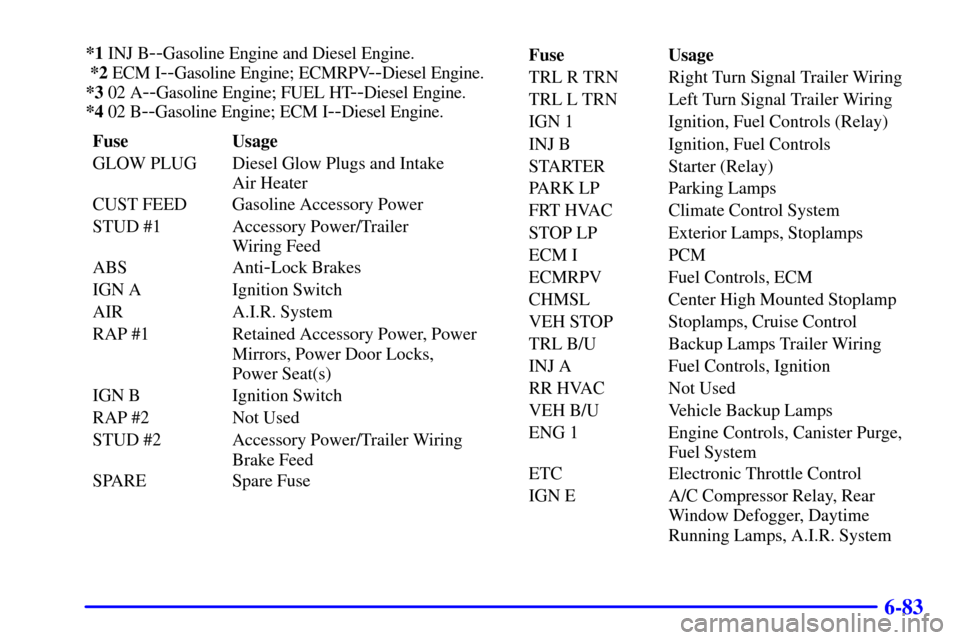
*1 INJ B--Gasoline Engine and Diesel Engine.
*2 ECM I
--Gasoline Engine; ECMRPV--Diesel Engine.
*3 02 A
--Gasoline Engine; FUEL HT--Diesel Engine.
*4 02 B
--Gasoline Engine; ECM I--Diesel Engine.
Fuse Usage
GLOW PLUG Diesel Glow Plugs and Intake
Air Heater
CUST FEED Gasoline Accessory Power
STUD #1 Accessory Power/Trailer
Wiring Feed
ABS Anti
-Lock Brakes
IGN A Ignition Switch
AIR A.I.R. System
RAP #1 Retained Accessory Power, Power
Mirrors, Power Door Locks,
Power Seat(s)
IGN B Ignition Switch
RAP #2 Not Used
STUD #2 Accessory Power/Trailer Wiring
Brake Feed
SPARE Spare FuseFuse Usage
TRL R TRN Right Turn Signal Trailer Wiring
TRL L TRN Left Turn Signal Trailer Wiring
IGN 1 Ignition, Fuel Controls (Relay)
INJ B Ignition, Fuel Controls
STARTER Starter (Relay)
PARK LP Parking Lamps
FRT HVAC Climate Control System
STOP LP Exterior Lamps, Stoplamps
ECM I PCM
ECMRPV Fuel Controls, ECM
CHMSL Center High Mounted Stoplamp
VEH STOP Stoplamps, Cruise Control
TRL B/U Backup Lamps Trailer Wiring
INJ A Fuel Controls, Ignition
RR HVAC Not Used
VEH B/U Vehicle Backup Lamps
ENG 1 Engine Controls, Canister Purge,
Fuel System
ETC Electronic Throttle Control
IGN E A/C Compressor Relay, Rear
Window Defogger, Daytime
Running Lamps, A.I.R. System
Page 451 of 497
6-86
Capacities and Specifications
Please refer to ªRecommended Fluids and Lubricantsº in the Index for more information. All capacities are
approximate. When adding see the refrigerant charge label under the hood for charge capacity information and
requirements.
Engine Type VIN Code Spark Plug Gap
VORTEC 4300 V6 W 0.060 inches (1.52 mm)
VORTEC 4800 V8 V 0.060 inches (1.52 mm)
VORTEC 5300 V8 T 0.060 inches (1.52 mm)
VORTEC 6000 V8 U 0.060 inches (1.52 mm)
VORTEC 6600 V8 1 0.060 inches (1.52 mm)
VORTEC 8100 V8 G 0.060 inches (1.52 mm)
Wheels and Tires
Model Description Torque
C/K 1500 & C/K 2500 6 bolts (14 mm)
140 lb
-ft (190 N´m)
C/K 3500 8 bolts (14 mm)
140 lb
-ft (190 N´m)
Tire Pressure See the Certification/Tire label on the rear edge of the driver's door
or the incomplete vehicle document in the cab.
Page 452 of 497
6-87 Cooling System Capacity
After refill, the level must be rechecked. See ªCooling Systemº in the Index.
Engine Transmission Quantity
VORTEC 4300 V6 Automatic 12.6 quarts (11.9 L)
VORTEC 4300 V6 Manual 12.9 quarts (12.2 L)
VORTEC 4800 V8 Automatic 13.4 quarts (12.7 L)
VORTEC 4800 V8 Manual 13.7 quarts (13.0 L)
VORTEC 5300 V8 Automatic 13.4 quarts (12.7 L)
VORTEC 5300 V8** Automatic 14.9 quarts (14.1 L)
VORTEC 6000 V8 Automatic 14.8 quarts (14.0 L)
VORTEC 6000 V8* Automatic 14.4 quarts (13.6 L)
VORTEC 6000 V8 Manual 15.2 quarts (14.4 L)
VORTEC 6000 V8* Manual 14.8 quarts (14.0 L)
VORTEC 8100 V8 Manual 21.1 quarts (20.0 L)
VORTEC 8100 V8 Automatic 20.7 quarts (19.6 L)
* Vehicles equipped with the optional engine oil cooler.
** Vehicles equipped with the optional air conditioner.