Page 253 of 397

4-41 When You Are Ready to Leave After
Parking on a Hill
1. Apply your regular brakes and hold the pedal down
while you:
�start your engine,
�shift into a gear, and
�release the parking brake.
2. Let up on the brake pedal.
3. Drive slowly until the trailer is clear of the chocks.
4. Stop and have someone pick up and store the chocks.
Maintenance When Trailer Towing
Your vehicle will need service more often when you're
pulling a trailer. See the Maintenance Schedule for more
on this. Things that are especially important in trailer
operation are automatic transaxle fluid (don't overfill),
engine oil, drive belts, cooling system and brake system.
Each of these is covered in this manual, and the Index
will help you find them quickly. If you're trailering, it's
a good idea to review this information before you start
your trip.
Check periodically to see that all hitch nuts and bolts
are tight.
Engine Cooling When Trailer Towing
Your cooling system may temporarily overheat during
severe operating conditions. See ªEngine Overheatingº
in the Index.
Page 263 of 397

5-10
Towing Your Vehicle
Consult your dealer or a professional towing service
if you need to have your disabled vehicle towed.
See ªRoadside Assistanceº in the Index. If you
want to tow your vehicle behind another vehicle for
recreational purposes (such as behind a motorhome),
see ªRecreational Vehicle Towingº in the Index.
Engine Overheating
You will find a coolant temperature gage and a warning
message about a hot engine on your instrument panel
cluster. See ªEngine Coolant Temperature Gageº and
ªHot Coolant Temperature Messageº in the Index.
You also have a low coolant message on your instrument
panel cluster. See ªLow Coolant Level Messageº in
the Index.
Overheated Engine Protection
Operating Mode
This emergency operating mode allows your vehicle
to be driven to a safe place in an emergency situation.
If an overheated engine condition exists, an overheat
protection mode which alternates firing groups of
cylinders helps prevent engine damage. In this mode,
you will notice a significant loss in power and engine
performance. The low coolant light may come on and
the temperature gage will indicate an overheat condition
exists. Driving extended miles (km) and/or towing
a trailer in the overheat protection mode should
be avoided.
NOTICE:
After driving in the overheated engine protection
operating mode, to avoid engine damage, allow
the engine to cool before attempting any repair.
The engine oil will be severely degraded. Repair
the cause of coolant loss, change the oil and reset
the oil life system. See ªEngine Oilº in the Index.
Page 267 of 397
5-14
CAUTION:
An electric engine cooling fan under the hood can
start up even when the engine is not running and
can injure you. Keep hands, clothing and tools
away from any underhood electric fan.
If the coolant inside the coolant recovery tank is boiling,
don't do anything else until it cools down. The vehicle
should be parked on a level surface.
The coolant level should be at or above the COLD mark
on the coolant recovery tank. To check the coolant level,
look for the COLD mark on the side of the coolant
recovery tank that faces the engine. If the coolant level
is not at or above the COLD mark, If it isn't, you may
have a leak at the pressure cap or in the radiator hoses,
heater hoses, radiator, water pump or somewhere else in
the cooling system.
Page 269 of 397

5-16 How to Add Coolant to the Coolant
Recovery Tank
If you haven't found a problem yet, but the coolant level
isn't at the COLD mark, add a 50/50 mixture of clean,
drinkable water and DEX
-COOL� engine coolant at the
coolant recovery tank. See ªEngine Coolantº in the
Index for more information.
CAUTION:
Adding only plain water to your cooling system
can be dangerous. Plain water, or some other
liquid such as alcohol, can boil before the proper
coolant mixture will. Your vehicle's coolant
warning system is set for the proper coolant
mixture. With plain water or the wrong mixture,
your engine could get too hot but you wouldn't
get the overheat warning. Your engine could
catch fire and you or others could be burned.
Use a 50/50 mixture of clean, drinkable water
and DEX
-COOL� coolant.
NOTICE:
In cold weather, water can freeze and crack
the engine, radiator, heater core and other parts.
Use the recommended coolant and the proper
coolant mixture.
The coolant recovery tank is located in the rear of the
engine compartment on the passenger's side of the
vehicle. See ªEngine Compartment Overviewº in the
Index for more information on location.
Page 272 of 397
5-19
CAUTION:
You can be burned if you spill coolant on hot
engine parts. Coolant contains ethylene glycol
and it will burn if the engine parts are hot
enough. Don't spill coolant on a hot engine.
3. If you have the 3800 V6 engine, remove the 3800
Series II V6 engine cover shield to access the bleed valve.
A. Clean the area around the engine oil fill tube and
cap before removing. Twist the oil fill tube, with
cap attached, counterclockwise and remove it.
B. Lift the engine cover shield at the front, slide the
catch tab out of the engine bracket and remove
the cover shield.
C. Put the oil fill tube, with cap attached, in the valve
cover oil fill hole until you're ready to replace the
cover shield.
Page 274 of 397
5-21
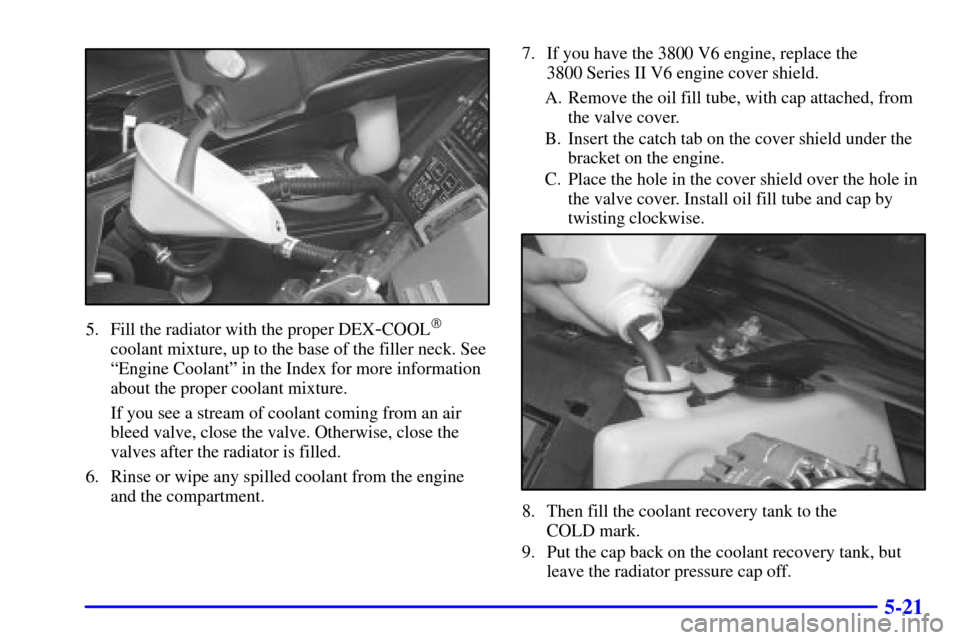
5. Fill the radiator with the proper DEX-COOL�
coolant mixture, up to the base of the filler neck. See
ªEngine Coolantº in the Index for more information
about the proper coolant mixture.
If you see a stream of coolant coming from an air
bleed valve, close the valve. Otherwise, close the
valves after the radiator is filled.
6. Rinse or wipe any spilled coolant from the engine
and the compartment.7. If you have the 3800 V6 engine, replace the
3800 Series II V6 engine cover shield.
A. Remove the oil fill tube, with cap attached, from
the valve cover.
B. Insert the catch tab on the cover shield under the
bracket on the engine.
C. Place the hole in the cover shield over the hole in
the valve cover. Install oil fill tube and cap by
twisting clockwise.
8. Then fill the coolant recovery tank to the
COLD mark.
9. Put the cap back on the coolant recovery tank, but
leave the radiator pressure cap off.
Page 283 of 397
5-30
3. Remove any rust or dirt
from the wheel bolts,
mounting surfaces and
spare wheel.
CAUTION:
Rust or dirt on the wheel, or on the parts to
which it is fastened, can make the wheel nuts
become loose after a time. The wheel could come
off and cause an accident. When you change a
wheel, remove any rust or dirt from the places
where the wheel attaches to the vehicle. In an
emergency, you can use a cloth or a paper towel
to do this; but be sure to use a scraper or wire
brush later, if you need to, to get all the rust or
dirt off.
CAUTION:
Never use oil or grease on studs or nuts. If you
do, the nuts might come loose. Your wheel could
fall off, causing a serious accident.
4. Install the compact spare tire.
5. Reinstall the wheel nuts
with the rounded end
of the nuts toward the
wheel. Tighten each nut
by hand until the wheel
is held against the hub.
Page 290 of 397

6-
6-1
Section 6 Service and Appearance Care
Here you will find information about the care of your vehicle. This section begins with service and fuel information,
and then it shows how to check important fluid and lubricant levels. There is also technical information about your
vehicle, and a part devoted to its appearance care.
6
-2 Service
6
-3 Fuel
6
-5 Fuels in Foreign Countries
6
-6 Filling Your Tank
6
-8 Filling a Portable Fuel Container
6
-8 Checking Things Under the Hood
6
-12 Engine Oil
6
-19 Engine Air Cleaner/Filter
6
-20 Passenger Compartment Air Filter
(If Equipped)
6
-21 Automatic Transaxle Fluid
6
-24 Engine Coolant
6
-28 Radiator Pressure Cap
6
-28 Power Steering Fluid
6
-29 Windshield Washer Fluid
6
-31 Brakes6
-34 Battery
6
-35 Bulb Replacement
6
-40 Windshield Wiper Blade Replacement
6
-41 Tires
6
-51 Appearance Care
6
-51 Cleaning the Inside of Your Vehicle
6
-53 Care of Safety Belts
6
-55 Cleaning the Outside of Your Vehicle
6
-58 Finish Damage
6
-59 GM Vehicle Care/Appearance Materials
6
-60 Vehicle Identification Number (VIN)
6
-60 Service Parts Identification Label
6
-61 Electrical System
6
-68 Replacement Bulbs
6
-68 Capacities and Specifications
6
-70 Normal Maintenance Replacement Parts