Page 192 of 384

3-16
Setting the Tone (Bass/Treble)
BASS: To adjust the bass, press this knob lightly so it
extends. Turn the knob clockwise to increase bass and
counterclockwise to decrease bass.
TREB (Treble): To adjust the treble, press this knob
lightly so it extends. Turn the knob clockwise to
increase treble and counterclockwise to decrease treble.
If a station is weak or noisy, you may want to decrease
the treble.
Push these knobs back into their stored positions when
you're not using them.
AUTO TONE: This feature allows you to choose
bass and treble equalization settings designed
for country/western, jazz, talk, pop, rock and
classical stations.
Each time you press the AUTO TONE button, this
feature will switch to one of these program types.
To return the bass and treble to the manual mode,
either press and release the AUTO TONE button until
the display goes blank or press and release the BASS
and TREB knob and turn it until the display goes blank.Adjusting the Speakers (Balance/Fade)
BAL (Balance): To adjust the balance between the right
and left speakers, press this knob lightly so it extends.
Turn the knob clockwise for the right speakers and
counterclockwise for the left speakers. The middle
position balances the sound between the speakers.
FADE: To adjust the fade between the front and rear
speakers, press this knob lightly so it extends. Turn the
knob clockwise to adjust the sound to the front speakers
and counterclockwise for the rear speakers. The middle
position balances the sound between the speakers.
Push these knobs back into their stored positions when
you're not using them.
Playing a Cassette Tape
Your tape player is built to work best with tapes that are
up to 30 to 45 minutes long on each side. Tapes longer
than that are so thin they may not work well in this
player. If a tape is inserted when the ignition is on but
the radio is off, the tape will begin playing. A tape
symbol is shown in the center of the graphic display
whenever a tape is inserted. When a tape is active, the
tape symbol will be accompanied by a direction arrow.
Page 195 of 384

3-19 AM-FM Stereo with Compact Disc Player
and Automatic Tone Control
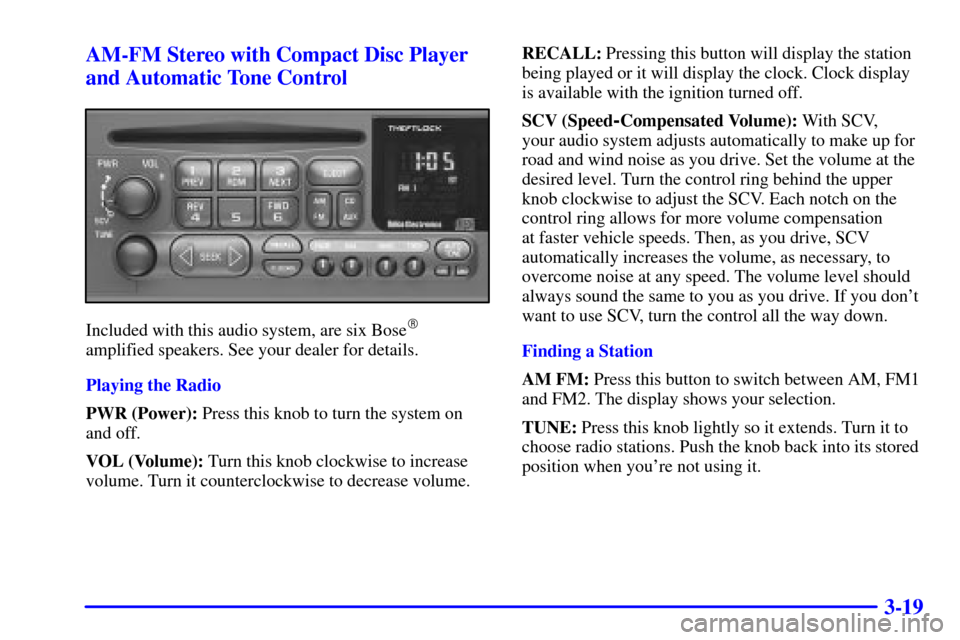
Included with this audio system, are six Bose�
amplified speakers. See your dealer for details.
Playing the Radio
PWR (Power): Press this knob to turn the system on
and off.
VOL (Volume): Turn this knob clockwise to increase
volume. Turn it counterclockwise to decrease volume.RECALL: Pressing this button will display the station
being played or it will display the clock. Clock display
is available with the ignition turned off.
SCV (Speed
-Compensated Volume): With SCV,
your audio system adjusts automatically to make up for
road and wind noise as you drive. Set the volume at the
desired level. Turn the control ring behind the upper
knob clockwise to adjust the SCV. Each notch on the
control ring allows for more volume compensation
at faster vehicle speeds. Then, as you drive, SCV
automatically increases the volume, as necessary, to
overcome noise at any speed. The volume level should
always sound the same to you as you drive. If you don't
want to use SCV, turn the control all the way down.
Finding a Station
AM FM: Press this button to switch between AM, FM1
and FM2. The display shows your selection.
TUNE: Press this knob lightly so it extends. Turn it to
choose radio stations. Push the knob back into its stored
position when you're not using it.
Page 197 of 384

3-21
Setting the Tone (Bass/Treble)
BASS: Press this knob lightly so it extends. Turn the
knob clockwise to increase bass and counterclockwise to
decrease bass.
TREB (Treble): Press this knob lightly so it
extends. Turn the knob clockwise to increase treble
and counterclockwise to decrease treble. If a station is
weak or noisy, you may want to decrease the treble.
Push these knobs back into their stored positions when
you're not using them.
AUTO TONE: This feature allows you to choose
bass and treble equalization settings designed for
country/western, jazz, talk, pop, rock and classical
stations. C/W will appear on the display when you
first press AUTO TONE.
Each time you press the AUTO TONE button, this
feature will switch to one of these program types.
To return the bass and treble to the manual mode,
either press and release the AUTO TONE button until
the display goes blank or press and release the BASS or
TREB knob and turn it until the display goes blank.Adjusting the Speakers (Balance/Fade)
BAL (Balance): Press this knob lightly so it extends.
Turn the knob clockwise for the right speakers and
counterclockwise for the left speakers. The middle
position balances the sound between the speakers.
FADE: Press this knob lightly so it extends. Turn the
knob clockwise to adjust the sound to the front speakers
and counterclockwise for the rear speakers. The middle
position balances the sound between the speakers.
Push these knobs back into their stored positions
when you're not using them.
Playing a Compact Disc
Insert a disc partway into the slot, label side up.
The player will pull it in. The disc should begin
playing. The display will show CD and the CD symbol.
If you want to insert a compact disc with the ignition
off, first press RECALL or EJECT.
If an error appears on the display, see ªCompact Disc
Messagesº later in this section.
Page 225 of 384

4-14 Steering in Emergencies
There are times when steering can be more effective
than braking. For example, you come over a hill and
find a truck stopped in your lane, or a car suddenly
pulls out from nowhere, or a child darts out from
between parked cars and stops right in front of you.
You can avoid these problems by braking
-- if you can
stop in time. But sometimes you can't; there isn't room.
That's the time for evasive action
-- steering around
the problem.
Your vehicle can perform very well in emergencies
like these. First apply your brakes. See ªBraking in
Emergenciesº earlier in this section. It is better to
remove as much speed as you can from a possible
collision. Then steer around the problem, to the left
or right depending on the space available.
An emergency like this requires close attention and a
quick decision. If you are holding the steering wheel at
the recommended 9 and 3 o'clock positions, you can
turn it a full 180 degrees very quickly without removing
either hand. But you have to act fast, steer quickly,
and just as quickly straighten the wheel once you have
avoided the object.
The fact that such emergency situations are always
possible is a good reason to practice defensive
driving at all times and wear safety belts properly.
Page 262 of 384
5-17
1. Park the vehicle on a level surface. You can remove
the coolant surge tank pressure cap when the cooling
system, including the coolant surge tank pressure cap
and upper radiator hose, is no longer hot. Turn the
pressure cap slowly counterclockwise (left) about
one
-quarter turn and then stop.
If you hear a hiss, wait for that to stop.
A hiss means there is still some pressure left.
2. Then keep turning the pressure cap slowly,
and remove it.
3. Then fill the coolant surge tank with the proper
mixture, to the FULL COLD mark on the coolant
surge tank.
Page 269 of 384

5-24
NOTICE:
Do not allow the air compressor to operate
continuously for more than six minutes to help
prevent damage from overheating.
NOTICE:
If 26 psi (179 kPa) tire pressure cannot be
reached after six minutes, the vehicle should not
be driven further. Damage to the tire is severe
and the sealant will not be effective. Remove the
air compressor plug from the accessory power
outlet and unscrew the inflating hose from
the tire valve. See ªRoadside Assistanceº in
the Index.
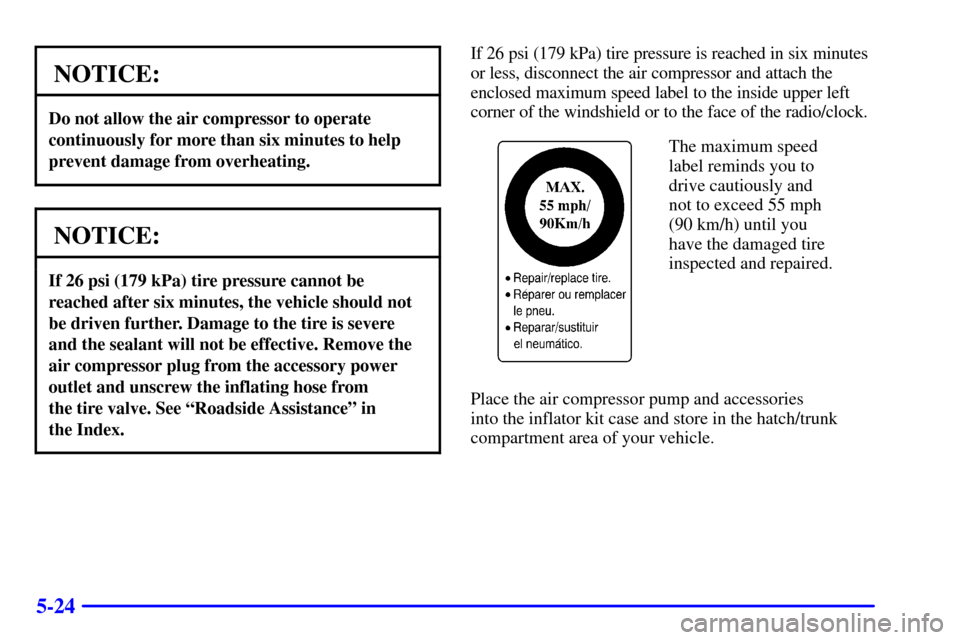
If 26 psi (179 kPa) tire pressure is reached in six minutes
or less, disconnect the air compressor and attach the
enclosed maximum speed label to the inside upper left
corner of the windshield or to the face of the radio/clock.
The maximum speed
label reminds you to
drive cautiously and
not to exceed 55 mph
(90 km/h) until you
have the damaged tire
inspected and repaired.
Place the air compressor pump and accessories
into the inflator kit case and store in the hatch/trunk
compartment area of your vehicle.
Page 279 of 384
6-7
If your fuel filler door release won't operate, there is a
manual release tab. The tab is located against the upper
trim on the driver's side in the rear compartment.
Pull the tab to manually release the fuel filler door.While refueling, rest the tether across the tab on the fuel
filler door to prevent damage to your vehicle's finish.
To remove the fuel cap, turn it slowly to the left
(counterclockwise). The fuel cap has a spring in it;
if you let go of the cap too soon, it will spring back
to the right.
Page 280 of 384

6-8
CAUTION:
If you get gasoline on yourself and then
something ignites it, you could be badly burned.
Gasoline can spray out on you if you open the
fuel cap too quickly. This spray can happen if
your tank is nearly full, and is more likely in hot
weather. Open the fuel cap slowly and wait for
any ªhissº noise to stop. Then unscrew the cap
all the way.
Be careful not to spill gasoline. Clean gasoline from
painted surfaces as soon as possible. See ªCleaning the
Outside of Your Vehicleº in the Index.When you put the fuel cap back on, turn it to the right
(clockwise) until you hear a clicking sound. Make sure
you fully install the cap. The diagnostic system can
determine if the fuel cap has been left off or improperly
installed. This would allow fuel to evaporate into the
atmosphere. See ªMalfunction Indicator Lampº in
the Index.
NOTICE:
If you need a new fuel cap, be sure to get the
right type. Your dealer can get one for you.
If you get the wrong type, it may not fit properly.
This may cause your malfunction indicator lamp
to light and may damage your fuel tank and
emissions system. See ªMalfunction Indicator
Lampº in the Index.