Page 127 of 356
2-74
5. Pull the sunshade back a little and remove the
backing paper from the Velcro buttons. Push the
sunshade back into place, sticking the Velcro to
the glass.
6. Install the T
-top, close the latch and lock the T-top.
Repeat the previous steps for the passenger's
side sunshade.
You can store the sunshades two different ways:
�When the T
-tops are in use, store the sunshades in
their storage area in the rear of the vehicle. Make
sure the cargo cover is in its closed, upright position.
�When you have the T
-tops off and in their storage
slots, store the sunshades on the T
-tops, in their
installed position.
Page 129 of 356
2-76
NOTICE:
It is not recommended to lower the top if the
vehicle is out in cold weather (0�F/
-18�C or
lower), or you may damage top components.
NOTICE:
Before lowering the convertible top into the
storage area, be sure there are no objects in the
way of the folded, stored top. The weight of a
stored top on items in the storage area will cause
the convertible top back glass to break.
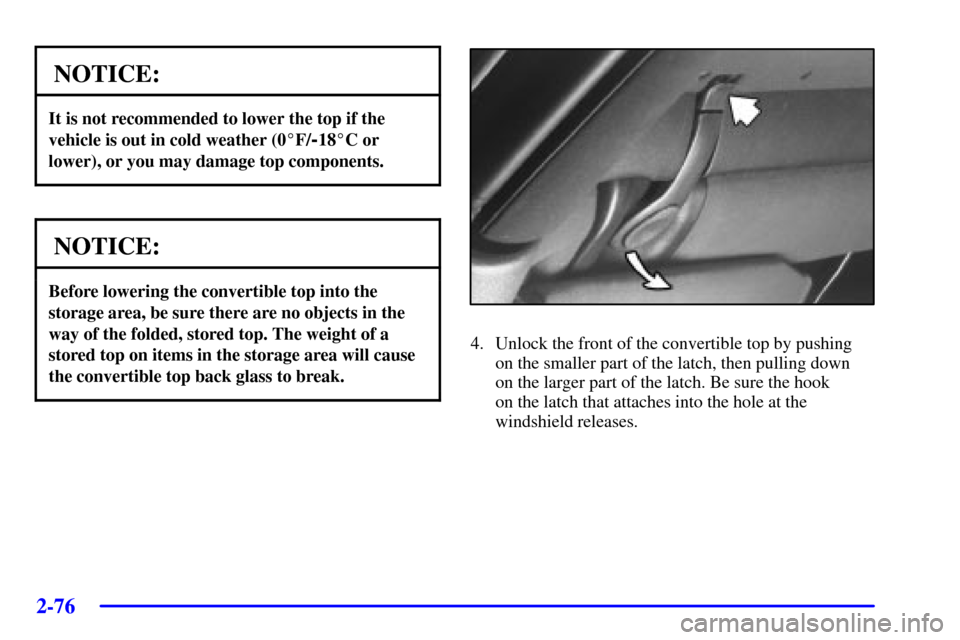
4. Unlock the front of the convertible top by pushing
on the smaller part of the latch, then pulling down
on the larger part of the latch. Be sure the hook
on the latch that attaches into the hole at the
windshield releases.
Page 132 of 356
2-79
3. Remove the two side pieces of the boot cover
by lifting the rear cover and sliding them out of
their slots.4. Store each piece of the cover in its separate
compartment according to the graphic printed inside
of the storage bag. Store the bag in the hatch and
close the hatch.
5. Unlock the two convertible top latches.
Page 134 of 356
2-81
Push forward on the larger part of the latch until it
clicks. Do not force the latch. If it is hard to lock, the
top is not properly aligned.
NOTICE:
The convertible top may be tight when pushing
forward on the latch when your vehicle is new,
but it will loosen up with time. Make sure that
the hooks are properly aligned before using any
kind of force.
If your vehicle has a power loss, such as a dead battery,
you can still raise or lower the top manually by turning
the valve in the driver's side of the trunk.1. Open the hatch and find the tab located along the
driver's side trim panel.
2. Lift up the tab and turn the valve clockwise to
release the hydraulic pressure.
3. Make sure the key is in LOCK.
You can now raise or lower your top manually. Be sure
to close the valve after installing your top so you can
raise or lower it electrically later.
Page 141 of 356

2-88 Voltmeter
You can read the battery
voltage on your voltmeter.
If it reads less than 11 volts
or more than 16 volts while
your engine is running, and
it stays there, you may have
a problem with the
electrical charging system.
Have it checked right away. Driving with the voltmeter
reading in a warning zone could drain your battery.
If you idle your engine for a while, the voltmeter reading
might move into the low voltage zone (indicated by red dots).
If the reading stays in the low voltage zone while you are
driving, you may have a problem with the electrical charging
system. Have it checked. While the voltmeter reads in the
low voltage zone, your battery may not be able to power
certain electrical accessories, like ABS. (If this happens, the
ABS INOP light will come on. See ªAnti
-Lock Brake
System Warning Lightº in the Index.)
If you must drive a short distance with the voltmeter
reading in a warning zone, turn off all your accessories,
including your air conditioning and audio system.
Brake System Warning Light
Your vehicle's hydraulic brake system is divided into
two parts. If one part isn't working, the other part can
still work and stop you. For good braking, though, you
need both parts working well.
If the warning light comes on, there is a brake problem.
Have your brake system inspected right away.
United States Canada
This light should come on briefly when you turn the
ignition key to RUN. If it doesn't come on then, have it
fixed so it will be ready to warn you if there's a problem.
Page 142 of 356

2-89
If the light comes on while you are driving, pull off the
road and stop carefully. You may notice that the pedal is
harder to push. Or, the pedal may go closer to the floor.
It may take longer to stop. If the light is still on, have the
vehicle towed for service. See ªTowing Your Vehicleº in
the Index.
CAUTION:
Your brake system may not be working properly
if the brake system warning light is on. Driving
with the brake system warning light on can lead
to an accident. If the light is still on after you've
pulled off the road and stopped carefully, have
the vehicle towed for service.
When the ignition is on, the brake system warning light
will also come on when you set your parking brake. The
light will stay on if your parking brake doesn't release
fully. If it stays on after your parking brake is fully
released, it means you have a brake problem.
Anti-Lock Brake System Warning Light
United States Canada
With the anti
-lock brake system, the light will come on
when your engine is started and may stay on for several
seconds. That's normal.
If the anti
-lock brake system warning light stays on longer
than normal after you've started your engine, turn the
ignition off. Or, if the light comes on and stays on when
you're driving, stop as soon as possible and turn the
ignition off. Then start the engine again to reset the
system. If the light still stays on, or comes on again while
you're driving, your vehicle needs service. If the light is
on and the regular brake system warning light isn't on, you
still have brakes, but you don't have anti
-lock brakes.
The anti
-lock brake system warning light should come
on briefly when you turn the ignition key to RUN. If the
light doesn't come on then, have it fixed so it will be
ready to warn you if there is a problem.
Page 143 of 356
 System
Warning Light (Option)
This warning light should
come on briefly as you start
the engine. If the warning
light doesnt come on then,
have it fixed so it")
2-90 Acceleration Slip Regulation (ASR) System
Warning Light (Option)
This warning light should
come on briefly as you start
the engine. If the warning
light doesn't come on then,
have it fixed so it will be
ready to warn you if there's
a problem.
If it stays on, or comes on when you're driving, there
may be a problem with your ASR system and your
vehicle may need service. When this warning light is
on, the system will not limit wheel spin. Adjust your
driving accordingly.
The ASR system warning light will come on if you turn
the system off by pressing the ASR button located on
the instrument panel and the warning light will come on
and stay on. To turn the system back on, press the button
again. The warning light should go off. See ªASR
Systemº in the Index for more information.
If the ASR system warning light comes on and stays on
for an extended period of time when the system is
turned on, your vehicle needs service.
Low Traction Light
When your anti-lock system
is adjusting brake pressure
to help avoid a braking skid,
this light will come on.
If you have the ASR system, this light will also come on
when the system is limiting wheel spin. You may feel or
hear the system working, but this is normal. Slippery
road conditions may exist if the low traction light comes
on, so adjust your driving accordingly. The light will
stay on for a few seconds after the ASR system stops
limiting wheel spin.
The low traction light also comes on briefly when you
turn the ignition key to RUN. If the light doesn't come
on then, have it fixed so it will be there to tell you when
the anti
-lock brake system or ASR system is active.
Page 153 of 356
3-
3-1
Section 3 Comfort Controls and Audio Systems
In this section, you'll find out how to operate the comfort control and audio systems offered with your vehicle.
Be sure to read about the particular systems supplied with your vehicle.
3
-2 Comfort Controls
3
-3 Cooling
3
-3 Heating
3
-4 Defogging and Defrosting
3
-4 Rear Window Defogger (If Equipped)
3
-5 Ventilation System
3
-6 Audio Systems
3
-6 Setting the Clock
3
-6AM-FM Stereo with Compact Disc Player and
Automatic Tone Control3
-11 Trunk-Mounted CD Changer (If Equipped)
3
-15 Theft-Deterrent Feature
3
-17 Audio Steering Wheel Controls (If Equipped)
3
-18 Understanding Radio Reception
3
-18 Tips About Your Audio System
3
-19 Care of Your Compact Discs
3
-19 Care of Your Compact Disc Player
3
-19 Fixed Mast Antenna