Page 63 of 331
2-20
SECOND (2): This position gives you more power, but
lower fuel economy. You can use SECOND (2) on hills.
It can help control your speed as you go down steep
mountain roads, but then you would also want to use
your brakes off and on.
If you manually select SECOND (2), the transmission
will drive in second gear. You may use this feature
for reducing torque to the rear wheels when you are
trying to start your vehicle from a stop on slippery
road surfaces.FIRST (1): This position gives you even more power,
but lower fuel economy than SECOND (2). You can use
it on very steep hills, or in deep snow or mud. If the shift
lever is put in FIRST (1) while the vehicle is moving
forward, the transmission won't shift into first gear until
the vehicle is going slowly enough.
NOTICE:
If your rear wheels can't rotate, don't try to
drive. This might happen if you were stuck in
very deep sand or mud or were up against a solid
object. You could damage your transmission.
Also, if you stop when going uphill, don't hold
your vehicle there with only the accelerator
pedal. This could overheat and damage the
transmission. Use your brakes or shift into
PARK (P) to hold your vehicle in position on
a hill.
Page 69 of 331
2-26 Leaving Your Vehicle With the Engine
Running (Automatic Transmission Only)
CAUTION:
It can be dangerous to leave your vehicle with the
engine running. Your vehicle could move
suddenly if the shift lever is not fully in PARK (P)
with the parking brake firmly set. And, if you
leave the vehicle with the engine running, it could
overheat and even catch fire. You or others could
be injured. Don't leave your vehicle with the
engine running unless you have to.
If you have to leave your vehicle with the engine
running, be sure your vehicle is in PARK (P) and the
parking brake is firmly set before you leave it. After you
move the shift lever into PARK (P), hold the regular
brake pedal down. Then, see if you can move the shift
lever away from PARK (P) without first pulling it
toward you. If you can, it means that the shift lever
wasn't fully locked into PARK (P).
Torque Lock (Automatic Transmission)
If you are parking on a hill and you don't shift your
transmission into PARK (P) properly, the weight of the
vehicle may put too much force on the parking pawl in
the transmission. You may find it difficult to pull the
shift lever out of PARK (P). This is called ªtorque lock.º
To prevent torque lock, set the parking brake and then
shift into PARK (P) properly before you leave the
driver's seat. To find out how, see ªShifting Into
PARK (P)º in the Index.
When you are ready to drive, move the shift lever out of
PARK (P) before you release the parking brake.
If torque lock does occur, you may need to have another
vehicle push yours a little uphill to take some of the
pressure from the parking pawl in the transmission, so
you can pull the shift lever out of PARK (P).
Page 194 of 331
5-22
Changing a Flat Tire
Your truck, when new, did not include tire changing
equipment or a place to store a tire in the vehicle. Few
drivers of these vehicles have the necessary equipment
aboard to be able to change a flat tire safely. For
example, you would need a truck jack that can lift
several thousand pounds and a torque wrench that can
generate several hundred foot
-pounds (Newton-meters)
of twisting force.
CAUTION:
If you try to put air back into a tire that has run
flat, or even a tire that was quite low on air, the
tire can have a sudden air
-out. This could cause
you to lose control of the vehicle and have a
serious crash. Don't refill a flat or very low tire
with air without first having the tire taken off the
wheel and checked for damage.
So if you're stopped somewhere by a flat or damaged
tire or wheel, you should get expert help. See ªRoadside
Assistanceº in the Index.
CAUTION:
Your vehicle, when new, did not include tire
changing equipment or a place to store a tire in
the vehicle. Special tools and procedures are
required if a tire needs to be serviced. If these
tools and procedures aren't used, you or others
could be injured or killed while trying to change
or service a truck tire.
Page 228 of 331
6-33 Brake Wear
Your vehicle has four-wheel disc brakes without wear
indicators. If you ever hear a brake rubbing noise,
have the brake linings inspected.
NOTICE:
Continuing to drive with worn-out brake pads
could result in costly brake repair.
Some driving conditions or climates may cause a
brake squeal when the brakes are first applied or
lightly applied. This does not mean something is
wrong with your brakes.Properly torqued wheel nuts are necessary to help
prevent brake pulsation. When tires are rotated, inspect
brake pads for wear and evenly tighten wheel nuts in
the proper sequence to GM torque specifications.
Brake linings should always be replaced as complete
axle sets.
See ªBrake System Inspectionº in Section 7 of this
manual under Part C ªPeriodic Maintenance Inspections.º
Brake Pedal Travel
See your dealer if the brake pedal does not return to
normal height, or if there is a rapid increase in pedal
travel. This could be a sign of brake trouble.
Brake Adjustment
Every time you make a brake stop, your disc brakes
adjust for wear.
Page 238 of 331
6-43
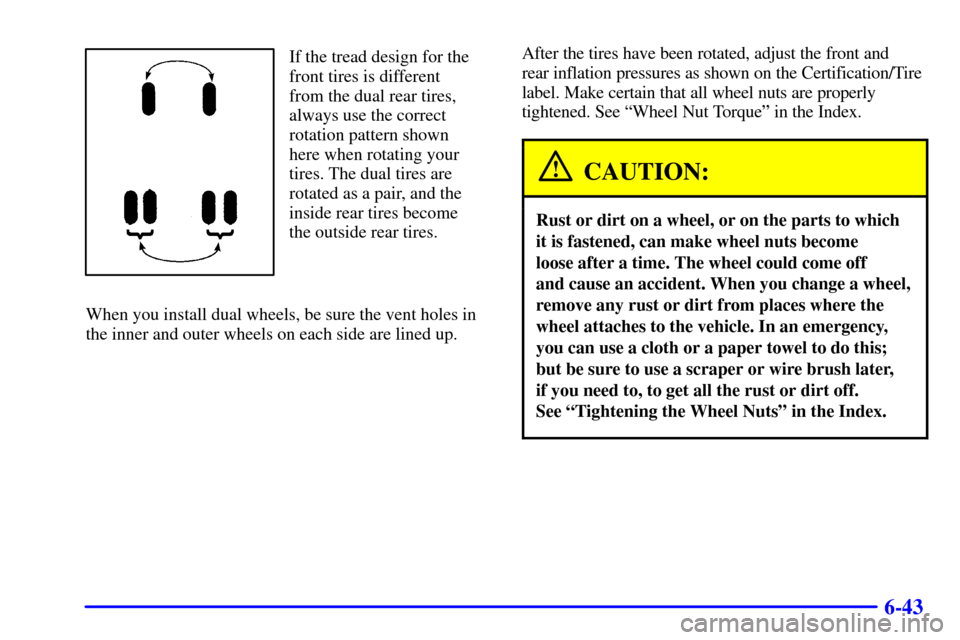
If the tread design for the
front tires is different
from the dual rear tires,
always use the correct
rotation pattern shown
here when rotating your
tires. The dual tires are
rotated as a pair, and the
inside rear tires become
the outside rear tires.
When you install dual wheels, be sure the vent holes in
the inner and outer wheels on each side are lined up.After the tires have been rotated, adjust the front and
rear inflation pressures as shown on the Certification/Tire
label. Make certain that all wheel nuts are properly
tightened. See ªWheel Nut Torqueº in the Index.
CAUTION:
Rust or dirt on a wheel, or on the parts to which
it is fastened, can make wheel nuts become
loose after a time. The wheel could come off
and cause an accident. When you change a wheel,
remove any rust or dirt from places where the
wheel attaches to the vehicle. In an emergency,
you can use a cloth or a paper towel to do this;
but be sure to use a scraper or wire brush later,
if you need to, to get all the rust or dirt off.
See ªTightening the Wheel Nutsº in the Index.
Page 239 of 331

6-44
When It's Time for New Tires
One way to tell when it's
time for new tires is to
check the treadwear
indicators, which will
appear when your tires have
only 1/16 inch (1.6 mm) or
less of tread remaining.
Some commercial truck
tires may not have
treadwear indicators.
You need a new tire if any of the following statements
are true:
�You can see the indicators at three or more places
around the tire.
�You can see cord or fabric showing through the
tire's rubber.
�The tread or sidewall is cracked, cut or snagged
deep enough to show cord or fabric.
�The tire has a bump, bulge or split.
�The tire has a puncture, cut or other damage that
can't be repaired well because of the size or location
of the damage.
Dual Tire Operation
When the vehicle is new, or whenever a wheel, wheel
bolt or wheel nut is replaced, check the wheel nut
torque after 100, 1,000 and 6,000 miles (160, 1 600 and
10 000 km) of driving. For proper torque, see ªWheel
Nut Torqueº in the Index.
The outer tire on a dual wheel setup generally wears
faster than the inner tire. Your tires will wear more
evenly and last longer if you rotate the tires periodically.
If you're going to be doing a lot of driving on
high
-crown roads, you can reduce tire wear by adding
5 psi (35 kPa) to the tire pressure in the outer tires.
Be sure to return to the recommended pressures when
no longer driving under those conditions. See ªTiresº
and ªInflation
- Tire Pressureª in the Index for more
information on proper tire inflation.
CAUTION:
If you operate your vehicle with a tire that is
badly underinflated, the tire can overheat. An
overheated tire can lose air suddenly or catch fire.
You or others could be injured. Be sure all tires
(including the spare, if any) are properly inflated.
Page 240 of 331
6-45 Tightening the Wheel Nuts
All wheel nuts must be properly tightened. With a
torque wrench, tighten the wheel nuts firmly in a
crisscross sequence using the proper wheel nut torque.
Front Rear
CAUTION:
Incorrect wheel nuts or improperly tightened
wheel nuts can cause the wheel to become loose
and even come off. This could lead to a crash.
Be sure to use the correct wheel nuts. If you have
to replace them, be sure to get new GM original
equipment wheel nuts.
Tighten with a torque wrench to the proper torque.
When the vehicle is new, or whenever a wheel, wheel bolt
or wheel nut is replaced on a dual wheel setup, check
the wheel nut torque after 100, 1,000 and 6,000 miles
(60, 1 600 and 10 000 km) or driving. For proper torque
specifications, see ªWheel Nut Torqueº in the Index.
Page 241 of 331
6-46
CAUTION:
Rust or dirt on a wheel, or on the parts to which
it is fastened, can make the wheel nuts become
loose after a time. The wheel could come off and
cause a crash. When you change a wheel, remove
any rust or dirt from the places where the wheel
attaches to the vehicle. In an emergency, you can
use a cloth or a paper towel to do this; but be
sure to use a scraper or wire brush later, if you
need to, to get all the rust or dirt off.
CAUTION:
Never use oil or grease on studs or nuts.
If you do, the wheel nuts might come loose
and the wheel could fall off, causing a crash.
NOTICE:
Improperly tightened wheel nuts can lead to
brake pulsation and rotor damage. To avoid
expensive brake repairs, evenly tighten the wheel
nuts in the proper sequence and to the proper
torque specifications.