2002 CHEVROLET AVEO ECO mode
[x] Cancel search: ECO modePage 1686 of 5127
Intended Outboard Sidewall:The side of an
asymmetrical tire that must always face outward when
mounted on a vehicle.
Kilopascal (kPa):The metric unit for air pressure.
There are 6.9 kPa’s to one psi.
Light Truck (LT-Metric) Tire:A tire used on light duty
trucks and some multipurpose passenger vehicles.
Load Index:An assigned number ranging from 1 to 279
that corresponds to the load carrying capacity of a tire.
Maximum In�ation Pressure:The maximum cold
inflation pressure to which a tire may be inflated.
Maximum Load Rating:The load rating for a tire at
the maximum permissible inflation pressure for that tire.
Maximum Loaded Vehicle Weight:The sum of
curb weight; accessory weight; vehicle capacity weight;
and production options weight.
Normal Occupant Weight:The number of occupants a
vehicle is designed to seat multiplied by 150 pounds
(68 kg). SeeLoading Your Vehicle on page 4-32.
Occupant Distribution:Designated seating positions.Outward Facing Sidewall:The side of a asymmetrical
tire that has a particular side that faces outward
when mounted on a vehicle. The side of the tire that
contains a whitewall, bears white lettering or bears
manufacturer, brand and or model name molding that is
higher or deeper than the same moldings on the
other sidewall of the tire.
Passenger (P-Metric) Tire:A tire used on passenger
cars and some light duty trucks and multipurpose
vehicles.
Recommended In�ation Pressure:Vehicle
manufacturer’s recommended tire inflation pressure
shown on the tire placard. SeeInflation - Tire Pressure
on page 5-59andLoading Your Vehicle on page 4-32.
Radial Ply tire:A pneumatic tire in which the ply cords
that extend to the beads are laid at 90 degrees to the
centerline of the tread.
Rim:A metal support for a tire and upon which the tire
beads are seated.
Sidewall:The portion of a tire between the tread and
the bead.
5-57
Page 1760 of 5127
Additional Program Information
Courtesy Transportation is available during the
Bumper-to-Bumper warranty coverage period,
but itis notpart of the New Vehicle Limited Warranty.
A separate booklet entitled “Warranty and Owner
Assistance Information” furnished with each new vehicle
provides detailed warranty coverage information.
Courtesy Transportation is available only at participating
dealers and all program options, such as shuttle
service, may not be available at every dealer. Please
contact you dealer for specific information about
availability. All Courtesy Transportation arrangements
will be administered by appropriate dealer personnel.
Canadian Vehicles:For warranty repairs during
the Complete Vehicle Coverage period of the General
Motors of Canada New Vehicle Limited Warranty,
alternative transportation may be available under the
Courtesy Transportation Program. Please consult
your dealer for details.
General Motors reserves the right to unilaterally modify,
change or discontinue Courtesy Transportation at
any time and to resolve all questions of claim eligibility
pursuant to the terms and conditions described
herein at its sole discretion.
Vehicle Data Collection and Event
Data Recorders
Your vehicle, like other modern motor vehicles, has a
number of sophisticated computer systems that monitor
and control several aspects of the vehicle’s performance.
Your vehicle uses on-board vehicle computers to monitor
emission control components to optimize fuel economy,
to monitor conditions for air bag deployment and, if so
equipped, to provide anti-lock braking and to help the
driver control the vehicle in difficult driving situations.
Some information may be stored during regular
operations to facilitate repair of detected malfunctions;
other information is stored only in a crash or near crash
event by computer systems commonly called event data
recorders (EDR).
In a crash or near crash event, computer systems,
such as the Air Bag Sensing and Diagnostic Module
(SDM) in your vehicle may record information about the
condition of the vehicle and how it was operated,
such as engine speed, brake applications, throttle
position, vehicle speed, safety belt usage, air bag
readiness, air bag performance data, and the severity of
a collision. This information has been used to improve
vehicle crash performance and may be used to improve
crash performance of future vehicles and driving
safety. Unlike the data recorders on many airplanes,
these on-board systems do not record sounds, such as
conversation of vehicle occupants.
7-9
Page 1830 of 5127
{CAUTION:
Children can be seriously injured or strangled
if a shoulder belt is wrapped around their neck
and the safety belt continues to tighten.
Secure any unused safety belts behind the
child restraint so children cannot reach them.
Pull the shoulder belt all the way out of the
retractor to set the lock, if your vehicle has
one, after the child restraint has been installed.
Be sure to follow the instructions of the child
restraint manufacturer.
Notice:Contact between the child restraint or the
LATCH attachment parts and the vehicle’s safety
belt assembly may cause damage to these parts.
Make sure when securing unused safety belts
behind the child restraint that there is no contact
between the child restraint or the LATCH attachment
parts and the vehicle’s safety belt assembly.
Folding an empty rear seat with the safety belts
secured, may cause damage to the safety belt or the
seat. When removing the child restraint, always
remember to return the safety belts to their normal
position before folding the rear seat.1. Attach and tighten the lower attachments to the
lower anchors. If the child restraint does not have
lower attachments or the desired seating position
does not have lower anchors, secure the child
restraint with the top tether and the safety belts.
Refer to your child restraint manufacturer
instructions and the instructions in this manual.
1.1. Find the lower anchors for the desired
seating position.
1.2. Put the child restraint on the seat.
1.3. Attach and tighten the lower attachments on
the child restraint to the lower anchors.
2. If the child restraint manufacturer recommends that
the top tether be attached, attach and tighten the
top tether to the top tether anchor, if equipped.
Refer to the child restraint instructions and
the following steps:
2.1. Find the top tether anchor.
2.2. Squeeze and pull the front part of the plastic
cover to access the top tether anchors.
2.3. For hatchback models, remove the cargo
shade before installing the top tether. The
cargo shade should remain off while the top
tether is in use.
1-47
Page 1870 of 5127
To avoid activating the alarm by accident, do one of the
following:
•Unlock the driver’s or passenger’s front door using
the key.
•Press the unlock button on the remote keyless
entry transmitter.
Unlocking a door any other way will activate the alarm
when a door or the trunk or liftgate is opened.
If you do not want to arm the theft-deterrent system,
lock the vehicle using the key or the manual door locks.
Disarming the System
To disarm the system, do one of the following:
•Unlock the driver’s or passenger’s front door using
the key.
•Press the unlock button on the remote keyless
entry transmitter.
- The LED light on the transmitter will
flash once.
- All of the doors will unlock.
- The hazard warning lamps will flash twice.
If the door is not opened or if the engine is not started
within 30 seconds after disarming the system using
the transmitter, all of the doors will automatically lock
and the theft-deterrent mode will rearm.
How the System Alarm is Activated
If a door or the trunk or liftgate is opened without using
the key or the remote keyless entry transmitter, the
horn will sound and the lamps will flash for up to
30 seconds.
How to Turn Off the System Alarm
If the system alarm is active, it can be deactivated using
one of the following methods:
•Press the lock or unlock buttons on the remote
keyless entry transmitter.
•Unlock the driver’s or passenger’s front door using
the key.
Otherwise, the alarm will automatically stop after
30 seconds. The system will then lock the doors and
rearm the theft-deterrent system.
How to Detect a Tamper Condition
If the hazard warning lamps flash once when you press
the lock or unlock buttons on the remote keyless
entry transmitter, the theft-deterrent system alarm was
activated while you were away.
2-15
Page 1878 of 5127
AUTOMATIC OVERDRIVE (D4):This position is for
normal driving.
When operating your vehicle in severe cold conditions,
the transaxle may be prevented from shifting into
D4 gear until the transaxle fluid has warmed up to it’s
operational temperature.
Notice:Driving your vehicle if you notice that it is
moving slowly or not shifting gears as you
increase speed may damage the transaxle. Have
your vehicle serviced right away. You can drive in
SECOND (2) when you are driving less than 35 mph
(55 km/h) and AUTOMATIC OVERDRIVE (D4) for
higher speeds until then.
SECOND (2):This position gives you more power but
lower fuel economy. You can use SECOND (2) on
hills. It can help control your speed as you go down
steep mountain roads, but then you would also want to
use your brakes off and on.
Notice:Do not drive in SECOND (2) at speeds over
65 mph (105 km/h), or you can damage the transaxle.
Use AUTOMATIC OVERDRIVE (D4) as much as
possible. Do not shift into SECOND (2) unless you
are going slower than 65 mph (105 km/h) or you can
damage your engine.FIRST (1):This position gives you even more power
but lower fuel economy than SECOND (2). You can use
it on very steep hills, or in deep snow or mud. If the
shift lever is put in FIRST (1), the transaxle will not shift
into first gear until the vehicle is going slowly enough.
Notice:Spinning the tires or holding the vehicle in
one place on a hill using only the accelerator
pedal may damage the transaxle. If you are stuck,
do not spin the tires. When stopping on a hill,
use the brakes, or parking brake to hold the vehicle
in place.
If there is a malfunction with the automatic transaxle,
the malfunction indicator lamp (MIL) or the HOLD
indicator light will turn on or flash. SeeMalfunction
Indicator Lamp on page 3-34orHold Mode Light
on page 3-34.
Have your vehicle fixed as soon as possible.
2-23
Page 1879 of 5127
Hold Mode
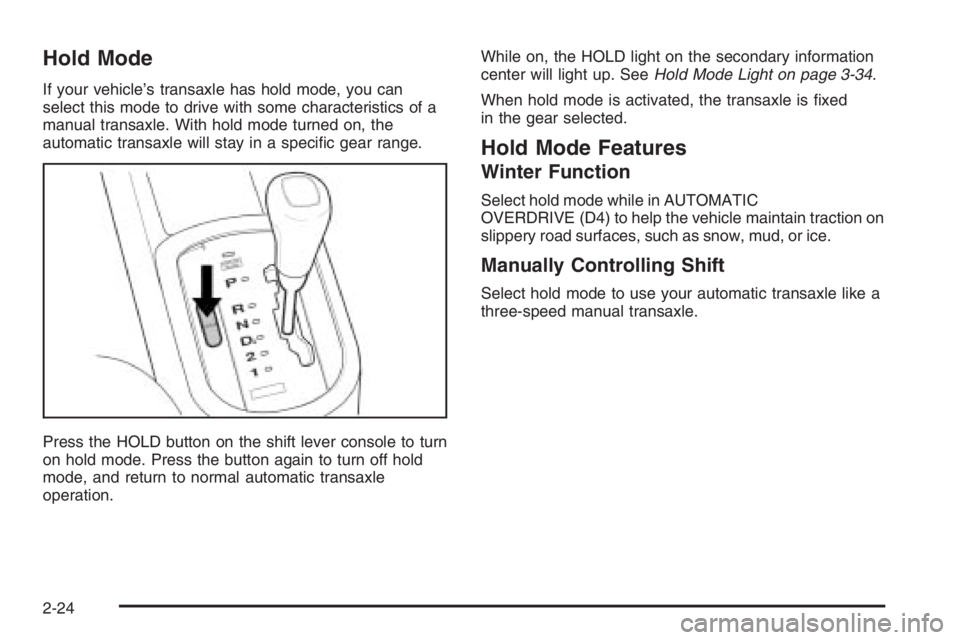
If your vehicle’s transaxle has hold mode, you can
select this mode to drive with some characteristics of a
manual transaxle. With hold mode turned on, the
automatic transaxle will stay in a specific gear range.
Press the HOLD button on the shift lever console to turn
on hold mode. Press the button again to turn off hold
mode, and return to normal automatic transaxle
operation.While on, the HOLD light on the secondary information
center will light up. SeeHold Mode Light on page 3-34.
When hold mode is activated, the transaxle is fixed
in the gear selected.
Hold Mode Features
Winter Function
Select hold mode while in AUTOMATIC
OVERDRIVE (D4) to help the vehicle maintain traction on
slippery road surfaces, such as snow, mud, or ice.
Manually Controlling Shift
Select hold mode to use your automatic transaxle like a
three-speed manual transaxle.
2-24
Page 1892 of 5127
Instrument Panel Overview...............................3-4
Hazard Warning Flashers................................3-6
Other Warning Devices...................................3-6
Horn .............................................................3-6
Tilt Wheel.....................................................3-6
Turn Signal/Multifunction Lever.........................3-7
Turn and Lane-Change Signals........................3-7
Headlamp High/Low-Beam Changer..................3-8
Flash-to-Pass.................................................3-8
Windshield Wipers..........................................3-8
Windshield Washer.........................................3-9
Rear Window Wiper/Washer...........................3-10
Cruise Control..............................................3-10
Exterior Lamps.............................................3-13
Headlamps on Reminder................................3-13
Daytime Running Lamps (DRL).......................3-14
Fog Lamps ..................................................3-15
Instrument Panel Brightness...........................3-15
Dome Lamp .................................................3-16
Accessory Power Outlet(s).............................3-16
Ashtray(s) and Cigarette Lighter......................3-17
Climate Controls............................................3-18
Climate Control System.................................3-18
Outlet Adjustment.........................................3-21
Passenger Compartment Air Filter...................3-21Warning Lights, Gages, and Indicators............3-23
Instrument Panel Cluster................................3-24
Speedometer and Odometer...........................3-25
Trip Odometer..............................................3-25
Tachometer.................................................3-25
Safety Belt Reminder Tone............................3-25
Passenger Airbag Status Indicator...................3-26
Brake System Warning Light..........................3-27
Engine Coolant Temperature Gage..................3-28
Cruise Control Light......................................3-29
Highbeam On Light.......................................3-29
Daytime Running Lamps (DRL) Indicator Light.....3-29
Fuel Gage...................................................3-30
Low Fuel Warning Light.................................3-30
Secondary Information Center (SIC).................3-31
Clock..........................................................3-32
Safety Belt Reminder Light.............................3-32
Airbag Readiness Light..................................3-32
Charging System Light..................................3-33
Anti-Lock Brake System Warning Light.............3-34
Hold Mode Light...........................................3-34
Malfunction Indicator Lamp.............................3-34
Oil Pressure Light.........................................3-37
Fog Lamp Light............................................3-38
Door Ajar Light.............................................3-38
Section 3 Instrument Panel
3-1
Page 1910 of 5127
If your vehicle has a lever (base model), move the lever
to choose the recirculation mode.
Using the recirculation mode for extended periods may
cause your windows to fog. If this happens, select
the defrost mode.
:(Outside Air):This mode brings outside air into
the vehicle.
If your vehicle has a recirculation button (uplevel
model), press the button until the recirculation mode is
turned off. Your vehicle will then return to outside
air mode.
If your vehicle has a lever (base model), move the lever
to choose the outside air mode.
A/C (Air Conditioning):If your vehicle has air
conditioning, follow these steps to use the system. Start
the engine and set the fan control knob to the desired
speed. The air conditioning compressor does not
operate when the fan control knob is in the off position.
Press the A/C button to turn the air conditioning
compressor on and off. When the A/C button is pressed,
an indicator light in the button will come on to let you
know that air conditioning is activated.On hot days, open the windows to let hot inside air
escape; then close them. This helps to reduce the time
it takes for your vehicle to cool down. It also helps
the system to operate more efficiently.
For quick cool down on hot days, do the following:
1. Select the vent mode.
2. Select the highest fan speed.
3. Press the A/C button.
4. Select the recirculation mode.
5. Select the coolest temperature.
Using these settings together for long periods of time
may cause the air inside of your vehicle to become too
dry. To prevent this from happening, after the air in
your vehicle has cooled, turn the recirculation mode off.
The air conditioning system removes moisture from
the air, so you may sometimes notice a small amount of
water dripping underneath your vehicle while idling or
after turning off the engine. This is normal.
3-19