Page 9 of 399
1-3 Memory Seat, Mirrors and Steering
Wheel (Option)
The controls for these
features are located on
the driver's door panel.These buttons are used to program and recall memory
settings for the driver's seating and outside rearview
mirror positions. Use the following steps to program
each button:
1. Adjust the driver's seat (including the seatback
recliner, lumbar, head restraint and shoulder belt
height adjustments), both outside mirrors and the
steering wheel to a comfortable position.
2. Press the SET button.
3. Within five seconds, press button 1 for Driver 1.
A single beep will sound through the driver's side
front speaker to let you know that the position has
been stored.
Page 10 of 399

1-4
A second mirror, seating and steering wheel position
can be programmed by repeating the above steps and
pressing button 2 (for driver 2). Each time a memory
button is pressed, a single beep will sound. Each time
button 1 or 2 is pressed and released while the vehicle is
in PARK (P), the memory positions will be recalled. If
the vehicle is not in PARK (P), the memory buttons
must be pressed and held to recall the stored positions.
If you use the remote keyless entry transmitter to enter
your vehicle, automatic seat and mirror movement will
occur. The numbers on the back of the transmitters,
1 and 2, correspond to the numbers on the buttons on
the door panel.
When the key is placed in the ignition in OFF if you
have entered the vehicle without using the remote
keyless entry transmitter, the seats and mirrors will
automatically adjust to the programmed position of
the last driver.
To stop recall movement of the memory feature at
any time, press one of the power seat controls or
memory buttons.Two personalized exit positions can be set by first
recalling the driving position (by pressing 1 or 2), then
positioning the steering wheel and seat in the desired
exit positions and then pressing and releasing the
MEMORY SET button and, within five seconds,
pressing the EXIT button. With the vehicle in
PARK (P), the exit position for the previously set
driver can be recalled by pressing the EXIT button.
The mirrors, power lumbar and shoulder belt height
positions will not be stored or recalled for the
exit positions.
Further programming for automatic seat and mirror
movement can be done using the Driver Information
Center (DIC). You can select or not select the following:
�Automatic seat and mirror movement when the
vehicle is unlocked with the remote keyless entry
transmitter, or
�automatic seat and mirror movement when a key is
placed in the ignition.
For programming information, see ªVehicle
Programming and Personalization Featuresº in
the Index.
Page 11 of 399
1-5 Heated Seats
The front seat controls
are located in the center
console. The rear seat
controls are located
on the rear doors.
Push the button once for a high setting, twice for a low
setting, and a third time to turn off the heated seat. The
LO setting warms the seatback and cushion until the seat
approximates body temperature. The HI setting heats the
seat to a slightly higher temperature.
The heated seats can only be used when the ignition is
turned on. The heating elements in the seats
automatically turn off when the vehicle's ignition is
turned off.
Only the outboard rear seat positions have
heating elements.
Reclining Front Seatbacks
The reclining front
seatback controls are
located on the outboard
side of each front seat.
Press the top of the control forward or rearward to
adjust the seatback angle. Push the control up or
down to adjust the head restraint and shoulder belt
height positions.
See ªHead Restraintsº later in this section.
Page 13 of 399
1-7 Head Restraints
The switches to move your
head restraints are located
on the outboard side of each
front seat.
Use this switch to move a front head restraint up or
down. Lift up on the switch to move the head restraint
up. Press down on the switch to move the head restraint
down. The top of the head restraint should be closest to
the top of your head. This position helps reduce the
chance of a neck injury in a crash. When you move a
front seat head restraint up or down, the shoulder belt
height changes.
Page 21 of 399

1-15
4. Push the latch plate into the buckle until it clicks.
Pull up on the latch plate to make sure it is secure.
If the belt isn't long enough, see ªSafety Belt
Extenderº at the end of this section.
Make sure the release button on the buckle is
positioned so you would be able to unbuckle the
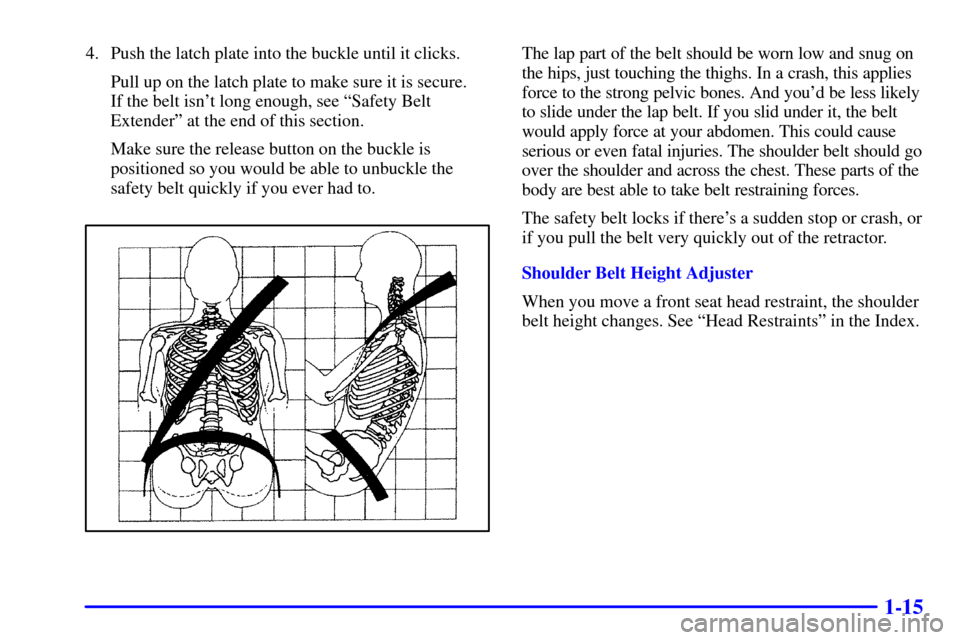
safety belt quickly if you ever had to.The lap part of the belt should be worn low and snug on
the hips, just touching the thighs. In a crash, this applies
force to the strong pelvic bones. And you'd be less likely
to slide under the lap belt. If you slid under it, the belt
would apply force at your abdomen. This could cause
serious or even fatal injuries. The shoulder belt should go
over the shoulder and across the chest. These parts of the
body are best able to take belt restraining forces.
The safety belt locks if there's a sudden stop or crash, or
if you pull the belt very quickly out of the retractor.
Shoulder Belt Height Adjuster
When you move a front seat head restraint, the shoulder
belt height changes. See ªHead Restraintsº in the Index.
Page 42 of 399

1-36
CAUTION:
Children who are up against, or very close to, any
air bag when it inflates can be seriously injured
or killed. Air bags plus lap
-shoulder belts offer
outstanding protection for adults and older
children, but not for young children and infants.
Neither the vehicle's safety belt system nor its air
bag system is designed for them. Young children
and infants need the protection that a child
restraint system can provide.
Q:What are the different types of add-on
child restraints?
A:Add-on child restraints, which are purchased
by the vehicle's owner, are available in four basic
types. Selection of a particular restraint should
take into consideration not only the child's weight,
height and age but also whether or not the restraint
will be compatible with the motor vehicle in which
it will be used.
For most basic types of child restraints, there are
many different models available. When purchasing
a child restraint, be sure it is designed to be used in
a motor vehicle. If it is, the restraint will have a
label saying that it meets federal motor vehicle
safety standards.
The restraint manufacturer's instructions that
come with the restraint state the weight and
height limitations for a particular child restraint.
In addition, there are many kinds of restraints
available for children with special needs.
Page 314 of 399

6-33
Properly torqued wheel nuts are necessary to help
prevent brake pulsation. When tires are rotated, inspect
brake pads for wear and evenly tighten wheel nuts in the
proper sequence to GM torque specifications.
Brake linings should always be replaced as complete
axle sets.
See ªBrake System Inspectionº in Section 7 of
this manual under Part C ªPeriodic
Maintenance Inspections.º
Brake Pedal Travel
See your dealer if the brake pedal does not return to
normal height, or if there is a rapid increase in pedal
travel. This could be a sign of brake trouble.
Brake Adjustment
Every time you apply the brakes, with or without the
vehicle moving, your brakes adjust for wear.
Replacing Brake System Parts
The braking system on a vehicle is complex. Its many
parts have to be of top quality and work well together if
the vehicle is to have really good braking. Your vehicle
was designed and tested with top
-quality GM brake
parts. When you replace parts of your braking
system
-- for example, when your brake linings wear
down and you need new ones put in
-- be sure you get
new approved GM replacement parts. If you don't, your
brakes may no longer work properly. For example, if
someone puts in brake linings that are wrong for your
vehicle, the balance between your front and rear brakes
can change
-- for the worse. The braking performance
you've come to expect can change in many other ways if
someone puts in the wrong replacement brake parts.
Page 340 of 399
6-59
NOTICE:
The wrong wheel can also cause problems with
bearing life, brake cooling, speedometer or
odometer calibration, headlamp aim, bumper
height, vehicle ground clearance and tire or tire
chain clearance to the body and chassis.
See ªChanging a Flat Tireº in the Index for
more information.Used Replacement Wheels
CAUTION:
Putting a used wheel on your vehicle is
dangerous. You can't know how it's been used or
how far it's been driven. It could fail suddenly
and cause a crash. If you have to replace a wheel,
use a new GM original equipment wheel.