Page 179 of 395
: Press this pushbutton to advance
quickly to another part of the tape. Press it again to
return to playing speed. The radio will play while the
tape advances.
5 SIDE: Press this pu")
3-16
4 �� (Forward): Press this pushbutton to advance
quickly to another part of the tape. Press it again to
return to playing speed. The radio will play while the
tape advances.
5 SIDE: Press this pushbutton to change the side of the
tape that is playing.
6 RAND (Dolby): Press this pushbutton to reduce
background noise. The double
-D symbol will appear on
the display.
Dolby Noise Reduction is manufactured under a license
from Dolby Laboratories Licensing Corporation. Dolby
and the double
-D symbol are trademarks of Dolby
Laboratories Licensing Corporation.
AM
-FM: Press this button to listen to the radio when a
cassette tape is playing.
SOURCE: Press this button to play a cassette tape or a
CD when listening to the radio. TAPE SIDE and an
arrow will appear on the display. If this button is pressed
again, the system will go to disc play; CD PLAY will
appear on the display.
� SEEK �: Press the up or down arrow to go to
the next or previous selection on the tape. Your tape
must have at least three seconds of silence between
each selection for seek to work. The sound will mute
while seeking.
EJECT: Press this button, located next to the cassette
tape slot, to eject a tape. Eject may be activated with the
radio off.
Cassette Tape Messages
E (Error): If this message and a number appears while
trying to play a cassette tape, it could be for one of the
following reasons:
�E10: The tape is tight and the player can't turn the
tape hubs. Remove the tape. Hold the tape with the
open end down and try to turn the right hub
counterclockwise with a pencil. Turn the tape over
and repeat. If the hubs do not turn easily, your tape
may be damaged and should not be used in the
player. Try a new tape to make sure your player is
working properly.
�E11: The tape is broken. Try a new tape.
Page 204 of 395

4-12
If you need to reduce your speed as you approach a
curve, do it before you enter the curve, while your front
wheels are straight ahead.
Try to adjust your speed so you can ªdriveº through the
curve. Maintain a reasonable, steady speed. Wait to
accelerate until you are out of the curve, and then
accelerate gently into the straightaway.
Steering in Emergencies
There are times when steering can be more effective
than braking. For example, you come over a hill and
find a truck stopped in your lane, or a car suddenly pulls
out from nowhere, or a child darts out from between
parked cars and stops right in front of you. You can
avoid these problems by braking
-- if you can stop in
time. But sometimes you can't; there isn't room.
That's the time for evasive action
-- steering around
the problem.
Your vehicle can perform very well in emergencies like
these. First apply your brakes. See ªBraking in
Emergenciesº earlier in this section. It is better to
remove as much speed as you can from a possible
collision. Then steer around the problem, to the left or
right depending on the space available.
An emergency like this requires close attention and a
quick decision. If you are holding the steering wheel at
the recommended 9 and 3 o'clock positions, you can
turn it a full 180 degrees very quickly without removing
either hand. But you have to act fast, steer quickly, and
just as quickly straighten the wheel once you have
avoided the object.
The fact that such emergency situations are always
possible is a good reason to practice defensive driving at
all times and wear safety belts properly.
Page 249 of 395
5-16 How to Add Coolant to the Radiator
1. You can remove the radiator pressure cap when
the cooling system, including the radiator pressure
cap and upper radiator hose, is no longer hot.
Turn the pressure cap slowly counterclockwise until
it first stops. (Don't press down while turning the
pressure cap.)
If you hear a hiss, wait for that to stop.
A hiss means there is still some pressure left.
2. Then keep turning the pressure cap, but now push
down as you turn it. Remove the pressure cap.
Page 250 of 395
5-17
3. Remove the 3800 Series II V6 engine cover shield to
access the bleed valve.
A. Clean the area around the engine oil fill tube and
cap before removing. Twist the oil fill tube, with
cap attached, counterclockwise and remove it.
B. If you have the supercharged engine, remove the
nut in the center of the cover shield.C. Lift the engine cover shield at the front, slide the
catch tab out of the engine bracket and remove
the cover shield.
D. Put the oil fill tube, with cap attached, in the valve
cover oil fill hole until you're ready to replace the
cover shield.
There is one bleed valve.
It is located on the
thermostat housing.
4. After the engine cools, open the coolant air
bleed valve.
Page 251 of 395
5-18
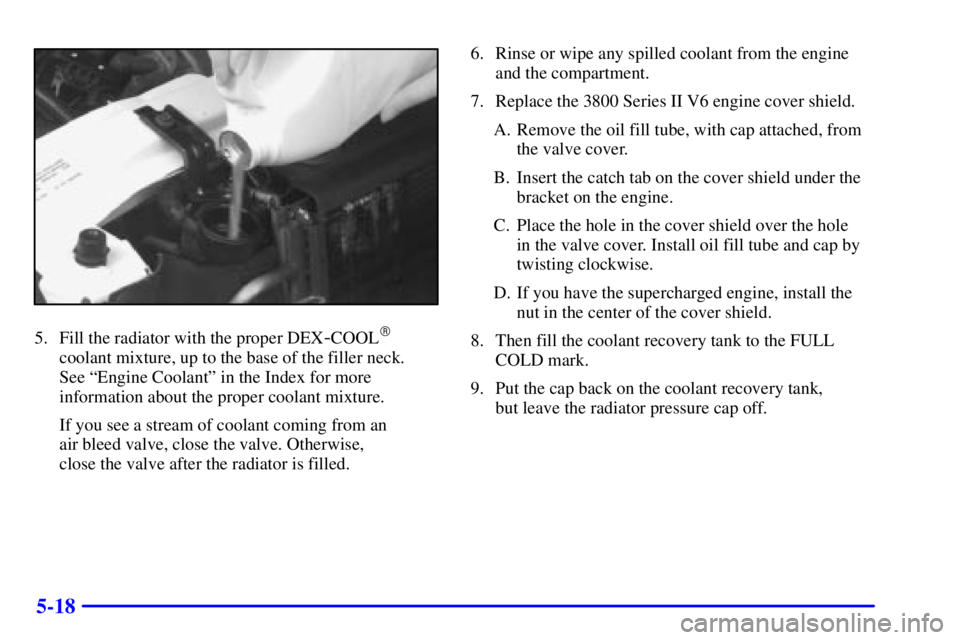
5. Fill the radiator with the proper DEX-COOL�
coolant mixture, up to the base of the filler neck.
See ªEngine Coolantº in the Index for more
information about the proper coolant mixture.
If you see a stream of coolant coming from an
air bleed valve, close the valve. Otherwise,
close the valve after the radiator is filled.6. Rinse or wipe any spilled coolant from the engine
and the compartment.
7. Replace the 3800 Series II V6 engine cover shield.
A. Remove the oil fill tube, with cap attached, from
the valve cover.
B. Insert the catch tab on the cover shield under the
bracket on the engine.
C. Place the hole in the cover shield over the hole
in the valve cover. Install oil fill tube and cap by
twisting clockwise.
D. If you have the supercharged engine, install the
nut in the center of the cover shield.
8. Then fill the coolant recovery tank to the FULL
COLD mark.
9. Put the cap back on the coolant recovery tank,
but leave the radiator pressure cap off.
Page 257 of 395
5-24
3. Turn the wheel wrench counterclockwise to lower
the jack head until it fits under the vehicle.
4. Near each wheel well is a notch in the plastic trim
panel to position the jack head. You'll find the word
JACK and an arrow stamped into the plastic near
each notch. Position the jack under the vehicle and
raise the jack head until it fits firmly against the
sheet metal next to the word JACK. Do not raise
the vehicle yet. Put the compact spare tire near you.
CAUTION:
Getting under a vehicle when it is jacked up is
dangerous. If the vehicle slips off the jack, you
could be badly injured or killed. Never get under
a vehicle when it is supported only by a jack.
CAUTION:
Raising your vehicle with the jack improperly
positioned can damage the vehicle and even
make the vehicle fall. To help avoid personal
injury and vehicle damage, be sure to fit the jack
lift head into the proper location before raising
the vehicle.
Page 258 of 395
5-25
5. Raise the vehicle by turning the wheel wrench
clockwise in the jack. Raise the vehicle far enough
off the ground so there is enough room for the
compact spare tire to fit underneath the wheel well.
6. Remove all the wheel nuts and take off the flat tire.
7. Remove any rust or dirt
from the wheel bolts,
mounting surfaces and
spare wheel.
CAUTION:
Rust or dirt on the wheel, or on the parts to
which it is fastened, can make the wheel nuts
become loose after a time. The wheel could come
off and cause an accident. When you change a
wheel, remove any rust or dirt from the places
where the wheel attaches to the vehicle. In an
emergency, you can use a cloth or a paper towel
to do this; but be sure to use a scraper or wire
brush later, if you need to, to get all the rust or
dirt off.
Page 259 of 395
5-26
CAUTION:
Never use oil or grease on studs or nuts. If you
do, the nuts might come loose. Your wheel could
fall off, causing a serious accident.
8. Install the compact spare tire on the
wheel
-mounting surface.
9. Then reinstall the wheel
nuts with the rounded
end of the nuts toward
the wheel. Tighten each
nut by hand until the
wheel is held against
the hub.
10. Lower the vehicle by turning the wheel wrench
counterclockwise. Lower the jack completely.