Page 316 of 395
6-52
After the tires have been rotated, adjust the front and
rear inflation pressures as shown on the Tire
-Loading
Information label. Reset the Check Tire Pressure
System. See ªCheck Tire Pressure Systemº in the Index.
Make certain that all wheel nuts are properly tightened.
See ªWheel Nut Torqueº in the Index.
CAUTION:
Rust or dirt on a wheel, or on the parts to which
it is fastened, can make wheel nuts become loose
after a time. The wheel could come off and cause
an accident. When you change a wheel, remove
any rust or dirt from places where the wheel
attaches to the vehicle. In an emergency, you can
use a cloth or a paper towel to do this; but be
sure to use a scraper or wire brush later, if you
need to, to get all the rust or dirt off. See
ªChanging a Flat Tireº in the Index.
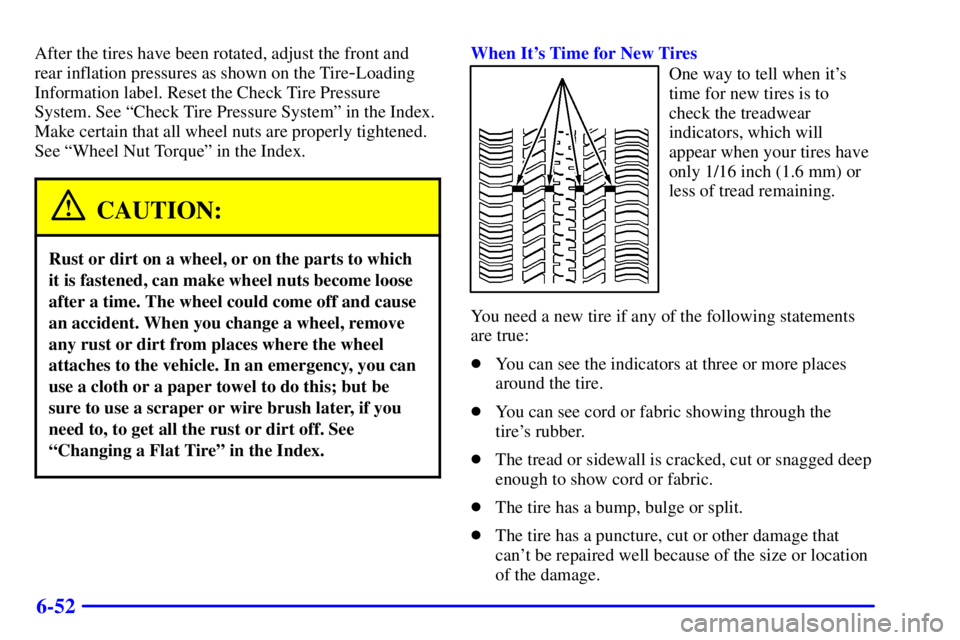
When It's Time for New Tires
One way to tell when it's
time for new tires is to
check the treadwear
indicators, which will
appear when your tires have
only 1/16 inch (1.6 mm) or
less of tread remaining.
You need a new tire if any of the following statements
are true:
�You can see the indicators at three or more places
around the tire.
�You can see cord or fabric showing through the
tire's rubber.
�The tread or sidewall is cracked, cut or snagged deep
enough to show cord or fabric.
�The tire has a bump, bulge or split.
�The tire has a puncture, cut or other damage that
can't be repaired well because of the size or location
of the damage.
Page 320 of 395
6-56
Each new wheel should have the same load-carrying
capacity, diameter, width, offset and be mounted the
same way as the one it replaces.
If you need to replace any of your wheels, wheel bolts
or wheel nuts, replace them only with new GM original
equipment parts. This way, you will be sure to have the
right wheel, wheel bolts and wheel nuts for your vehicle.
CAUTION:
Using the wrong replacement wheels, wheel bolts
or wheel nuts on your vehicle can be dangerous.
It could affect the braking and handling of your
vehicle, make your tires lose air and make you
lose control. You could have a collision in which
you or others could be injured. Always use the
correct wheel, wheel bolts and wheel nuts
for replacement.
NOTICE:
The wrong wheel can also cause problems with
bearing life, brake cooling, speedometer or
odometer calibration, headlamp aim, bumper
height, vehicle ground clearance and tire or tire
chain clearance to the body and chassis.
See ªChanging a Flat Tireº in the Index for
more information.
Used Replacement Wheels
CAUTION:
Putting a used wheel on your vehicle is
dangerous. You can't know how it's been used or
how far it's been driven. It could fail suddenly
and cause a crash. If you have to replace a wheel,
use a new GM original equipment wheel.
Page 322 of 395
6-58
Don't use any of these unless this manual says you can.
In many uses, these will damage your vehicle:
�Alcohol
�Laundry Soap
�Bleach
�Reducing Agents
Cleaning the Inside of Your Vehicle
Use a vacuum cleaner often to get rid of dust and loose
dirt. Wipe vinyl, leather, plastic and painted surfaces
with a clean, damp cloth.
Cleaning of Fabric/Carpet
Your dealer has cleaners for the cleaning of fabric and
carpet. They will clean normal spots and stains very
well. You can get GM
-approved cleaning products
from your dealer. See ªAppearance Care and Materialsº
in the Index.Here are some cleaning tips:
�Always read the instructions on the cleaner label.
�Clean up stains as soon as you can
-- before they set.
�Carefully scrape off any excess stain.
�Use a clean cloth or sponge, and change to a
clean area often. A soft brush may be used if stains
are stubborn.
�If a ring forms on fabric after spot cleaning, clean the
entire area immediately or it will set.
Using Cleaner on Fabric
1. Vacuum and brush the area to remove any loose dirt.
2. Always clean a whole trim panel or section. Mask
surrounding trim along stitch or welt lines.
3. Follow the directions on the container label.
4. Apply cleaner with a clean sponge. Don't saturate
the material and don't rub it roughly.
5. As soon as you've cleaned the section, use a sponge
to remove any excess cleaner.
6. Wipe cleaned area with a clean, water
-dampened
towel or cloth.
7. Wipe with a clean cloth and let dry.
Page 325 of 395
6-61
Cleaning Glass Surfaces
Glass should be cleaned often. GM Glass Cleaner or a
liquid household glass cleaner will remove normal
tobacco smoke and dust films on interior glass. See
ªAppearance Care and Materialsº in the Index.
NOTICE:
Don't use abrasive cleaners on glass, because they
may cause scratches. Avoid placing decals on the
inside rear window, since they may have to be
scraped off later. If abrasive cleaners are used on
the inside of the rear window, an electric
defogger element may be damaged. Any
temporary license should not be attached
across the defogger grid.
Cleaning the Outside of the
Windshield and Wiper Blades
If the windshield is not clear after using the windshield
washer, or if the wiper blade chatters when running,
wax, sap or other material may be on the blade
or windshield.
Clean the outside of the windshield with a full
-strength
glass cleaning liquid. The windshield is clean if beads
do not form when you rinse it with water.
Grime from the windshield will stick to the wiper
blades and affect their performance. Clean the blade
by wiping vigorously with a cloth soaked in
full
-strength windshield washer solvent. Then
rinse the blade with water.
Check the wiper blades and clean them as necessary;
replace blades that look worn.
Weatherstrips
Silicone grease on weatherstrips will make them
last longer, seal better, and not stick or squeak.
Apply silicone grease with a clean cloth at least
every six months. During very cold, damp weather
more frequent application may be required. See
ªRecommended Fluids and Lubricantsº in the Index.
Page 326 of 395
6-62
Cleaning the Outside of Your Vehicle
The paint finish on your vehicle provides beauty, depth
of color, gloss retention and durability.
Washing Your Vehicle
The best way to preserve your vehicle's finish is to
keep it clean by washing it often with lukewarm or
cold water.
Don't wash your vehicle in the direct rays of the sun.
Use a car washing soap. Don't use strong soaps or
chemical detergents. Be sure to rinse the vehicle well,
removing all soap residue completely. You can get
GM
-approved cleaning products from your dealer. See
ªAppearance Care and Materialsº in the Index. Don't
use cleaning agents that are petroleum based, or that
contain acid or abrasives. All cleaning agents should be
flushed promptly and not allowed to dry on the surface,
or they could stain. Dry the finish with a soft, clean
chamois or an all
-cotton towel to avoid surface
scratches and water spotting.
High pressure car washes may cause water to enter
your vehicle.
Cleaning Exterior Lamps/Lenses
Use only lukewarm or cold water, a soft cloth and a car
washing soap to clean exterior lamps and lenses. Follow
instructions under ªWashing Your Vehicle.º
Finish Care
Occasional waxing or mild polishing of your vehicle by
hand may be necessary to remove residue from the paint
finish. You can get GM
-approved cleaning products
from your dealer. See ªAppearance Care and Materialsº
in the Index.
Your vehicle has a ªbasecoat/clearcoatº paint finish.
The clearcoat gives more depth and gloss to the colored
basecoat. Always use waxes and polishes that are
non
-abrasive and made for a basecoat/clearcoat
paint finish.
NOTICE:
Machine compounding or aggressive polishing on
a basecoat/clearcoat paint finish may dull the
finish or leave swirl marks.
Page 331 of 395
6-67
Electrical System
Add-On Electrical Equipment
NOTICE:
Don't add anything electrical to your vehicle
unless you check with your dealer first. Some
electrical equipment can damage your vehicle
and the damage wouldn't be covered by your
warranty. Some add
-on electrical equipment
can keep other components from working as
they should.
Your vehicle has an air bag system. Before attempting to
add anything electrical to your vehicle, see ªServicing
Your Air Bag
-Equipped Vehicleº in the Index.
Fuses and Circuit Breakers
The wiring circuits in your vehicle are protected from
short circuits by a combination of fuses and circuit
breakers. This greatly reduces the chance of damage
caused by electrical problems.
Look at the silver
-colored band inside the fuse. If the
band is broken or melted, replace the fuse. Be sure you
replace a bad fuse with a new one of the identical size
and rating.
There are three fuse blocks in your vehicle: the
instrument panel fuse block located under the instrument
panel, the underhood fuse block located in the engine
compartment on the passenger's side of the vehicle and
the rear fuse block, located under the rear seat.
Page 334 of 395
6-70
Auxiliary Instrument Panel Fuse Block
Fuse Usage
PERIM LP Perimeter Lamps
ACCY Accessory
IGN 3 Ignition 3Underhood Fuse Block
There are additional fuses located in the engine
compartment on the passenger's side of the vehicle. See
ªEngine Compartment Overviewº in the Index for more
information on location.
To check the fuses in this underhood fuse block, turn the
knob counterclockwise and remove the cover. There is a
chart inside the cover that explains the features and
controls governed by each fuse and relay.
Page 340 of 395
6-76
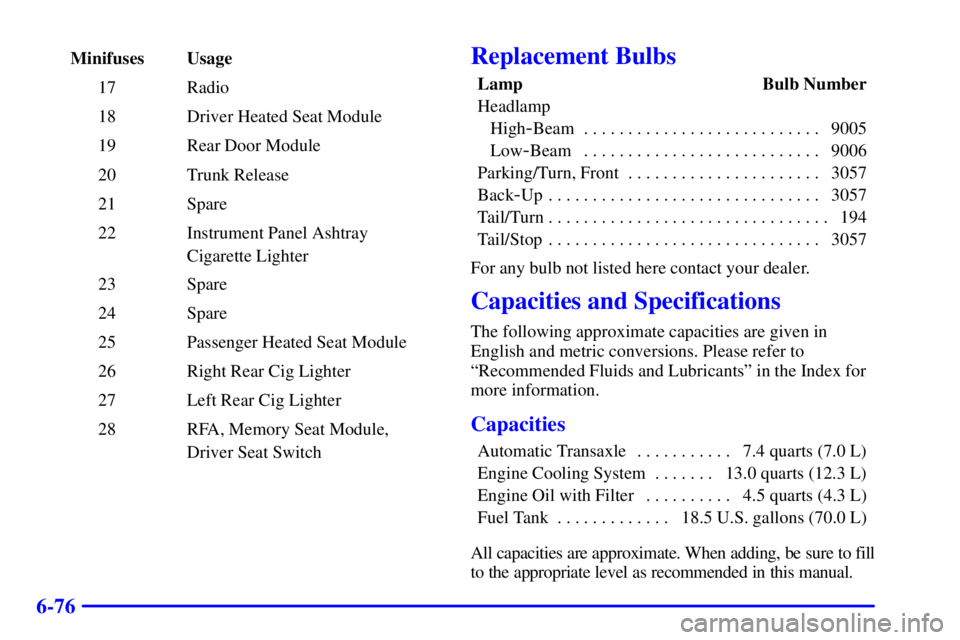
Minifuses Usage
17 Radio
18 Driver Heated Seat Module
19 Rear Door Module
20 Trunk Release
21 Spare
22 Instrument Panel Ashtray
Cigarette Lighter
23 Spare
24 Spare
25 Passenger Heated Seat Module
26 Right Rear Cig Lighter
27 Left Rear Cig Lighter
28 RFA, Memory Seat Module,
Driver Seat SwitchReplacement Bulbs
Lamp Bulb Number
Headlamp
High
-Beam 9005. . . . . . . . . . . . . . . . . . . . . . . . . . .
Low
-Beam 9006. . . . . . . . . . . . . . . . . . . . . . . . . . .
Parking/Turn, Front 3057. . . . . . . . . . . . . . . . . . . . . .
Back
-Up 3057. . . . . . . . . . . . . . . . . . . . . . . . . . . . . . .
Tail/Turn 194. . . . . . . . . . . . . . . . . . . . . . . . . . . . . . . .
Tail/Stop 3057. . . . . . . . . . . . . . . . . . . . . . . . . . . . . . .
For any bulb not listed here contact your dealer.
Capacities and Specifications
The following approximate capacities are given in
English and metric conversions. Please refer to
ªRecommended Fluids and Lubricantsº in the Index for
more information.
Capacities
Automatic Transaxle 7.4 quarts (7.0 L). . . . . . . . . . .
Engine Cooling System 13.0 quarts (12.3 L). . . . . . .
Engine Oil with Filter 4.5 quarts (4.3 L). . . . . . . . . .
Fuel Tank 18.5 U.S. gallons (70.0 L). . . . . . . . . . . . .
All capacities are approximate. When adding, be sure to fill
to the appropriate level as recommended in this manual.